Puff pastry tart with fruits
Many of you write to me saying that you love laminated doughs, but that you are very lazy to make them. The process, resting-time, rising… But today I’m going to leave you like making homemade puff pastry with very simple steps and without rising. Yes, I haven’t gone crazy! Surely many of you didn’t know it, but to make puff pastry (and according to what elaborations) it is not necessary to subject the dough to a fermentation process. As in this Puff pastry tart with fruits that I am going to leave you today, for example.
I know that it may seem impossible for a dough, such as puff pastry, to grow in the oven without using an element that makes it yeast like yeast or sourdough. But this process can be carried out.

What is puff pastry?
Puff pastry is a type of laminated dough made with flour, water and butter. Its taste is quite neutral, which allows us to use it in both salty and sweet preparations being one of the bases of pastry. If we use it for the latter, we can add sugar and thus give it a sweet flavor.
In my case I also add a little honey. I do it with all kinds of laminated dough as I learned from Olivier Magne. Honey gives this type of dough a crunchier texture and also helps to preserve it.
Puff pastry origin.
The origin of the puff pastry is not very clear and is somewhat confusing since there are several stories and legends that make it difficult to locate the true authorship.
Yes, we can know that puff pastry or the process of stretching and laminating doughs was invented many years ago. An example of this is Arab pastries. Many of its sweets are made with very fine doughs and brushed with fat to encourage their lamination or creation of layers. In Egypt a type of dough was prepared with oil instead of butter, which was made known to the Greek and Italic population.
Some argue that Marie-Antoine Carême, established the 5-turn method that is still used today. Others say that the modern version of puff pastry was devised by François Pierre de la Varenne (who invented béchamel sauce). It is also said that it was a mistake of an apprentice who forgot to integrate butter into a brisée dough and then did it…
Why don’t I need yeast to get my puff pastry rise?
Although we think that for a dough to grow/rise we must add yeast, this is not always the case. In the case of puff pastry, the dough grows and swells thanks to the evaporation of water contained in the dough, which tends to rise as it is subjected to a heat source. The layers of fat melt at the same time as they separate the layers of dough from each other. Thanks to the pressure exerted by the steam, the dough swells as the layers become thinner and crispier as the cooking time passes.
If the number of layers is excessive, these gases are too tight in a vertical direction and escape horizontally as soon as the sides expand sufficiently. On the contrary, the number of layers is insufficient the expansion of the gases occurs so quickly that it does not give time to solidify the layer of dough, producing a sudden decrease of the puff pastry.
What should I take into account when making puff pastry at home?
The proportion of puff pastry is determined by the flour and fat. The flour can be in equal or superior proportion to the fat matter, being able to reach until near the double in some cases.
On the other hand, the fat should never exceed the amount of flour.
FLOUR: The first doubt that can arise to all of you is the type of flour to use. In my case I have used a flour from the Molino Pasini called “Primitiva 300“. It is a flour with an approximate strength W=300 and works very well to make laminated doughs. In any case, this is not the only flour you can make with.
Puff pastry can be made using a strength flour W=200 and also gives very good results by mixing pastry flour and bread/AP flour. We must use a flour with 9-10% protein. Normally the percentage of water is around 45-55% final hydration, but remember that this factor will depend on the type of flour you use since each has a different absorption capacity.
WATER: When we make dough that we are going to laminate, the ideal is to work with all the cold elements. From flour to water. It is not necessary to use a specific type of water, by this I mean mineral waters.
BUTTER: Here we may find ourselves with a dilemma because butter is an important element to work with this type of doughs. We need a butter with a small amount of water and a high melting point. Butter from the supermarket usually contains a lot of water, which is the opposite of what we need to work with this type of dough. KerryGold, Président … are the ones I have worked with that have given me the best results.
Of course, if you have the possibility to buy a dry butter like Elle & Vire, Corman… Fantastic.
If you can’t access any of these types of butter, we can always dry ours with flour. This process consists of mixing the butter with flour in order to dry it. But under no circumstances use margarine, the result will not be the same, in addition to leaving a bad taste in the final product.

The dough and butter should have the same consistency.
To obtain good results in our puff pastry, we must work with these two elements trying to have the same consistency and temperature. Ideally, they should be around 53º-57ºF/12º-14ºC.
If we work with a very cold butter, when it is laminated, it will crack and will not maintain uniformity when it is stretched, making it impossible for layers to form correctly.
If, on the other hand, the butter has a higher temperature than the dough, it will melt and penetrate into the layers of dough.
The dough should not have a higher hydration than I specify, otherwise it will not withstand the lamination process and will be interspersed with the layers of butter leaving a result far from what we are looking for.
Laminating.
A very important point during the rolling process is to keep our dough cold. In order to do this without problems, I recommend that you cool the dough after each fold. Very well wrapped in film and inside a bag to prevent it from drying out, just as we did with Danish dough.
In a cold season we can do it in the fridge, but when temperatures are around 71º-75ºF/22 º-24 º C, we can rest keeping the dough in the freezer.
How many folds should I make? The more, the better?
Here we must keep in mind that the fewer the layers, the more complicated it is for the dough to grow. But the greater the number of layers, the smaller the final volume. It is important to take into account the elaboration that we are going to carry out.
To calculate the number of layers we will do it in the following way:
S = Kn
- S = the total number of layers of fat (butter)
- K = number of layers of total dough (dough+grease) in a fold
S = Kn = 44 = 256 folds
To this quantity we must add 1 because the number of layers of dough is always one more than that of butter since both the top layer and bottom are of dough.
What’s the meaning of this?
The number of layers grows in proportion, the additions are multiplied by the total of those already obtained. When counting the layers, we must take into account that as we are making the folds, the upper layers of dough without butter are integrated with the adjacent (because they are of the same nature), reducing to one layer what were originally two layers. This happens thanks to the pressure of the laminate. For that reason we add 1 to the total of layers.

To make puff pastry…
That we will use for tartlets, volt au vents… We must make a total of 5-6 single folds or 1 double fold and 3 single folds. Approximately.
From here on, the more folds we make, the less volume our puff pastry will have. For example, to elaborate a puff pastry that will be destined to make mille feuilles, 10 simple folds are usually made.
One important thing, if we do a lot of folding, there will come a time when the layers of dough and fat will be so thin that when they are cooked, they will melt together and will not give rise to layers. More than 10 simple folds is not going to give good results.
Manipulation of the dough and baking.
We must always handle the puff pastry with care so as not to damage the layers. At this point it will always help that the dough is cold. When you are about to cut the puff pastry, try to do so with a knife / cutter that makes clean cuts. This is important so that the dough keeps a straight cut and grows correctly when baked.
When baking puff pastry, we should try to maintain a temperature around 410º-445ºF/210º-230ºC. A higher or lower temperature will not benefit us. Cooking should be done without steam and no convection, unlike other types of laminated dough. If you don’t want the puff pastry to grow, you just need to puncture the surface with a fork.
Problems that we can obtain when making puff pastry.
- Irregularly rising puff pastry: Poor distribution of fat during lamination or poorly executed folds.
- Shrinking puff pastry: Use of flour that is too strong, too little rest or both.
- Puff pastry that loses fat: Few folds. The greater the loss, the more layers the puff pastry will lack. Baking at a low temperature also causes a loss of fat.
- Low rise puff pastry: Flours that are too loose or too many folds. Excessive rest or an oven with little heat can also influence.
- Raw puff pastry in the middle: Oven too strong or pieces too thick.
- Puff pastry shrunk at the top: Oven too strong.
Ingredients for 2 pieces
FOR PUFF PASTRY:
- 500 g flour W=300 (he utilizado Primitiva 300 Molino Pasini). You can use AP flour instead
- 230 g cold water
- 50 g sugar
- 20 g honey
- 35 g unsalted butter at room temperature
- 10 g salt
- 360 g cold butter for laminating
FOR PASTRY CREAM:
- 250 g whole milk
- 2 large egg yolks
- 60 g sugar
- 1/2 vainilla pod or 1 tsp vanilla extract
- 1 y 1/2 Tbsp flour (about 22 g)
- 1 y 1/2 Tbsp cornflour (about 22 g)
TO DECORATE:
- apple
- orange
- kumquats
- strawberries
- currants
- edible flowers
FOR PECTIN SYRUP:
- 165 g water
- 5 g apple Pectin NH
- 100 g sugar
- few drops lemon juice
Instructions
FIRST DAY (NIGHT BEFORE)
Make the dough for puff pastry.
- In the bowl of the stand mixer add the flour, previously sifted, together with the water, the sugar, the honey and the salt. Knead with the hook at speed 1 and leave until you get an almost developed dough. It will take about 5-7 minutes.
- Add the butter and knead again until it completely integrates and we obtain a homogeneous and smooth dough.
- Take the dough out of the bowl, shape a disc, wrap very well in film and put it in the fridge until the next day.
Make cream pastry.
- In this link you can see how to make pastry cream.
- Once it has cooled, refrigerate it (covered with film to prevent it from drying out) until the next day.
SECOND DAY
Make pectin syrup.
- Pour the water into a saucepan and place in medium heat.
- While it takes temperature, mix the sugar with the pectin.
- When the water starts to be hot, but not boiling, add the mixture of sugar and pectin little by little and mix with a whisk constantly.
- Leave at medium heat, stirring constantly, until it boils.
- Add a few drops of lemon juice, stir well and pour into an airtight container.
- Let it cool completely.
Stretch the dough.
- Take the dough out of the cold and proceed to stretch it immediately.
- Lightly sprinkle a work surface with flour and stretch the dough. The measure should not be exact, around 14 x 8 inches / 45 x 20 cm.
- Set aside.
Prepare the butter.
- Prepare two teflon sheets and place the butter on one of them. Cover with the other sheet and began to beat it with the aid of a roller to flatten it.
- Flatten square, or as much as possible, about 7.9 inches side (or the width we have given to our dough).
- Place the butter in the middle of the dough, so that the width of the butter and the width of the dough is the same.
- Fold the ends of the dough on the butter, bringing each of them to the center. Seal well the union of both folds in the center as well as the sides. The dough should be completely sealed by each of its sides.
Laminate the dough.
- In this step we will have to control very well the dough and the butter temperature, always looking for that both are equal or very similar. Do you remember the important points that I told you about in Kouign amann? In this case they are identical and also applicable.
- First important point: Pound cold butter, it will be easier to soft and reshape.
- Second important point: Work with a cold dough.
- Third important point: When you pound butter it turn soft but chill. It will be easily manageable.
- Fourth important point: Butter mustn´t be at room temperature or warm, because it will be absorbed by the dough rather than forming layers.
Stretch the dough and make the first double fold.
- Lightly sprinkle the work surface with flour and proceed to stretch the dough. Pass the roll of a single pass, from the center towards the ends, and avoiding insisting in the same place. Stretch the dough and make the first simple fold.
- As we stretch the dough, we will try to lift this from the work table from time to time to make sure it does not stick to the table (it could damage the final layers making breaks). In case it is necessary to sprinkle a little flour, we will do it without exceeding.
- Stretch until reaching about 18 x 8 inches.
- Using a knife or pizza cutter, cut a thin thread from the two upper ends. This way we equate the dough sides.
- Make the first fold, take one of the ends to the center and repeat the same process with the other end by placing it next to the previous one, but without superimposing it. Fold the dough in half on itself.
- Roll gently on the surface to join the folds, cover with film and take the cold for 15 minutes.
Make second single fold.
- Lightly sprinkle the work surface with flour and stretch the dough. Put pressure on it but do not exceed it.
- Stretch again until reaching the same length as the previous time, approximately 18 x 8 inches aprox.
- Cut the ends again and fold in the same way as the previous time.
- On this occasion we take one of the ends to the center and repeat the same process with the other end placing it over the previous one. In the same way as if we closed a triptych.
- Cover with film and refrigerate for 15 minutes.
- Repeat this fold a total of 3-4 times.
In this step we can do 3 things:
- Refrigerate for 2 hours and stretch to use.
- Refrigerate for 1-3 days for use.
- Leave it frozen until you want to use it. To use it, take it out of the freezer the night before and place it in the fridge so that it defrosts there all night long. Never at room temperature.
Make the last stretch to form the tartlets.
- Take the dough out of the cold and proceed to stretch it.
- Lightly sprinkle the work surface with flour and stretch the dough. We will give dimensions of 20 x 7,5 inches/50 x 19 cm approximately, its thickness will be 0,23 inches/0.6 mm.
- As you stretch the dough, remember to raise from time to time the dough on the work surface to ensure that it does not adhere to it and sprinkle a little flour if necessary.
- Once we have the measurements in our dough, cut a strip of each side to equal the dough and leave the layers puff pastry "visible".
- Divide the piece in two equal parts to make two cakes. If you wish, you can do it with another measure or even make several individual cakes.
Bake.
- Preheat oven to 425ºF/220ºC (at least 20 minutes before baking).
- Place in the middle of the oven and bake for 15 minutes.
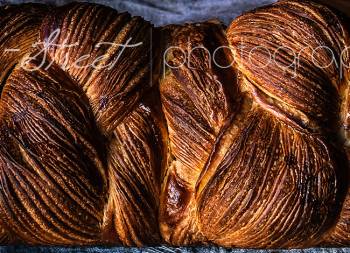
- After this time reduce to 375ºF/190ºC and leave 15-20 minutes. It should have grown (in my case it went from 0.6 mm to 6 cm high) and have a golden color.
- Take it out, place it on a grid and let it cool completely.
Decorate.
- Pipe pastry cream in the center of the tartlet leaving the edges without filling.
- Decorate with seasonal fruits to our liking. In case of decorating with apple, we must bathe it with the pectin syrup nothing when cutting and placing in the cake. Otherwise it will rust and will not look good when presented.
- Once we have decorated the tartlets with all the fruits, brush the surface of these and of the puff pastry with pectin syrup.
- Finish decorating with edible flowers, which we will place just before serving.


Notes
- Work with the cold ingredients and respect the rest times.
- When you manipulate the pieces, be careful not to press them, otherwise you can spoil the layers that will give rise to the future puff pastry.
- Preheat the oven well to ensure that the cooking is carried out correctly.
- The decoration is totally optional and you can adjust it to your tastes.
- If you do not have pectin, you can always make a shine with neutral gelatine or even brush with warm peach jam.
- We can keep it refrigerated for 2-3 days.

I'm aware that today I have left you a long and somewhat boring post... And I would have told you more things, but I would have kept a post that could almost be catalogued as an encyclopedia. And I don't want to bore you either! But well, I assure you that every effort is worthwhile to enjoy this Puff pastry tart with fruits.
I know it goes into old-fashioned desserts, but I don't care. Let's see who says no to a tartlet of this type, let's see, who? Yes, it's a delish! Besides, we can decorate it and fill it with whatever we like. Let your imagination run wild :)
All that's left for me to do is wish you a wonderful weekend, I'll see you on Monday.
Lots of love,
Eva
Sources:Panaderos, Baker-group, Perteghella