Fujisan Bread, Mount Fuji laminated brioche
What is it that makes me enjoy myself most in the world? Well, in my daily life, a lot of things, but in my kitchen it’s making bread and Viennoiserie dough (laminated and unlaminated). That’s why I couldn’t stop making a recipe like this before the hot weather came and made it difficult for us. This is something I must learn to do, to work all kinds of dough regardless of the temperature we are. It’s one of my challenges to get. For the moment and until the temperature allows me I’ll leave you with this Fujisan Bread.
Many of you ask me how I know or find such different recipes, and the truth is that many of them come after searching for other things. This one came while I was looking for a recipe in Pinterest that led me to this blog where I saw his version of the bread I bring you today. I was fascinated, loved and fell in love.

That’s when I started looking for more information about the recipe and saw that the original Fujisan bread is the one I left you and I learned how to make it, as well as following its wonderful recipe, through this blog. There is another version called “Singapourienne” which is the one shown by the girl from the first blog I shared above. That, of course, I hope and wish I will have time to do it during these holidays if the weather is with me, hahaha.
Fujisan Bread origin.
This bread can be found under the name of Fujisan Bread (富士山面包), Mt Fuji Swirl (เม้าท์ ฟูจิ สเวิร์ล), depending on the area where we find it; Malaysia, Thailand, Philippines, China or even Australia. There is a bakery chain called BreadTop that serves this sweet treat in both formats, you can find them without filling or with a filling of cream, coconut jam and pandan.
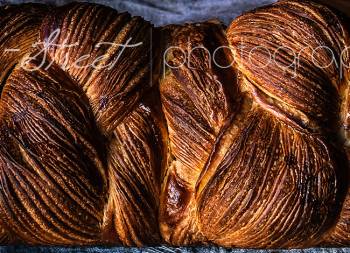
Its appearance is inspired by Mount Fuji in Japan, hence its name.
This sweet is very similar to a spongy and soft laminated brioche. When BreadTop launched its product, it described it as ‘Crispy, golden crust, a smooth, buttery taste, sugar on top as bright as spring snow‘.

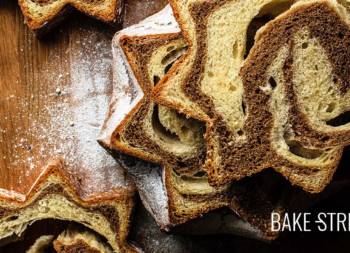
Without a doubt this bread is wonderful, slightly sweet, with a delicate texture, very aromatic and incredibly irresistible. When eating it it can be very reminiscent of a Danish or croissant dough, but with a more fluffy and soft inside. The outer texture is crispy and crackling, but the inner texture is tender, soft and silky. We can separate layers in the same way we would with an ensaimada or puff pastry dough, although not as much as a croissant. The subtle finish of icing sugar reminds us of the snow we find on the top of the mountain.
Making the recipe.
As this is a dough that we will handle in the same way as when we work with puff pastry, we must pay special attention to the whole process. Be careful with the temperatures of both the dough and the butter so that the layers are maintained and the butter does not melt and integrate into the dough.
I recommend you take a look at this Danish dough post, in which I not only talk about what a laminate is and what types of dough there are, flours, butter, osmotolerant yeast (in this case, it is not applicable), but also discuss in more detail how to make it. I also left you some time ago how to make a Laminated Danish sandwich loaf and maybe some of the steps will help you.
In this last recipe I made the mistake of using a pan that was too small for the amount of dough I placed. So don’t make this mistake…. It is not that the bread will be bad, but the crumb will not open all that it should open because we do not let it expand as it should.

A while ago I saw Yohan Ferrant a method to form the sheet of butter, which will be destined to laminate the dough, much more comfortable, simple and clean than the one I used to make before. Since then, I always do it this way and the result is better by far. Don’t forget to visit his profile, I always learn things through his photos and videos.
Respect the rising times as well as the ambient temperature while fermenting. Make sure that it does not exceed 77ºF (25ºC) at any time, otherwise we may obtain an undesirable result (the butter will melt). And finally, let it cool down completely before you eat it. I know I’m asking a lot of you, but you’ll thank me for it 😉
Ingredients for 4 pieces
- 14,1 oz (400 g) strong/bread flour (high protein contain)
- 3,5 oz (100 g) cake/pastry flour
- 7,75 - 8,8 oz (220-250 g) water
- 2,65 oz (75 g) sugar
- 1,75 oz (50 g) tangzhong (recipe below)
- 1,75 oz (50 g egg (1 medium egg)
- 0,7 oz (20 g) milk powder
- 1 oz (30 g) condensed milk
- 1,4 oz (40 g) unsalted butter at room temperature
- 0,17 oz (5 g) dry yeast
- 0,24 oz (7 g) salt
- 8,8 oz (250 g) cold unsalted butter (to laminate)
- icing sugar for dust
FOR TANGZHONG:
- 0,3 oz (9 g) plain flour
- 1,55 oz (44 g) water
Instructions
FIRST DAY
Make tangzhong.
- In a small saucepan pour the water together with the flour, place on low heat and stir with the help of a whisk. Cook, stirring constantly, until it thickens slightly.
- We must leave it until it reaches 149ºF (65ºC) approximately, for it we will use a digital thermometer.
- Remove from heat and pour into an airtight container. Cover and let cool completely.
- Once the tangzhong is completely cold, make the dough.
Make the dough.
- Set aside a teaspoon of water to dissolve the yeast.
- In the bowl of the stand mixer add the 2 kinds of flour, previously sieved, along 7,75 oz (220 g) of water, egg , milk powder, tangzhong, condensed milk, sugar and salt. Knead with the hook at speed 1 and leave until we obtain an almost developed dough. It will take us about 15 minutes.
- Add half of the butter and knead again until completely integrated.
- Integrate the other half and knead again until completely absorbed. We must obtain a perfectly developed dough.
- Dissolve the yeast in the water and pour it in the bowl, knead until having a homogeneous and smooth dough.
- Add more water if the dough allows it, up to a maximum of 8,8 oz (250 g). The texture of the dough is soft and slightly sticky to the touch.
- Remove the dough from the bowl, make a ball and place it in an airtight container, previously greased, until it grows 1/3 of its volume. In my case, it was 2 hours.
- Keep it in the fridge until the next day.
SECOND DAY
Make the butter sheet.
- Prepare two teflon sheets and place the butter cut in 6 pieces on one of them. Cover with the other sheet and began to beat it with the aid of a roller to flatten it.
- Flatten square, or as much as possible, about 9,85 inches (25 cm) side (or the width we have given to our dough).
- It is very likely that the butter has become very hot and has a melting texture. Place in the freezer until it has a firm, but malleable consistency.
Stretch the dough.
- Take the dough out of the fridge and proceed to stretch it.
- Lightly sprinkle a work surface with flour and roll out the dough. We will form a rectangle of 17,7 x 9,85 inches (45 x 25 cm).
- Set aside.
Laminate the dough.
- Place the butter in the middle of the dough, so that the width of the butter and the width of the dough is the same.
- Fold the ends of the dough on the butter, bringing each of them to the center. Seal well the union of both folds in the center as well as the sides. The dough should be completely sealed by each of its sides.
Stretch the dough and make the first simple fold.
- Lightly sprinkle the work surface with flour and proceed to stretch the dough. Pass the roll of a single pass, from the center towards the ends, and avoiding insisting in the same place. Stretch the dough and make the first simple fold.
- As we stretch the dough, we will try to lift this from the work table from time to time to make sure it does not stick to the table (it could damage the final layers making breaks). In case it is necessary to sprinkle a little flour, we will do it without exceeding.
- Stretch until reaching about 18 x 9,85 inches (45 x 25 cm).
- Using a knife or pizza cutter, cut a thin thread from the two upper ends. This way we equate the dough sides.
- Make the first fold, take one end to the center and repeat the same process with the other end placing it on the previous one. Just as if we were closing a triptych.
- Roll gently on the surface to join the folds, cover with film and take the cold for 30 minutes.
- NOTE: The dough cuts are not thrown, you can keep them wrapped in film (even freeze them) to add them to future doughs. Even in the next elaborations of Danish dough or puff pastry, bread, brioche … You can add between 20-25% of the total weight of the flour.
Hacemos el segundo pliegue.
Make the second fold.
- Sprinkle the work surface lightly with flour and strain the dough.
- Stretch again until reaching the same length as the previous time, 25,5 x 9,85 inches (65 x 25 cm)
- Cut the ends again and fold in the same way as the previous time.
- Cover with film and refrigerate for 30 minutes.
Third and final fold.
- Repeat the same steps as in the second fold.
- Cover with film and place in the fridge for 30 minutes.
Make the last stretch before making the bread.
- Line 4 round pans of 5,9 iches (15 cm) diameter with baking paper. Set aside.
- Take the dough out of the fridge and proceed to stretch it out.
- Sprinkle the work surface lightly with flour and roll out the dough. We will give dimensions of 14 x 8,2 inches (36 x 21 cm) approximately. I want the width to be 21 cm because I will cut the sides to leave the layers visible, 0.5 cm on each side, and then cut 8 strips of 2.5 cm.
- As you stretch out the dough, remember to raise the dough from time to time from the work surface to make sure it does not stick to it and sprinkle a little flour if necessary.
- Once we have the measurements in our dough, we will cut a strip from each side to equal the dough and leave the puff pastry layers "visible".
- Divide the rectangle to obtain 8 strips of 1 inch (2.5 cm) wide.
Shape the breads.
- Take 2 strips of dough and place, on a clean work surface, with the flaky side facing upwards.
- Braid as seen in the video.
- Hold one of the ends and roll the other one over it to form a conch shell.
- Place the end of the braid under the bread and put it inside a pan.
- Repeat the process with the rest of the breads.
- Spray with some water, cover with film and let them rise until they double in volume. In my case it was 3 3/4 hours at 70ºF (21ºC).
Bake.
- Preheat the oven to 430ºF (convection).
- Brush the breads with beaten egg with salt, avoid painting the layers, just brush the surface.
- Place in the oven at half height and bake 10 minutes.
- After this time we reduced to 375ºF and bake 20 minutes more. If the breads acquire a very intense golden brown, we will cover with aluminium foil in the final minutes of baking.
- Remove from the oven, place on a rack and let stand in the pans for 5 minutes.
- Unmould and leave to cool completely before consuming.
- Sprinkle with icing sugar before serving.

Notes
Important points to make the dough:
- First important point: Pound cold butter, it will be easier to soft and reshape.
- Second important point: Work with a cold dough.
- Third important point: When you pound butter it turn soft but chill. It will be easily manageable.
- Fourth important point: Butter mustn´t be at room temperature or warm, because it will be absorbed by the dough rather than forming layers.

- I have used Kerry Gold butter, the ideal is to use dry or extra dry butter, but in case you can't find it, that brand of butter works very well. It has a higher melting point than other varieties, so it will allow us to work well with it.
- To work the butter I prefer to do it between two sheets of Teflon, are reusable and is a very clean way of working. But use film or baking paper if you prefer.
- When handling the pieces, be careful not to press them, otherwise you can damage the layers that will lead to the future puff pastry.
- If you don't have round pans of that size, adjust the pans to the pans you have at home or even let them rise without them. No problem.
- Remember that to know that the baking is over, you can prick the inside of a bread with a digital thermometer. If their temperature reaches 190-194ºF (88-90ºC), they'll be ready.
- PRESERVATION: They are wonderful on the same day and the day after baking, but they stay in perfect condition for 4-5 days in a zip bag.


I love this kind of elaboration, whenever you prepare something like this it's like starting a challenge that you don't know how it will end. It is a process that requires a lot of guidelines for everything to go well and, of course, it is not easy. In my case I still have a lot of things to improve and learn, but I still have a lot of fun along the way.
This Fujisan Bread is an example, it is wonderful to know and prepare new breads. The feeling I feel when I discover a recipe of this kind can be comparable to when you give a child a great surprise. Something he wants very much and knows will come soon, that's what I feel when I see something like that and I can't wait to prepare it.
I enjoy a lot in the kitchen, not only is it love for what I do, but it is also my way of escape and disconnection. When I cook, there's nothing else but peace and happiness.
Of course, I'm going to tell you not to know already.... I'm looking forward to you getting down to work with it on these days and telling me how you've been doing. I will take a short break during these holidays and see you again next Friday.
Have a good time and get plenty of rest!
Big hugs,
Eva
Sources: Le Pétrin