How to make danish dough – {Video recipe}
Those who follow me on the social nets know that lately I do not stop making puff pastry, besides all the things that I leave them here. After going to the Esmeralda workshop, where I learned valuable information, I encouraged to apply some of this knowledge to make Danish dough.
I have always been fascinated by the puff pastry doughs, achieving hundreds of thin and light layers starting with a dough (détrempe) and butter. For me it is pure magic, to get that structure from such solid elements. Maybe now you understand more this addiction that I have developed …
Of course, I intend to transmit it so that you want to make it. If making bread is gratifying, these doughs are at the same time … I am fascinated.
One of my main doubts has always been what difference is there between the Danish dough and the croissants dough?
I have always believed that the difference was in the amount of ingredients with respect to one elaboration and another. And this is true, in some cases but not conclusive. The subject goes further.
We start from the Viennoiserie dough that could be defined as an intermediate point between the bread and the sweet doughs. The professionals use this term to refer yeast-raised products, sweetened and enriched, that are divided into two types:
- Laminated dough: croissant, danish dough.
- Non laminated dough: brioche, Gibassier, Pan d´Oro…
What is this laminate?
Lamination is the process of creating layers of dough and butter to obtain sweet, thin layers, light and very crisp.
How can I calculate how many folds my dough will have?
- A simple fold, multiply x 3
- Double, multiply x 4
- Multiple, multiply x 6
- The initial dough has 3 layers of dough and fat
We will work with 3 simple folds, so we will get ->3x3x3x3= 81 layers

IMPORTANCE OF INGREDIENTS FOR THIS TYPE OF DOUGHS
There is no doubt that in this process there are two elements in which we must be more careful when selecting: flour and butter.
FLOUR
After having done numerous tests, I have verified that the most important element is the flour, it is not worth any type of flour to carry out this dough. We need a flour with strength, that supports the elements that will enrich it, the manipulation of it to develop it and the long process of fermentation. To all this we must unite that it must be a flour with a good relation between elasticity and extensibility since we need to stretch it a lot and, once formed, maintain its shape.
In my case I used the Ylla special flour and it works me great, the T-45 is another type of flour that works very well for this type of doughs.
BUTTER
We should also be cautious about choosing butter. Usually in these doughs it is recommended to use an extra dry butter, which has a higher melting point than the majority of butters found in the supermarket.
It is also true that it is not easy to find and, if we do, they usually sell it in large quantities. In my last tests I have used Kerrygold butter and it works perfectly. It holds up quite well the process of handling without melting, of course, respecting the temperatures and watching them.
Many bakers use margarine instead of butter because their melting point is much higher and allows them to work better. Others choose to flour the butter, between 5-10%, so that it absorbs part of water of the butter and improves its firmness.
OSMOTOLERANT YEAST
This yeast is very similar, in identical aspect, to the dry baker’s yeast. Its peculiarity is that it works much better in enriched doughs (both with sugar and fats) allowing the fermentation process to be much better and with optimal results.
In our case we will use dough and a pinch of yeast to carry out the fermentation. The result will be much better in terms of flavor, texture and shelf life.
When you see the final time taken, you may be tempted to add more yeast …
Can I add more yeast?
I always tell you, it is an element that we should not abuse not only for health reasons (that too), taking very quickly leaves us a product with little taste, with little life turning to stone the next day as if Medusa would have looked at them.
The recommended maximum of yeast, for this as well as any dough or bread, is 2% of the total weight of the flour.
Can I accelerate the process of taking in warm places of my house like radiators, oven …?
NO.
Why?
Because it is totally impossible to control the actual temperature in these locations and we are working with a product that has butter not integrated in the dough, that is to say, we want it to remain firm and unmelted to give rise to that immensity of precious layers. If we accelerate the fermentation in very warm areas, the butter will melt, and the layers will disappear … we will get a bun without more.
In summer, is it difficult to make this type of Danish dough or puff pastry?
A lot, because the temperatures are very high and they exceed the melting point of the butter. Depending on the variety this will be more or less high, but around 75-79ºF we already have a problem to achieve good results with this type of dough.
And if I do not want to make this dough with sourdough, only yeast instead?
In that case we will omit that element and instead we will use a 1.3% osmotolerant yeast with respect to the amount of flour. In this case they would be 0.11 oz (3.25 g). The process is the same unlike the final fermentation, that you must observe its evolution to evaluate the moment in which to bake.

HANDLING PROCESS
- During the manipulation process it is very important to try to control the temperature of the dough and the butter. Ideally, they should be around 51-57 ° F and never exceed 75-79ºF. For the same reason, the less we touch the dough with our hands, the better. We will transmit much heat and we will be able to harm it.
- It is likely that the first time you make this dough you do not have much fluency when it comes to following the steps of the second day, it is normal. If you notice that the butter has lowered its temperature and begins to melt, put it in the freezer for a few minutes. In this way you will gain firmness again and we will be able to work with it without being integrated in the dough.
- To work the butter I prefer to do it between two Teflon sheets, they are reusable and it is a very clean way to work. But use film or baking paper if you prefer.
- The final syrup can be omitted if you wish, I like in these pastries because it gives them a very nice finish, but not important.
And patience … no longer for the process, which below I specify the exact time that will take you, but for the final fermentation. Be patient, take a little time to reach their ideal point but do not require us to be sitting next to you to be able to do it 😉
In this video you will be able to see the complete process to elaborate Danish dough and, from it, Danish pastries
DANISH DOUGH: (Recipe adapted Advance Bread and Pastry)
8-10 Danish pastries
SOURDOUGH:
We will need 2.65 oz (75 g) of sourdough at 100% hydration and fed with high strength flour (Manitoba flour)
DOUGH:
- 8.8 oz (250 g) flour with 12-13% protein or T-45 flour
- 3.9 oz (110 g) whole milk
- 1 oz (30 g) sugar
- 1 oz (28 g) egg
- 0.3 oz (8 g) unsalted butter at room temperature
- 0.5 oz (1,5 g) osmotolerant yeast + 0.17 oz (5 g) whole milk
- 2.65 oz (75 g) of sourdough
- 0.17 oz (5 g) salt
- 6.3 oz (180 g) unsalted cold butter to make folds
- beaten egg + 1 tsp water + a pinch of salt
FOR THE CUSTARD CREAM :
FOR DECORATE:
- blackberries and blueberries
- candied orange
- strawberries
- cream cheese
- almond crocanti
- smashed pistachios
FOR THE SYRUP:
- 1.75 oz (50 g) sugar
- 3.5 oz (100 g) water
INSTRUCTIONS:
FIRST DAY
Make Danish dough.
- In the bowl of the stand mixer add the flour, previously sieved, along with the dough, milk, egg *, sugar and salt. Knead with the hook at speed 1 and leave until we obtain an almost developed dough. It will take us about 5-7 minutes.
- Add the 0.3 oz (8 g) of butter and knead again until it is completely integrated.
- Dissolve the yeast in the milk and pour it in the bowl, knead until having a homogeneous and smooth dough.
- Remove the dough from the bowl, form a disk, wrap very well in film and introduce into the freezer for 3 hours.
- Remove from the freezer and place in the fridge until the next day.
* To add that exact amount of egg, you must beat it. That way we can get the amount we need. The rest can be stored in an airtight container and place in the refrigerator. You can use it to brush pastries before baking.
SECOND DAY
Stretch the dough.
- Remove the dough from the fridge and proceed to stretch it right away.
- Lightly sprinkle a work surface with flour and stretch the dough. The measurement should not be accurate, around 14 x 8 inches.
- Set aside.
Fold the dough.
In this step we will have to control very well the dough and the butter temperature, always looking for that both are equal or very similar.
Do you remember the important points that I told you about in Kouign amann? In this case they are identical and also applicable.
- First important point: Pound cold butter, it will be easier to soft and reshape.
- Second important point: Work with a cold dough.
- Third important point: When you pound butter it turn soft but chill. It will be easily manageable.
- Fourth important point: Butter mustn´t be at room temperature or warm, because it will be absorbed by the dough rather than forming layers.
- Prepare two teflon sheets and place the butter on one of them. Cover with the other sheet and began to beat it with the aid of a roller to flatten it.
- Flatten square, or as much as possible, about 7.9 inches side (or the width we have given to our dough).
- Place the butter in the middle of the dough, so that the width of the butter and the width of the dough is the same.
- Fold the ends of the dough on the butter, bringing each of them to the center. Seal well the union of both folds in the center as well as the sides. The dough should be completely sealed by each of its sides.
Stretch the dough and make the first simple fold.
- Lightly sprinkle the work surface with flour and proceed to stretch the dough. Pass the roll of a single pass, from the center towards the ends, and avoiding insisting in the same place. Stretch the dough and make the first simple fold.
- As we stretch the dough, we will try to lift this from the work table from time to time to make sure it does not stick to the table (it could damage the final layers making breaks). In case it is necessary to sprinkle a little flour, we will do it without exceeding.
- Stretch until reaching about 18 x 8 inches.
- Using a knife or pizza cutter, cut a thin thread from the two upper ends. This way we equate the dough sides.
- Make the first fold, take one end to the center and repeat the same process with the other end placing it on the previous one. Just as if we were closing a triptych.
- Roll gently on the surface to join the folds, cover with film and take the cold for 30 minutes.
NOTE: The dough cuts are not thrown, you can keep them wrapped in film (even freeze them) to add them to future doughs. Even in the next elaborations of Danish dough or puff pastry, bread, brioche … You can add between 20-25% of the total weight of the flour.
Make the second fold.
- Sprinkle the work surface lightly with flour and strain the dough.
- Stretch again until reaching the same length as the previous time, approximately 18 x 8 inches aprox.
- Cut the ends again and fold in the same way as the previous time.
- Cover with film and refrigerate for 30 minutes.
Third and final fold.
- Repeat the same steps as in the second fold.
- Cover with film.
In this step we can do 3 things:
- Freeze the dough for 3 hours and then refrigerate until the next day to stretch and shape the Danish pastries.
- Refrigerate for 2-3 hours and proceed to stretch to make Danish pastries.
- Freeze it until you want to make the Danish pastries.
This point will depend on your available time to wait in the final proof, it is quite long. If the folds were made early in the morning, it is very likely that you can make them on the same day and bake them at night. If you go too long, leave this step until the next day.
THIRD DAY
Make the last stretch before forming Danish pastries.
Take the dough out of the cold and proceed to stretch it.
- Sprinkle the work surface lightly with flour and stretch the dough. We will give dimensions of 18 x 8 inches approximately.
- As you stretch the dough, remember to occasionally lift the dough off the work surface to ensure it does not stick to it and sprinkle some flour if necessary.
- Once we have the measurements in our dough, cut a strip of each side to equalize the dough and leave the layers puffed “visible”.
- Divide the rectangle to obtain two rows of 5 squares of 3.5 inch/side. If you have a little shorter dough, instead of 10 pieces you can get 8.
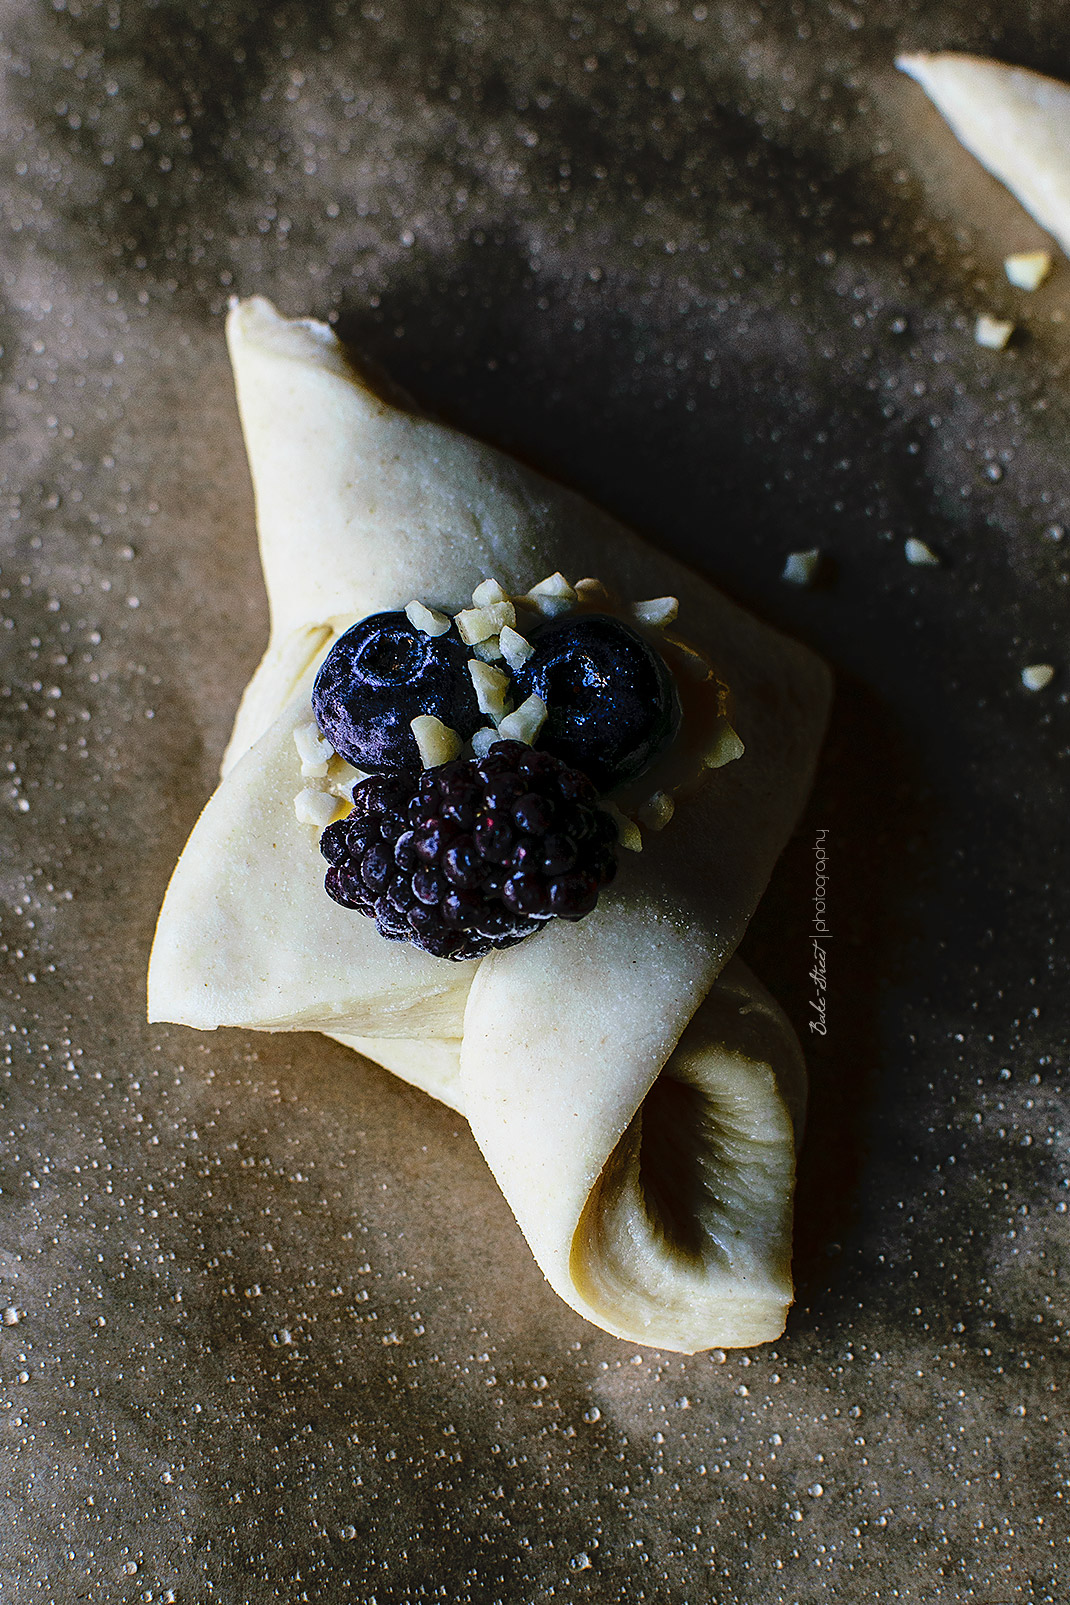
Shape Danish pastries.
In the video you can see different shapes to make with your Danish pastries, from a grinder, handkerchief, flower … to a simple rectangle if you do not feel very capable.
IMPORTANT:
- When manipulating the pieces, be careful and do not press them, otherwise you can spoil the layers that will give rise to the future puffed.
- For the pieces that we have to join ends in the center, seal without fear in that part, in this way we make sure that during baking these folds will not rise causing them to lose their shape. They’ll be rich just the same, but they will not be that flashy.

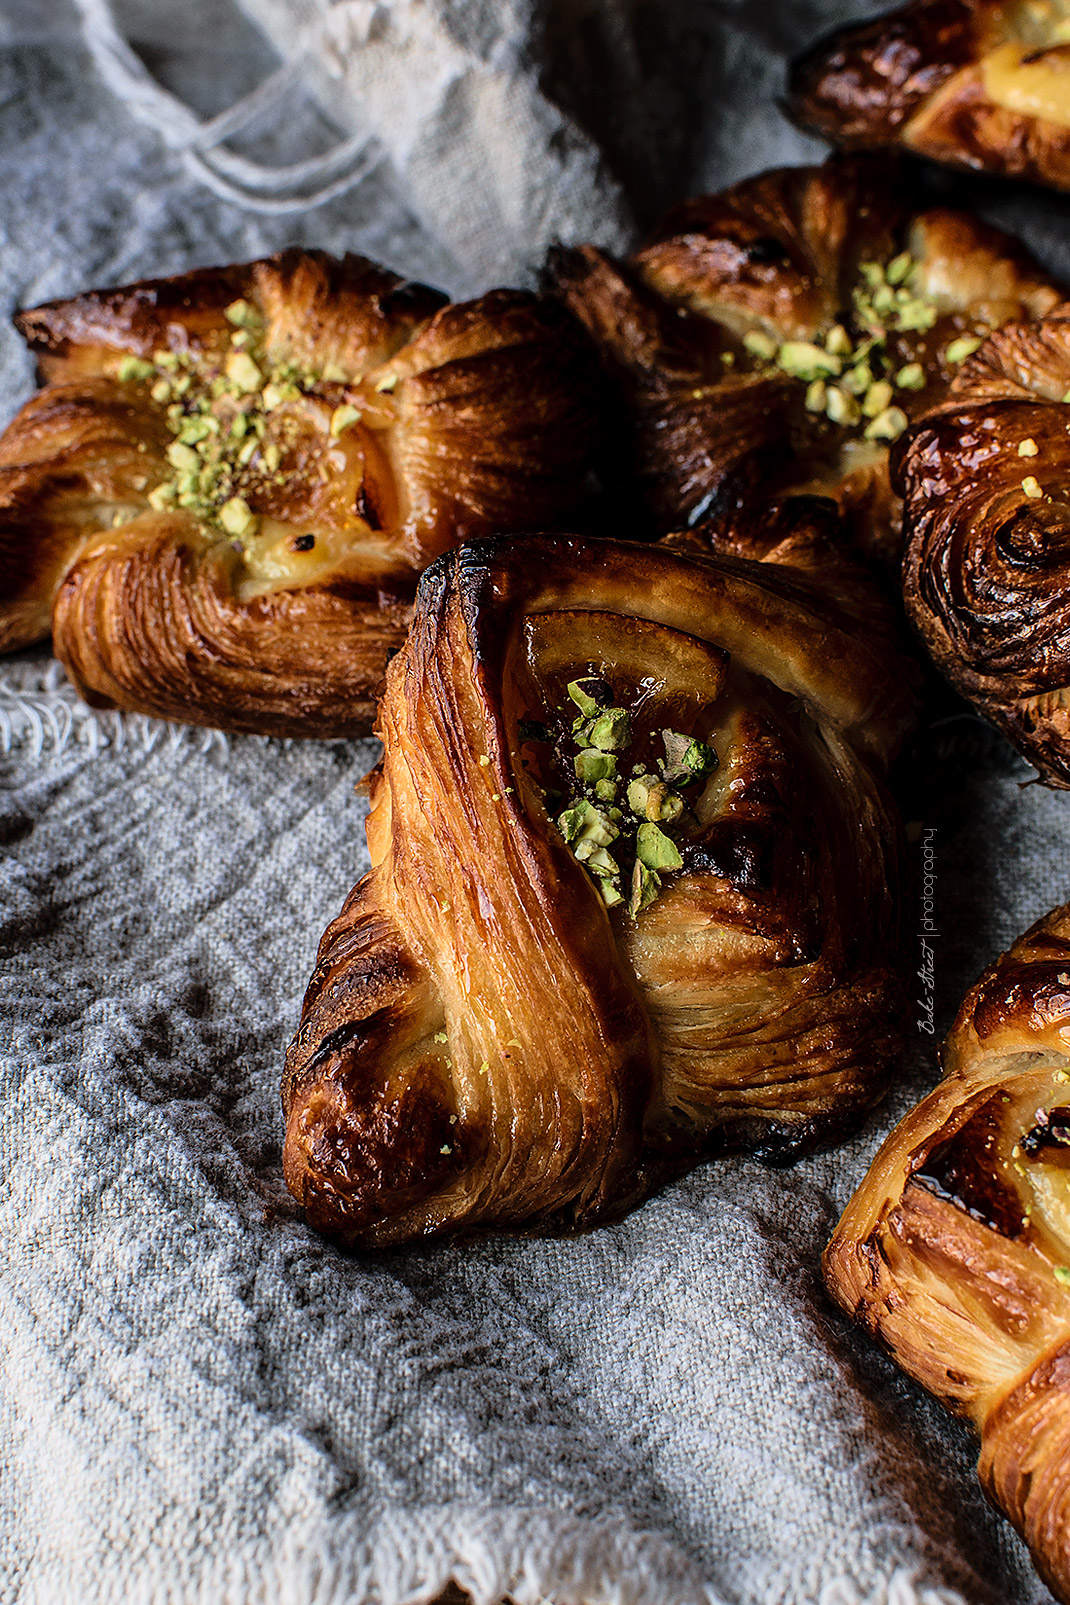
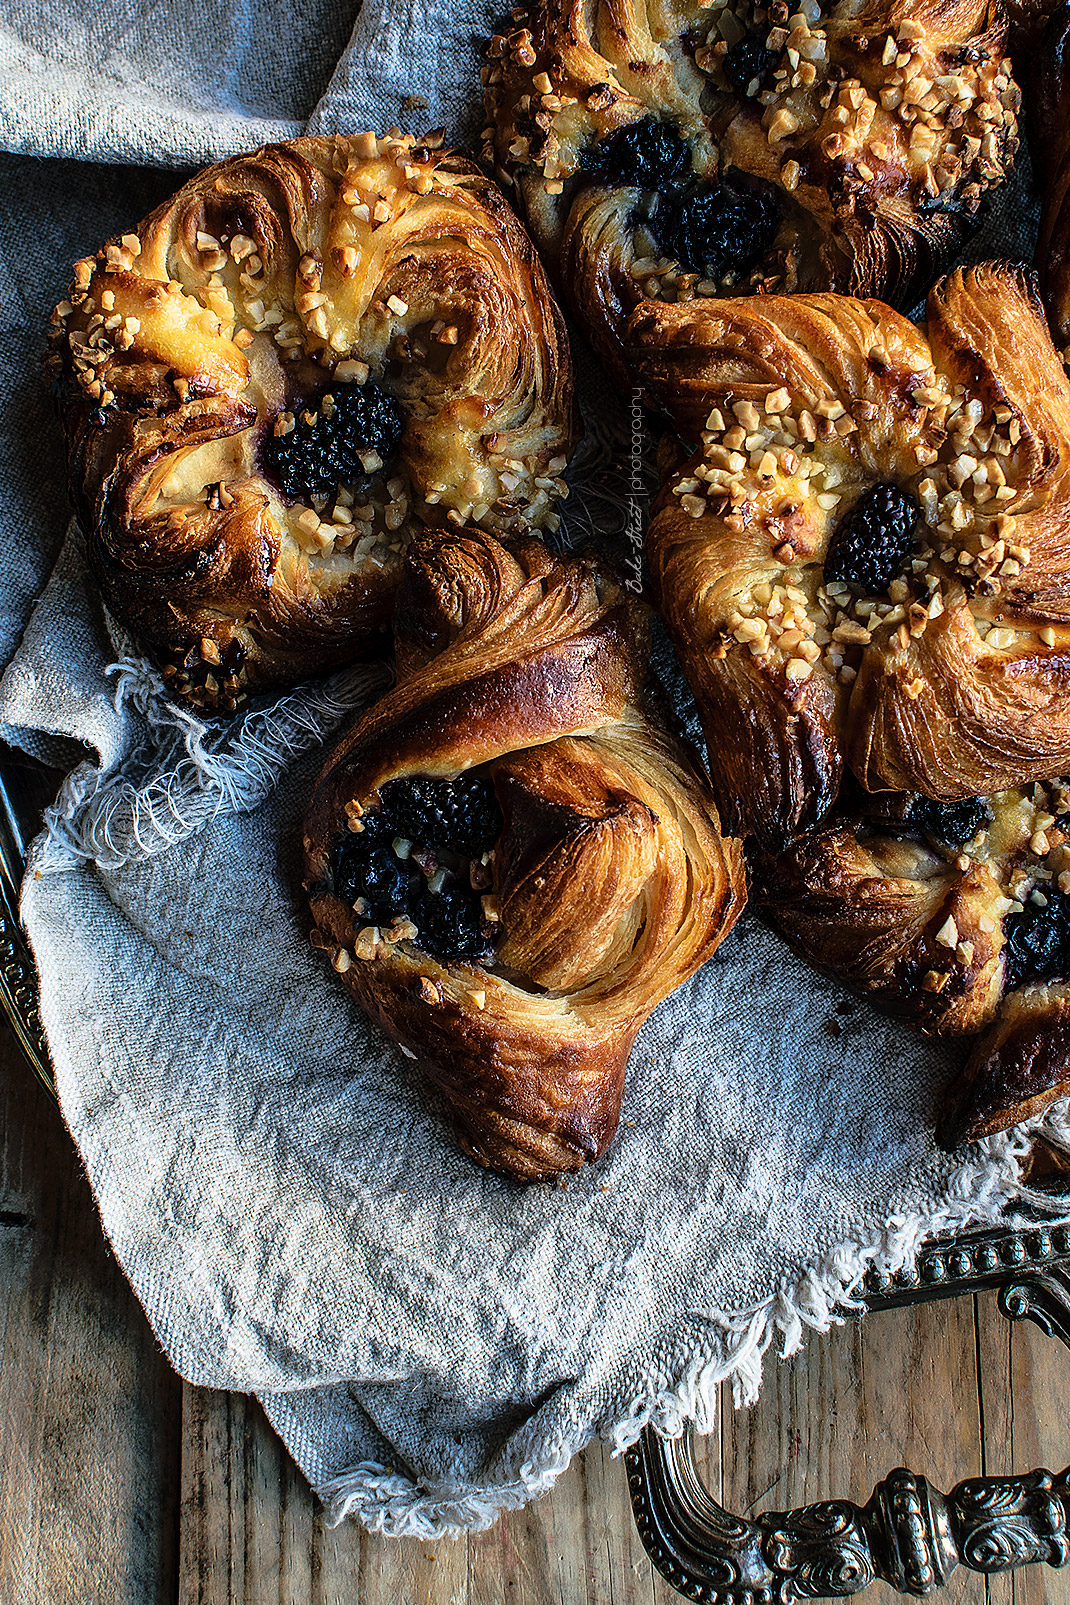
You can decorate the center with custard or cream cheese accompanied by fresh fruits (such as strawberry slices, blackberries, blueberries …) or sliced orange candies. I personally prefer, without a doubt, the choice of custard cream and candied orange with pistachios. But I leave you several options so that you can choose to your taste.
As you make the Danish pastries, place them on a tray lined with baking paper.

Let them rise…
In this step, do not be in any hurry. Depending on the temperature of your house will vary a little more or less, in my case they were between 9-12 hours at 68-72ºF. Yes, I know, how many hours, but it’s worth it without a doubt. I give you my word.
Keep in mind that most yeasts come from the sourdough and it needs its time to carry out its work. The yeast will help a little, but to be small amount, the process will be slow.
Make the syrup 10 minutes before brushing.
When we have the Danish pastries in the oven, prepare a light syrup. It will not take us more than 5-6 minutes. We must brush the pastries as they leave the oven, they must be hot to prevent the syrup from crystallizing on the surface.
Bake Danish pastries.
- Preheat the oven to 430ºF with air (minimum 20 minutes before baking) and the steel or stone inside, if you have it.
- Brush the Danish pastries with beaten egg with salt, avoid painting the layers, just brush the surface.
- Place in the oven at half height and bake 5 minutes.
- After this time we reduced to 375ºF with air and bake 10 minutes more.
- Remove, place on a rack and brush with the syrup.
- Let cool completely before consuming.
- In the variety of custard cream with candied orange, once cold at all, sprinkle smashed pistachio over. Do not do it before because they will lose their texture and color, better before serving.
I know that this last step will be very difficult or practically impossible, but it is really necessary. The taste, texture and aroma improves infinitely once the flavors have settled completely. Even the layers improves after allowing the pastries to cool for a few hours. The heat will not let us appreciate our perfect result.

PRESERVATION:
The same day and the next are when they are better, but are kept in perfect condition for 4-5 days inside a glass campaign or in a zip-type bag.
These Danish pastries are a splendid delicacy, for a long time I did not enjoy so much making a dough but, especially, eating it later 😉
After trying them you will see that these sweets are on another level, nothing to do with many buns or sweets that we have tried or bought. The result is a very crisp exterior with a very tasty inside and a filling (at your choice, which I insist on cream and orange) that will make you lose your senses.
Although you think is a complicated process, it is not. And it’s three days that will only require a little time a day, in fact the times are approximately:
- First day: 30 minutes
- Second day: 1 y 1/2 hours (more or less, with the dough rests)
- Third day: 30 minutes

The rest is done alone, do you see how it is not so much? 😉
I look forward to seeing yours! There’s a lot of weekend ahead … I do not say anything! See you on Monday.
A big hug,
Eva
Source: Advance Bread and Pastry