How to make homemade ensaimada
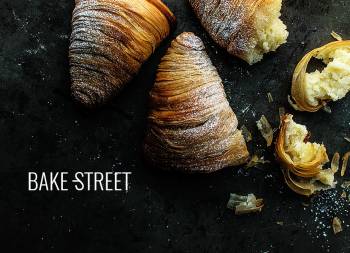
I like a lot of things about Majorca (Mallorca), not only its spectacular beaches and landscapes, Mahón cheese (its origin is from Menorca) and its sobrassada. What I like best, and consume, every time I go there are its spectacular ensaimadas. What a marvel of sweetness, you can’t be happier in the world than eating an ensaimada stuffed with candied spaghetti squash accompanied by a good coffee. That’s why I’m leaving you today how to make homemade ensaimada.
I’m sure many of you have thought about candied spaghetti squash? Yes. I love it, I can eat it even spoonfully. It’s a thing that has been driving me crazy since I was little and I am totally aware that many of you can’t even see it….

But it’s all right. If you don’t like it, you can make it without filling,“lisa“, as it is usually called and which is referred to as Ensaimada de Mallorca. It is also usual to fill it with other ingredients such as pastry cream, whipped cream, truffle… or sobrassada. I never imagined in my life that an ensaimada could be tasty stuffed with this ingredient. I have to admit that the first time I heard it, I was a little shocked by the combination.
Oh, how wicked ignorance is… It’s a true and absolute delight! I give you my word, spectacular. However, if you decide to fill it with sobrassada, buy one of good quality so that the result is great.
Discovering ensaimadas´world.
It was in our time when we had the online shop and went to “Mercado de Motores” (a vintage Market) where we sold our products. We were fortunate that in 90% of the editions we were next to the stand of “Formentor” and on the other side we were alternating with some colleagues who sold wines, other cheeses and sobrassadas from Mallorca and others who sold goat cheese in different formats, spectacular as well.
I’m sure you know this fantastic pastry shop where they make authentic delicacies, but they stand out for their wonderful ensaimadas.

It was thanks to them that I got to know this very different and attractive combination. Besides, they were very good people, they pampered us a lot! I ate more ensaimada than in my whole life, hahaha. In time, a very good relationship was created and Alberto, the owner, invited us to his bakery. I enjoyed it very much, not to mention that I loved seeing everything they do there firsthand.
If something good took me back then, it was the wonderful people we met.
At that moment I knew that someday I would have to make this recipe. The truth is that it’s been a long time, but it’s never too late if intention is good. Today’s post I owe it to a good friend of mine, Juana Guindilla. A few days ago she wrote to me and asked me if I had the recipe for the ensaimada on the blog. Seeing that I didn’t have it, she encouraged me (as she knows how to do) and I decided to go with her.
Ensaimada.
The ensaimada (ensaïmada in Majorcan) is a traditional sweet production of Mallorca. It is an enriched dough smeared with lard (saïm en mallorquín). That’s where it gets its name from.

The first written references to Mallorca’s ensaimada date from the 17th century. Apparently, at that time, the ensaimadas were made for parties and celebrations. The historical references show that it is part of the island’s heritage and history, giving rise to a reference of its confectionery.
It is a 100% handcrafted product that, to this day, is still being made in the same way as from its beginnings.
In 1854 the businessman Garin opened a pastry shop in Puerta del Sol (Madrid, Spain) called “La Mallorquina” where he popularized this sweet.

Making homemade ensaimada.
In spite of appearing to be a very complicated elaboration, I would rather define it as entertaining and delicate. Plus it requires supine patience.
The dough must be made with a conscientious kneading, we must develop very well the gluten to be able to stretch the dough very much. In this step, we must be delicate when working to stretch the dough carefully and without breaking it. The rest will be easy. Place the filling, in case you want it this way, roll it up and let it rise.
There is a detail, which you won’t see in the video, but it is usually done. When the dough is stretched, cut the excess out of one end and place it on the top where we have put the filling and roll the ensaimada from that part.
Ingredients for 2 large ensaimadas
FOR THE POOLISH:
- 2,1 oz (60 g) bread or strong flour (ideally Manitoba)
- 2,1 oz (60 g) water
- 0,014 oz (0,4 g) dry yeast
FOR THE DOUGH:
- all poolish
- 17,6 oz (500 g) bread or strong flour
- 5,45 oz (155 g) egg (about 2 y 1/2 large pieces)
- 5,3 oz (150 g) sugar
- 3,35 - 3,5 oz (95-100 g) water
- 0,17 oz (5 g) dry yeast
- 0,53 oz (15 g) olive oil
- 0,35 oz (10 g) salt
- lard, a lot
FILLING:
- 18,35 oz (520 g) candied spaghetti squash
Instructions
THE NIGHT BEFORE
Make the poolish.
- In a bowl add flour together with water and dry yeast.
- Mix until completely dissolved.
- Cover with film and let it proof at room temperature overnight. In my case it was 9 hours at 66º-68ºF (19-20ºC).
FIRST DAY
Make ensaimada dough.
- Dissolve the poolish with 80% of the total water. Set aside.
- In the bowl of KA add the flour together with the poolish dissolved with water, the beaten eggs and half of the sugar.
- Mix with the aid of the hook at speed 1. We will obtain a slightly brittle mixture. Continue kneading, occasionally removing the dough from the hook and sides, to make sure that the kneading is correct.
- Add the salt together with the rest of the water and knead again. We will need to do an intensive kneading, which means that it can be extended from 30-40 minutes without problems.
- Once we have more or less the developed gluten mesh, add the rest of sugar. Keep kneading for a few minutes.
- Incorporate the dry yeast, previously dissolved in 5 g of water, and continue with the kneading. We must obtain a perfect gluten development. To check this, we will perform the membrane test. In this post, I tell you how to do it.
- When our dough has a good gluten development, add the olive oil and knead again until it is fully integrated. The result must be a perfectly developed dough with a smooth appearance.
- Take the dough out of the bowl, finish kneading by hand (these are personal preferences, I think the dough looks better) and make a ball.
- Grease the entire surface with olive oil, place in a bowl, cover with film and leave to rest for 1 hour.
Stretch the dough.
- Divide the dough into two equal pieces. One of them will be reserved in the bowl and covered with film to avoid drying while working on the first piece.
- Flatten the dough lightly with your hand and start stretching with a roller. We'll do it until this one lets us.
- At this point, spread lard all over the surface. Be generous, never fall short at this point.
- And, we will proceed to stretch it with our hands.
- Place your hands underneath and slide your fingertips towards us as if you were stroking the dough.
- As it gets bigger, we will have to go around the table to access all the points of the dough.
- We will always stretch from the center to the ends. It is very important that we do not exert force or pressure, simply slide to stretch the dough little by little. You will notice as you stretch that the edges will become thicker than the rest. Try to stretch it as much as you can, if possible.
Fill the ensaimada and roll it up.
- I recommend you leave the filling inside a piping bag before you begin to stretch the dough.
- Place the filling making a cord from one side of the dough to the other. We will do this at the top of the stretched dough, leaving a little margin to fold the dough over it.
- Roll up the ensaimada. Fold the dough over the filling trying to cover it.
- We start rolling the dough on itself, we'll do it carefully. You will notice that this process is done very easily thanks to the amount of lard we have spread.
- Shape a spiral with the dough, cover with film and let rise, on a lined tray, for 20 hours at 64º-66ºF (18-19ºC). The dough will rise a little, but without doubling its volume.


SECOND DAY
Shape the ensaimada.
- Prepare two trays and line with baking paper.
- Take one of the ensaimadas and start unrolling. As we lift the dough, we press it in the same way as if we were milking. We must thin the dough and roll it in our hand.
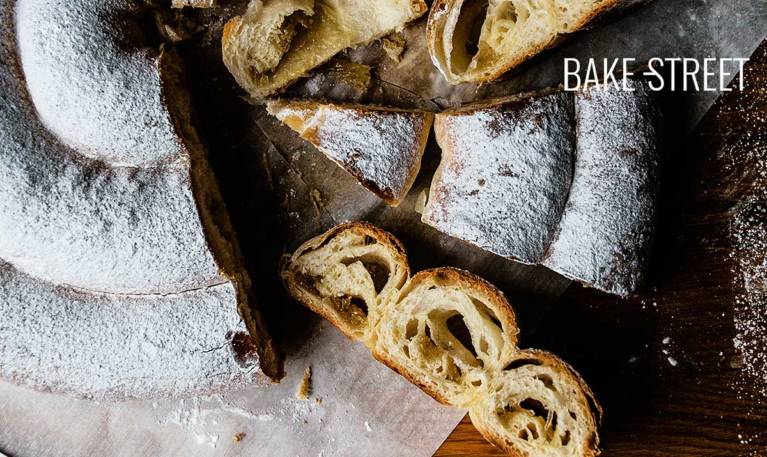
- Once we have all the dough stretched out, we begin to shape a spiral with it on the tray. It used to shape in a clockwise direction, but it wasn't comfortable for me... That's why you'll see that I roll it in the other direction.
- As we place the dough, press gently to flatten it. You must leave space in the spiral because the dough will rise a lot during the proofing.
- The end of the spiral, we'll put it underneath the dough.
- Slightly press the surface, cover with film and let it rise until it triples in size. In my case it was 14 hours at 82º-84º F (28-29ºC).


Bake.
- Preheat the oven to 355º F (180ºC) 30 minutes before baking the ensaimada.
- Place at medium height and bake for 18-20 minutes.
- Remove from the oven and let cool on a rack.
- Just before serving, sprinkle generously with icing sugar.
Notes
- The appeareance of our poolish should be how I show you in the picture. A flat surface. If the preferment is domed, it is a sign that it still lacks fermentation time.
- We must use a flour of great strength, Manitoba, so that it can withstand the long fermentations to which we will submit the ensaimada.
- In my case I decided to make the ensaimada with a poolish, but it can be made with liquid sourdough as well. The process to follow is the same, only using a preferment for another, in addition to adjusting the fermentation times. If you decide to use SD, you need to add the dry yeast amount too.
- I made a double fermentation because the dough was too tight and firm. I wanted to weaken the gluten and, for that reason, I subjected it to double fermentation. In fact you can appreciate the improvement of the texture of the dough, and its elasticity, in the final shape as opposed to when I roll it in the first fermentation.
- Why do you make the first fermentation with the stuffing inside? The truth is that this step was taken on the fly. The dough had too much tenacity and too little elasticity/extensibility. That's why I thought of giving it a first fermentation to weaken gluten and improve its extensibility.
- Depending on the temperature where you live, it will take longer or shorter time to proof.
- The dough usually shapes in a clockwise direction... But I couldn't manage. That's why you'll see that I shape it the other way around.
- You must respect the rising times to obtain a good final result. Be patient, it takes a long time to rise and more in a cold season.


If you want to enjoy a good breakfast, do not hesitate to prepare this homemade ensaimada. Its flavor and texture is incredible, not to mention how rewarding it is to make something like this with your own hands.
Don't be shy and encourage yourself to prepare them, this will surely make you the wave at home! I wish you a fantastic weekend. See you Monday ;)
Big hugs,
Eva