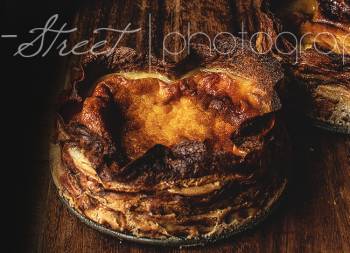
Harmony Retro Cake, crepes and fruits
Do you believe me if I tell you that from the first second I saw this cake, I fell in love. It was a very intense crush, I found it absolutely beautiful, original and creative. This cake, which I have decided to call Harmony Retro Cake, crepes and fruits, I saw it to a girl, Leckere Minute, on her Youtube channel.
I found it by chance, because (as it happens to me countless times) I was looking for something and her video was suggested to me. And with this recipe… Oh, please. I liked it so much that I changed the plans of what I was going to do, but that’s okay because I’ll leave it for you later.
I have searched for information about this cake, have not found anything about it and I don’t know who the first person who made it was, maybe it was this woman I am linking you to, as well as her name. That is why I have given it a name that, most likely, has nothing to do with the original (in case it does).

Making “Harmony Retro Cake, crepes and fruits”.
Her recipe helped me to develop, as well as inspire, the one I leave you. Crepe recipe is similar to hers, only in my case I reduce the amount of water a little and add melted butter. The filling is different from the one she shows, her cake is made with sour cream and, in my case, I use mascarpone cheese, yogurt and cream.
The combination of fruits she uses, peaches in syrup and candied cherries, besides being very much to my liking, seems to me to be very successful. Both in colors, which gives it a very vintage look, and in durability of the final product. It is true that this cake accepts any type of fruit, whether in syrup, candied or fresh, that we want to use, but if we use fruit that is not fresh, we will greatly prolong its shelf life.
When it comes to assembling the cake, I followed her process, except for the sides. She leaves the cake with the filling in sight, but in my case I preferred to cover the whole inside of the mold with the crepes. When unmolding, I recommend cutting the excess crepe both at the edges and at the junction between them, to prevent them from being loose. This would cause problems or leave an unattractive finish after coating it with the chocolate coating.
Decorating the cake.
I thought it was a great idea to coat the cake with chocolate. Not only because it is an ingredient that I love, but also because it covers the outside with a simple and versatile finish.
She just leaves the cake covered with chocolate. But you already know that I always have to give that personal touch to the things I make and, in this case, I did it in the top decoration. I used Italian meringue, caramelized cocoa nibs and a maraschino cherry. The end result was very retro, it represents me so much….. Everything vintage and retro fascinates me. In fact I’m sure you’ve already noticed it in more than one post.
Why Harmony Retro Cake?
The truth is that naming this cake was not an easy task. First, because there are already crepe cakes and, having called it that way, could lead to confusion to a person looking for that particular cake. The solution was to give it a name that could represent or convey what it is.
Reading the comments on this girl’s video, I saw one that I really liked, from Janet Planet. She commented that, since the name of the cake was unknown, after making it, she decided to call it “Hundertwasser Cake“. Very wise on her part and I will tell you why.
Friedensreich Hundertwasser, his original name was Friedensreich Stowasser, born in Vienna in 1928, to a Jewish mother and a Protestant father. He was a multifaceted artist in which, it is worth mentioning, his knowledge in painting and sculpture.
He adopted the prefix Sto (Czech for “hundred”) which is the same as “Hundert” in German, which is why it is called Hundertwasser or Stowasser. The name Friedensreich means “place of peace” or “kingdom of peace“. He adopted two other names, Regentagand Dunkelbunt which translate as “Rainy day” and “Dark, multicolored“. His name Friedensreich Hundertwasser means “Kingdom of peace with hundreds of waters“.

It is said that he was an artist in harmony with nature.
His colorful and unconventional works were inspired by sensory experiences and nature. He had a philosophy of life, it was in harmony with it, he had a vision of “human architecture“.
His art was inspired by Gaudi, Egon Schiele and Cheval. He disliked straight lines and the regularity of objects, according to him, did not correspond to the human essence. For Hundertwasser, buildings were the third skin of humans, after the epidermis and clothing. Thus, he believed that people should influence their homes in terms of design.
His main inspiration was spirals and he came to call the straight line the “devil’s tool”. He called his theory of art “transautomatism,” based in turn on automatic Surrealism. He was an artist who achieved notoriety for his colorful paintings and for his revolutionary architectural designs, which included features of natural landscapes.
And all this, how does it lead to the name of the cake?
Certainly this artist could be present in a design of these characteristics, keeping the distances since his work is formidable, but it is true that he fulfills some of his conditions. He based everything on harmony with the essence of life. I liked it very much and that is why the interior reflects that word.
As I mentioned above, the look was very retro. But this is something that comes out of me, I always tend towards that line (many times I have to control myself). That’s why it acquired a second name, being the final result Harmony Retro Cake.
Recipe Harmony Retro Cake
Ingredients for 18-20 cm diameter mold
CREPES (19-20 units):
- 180 g cake/pastry flour
- 20 g unsweetened cocoa powder
- 300 g whole milk
- 2 large eggs
- 170 g water at room temperature
- 45 g sugar
- 20 g unsalted butter, melted and cooled
- 1 tsp Bourbon vanilla extract
- 2 g salt
FILLING:
- 250 g mascarpone cheese
- 125 g plain Greek yogurt, unsweetened
- 335 g heavy cream
- 130 g powdered sugar
- 17 g gelatin powder + 100 g water very cold (from the fridge)
Note: with 15 g of gelatin it is fine and the texture is creamier
- 250-300 g peach in syrup, cut in pieces
- 125 g candied cherries, cut in half
CHOCOLATE COATING:
- 200 g dark chocolate 70%
- 210 g heavy cream
- 47 g unsalted butter at room temperature
ITALIAN MERINGUE:
- 70 g egg whites
- 150 g sugar
- 34 g water
FOR DECORATING:
- caramelized cocoa nibs
- maraschino cherry
MATERIAL WE WILL NEED:
- mold 18-20 cm in diameter, mine is 18 cm Push-Pan
- bowls
- manual whisk
- spatula
- iron skillet, mine is De Buyer 20 cm diameter
- digital cooking thermometer
- blowtorch
- plastic film
Instructions
FIRST DAY
Prepare crepes.
- In a large bowl, add the eggs, sugar and milk. Mix with a whisk until homogenized.
- Incorporate salt, flour and cocoa, previously sifted, and mix again until a homogeneous mixture is obtained.
- Add melted butter, mix again until it is completely integrated.
- Pour the water, little by little and mixing at the same time.
- Cover with cling film and let stand for 20 minutes.
Cook crepes.
- Place a cast iron frying pan/skillet over medium heat, let it get warm.
- Spread a thin layer of olive oil over the entire surface of the pan.
- Once the pan is hot, with the help of a ladle, pour about half of it. We will tilt the frying pan while we pour the batter, in that way we will manage to extend it for the whole surface in addition to obtaining thin crepes.
- Cook until the surface of the crepe is cooked.
- Turn the crepe over and finish cooking.
- Remove and place on a plate.
- Repeat the same process until the batter is finished. As we take them out, we will stack them. In this way we will achieve a soft and manageable consistency.
- We will get about 19-20 crepes.
Prepare the filling.
- In a bowl, pour the water and add the gelatin. Mix and let it hydrate for 15 minutes.
- Meanwhile, mix the rest of the ingredients.
- In a large bowl, add the mascarpone cheese together with the yogurt, cream and powdered sugar. Mix with a whisk until homogenized.
- After 15 minutes, we will observe that the gelatin has solidified. Heat, very carefully (we can do it in a bain-marie or in small batches in the microwave) until it reaches 104ºF/40ºC. Use a digital thermometer to help you.
- Pour the gelatine into the filling and mix again until a uniform mixture is obtained.
Prepare the cake.
- Line a mold with plastic film. Set aside.
- Prepare several bowls or cups, we will use them to fill the crepes.
- Place a crepe in the base of the mold lined with plastic wrap, adjust well. Line the sides with crepes, we will place them adjusting them in the base (to avoid holes) and placed on the mold to hold them. You will see this step in the video.
- To fill the crepes, place in a bowl or glass, fill with a little cream filling and some chopped fruit. Make sure that the fruits are distributed unevenly in the cream and not all accumulated on one side (I tell you from experience). In my case I filled 6 crepes, but you can fill more or less, according to your needs.
- Once we have them filled, we proceed to transfer them into the mold.
- Spread a layer of cream filling on the base of the mold, on top of the crepe.
- Place the stuffed crepes inside the mold. The ideal is to place them in different ways so that the cut is not the same in all the portions.
- Arrange some chopped fruit on top of the crepes.
- The rest of the filling cream will have solidified a lot. What we will do is to heat it up to 113ºF/45ºC, so that it changes its consistency and becomes more liquid. In addition, this will help it to seep through all the holes and the final result will be more attractive.
- Pour the mixture over the crepes and smooth the surface.
- Place a crepe on top of the filling, adjust and cut the excess of the edges. Both the top crepe and the crepes on the sides.
- Cover with plastic wrap and refrigerate for a minimum of 12 hours. In my case it was 20 hours at 39,2ºF/4ºC.
- NOTE: Gelatine is thermo-reversible, which means that we can reheat it to change its consistency from solid to liquid. Once it cools, it will solidify again.
SECON DAY
Remove the cake from the mold.
- Remove the cake from the mold, remove the film and place on a cake plate.
- Refrigerate while preparing the chocolate coating.
Prepare chocolate coating.
- In a bowl, add the chopped chocolate and butter.
- On the other hand, heat the cream in a saucepan until it almost boils.
- Pour the cream over the chocolate and let it stand for 2 minutes.
- Mix with the whisk until homogenized.
- Before pouring over the cake, check that the temperature does not exceed 95ºF/35ºC.
Cover the cake with the chocolate coating.
- Place the cake on a rack and place it on a serving dish or container where we can collect the excess chocolate.
- Pour the glaze over the cake, using a spatula to smooth the top.
- Gently tap the rack with the cake on the tray. In this way, the chocolate will settle and the excess will fall off. In addition to achieving a more uniform finish.
- Leave at room temperature until the coating solidifies.
- Note: The coating will not become hard like chocolate, it will be firm, but to the touch it will leave an imprint.
Prepare Italian meringue.
- Add the sugar and water in a saucepan, in that order. Place over medium heat.
- Use a cooking thermometer to check the temperature of the syrup. When it reaches 244ºF/118ºC, remove the syrup and add it to the semi-whipped egg whites.
- Add the egg whites in a bowl or in the bowl of the KitchenAid and begin to whip them.
- Whip the egg whites until they are fairly stiff, but not too stiff or they will be dry.
- The syrup will be ready in the time it takes to reach this point.
- Incorporate the syrup in a thin, continuous stream over the whipped egg whites and whisk at the same time.
- Continue until a firm consistency is achieved. We will have a very shiny meringue.
- If we check the temperature, we must beat at high speed until the temperature reduces to 104ºF/40ºC.
- Let stand for 2 minutes before using.
- Pour into a piping bag with a star nozzle. In my case I used the SF18 nozzle from Decora.
Decorate the cake.
- Pipe the Italian meringue over the top of the cake. In my case I have done it as I show you in the video, but you can do it the way you like.
- Toast with a blowtorch, lightly.
- With the help of a spoon, make a hole in the center of the meringue.
- Sprinkle caramelized cocoa nibs, to taste.
- Finish by decorating with a maraschino cherry.
- Serve.


Notes
- My mold is 18 cm and is quite high, but these same quantities are suitable for a mold of 20 cm a little lower.
- Crepes can be made with other flavors if you prefer. In my case I have made them with cocoa powder, but they can be made with matcha tea, beet powder, strawberry.... We can use any ingredient that adds flavor and color.
- Crepes batter can be made without gluten and, thus, adapt it. On the blog I have two recipes for gluten-free crepes (they are savory, of course) that maybe you can use to adapt them. This is one recipeand this is another.
- It is important that the pan where we cook them is hot, but not too hot, to prevent the batter from sticking.
- The recipe I saw used sour cream to make the filling. In my case I decided to use a combination of mascarpone cheese, Greek yogurt and cream. These ingredients can be adjusted and changed. The end result reminds me a bit of panna cotta.
- The cream filling can also be flavored or colored if desired. In my case I preferred to use only vanilla.
- I have used the same fruits as the version I followed, but others can be used without problems. Even fresh fruits. But, the shelf life of the cake will be shortened if we use fresh fruits (raspberries, blackberries, blueberries, lychees...) instead of fruits in syrup or candied fruits.
- I advise you to make Italian or Swiss meringue instead of French meringue, the final texture is much creamier, and it keeps its shape much better over time.
- If you do not have caramelized cocoa nibs, you can use chocolate chips, shaved chocolate or whatever you like.
- Can be kept in the fridge for 3-4 days..


I think this Harmony Retro Cake is one of the most original and versatile crepe cakes we can find. We do not need an oven to make it, something that can play in our favor at this time with the price of light.
The inside reminds me a lot of panna cotta, but a little creamier. I have left two quantities of gelatin, with 15 g you will have good results and very good texture. With 17 g, we ensure a little more final firmness with the passage of time outside the cold (especially if it is hot).
You can adapt and modify the outer decoration to your taste. You can even omit the chocolate, if you don't like it, and decorate it with a buttercream or simply cover it with a sugar glaze. I look forward to hearing how it turned out!
I wish you a wonderful weekend!
Lots of love,
Eva