Mugis – laminated soft cream buns
Despite having shared a Mugis recipe with you over 10 years ago, this is only available in Spanish, which was part of a mini cookbook of stories titled “What Did Little Red Riding Hood Have in Her Basket?“. I wanted to provide you with an improved and updated version of these buns that I adore. I believe they are one of my favorites, although anything that involves enriched and laminated dough is. These Mugis laminated soft cream buns, also known as lazos de crema, ochos or orejas, were one of the buns that were part of my childhood, and for some reason, I have a special fondness for them.
Seriously, I love these buns.
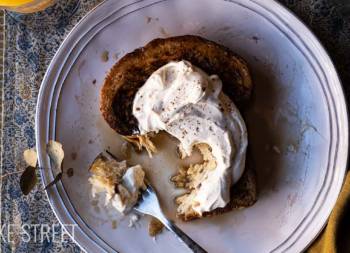
I know that many times when I create recipes and share them with you, I say the same thing, I love this, I adore this, this is the best in the world… But undoubtedly, specifically these, have stolen my heart. The same day I made them, I ate four. An incredibly tender bun along with a silky, creamy custard with just the right amount of sweetness not to overshadow the whole. Seriously, trust me, they are perfect.
This time, I don’t have information about the origin of these buns. The truth is that I feel a bit frustrated every time I search for information about a recipe and find nothing about it. But clearly, every creation has a starting point. Since to make these Mugis we need to prepare an enriched dough that we will later laminate, let’s start from that foundation.

Viennoiseries dough.
The origin of this type of dough dates back to the 19th century in France. The introduction of Austrian pastry to France is credited to August Zang, a Viennese pastry chef who opened a bakery in Paris in 1839. It was he who popularized viennoiseries in France and contributed to the development of the Viennese pastry tradition in the country.
These products are known for their richness, high content of fats such as butter and sugar, their laminating or puffing process, and, of course, their unmistakable aroma and buttery flavor.
Although the term “viennoiserie” suggests a Viennese origin, it is important to note that the interpretation and evolution of these products have taken place in different countries. Especially in France, where the tradition of viennoiseries has flourished and diversified over the years. Viennoiseries have become an integral part of French bakery and are appreciated worldwide.
The influence of Viennese pastry, including viennoiseries, in Spain can be traced through various historical and cultural factors. The arrival of this pastry technique in Spain likely occurred over time as gastronomic trends and bakery techniques spread across Europe.
Several factors could have contributed to the introduction of viennoiseries in Spain.
- Influence of Foreign Pastry Chefs: In the 19th and early 20th centuries, many foreign pastry chefs and chefs, including those with experience in Viennese and French pastry, established themselves in various European countries, thus contributing to the spread of techniques and recipes.
- Travel and Trade: Cultural exchanges, trade routes, and travels between European countries facilitated the transfer of culinary knowledge. The expansion of viennoiseries might have occurred through pastry chefs relocating to Spain or through the influence of establishments importing and offering products inspired by Viennese pastry.
- Development of Tourism: As tourism became more common in the 20th century, travelers who experienced the delights of Viennese pastry in other European countries might have sought to recreate or incorporate these preparations into the Spanish gastronomic scene.
- Local Adaptation: It is likely that viennoiseries were adapted to local tastes and preferences as they became part of the Spanish pastry tradition. Some of these products, such as croissants or brioches, may have acquired regional variations in Spain.
From here, we can conclude that the result of this type of dough was probably a gradual process influenced by cultural exchanges, movements of pastry chefs and chefs, and openness to new gastronomic trends in Europe. Hence, various creations such as these Mugis emerged.

Creating mugis – laminated soft cream buns.
As we have observed, the same preparation is carried out in different parts of Spain; Mugis in Asturias, Raquetas in Salamanca, Orejas in Madrid… This likely occurred through word of mouth, travels that spread the preparation, and then individuals wanting to recreate it, or pastry chefs moving from one region to another within the country.
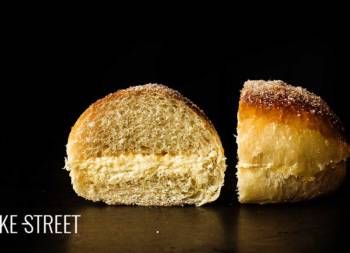
The shape may change for the same reason – not replicating it exactly to identify it with an original recipe. However, in all cases, it involves laminated dough, not puff pastry, pastry cream, and a finishing touch that can range from a shine to a sugar glaze.
Here, I provide detailed information on laminated dough (a type of enriched dough that undergoes a leavening process), and in another explanation, I explain what puff pastry is (a leavened dough that does not require a leavening process as it contains no yeast).
In my case, unlike the first ones I shared, I decided to shape them like hearts to faithfully express that they have completely stolen my heart…
Recipe Mugis, laminated soft cream buns
Ingredients for9 pieces
DOUGH:
- 300 g T45 flour (in the NOTES section I leave substitutes for this type of flour)
- 100 g water
- 35 g sugar
- 55 g egg
- 10 g powdered milk
- 15 g honey
- 1 teaspoon natural vanilla extract
- 20 g unsalted butter, room temperature
- 7 g fresh yeast or 2.3 g dry yeast
- 5.5 g salt
- 125 g extra dry butter* (for laminating)
* You can use supermarket butter with a fat content of 82%.
FOR BRUSHING:
- 1 egg+ pinch of salt
PASTRY CREAM:
- 250 g whole milk
- 85 g créme fraîche
- 3 large egg yolks
- 55 g sugar
- 30 g cornstarch
- 1 teaspoon vanilla extract
- 20 g unsalted butter, room temperature
PECTIN SYRUP:
- 165 g water
- 5 g NH apple Pectin
- 100 g sugar
- a few drops of lemon juice (6-7 g)
MATERIAL WE WILL NEED AND SHOWN IN THE VIDEO:
- metallic rolling pin
- 2 Teflon sheets
- piping bag + smooth nozzle 1 cm diameter
- bowls
- whisk
- pastry spatula (optional)
- digital kitchen scale
- pizza cutter or sharp knife
- ruler
- silpat
- perforated tray
- cooling racks
- water sprayer (optional)
- pastry brush
Instructions
FIRST DAY
Prepare the dough.
- In the bowl of the mixer add the flour, water, egg, powdered milk, honey, sugar, yeast and salt. Knead in a spiral mixer or in a regular mixer with the dough hook on speed 2 until you get a dough that is almost developed. It will take about 10-15 minutes depending on your mixer.
- Add half of the butter along with the vanilla and continue to knead until fully integrated.
- Incorporatethe other half of the butter and knead again until fully integrated. You should have a perfectly developed dough.
- Take the dough out of the bowl, round and put it in an airtight container, previously greased, until it grows 1/3 of its volume. In my case it took 3 and 1/2 hours at 70ºF/21ºC.
- Store in the refrigerator until the next day, during the night the dough will almost triple its volume.
SECOND DAY
Prepare pastry cream.
- In a medium saucepan pour the milk together with créme fraîche and vanilla. Place over medium heat and bring to a gentle boil.
- Meanwhile, in a large bowl, whisk the egg yolks with the sugar and the previously sieved cornflour until completely homogenised.
- Once the milk has come to the boil, pour some of it over the egg yolk mixture.
- Whisk quickly to temper the yolks and prevent them from curdling into lumps.
- Stir in the rest of the milk little by little, mixing very well each time.
- Pour the mixture back into the pan and place over medium-low heat, stirring constantly. You will notice that the texture will gradually become thicker, but it will take a while. Patience.
- Once at this point, remove from the heat.
- While still hot, add the butter and mix with the whisk until homogeneous.
- Pour into a tray/tupper/bowl (the larger the better because it will cool faster).
- Cover with cling film to prevent it from setting and leave to cool completely.
- Allow to cool completely before using. If desired, it can be made the day before and refrigerated until the next day.
Prepare butter square.
- Prepare two Teflon sheets and place the butter cut into more or less equal pieces on one of them. Cover with the other sheet and flatten with a rolling pin.
- You should give a square shape, or as far as possible, 20 cm on each side (or the width you have given to your dough).
- It is very likely that the butter, after this process, has become warm and has a melting texture. Place the stretched butter with the Teflon sheets in the freezer until it has a firm but malleable consistency.
- NOTE: If you use extra dry butter, it usually comes in slabs. Just adjust the size, and the desired amount, using a rolling pin to flatten it slightly.
Stretch the dough.
- Take the dough out of the fridge and proceed to stretch it. You must work the dough directly from the cold, no need to temper it.
- Lightly dust a work surface with flour and roll out the dough. Form a rectangle of approximately 32 x 20 cm.
- Set aside.
Laminate.
- Place the butter square in the center of the dough so that the width of the butter and the width of the dough are the same.
- Fold the ends of the dough over the butter, bringing each of them to the center. Seal well the join of both folds in the central part, it is not necessary to seal the other two ends.
Stretch the dough and make the first single fold.
- Lightly dust the work surface with flour and proceed to roll out the dough. Roll the dough in a single pass, from the center to the ends, and avoid insisting on the same place by rolling the dough over it.
- As you roll out the dough, try to lift it from the work surface from time to time to make sure that it does not stick to the work surface (this could damage the pastry by causing it to break). If necessary, sprinkle with a little flour.
- Stretch to approximately 40 x 20 cm.
- With the help of a knife or pizza cutter, cut a thin thread from the two upper ends. In this way you equalize the dough.
- Make the first fold, bring one of the ends to the center and repeat the same process with the other end placing it on top of the previous one. In the same way as if you were closing a triptych.
- Gently roll the surface with a rolling pin to bring the folds together, if desired, cover with plastic wrap and refrigerate for 30 minutes.
- NOTE: The dough scraps are not thrown away, you can keep them wrapped in film for 2 days (even freeze them) to add them to future doughs. For example Danish dough or puff pastry, bread, brioche... You can add between 20-25% of dough trimmings with respect to the total weight of flour in the recipe.
Second fold.
- Lightly dust the work surface with flour and roll out the dough. Put pressure on it but do not overdo it.
- Stretch again to the same length as last time, about 40 x 20 cm.
- Cut the ends again and fold in the same way as the previous time.
- Cover with film and refrigerate for 30 minutes.
Third and last fold.
- Repeat the same steps as for the second fold.
- Cover with plastic wrap and refrigerate for 1 hour.
Make the last stretch before shaping the mugis.
- Lightly dust the work surface with flour and roll out the dough. Give the dough dimensions of approximately 30 x 15 cm.
- As you stretch the dough, remember to occasionally lift the dough off the work surface to make sure it does not stick to the work surface and sprinkle a little flour if necessary.
- Once you have the correct measurements, cut a strip from each side to even out the dough and leave the flaky layers "visible".
- Divide the rectangle, on the narrower side, to obtain 9 strips of 1.5 cm wide.
- Cover with plastic wrap and let stand for 30 minutes in the refrigerator.
- NOTE: In the video you can see that the dough, when stretching the strips, shrinks trying to regain its shape. This is because the gluten is tense, a sign that it will be very difficult to form the buns. For this reason, you should let the dough rest so that the gluten relaxes and allows you to form the buns without resistance.
Shape mugis.
- Take one of the strips, keeping the rest covered with film, and stretch it gently by sliding the strip of dough, on the sides that are not laminated, between your thumb and forefinger. You should achieve a length of approximately 50 cm.
- Holding both ends of the strip of dough, roll it on the work surface as shown in the video. This way you will create a spiral look without damaging the dough laminate.
- Shape into a heart shape.
- Place on a perforated tray lined with silpat or Teflon, repeat the same process with the rest of the pieces.
Fill mugis with pastry cream and make final proof.
- Put pastry cream in a piping bag with a 1 cm smooth nozzle and pour the cream to fill the holes. There is no dough under the cream, but after baking, the cream will be perfect and will stick to the baked dough, don't worry.
- Spray mugis with water and cover with cling film to let them rise. To prevent the film from sticking to the pastry cream, place shot glasses in the center of the tray and sides, if necessary, and place the film over them, making sure the sides are covered.
- Let rise until doubled in size. In my case they were 3 and 1/2 hours at 70ºF/21ºC.


Bake.
- Preheat the oven to 365ºF/185ºC fan.
- Beat an egg with a pinch of salt and brush. You should brush the mugis, avoiding always painting the layers or laminated part, you should only brush the areas where there is no laminate.
- Bake for 13-14 minutes.
- Remove, place on a cooling rack without removing from the Teflon or silpat (the cream will be hot and can separate) and let cool completely before brushing with pectin syrup.
- NOTE: In my case, as I was very late, once they had cooled, I left on the cooling rack itself with the silpat or teflon and covered with film. I left them at room temperature until the next day.
Make pectin syrup.
- Add water to a saucepan and place over medium heat.
- While it is heating, mix the sugar with the pectin.
- When the water begins to be hot, but not boiling, add the sugar and pectin mixture, little by little, while stirring constantly with a whisk.
- Cook over medium heat, stirring constantly, until it comes to a boil.
- At this point, remove from heat.
- Add the lemon juice, mix and pour into a glass container.
- Allow to cool completely before using.
Brush mugis.
- Brush the buns with the pectin syrup, both the dough and the cream.
- Let stand at room temperature for 30 minutes for the glaze to dry.
- Serve.

Notes
- First important point: Pound cold butter, it will be easier to soft and reshape.
- Second important point: Work with a cold dough.
- Third important point: When you pound butter it turn soft but chill. It will be easily manageable.
- Fourth important point: Butter mustn´t be at room temperature or warm, because it will be absorbed by the dough rather than forming layers.
- If you don't have T45 flour, you can use instead: 250 g of high-strength flour W=380 + 50 g of soft pastry flour + 113 g of water (in this case more water must be added). You can also replace it with a high-strength flour W= 220-240.
- The final amount of water to be added to the dough will depend a little on the quality of the proteins in the dough or their absorption capacity. If necessary, we can add 5-10 g more water. The consistency of the dough should be very pleasant to the touch and easy to handle.
- For each gram of dry yeast we will use 3 g of fresh yeast.
- You can use natural vanilla or vanilla extract.
- I have used supermarket butter in this case, for that reason you can watch in the video that I sprinkle a little flour on the butter square. In other occasions I have used extra dry butter which gives very good results. This has a higher melting point than other varieties, so it will allow us to work better with it.
- To work the butter I prefer to do it between two sheets of Teflon, are reusable and is a very clean way of working. But use film or baking paper if you prefer.
- When handling the pieces, be careful not to press them, otherwise you can damage the layers that will lead to the future laminating.
- For this recipe I decided to make the custard I made for the Flan Pâtissier or Tortas Locas Malagueñas, but if you wish, you can make the traditional custard (recipe in this link). The cream I leave you with is softer in texture and much more delicate, but it also takes a little longer to be ready.
- On this occasion, for pastry cream, I have replaced the cream with créme fraîche. The result is wonderful. But if you can't find it, you can use whipping cream instead.
- Don't forget to temper the egg yolks to prevent them from curdling and forming lumps.
- Be patient when you are making the custard, it takes a little while to set and gain consistency. Don't be tempted to increase the heat as you run the risk of burning some of the base and transferring the flavour to the custard.
- If the pectin syrup gels too much, you can warm it in the microwave to lighten it.
- STORAGE: They are wonderful the same day we bake them, but surprisingly, the second and third day they are still amazing. I only lasted until the fourth day without eating one.... It was still very tender, a little less than the first days. I recommend storing them in an airtight container, they can be kept at room temperature because the cream is baked.

I know many of you have made my first mugis recipe because you have shared it with me so much. But, believe me, this new recipe for Mugis, laminated soft cream buns is extraordinary...
The texture so tender and fluffy, the cream so silky, the aroma and flavor of butter and vanilla, a dream.
I hope you will try it and let me know what you think!
By the way, I remind you that you can watch all my videos on my YouTube channel. If you subscribe and turn on the little bell, I will be eternally grateful!
I wish you a wonderful Sunday afternoon!
Lots of love,
Eva
This post contains affiliated links.