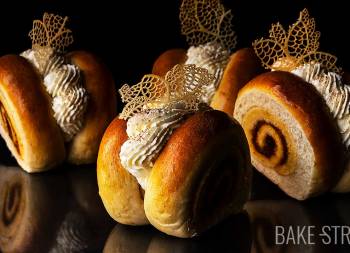
Inspiration Raspberry Laminated Brioche
If you ask me, what’s the best thing about cold weather or winter? I’ll tell you, setting up the Christmas tree (you know I love this time of the year) and being able to work Viennoiseries doughs, like this Raspberry Inspiration Laminated Brioche. I love to cook, I am very happy preparing all kinds of doughs, but working enriched doughs is, without a doubt, my greatest satisfaction. Along with baking bread.
So when these temperatures arrive, I get out the butter and the rolling pins to prepare these types of doughs. You are probably familiar with this piece from a recipe I left you some time ago, Fujisan bread. And you are right. To carry out this preparation, I have based myself on that wonderful recipe, only I have modified some elements and quantities. In addition to the decoration… I’m in love with it!
For those of you who want to know the origin of Fujisan bread, you can do so in the post I left you 3 years ago. In this case, we could talk more about laminated doughs, two of the types that are part of the Viennoiseries doughs.
Within the laminated doughs, we can find 4 varieties.
Laminated doughs, although they may seem all similar in origin, are distinguished into several groups that differ among them, mainly, by the final amount of ingredients that are part of the process:
PUFF PASTRY: French origin dough carried out by an alternating lamination of dough and butter, in which no yeast is used. The growth of the dough originates thanks to the steam that is generated during baking and separates the layers that are isolated by the fat. The end result is a product with a crunchy and airy texture. This type of dough is perfect for making sweet or savory products.
There are variations such as inverted puff pastry where the beurrage (butter) is on the outside and the dough is on the inside. There is also the blitz or quick puff pastry where the butter is incorporated into the dough in cubes and the end result is a slightly mixed dough where both elements (flour and butter) can be appreciated. In this post you have the recipe for quick puff pastry.
CROISSANT: Its shape is reminiscent of crescent moons, symbolizing the moon of the Turkish and Ottoman Empire. But its origin is Austrian, unlike what is believed, which occurred in France. You have its origin in this post. This variety of dough does have yeast unlike puff pastry, so that the process of growth of these pieces, is carried out thanks to fermentation. This gives rise to several aerated layers inside. Less butter is required to make them.
DANISH PASTRY O PLUNDERGEBÄCK: Wienerbröd/ Wienerbrødin the Scandinavian countries.
The German Food Code establishes guidelines and requirements for making these Danish pastries or fine bakery products (Feingebäck, Feinbackware):
- Danish pastries contain at least 30 kg of butter or corresponding amount of milk fat products, margarine or practically anhydrous fats, based on 100 kg of cereal products and/or starches.
- Danish pastry (also known as “Pludergebäck“) contains at least 60 kg of butter or a corresponding amount of milk fat products, margarine or practically anhydrous fats, based on 100 kg of cereal products and/or starches.
- The Austrian food book stipulates for Danish pastries (Danish pastry baked goods) that at least 250 g of fat per 1000 g of basic dough must be absorbed in the dough (the fat contained in the basic dough is not included). Flour incorporated into the fat of the laminate is part of the basic dough.
LAMINATED BRIOCHE: The origin of this piece is quite recent and, it seems, was among European bakers. A very elegant and extremely delicate product that takes it to a higher level. If you like brioche, you will be fascinated by this preparation, which we will carry out today.

Making the Inspiration Raspberry Laminated Brioche.
It is true that a laminated brioche does not need much more to captivate us, but we can always go a step further and make it even more desirable if possible. As soon as I got my hands on Inspiration raspberry Valrhona chocolate, I knew that I had to use it for a majestic elaboration. Because it deserves nothing less.
Since you already had the Fujisan bread recipe, I decided to change it a bit and make some steps easier, such as omitting the tangzhong (some of you are lazy when you have to elaborate many processes in one elaboration). In addition to changing some quantities and substituting ingredients. This time, I also flavored the dough with Tahiti Norohy vanilla. It is a vanilla with floral and aniseed aromas that is grown on the island of Tahaa and processed on the island of Raiatea.

In fact, you can see the whole process, elaboration and forming, in the video I left on Youtube, which is the same one I have carried out this time. Just note the variation of ingredients used in this process.
To decorate it I used an Inspiration raspberry Valrhona chocolate coating, its aroma and acid flavor that directly evokes the taste of fresh raspberries, is perfect to combine with this delicately sweet and vanilla flavored dough.
The final touch is given by a combination of crunchy and creamy texture. On the one hand, we will make a raspberry ganache with Inspiration raspberry Valrhona chocolate, which we will combine with Raspberry Crispy, small pieces of freeze-dried raspberry, sweet and very crunchy. If you can’t resist the taste of this chocolate, then do like me, finish with a raspberry chocolate bean.

Recipe Inspiration Raspberry Laminated Brioche
This post is a collab with Valrhona.
You can watch the whole process of this recipe in this video on Youtube
Ingredients for 3 pieces
DOUGH:
- 250 g Manitoba flour W=380
- 50 g pastry/cake flour
- 113 g water
- 38 g sugar
- 55 g egg
- 10 g milk powder
- 15 g honey
- 1/2 pod vanillaTahiti Norohy
- 20 g unsalted butter at room temperature
- 7 g fresh yeast or 2,3 g dry yeast
- 5,5 g salt
- 125 g extra dry butter (for laminating)
RASPBERRY WHIPPED GANACHE:
- 80 g Inspiration frambuesa Valrhona chocolate
- 60 g heavy cream, at room temperature
- 135 g heavy cream, very cold
RAPSBERRY CHOCOLATE COATING:
- 100 g Inspiration frambuesa Valrhona chocolate
- 11 g cocoa butter
DECORATING:
- Frambuesa Crispy
- icing sugar, for dusting
- 3 Inspiration frambuesa Valrhona beans
MATERIAL WE WILL NEED:
- kneader
- 3 round molds of 15 cm in diameter or others with similar characteristics
- rolling pin
- piping bag + SF18 Decora nozzle
- digital thermometer
- digital scale
- hand blender
Instructions
FIRST DAY
Prepare the dough.
- In the bowl of the stand mixer add the 2 kinds of flour, previously sieved, along water, egg, milk powder, honey, sugar, yeast and salt. Knead with the hook at speed 1 and leave until we obtain an almost developed dough. It will take us about 10-15 minutes depending in our kneader.
- Cut half Tahiti Norohy vanilla pod in half, open lengthwise and remove the seeds by sliding a knife inside.
- Add half of the butter along with vanilla and knead again until completely integrated.
- Integrate the other half and knead again until completely absorbed. We must obtain a perfectly developed dough.
- Remove the dough from the bowl, make a ball and place it in an airtight container, previously greased, until it grows 1/3 of its volume. In my case, it was 2 hours 35 minutes to 72,8ºF/22,7ºC.
- Keep it in the fridge until the next day.
Prepare raspberry whipped ganache.
- Melt Inspiration raspberry Valrhona chocolate beans in a bowl in a bain-marie. Set aside.
- In a small saucepan, add 60 g of liquid cream and bring to the boil.
- Remove from the heat and pour, little by little, the hot cream over the melted chocolate. We will do it in several batches and in small quantities, mixing with a whisk after each addition. At the first addition, the mixture will thicken slightly, that's normal, stir very well and pour another small amount. We will observe that the consistency will become fluid.
- Add the rest of the cream, as detailed, and mix very well with the whisk until a homogeneous mixture is obtained.
- With the help of a blender, blend at low speed, without moving or lifting it, until a shiny and homogeneous mixture is obtained.
- Add the 135 g of cold cream and mix with the whisk until homogeneous.
- Cover with cling film, the plastic should be in direct contact with the surface of the cream.
- Store in the refrigerator for 4 hours or until the next day.
SECOND DAY
Make the butter sheet.
- Prepare two teflon sheets and place the butter cut in 6 pieces on one of them. Cover with the other sheet and began to beat it with the aid of a roller to flatten it.
- Flatten square, or as much as possible, about 20 cm side (or the width we have given to our dough).
- It is very likely that the butter has become very hot and has a melting texture. Place in the freezer until it has a firm, but malleable consistency.
- NOTE: If we use extra dry butter, it usually comes in a sheet format. We only need to adjust the size and the desired amount, beating it with a rolling pin to flatten it slightly.
Stretch the dough.
- Take the dough out of the fridge and proceed to stretch it. We will work with a cold dough, from the fridge.
- Lightly sprinkle a work surface with flour and roll out the dough. We will form a rectangle of 32 x 20 cm.
- Set aside.
Laminate the dough.
- Place the butter in the middle of the dough, so that the width of the butter and the width of the dough is the same.
- Fold the ends of the dough on the butter, bringing each of them to the center. Seal well the union of both folds in the center as well as the sides. The dough should be completely sealed by each of its sides.
Stretch the dough and make the first simple fold.
- Lightly sprinkle the work surface with flour and proceed to stretch the dough. Pass the roll of a single pass, from the center towards the ends, and avoiding insisting in the same place. Stretch the dough and make the first simple fold.
- As we stretch the dough, we will try to lift this from the work table from time to time to make sure it does not stick to the table (it could damage the final layers making breaks). In case it is necessary to sprinkle a little flour, we will do it without exceeding.
- Stretch until reaching about 35 x 20 cm.
- Using a knife or pizza cutter, cut a thin thread from the two upper ends. This way we equate the dough sides.
- Make the first fold, take one end to the center and repeat the same process with the other end placing it on the previous one. Just as if we were closing a triptych.
- Roll gently on the surface to join the folds, cover with film and take the cold for 30 minutes.
- NOTE: The dough cuts are not thrown, you can keep them wrapped in film (even freeze them) to add them to future doughs. Even in the next elaborations of Danish dough or puff pastry, bread, brioche … You can add between 20-25% of the total weight of the flour.
Make second fold.
- Sprinkle the work surface lightly with flour and strain the dough.
- Stretch again until reaching the same length as the previous time, 45 x 20 cm
- Cut the ends again and fold in the same way as the previous time.
- Cover with film and refrigerate for 30 minutes.
Third and final fold.
- Repeat the same steps as in the second fold.
- Cover with film and place in the fridge for 30 minutes.
Make the last stretch before making the bread.
- Line 3 round pans of 15 cm diameter with baking paper. Set aside.
- Take the dough out of the fridge and proceed to stretch it out.
- Sprinkle the work surface lightly with flour and roll out the dough. We will give dimensions of 45 x 20 cm) approximately.
- As you stretch out the dough, remember to raise the dough from time to time from the work surface to make sure it does not stick to it and sprinkle a little flour if necessary.
- Once we have the measurements in our dough, we will cut a strip from each side to equal the dough and leave the puff pastry layers "visible".
- Divide the rectangle to obtain 6 strips of 1 inch (2,5 cm) wide.
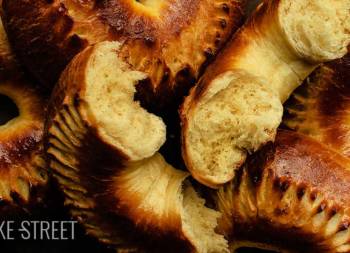
Shape brioches.
- Take 2 strips of dough and place, on a clean work surface, with the flaky side facing upwards.
- Braid as seen in the video.
- Hold one of the ends and roll the other one over it to form a conch shell.
- Place the end of the braid under the bread and put it inside a pan.
- Repeat the process with the rest of the breads.
- Spray with some water, cover with film and let them rise until they double in volume. In my case it was 3 hours 40 minutes to 71,6ºF/21,7ºC.


Bake.
- Preheat the oven to 392ºF/200ºC (convection).
- Brush the breads with beaten egg with salt, avoid painting the layers, just brush the surface.
- Place in the oven at half height and bake 10 minutes.
- After this time we reduced to 355ºF/180ºC and bake 20 minutes more. If the breads acquire a very intense golden brown, we will cover with aluminium foil in the final minutes of baking.
- Remove from the oven, place on a rack and let stand in the pans for 5 minutes.
- Unmould and leave to cool completely.
Prepare raspberry coating.
- Melt Inspiration raspberry Valrhona chocolate until it reaches 113ºC/45°C.
- On the other hand, add the cocoa butter in a saucepan and melt it. Do this over medium low heat and I recommend from time to time.
- Incorporate the melted cocoa butter, little by little, over the raspberry chocolate. Stir with the help of a whisk to homogenize the mixture.
- Let the couverture cool to 95ºF/35ºC.
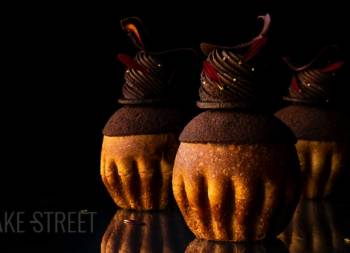
Cover laminated brioches with the raspberry coating.
- Place a rack over a serving dish or bowl and place a sliced brioche on top. Pour the raspberry topping over half of the brioche.
- Let drain for a couple of minutes.
- Decorate with sweet freeze-dried raspberry (Raspberry Crispy) and let the topping harden.

Whip raspberry ganache.
- To whip ganache, it must be very cold.
- Add the ganache in the bowl of a KitchenAid mixer or in a bowl to beat with an electric whisk.
- Whip the ganache at medium speed for 1-2 minutes. We must obtain a creamy texture.
- We should not exceed the beating time since we run the risk of damaging the ganache.
- Transfer into a piping bag with a SF18 Decora star nozzle or any other of your choice.

Finish decorating.
- Sprinkle the other half of the brioche with powdered sugar to prevent it from falling on the raspberry coating, cover with a scraper.
- Pipe some whipped raspberry ganache and decorate with an Inspiration raspberry Valrhona bean.
- Serve.

Notes
Important points to make the dough:
- First important point: Pound cold butter, it will be easier to soft and reshape.
- Second important point: Work with a cold dough.
- Third important point: When you pound butter it turn soft but chill. It will be easily manageable.
- Fourth important point: Butter mustn´t be at room temperature or warm, because it will be absorbed by the dough rather than forming layers.
- The final amount of water to be added to the dough will depend a little on the quality of the proteins in the dough or their absorption capacity. If necessary, we can add 5-10 g more water. The consistency of the dough should be very pleasant to the touch and easy to handle.
- For each gram of dry yeast we will use 3 g of fresh yeast.
- Natural vanilla can be replaced by vanilla extract, but the final flavor and aroma will have nothing to do with it.
- I have used extra dry butter, but when I made the Fujisan bread I used Kerry Gold. Ideally you should use a dry or extra dry butter, but in case you can't find it, that brand of butter works very well. It has a higher melting point than other varieties, so it will allow us to work well with it.
- To work the butter I prefer to do it between two sheets of Teflon, are reusable and is a very clean way of working. But use film or baking paper if you prefer.
- When handling the pieces, be careful not to press them, otherwise you can damage the layers that will lead to the future puff pastry.
- If you don't have round pans of that size, adjust the pans to the pans you have at home or even let them rise without them. No problem.
- Remember that to know that the baking is over, you can prick the inside of a bread with a digital thermometer. If their temperature reaches 190-194ºF (88-90ºC), they'll be ready.
- Using good quality chocolate in the recipe is very important because the final result will have nothing to do with a cake made with low quality chocolates. Both in aromas and in taste and texture.
- It is very important to temper the chocolate well to achieve a good gloss and finish. It also helps the chocolate to unmould well and without any problems. Do not omit this step.
- A poorly tempered chocolate will result in a streaky, grainy, weak, unstable and easily melted finish. Spending a few minutes tempering will make your final product spectacular; shiny, uniform and without streaks or striations, smooth, more resistant to melting and stable.
- To lighten the raspberry coating, we should use cocoa butter, not butter. The reason is that the consistency of the butter can become dense, even with a curdled appearance.
- STORAGE: They are wonderful the same day and the day after baking, but can be kept in perfect condition for 4-5 days in zip bag, undecorated.

If you like to work these doughs like me, give yourself a treat and prepare this Inspiration Raspberry Laminated Brioche. Your breakfast will become a unique and glorious moment, I promise.
I know that when you see the process you may be a bit put off, but if you plan it well and divide it into 2 days, it becomes very bearable. The first day we prepare the dough and the first part of the raspberry ganache. The next day we laminate the dough and finish whipping the ganache. Preparing the coating will take very little time, we just have to wait until we reach the right temperature for both melting and tempering.
And that's all. Decorating is a wonderful creative process that is as enjoyable, or almost as enjoyable, as tasting it. I hope you dare to prepare it and let me know how it went.
I wish you a wonderful weekend!
Lots of love,
Eva