Crazy Cakes from Malaga – Tortas Locas Malagueñas
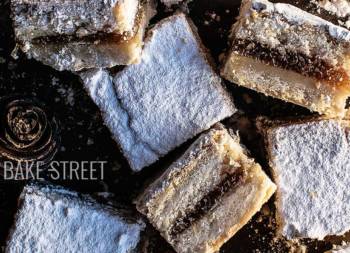
There are combinations that never fail and puff pastry and custard is one of them. The recipe I bring you today is totally crazy…. Maybe that’s where its name comes from? I don’t know if you are lucky enough to know the famous Crazy Cakes from Málaga – Tortas Locas Malagueñas, also known as Loquitas. But in case you are not, I have the honor of bringing you a classic, simple and wonderful sweet that you will not be able to do without from now on.
And it has another element that, for me, makes it irresistible. The yolk topping. I admit that chocolate palmiers amaze me, but yolk palmiers are way above them. They drive me crazy. Well, this incredible elaboration is also part of this sweet treat. Locas malagueñas are made with two puff pastry circles, the base and the top cover. The latter is covered with sweet yolk and a glaze of egg white that allows it to be preserved in perfect condition. The whole, as you may already guess, is a complete and utter delicacy.

Crazy Cakes – Tortas Locas Malagueñas origin.
This cake, of simple appearance and elaborated with some traditional pastry basics, was created in the hands of the Tejeros family, one of the great confectioner families of Malaga.
In the post-war period in Spain, the times of hunger, a woman named Ángeles decided to turn the kitchen of her house located in the hamlet “Camino de los almendrales” into a small bakery. She made buns, fried doughnuts and borrachuelos to sell them in the dairies and old bread bakeries that were in the neighborhoods of Malaga.
José Ruiz, at that time a child, accompanied his mother every day and, over the years, was learning the trade of his mother. The way in which Angeles decided to change his lifestyle to survive in those hard times of life, ended up being one of the most recognized bakers in Malaga.
Eduardo Rubio, player of Club Deportivo Malaga, crosses the path of “Mari Tejeros and Pepe Ruiz”, owners of the famous bakery. They decided to join together with the aim of achieving a goal: to raise the level and quality of sweets.
At that time of scarcity, the pastries available to most Malagueños were very basic and not very elaborate.
Fine pastries were within the reach of only a privileged few, wealthy people, being totally inaccessible to the vast majority.
A good sweet treat was an exclusive luxury for the wealthy classes.
Tejeros family wanted to change this situation and allow everyone to have access to a delicate, tasty and pleasant to eat sweet despite the difficult times. This is how this famous cake was born in Malaga. Two puff pastry pieces, pastry cream filling and an orange icing crowned with half a cherry are the elements that give rise to torta loca. Simple and inexpensive ingredients, including the icing which, although it may seem otherwise, was not egg yolk but a colored sugar icing that was much cheaper (and more colorful).
At the end of the seventies, this sweet reached its maximum popularity in Malaga. But where did they get their name from? With the arrival of the song by Luisa Linares y los Galindos, which caused a sensation at the time: “A lo loco se vive mejor“.
The couple was expanding the staff and managed to gather a group of young pastry chefs whom they trained to become professionals and from there the Obrador de Confitería Tejeros was born.

Making the famous Tortas Locas Malagueñas at home.
To make this famous pastry, we can do it as I show you or simplify the process a bit. I will show you how to make traditional puff pastry, but if you do not want to complicate it too much, you can make a blitz puff pastry (which gives very good results) or use store-bought puff pastry as a much more convenient resource (although it will not be the same …)
Then we will make a pastry cream, very soft and delicate, you will love it! And finally, we will make an egg yolk topping and an egg white glaze. I know that the classic version does not use the sweet egg yolk, although nowadays they are made that way. I will show you the process to make the yolk topping and the egg white glaze which gives much better results than the sugar and water glaze. In fact, it is the same one I use to make the famous Carbayones de Oviedo.
Originally, I think, they didn’t even use a piece of cherry. Instead, a dot was drawn with red icing simulating that it was a piece of candied cherry.
You know how hard it is for me not to give a different touch to what I do…. Hence I decided to make the decoration that I leave you that, personally, I love and I think it goes very well. But this step is always optional and you can adjust it to your tastes or needs.
Recipe Crazy Cakes from Malaga - Tortas Locas Malagueñas
Ingredients for 18-20 pieces
PARA EL HOJALDRE:
- 400 g T45 flour (W=280, more or less)
- 100 g cake flour
- 268 g water
- 10 g salt
- 385 g unsalted butter
PASTRY CREAM:
- 250 g whole milk
- 85 g heavy cream
- 3 large egg yolks
- 55 g sugar
- 30 g cornstarch
- 1 tsp vanilla extract
YOLK COATING:
- 4 large egg yolks
- 120 g sugar
- 100 g water
EGG WHITE COATING:
- 50 g egg white, room temperature
- 100-120 g powdered sugar, sifted
- few drops lemon juice
DECORATION:
- edible carnation petals
- diced candied cherries or whole Maraschino cherries
- edible golden powder coloring
MATERIAL WE WILL NEED:
- metal roller pin
- curled cookie cutters
- medium pot/saucepan
- pastry brush
- piping bag + smooth nozzle 1 cm diameter
Instructions
FIRST DAY (NIGHT BEFORE)
Make the dough for puff pastry.
- In the bowl of the stand mixer add the flour, previously sifted, together with the water and the salt. Knead with the hook at speed 1 and leave until you get an almost developed dough. It will take about 5-7 minutes.
- We must obtain a homogeneous and smooth dough.
- Take the dough out of the bowl, shape a rectangle, wrap very well in film and put it on a tray in the fridge until the next day.
SECOND DAY
Prepare the butter.
- Prepare two teflon sheets and place the butter on one of them. Cover with the other sheet and began to beat it with the aid of a roller to flatten it.
- Flatten making a rectangle, or as much as possible, about 18 x 26 cm (or the width we have given to our dough).
- Place in the fridge covered with teflon or film.
Strecht the dough.
- Take the dough out of the fridge and proceed to stretch it.
- Sprinkle lightly a work surface with flour and we stretch the dough. The measure should not be exact, about 36 x 26 cm.
- Set aside.
Place the butter.
- Place the butter sheet in the center of the dough, so that the width of the butter and the width of the dough are the same.
- Fold the ends of the dough over the butter, bringing each one to the center. Seal the two folds well in the centre and on the sides. The dough must be completely sealed on each side.
Laminate the dough.
- In this step we will have to control very well the dough and the butter temperature, always looking for that both are equal or very similar. Do you remember the important points that I told you about in Kouign Amann? In this case they are identical and also applicable.
- First important point: Pound cold butter, it will be easier to soft and reshape.
- Second important point: Work with a cold dough.
- Third important point: When you pound butter it turn soft but chill. It will be easily manageable.
- Fourth important point: Butter mustn´t be at room temperature or warm, because it will be absorbed by the dough rather than forming layers.
Stretch the dough and make the first single fold.
- Lightly sprinkle the work surface with flour and proceed to stretch the dough. Pass the roll of a single pass, from the center towards the ends, and avoiding insisting in the same place.
- Stretch the dough, we will try to lift this from the work table from time to time to make sure it does not stick to the table (it could damage the final layers making breaks). In case it is necessary to sprinkle a little flour, we will do it without exceeding.
- Make a single fold, take one of the ends to the center and repeat the same process with the other end placing it over the previous one. In the same way as if we closed a triptych.
- Roll gently on the surface to join the folds.
Make a second single fold.
- Lightly sprinkle the work surface with flour and roll out the dough. Exert pressure on it but without exceeding it.
- Fold in the same way as the previous time.
- Cover with film and store in the fridge for 30 minutes or in freezer for20 minutes if it's hot.
Make the third double fold.
- Lightly sprinkle the work surface with flour and proceed to stretch the dough. Exert pressure on it but without exceeding it.
- Take one of the ends to the center and repeat the same process with the other end by placing it next to the previous one, but without superimposing it. Fold the dough in half on itself.
- Roll gently on the surface to join the folds, cover with film and place in the fridge for 30 minutes or in freezer for20 minutes if it's hot.
Make the fourth and last fold.
- Lightly sprinkle the work surface with flour and proceed to stretch the dough. Exert pressure on it but without exceeding it.
- Take one of the ends to the center and repeat the same process with the other end placing it over the previous one. In the same way as if we closed a triptych.
- Stretch the dough a little to form a square. Place it on a perforated tray lined with Teflon and cover it with film.
- Refrigerate for 1 hour.
Do the last stretch.
- Take the dough out of the fridged and proceed to stretch it.
- Sprinkle the work surface lightly with flour and stretch the dough a little. If our work surface is not very wide, once we stretch the dough a little, we can proceed to divide it into two equal parts and finish stretching them. We will give dimensions of 24 x 60 cm approximately to each of them. If we do not divide the dough, we will stretch it to give dimensions of 58 x 120 cm approximately.
Cut puff pastry.
- With the help of a curly cookie cutter, or smooth if you prefer, cut the puff pastry. In my case I have used cutters of different sizes, between 8 and 12 cm in diameter, to obtain more or less large cakes.
- Cut the puff pastry, trying to make a clean cut, and place very carefully on a perforated tray lined with a perforated mat or Teflon sheet.
- Once all the puff pastry has been cut, refrigerate while preheating the oven.
- NOTE: The scraps of dough can be joined and stretched again to form more tortas locas or other elaboration you want; base for pies, puff pastry fruit tarts, puff pastry palmiers ... I advise you to join the scraps and refrigerate the dough for 30 minutes, this will allow the gluten to relax and that the butter does not gain temperature and can reach its melting point.


Bake.
- Preheat the oven to 375ºF/190ºC (minimum 20 minutes before baking).
- Prick the surface of the puff pastry to prevent it from puffing up too much during baking.
- Bake in the oven at a medium height and bake for 20-25 minutes.
- Remove, place on a wire rack and let cool completely.
- Repeat the same process with the rest of the puff pastry pieces.
- NOTE: The puff pastry baked a day in advance, has much better results since we allow it to dry well. If possible, bake it the day before filling the tortas locas. We can keep it at room temperature and in a dry place, it is very important that there is no humidity.
Prepare pastry cream.
- In a medium saucepan or large skillet pour the milk along with the cream and vanilla. Place over medium heat and let it come to a gentle boil.
- Meanwhile, in a large bowl, whisk the egg yolks with the sugar and the cornstarch, previously sifted, until completely homogenized.
- Once the milk has come to the boil, pour a little of it over the yolk mixture.
Beat quickly with the whisks to temper the yolks and prevent the yolks from curdling into lumps. - Add the rest of the milk little by little and mixing very well each time.
- Pour the mixture back into the saucepan and place over medium-low heat, stirring constantly. You will notice that the texture will become denser, but it will take a while. Patience.
- Once the cream has a creamy texture, as shown in the video, remove from heat.
- Pour into a tray / tupper / bowl (the larger the better because it will cool faster).
- Cover with cling film touching the surface to prevent it from drying, and let it cool completely.

Prepare yolk coating.
- In a saucepan add the sugar along with the water.
- Place at low heat, in a range of 1-5 I put it at value 2, and leave without stirring until it reaches 233ºF/112º C.
- Meanwhile, beat the yolks in a heat-resistant bowl.
- Once the syrup is ready, pour it over the yolks in a fine continuous thread and mix.
- We must do it this way to prevent the yolks from curdling.
- Transfer the mixture again to the saucepan and place at low heat, in my case position 2.
- Mix constantly until the mixture thickens, in this point it will reach 221º-230ºF/105º-110ºC.
- Remove from the heat and continue stirring for a few seconds.
- Let it rest for 2 minutes before covering puff pastry circles.
Cover the upper puff pastry discs with the yolk.
- With the help of a pastry brush, cover the upper puff pastry discs (that is, half of the puff pastry discs that have been baked) with the egg yolk topping.
- We will do it until we reach the edge of the puff pastry. Do not worry if as you brush the pastry the finish is not smooth, the yolk topping will set by itself.
- In this step, we can place a small piece of candied cherry in the center of the circle.
- Let dry for 30-40 minutes before covering with the final glaze.
Prepare egg white coating.
- Sift the icing sugar.
- Add lemon juice, a few drops, along with the egg whites. In my case I added first 30 g and then 20 g. The reason was to observe the final consistency until I got the one I was looking for.
- Mix very well until completely homogenized.
- With the help of a spoon, place the egg white coating on the yolk pieces. Drain the excess and place on a wire rack.
- Once they are all covered, let them dry until the glaze has hardened completely.
Fill and decorate tortas locas malagueñas.
- Before using the pastry cream to pipe, whisk to soften the consistency.
- Put it in a piping bag with a smooth nozzle and proceed to fill the cakes.
- Pipe the pastry cream on a puff pastry circle. Cover with the piece decorated with egg yolk and press gently.
- Repeat the same process with the rest of the pieces.
- If we wish, we can decorate the top of the cakes. In my case, I sprinkled some edible golden powder coloring and decorated with a carnation petal and Maraschino cherry.
- Serve.

Notes
- Work with the cold ingredients and respect the rest times.
- Butter brings a lot of flavor, I recommend you to use a good one quality.
- When you manipulate the pieces, be careful not to press them, otherwise you can spoil the layers that will give rise to the future puff pastry.
- Puff pastry, if well done, grows a lot during baking. If the pieces are very thin or have many folds, it is easy for them to lose their shape while being baked.
- If you prefer to make an easier puff pastry, you can always opt for this quick/blitz puff pastry.
- Preheat the oven well to ensure that the cooking is carried out correctly.
- This time I decided to make the custard I made for the Flan Pâtissier, but if you wish, you can make the traditional custard (recipe at this link).
- Do not forget to temper the yolks to prevent them from curdling and forming lumps. This cream is softer in texture and much more delicate, but it also takes a little longer to set.
- Be patient when you are making the pastry cream, it takes a while to curdle and acquire consistency. Don't be tempted to increase the heat because you run the risk that some part of the base will burn and transfer the taste to the cream.
- You must let the yolk coating dry before proceeding to cover them with egg white glaze.
- And you should let the egg white glaze dry before placing them in the paper capsules.
- If you don't want to coating with egg whites, you can do it with water and icing sugar. But the final result is not the same, you lose the crunchy texture.
- The decoration is totally optional and you can adjust it to your taste.
- They can be kept refrigerated for 2-3 days.


I know you will fall in love with these Crazy Cakes from Malaga - Tortas Locas Malagueñas, in fact I think it is impossible not to fall in love with them. It is a sweet unpretentious, classic, simple and with an appearance that borders on simplicity, but almost touching the fine line of delicacy.
It is one of those pastries that should be enjoyed bite by bite, letting pieces fall and smearing our hands with cream.
As usual, I hope you are encouraged to make them at home, tell me about your experience and let me know what you think of them. I wish you a wonderful Sunday!
Lots of love,
Eva
Sources: Málaga en el corazón