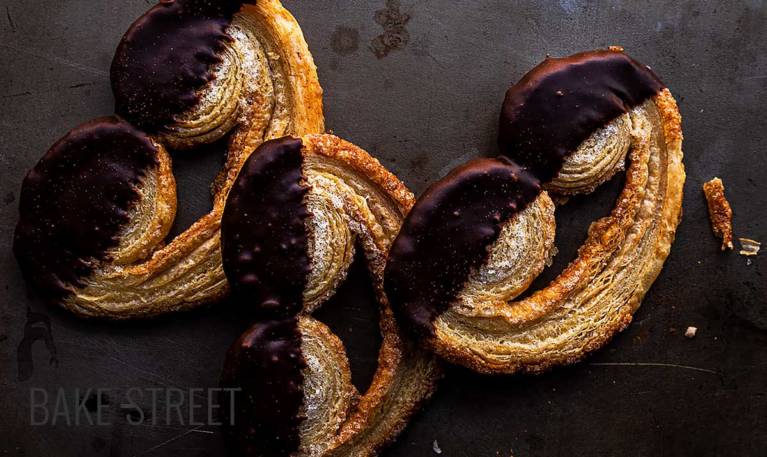
How to make puff pastry palmiers with chocolate fondant
If there is one sweet that has been part of our childhood, I would certainly say it is chocolate puff pastry palmiers. It was one of those sweets your parents used to buy you, sometimes, when you were out of school. I have the memory of taking a huge chocolate palmier (maybe I was too small), with both hands of course, held with a couple of paper napkins (those that were very hard with a drawing around the blue edge and that didn’t clean anything). How much happiness contained between two little hands! That’s why today I want to show you how to make puff pastry palmiers with fondant chocolate.
There are sweets that will never go out of fashion and will never stop tasting amazing. That is the case with croissants, brioches, palmiers… It’s impossible for a pastry like this not to attract our attention. But, of course, if we stop to think; puff pastry + chocolate… Let’s see, how crazy someone says no to this! In time I discovered the yolk toppinge and they became my favorite. I’ll leave these to you some other time.

Puff pastry palmier origin.
As I told you in the post of Puff pastry tart with fruits, the origin of the puff pastry is not very clear and it is a bit confusing since there are several stories and legends that make it difficult to locate the real authorship.
We can know that puff pastry or the process of stretching and rolling doughs was already done many years ago by the Arabs. Many of their sweets are made with very thin doughs and hydrated with fat to favour their lamination or creation of layers. In Egypt, a type of dough brushed with oil instead of butter was prepared, which was made known to the Greek and Italian population.
The origin of the recipe for the palmiers is not documented so it is not known who its creator was. But it is believed that the elaboration was invented in France at the beginning of the 20th century known as “Palmier“. It is believed that this candy received that name because of its resemblance to the palm leaf. Although there are many other theories about the name, such as its similarity to an open hand palm.
We can also find it under the name of ears, glasses (ulleres in Catalan), elephant ear cookies, shoe soles, French hearts…
An unleavened puff pastry is used to make them. The process for making the puff pastry is the same as we would use for making croissants, for example. Only we don’t need to leave the puff pastry to rise once we have shaped the palmiers. They can be decorated with chocolate, yolk, sprinkled with sugar… Nowadays it is very common to find other types of fillings very varied and original. Both sweet and salty.
How to make puff pastry palmiers with chocolate fondant.
Making puff pastry at home is a very simple process, but it requires a lot of patience. We must respect the whole process and control the temperature to prevent the butter from reaching its melting point. In this post I detail everything you must take into account to make a good puff pastry at home; flour, water, butter … I also explain you why this kind of puff pastry doesn’t need yeast and, even so, it grows during baking.

I also explain you how the lamination is carried out, why we have to make the folds, how many are recommended to make and possible problems that can arise during the baking.
It may be that making a puff pastry of this type is very laborious and you prefer to do something simpler. In that case, you can make a quick/blitz puff pastry, like this one I left in the Carbayones from Oviedo, instead. It gives very good results too, although they will not be as good as with the puff pastry I leave you in the recipe. And the last option is to buy it store-bought… It works well too, but it doesn’t look the same.
This is the second recipe for laminated puff pastry that I leave you in the blog. The first one was the one for the puff pastry tarts, but I wanted to try to make a puff pastry without sugar and observe the results for future elaborations. I like both results very much. This one can also be used for salty preparations. Another point that I have changed is the order of the folds; this time I made two singles, one double and one single. On the first occasion I made a double and three singles.

Chocolate topping…
I mean, I can’t say this topping is the same as fondant doughnuts. It’s like saying we’ve managed to make the formula for Coca-Cola at home, no, this wouldn’t happen under any circumstances. We can achieve something similar, but not the same (these secret formulas that have us hooked… Although I must say that I’m not a big fan from Coca-Cola!)
It’s true that it looks a lot like it! The texture, appearance, the final taste… I don’t know, I’d rather you tried it and told me what you thought. But I’m in love with it.

As simple as melting chocolate and mixing it with a mixture of icing sugar and water. It is also very common to mix the chocolate with a syrup to cover the palmiers. You can also do it if you wish. In my case I have chosen a 70% chocolate because the sugar will bring enough sweetness. If we use a milk chocolate it is still too cloying.
As you can see in the post, I’ve also decided to make a different version both in shape and decoration. Do the same, let your imagination do its job.
And, once done, enjoy them. But enjoy them a lot! Close your eyes and go back to being those kids leaving school with the palmier in their hands.
Ingredients for 24 pieces
FOR PUFF PASTRY:
- 400 g bread flour W=300
- 100 g pastry/cake flour
- 268 g water
- 10 g salt
- 385 g unsalted butter
FOR CHOCOLATE FONDANT:
- 150 g black chocolate 70%
- 200 g icing sugar
- 80 g water
DECORATING:
- 2 Tbsp orange jam + 1-2 tsp water
- chopped almonds
- sprinkles
- cocoa powder
- gold leaf
Instructions
FIRST DAY (NIGHT BEFORE)
Make the dough for puff pastry.
- In the bowl of the stand mixer add the flour, previously sifted, together with the water and the salt. Knead with the hook at speed 1 and leave until you get an almost developed dough. It will take about 5-7 minutes.
- We must obtain a homogeneous and smooth dough.
- Take the dough out of the bowl, shape a rectangle, wrap very well in film and put it on a tray in the fridge until the next day.
SECOND DAY
Prepare the butter.
- Prepare two teflon sheets and place the butter on one of them. Cover with the other sheet and began to beat it with the aid of a roller to flatten it.
- Flatten making a rectangle, or as much as possible, about 7 x 10,2 inches / 18 x 26 cm (or the width we have given to our dough).
- Place in the fridge covered with teflon or film.
Strecht the dough.
- Take the dough out of the fridge and proceed to stretch it.
- Sprinkle lightly a work surface with flour and we stretch the dough. The measure should not be exact, about 14,1 x 10,2 inches/36 x 26 cm.
- Set aside.
Place the butter.
- Place the butter sheet in the center of the dough, so that the width of the butter and the width of the dough are the same.
- Fold the ends of the dough over the butter, bringing each one to the center. Seal the two folds well in the centre and on the sides. The dough must be completely sealed on each side.
Laminate the dough.
- In this step we will have to control very well the dough and the butter temperature, always looking for that both are equal or very similar. Do you remember the important points that I told you about in Kouign amann? In this case they are identical and also applicable.
- First important point: Pound cold butter, it will be easier to soft and reshape.
- Second important point: Work with a cold dough.
- Third important point: When you pound butter it turn soft but chill. It will be easily manageable.
- Fourth important point: Butter mustn´t be at room temperature or warm, because it will be absorbed by the dough rather than forming layers.
Stretch the dough and make the first single fold.
- Lightly sprinkle the work surface with flour and proceed to stretch the dough. Pass the roll of a single pass, from the center towards the ends, and avoiding insisting in the same place.
- we stretch the dough, we will try to lift this from the work table from time to time to make sure it does not stick to the table (it could damage the final layers making breaks). In case it is necessary to sprinkle a little flour, we will do it without exceeding.
- Make a single fold, take one of the ends to the center and repeat the same process with the other end placing it over the previous one. In the same way as if we closed a triptych.
- Roll gently on the surface to join the folds.
Make a second single fold.
- Lightly sprinkle the work surface with flour and roll out the dough. Exert pressure on it but without exceeding it.
- Fold in the same way as the previous time.
- Cover with film and store in the freezer for 20 minutes.
Make the third double fold.
- Lightly sprinkle the work surface with flour and proceed to stretch the dough. Exert pressure on it but without exceeding it.
- Take one of the ends to the center and repeat the same process with the other end by placing it next to the previous one, but without superimposing it. Fold the dough in half on itself.
- Roll gently on the surface to join the folds, cover with film and take the cold for 20 minutes.
Make the fourth and last fold.
- Lightly sprinkle the work surface with flour and proceed to stretch the dough. Exert pressure on it but without exceeding it.
- Using a knife or pizza cutter, cut a thin thread from the sidess. This way we equate the dough sides. Take one of the ends to the center and repeat the same process with the other end placing it over the previous one. In the same way as if we closed a triptych.
- Stretch the dough a little to form a square. Place it on a perforated tray lined with Teflon and cover it with film.
- Refrigerate for 1 hour.
Do the last stretch.
- Take the dough out of the fridged and proceed to stretch it.
- Sprinkle the work surface lightly with flour and stretch the dough a little.
- Clean the work surface and generously sprinkle with sugar.
- Place the dough on the sugar and roll it out with a rolling pin. The dough should measure about 19,6 x 12,6 inches / 50 x 32 cm.
- Once our dough is stretched, sprinkle a little more sugar.
- Fold the ends inwards, making folds of about 2 inches/5 cm. We must fold the dough, not roll it up. Each time we make a fold, tighten it slightly.
- We will make 4 folds. Once we have made the four folds, we must have a hole in the center so that we can fold one over another.
- Press lightly, place on a perforated tray, cover with film and refrigerate for 2 hours.
Cut the palmiers.
- With the help of a sharp knife, cut pieces with a thickness of approximately 0,4-0,6 inch/1-1.5 cm.
- Place on a perforated tray lined with baking paper. We must try to leave enough space between each palmiers because the puff pastry grows a lot during baking.

- The pieces that we are not going to bake right away, we will keep them refrigerated until the moment they are cooked.
- In the video I show you a couple of ways to form the palmiers.


Bake.
- Preheat oven to 374ºF/190ºC (at least 20 minutes before baking).
- Place in the middle of the oven and bake for 15 minutes.
- Take it out, place it on a rack and let them cool completely.
- Repeat the same process with the rest of pieces.
Make chocolate fondant.
- In a bowl mix the icing sugar and water. Make sure it dissolves well.
- Melt the chocolate, we can do it in a bain-marie or in small batches in the microwave.
- Pour the chocolate into the sugar mixture and mix until a homogeneous mixture is obtained.
Cover the palmiers.
- To cover the palmiers we can do it the way we like. In my case I have chosen to cover only the top part.
- Let them drain a little before placing it on a tray.
- If we wish, we can decorate them with chopped almonds, sprinkles, cocoa powder... In the video I leave you a suggestion, in case you want to do something different.
- Let the chocolate coating solidify. The texture is not crunchy, it's like fondant chocolate, soft.
- Serve.

Notes
- Work with the cold ingredients and respect the rest times.
- Butter brings a lot of flavor, I recommend you to use a good one quality.
- When you manipulate the pieces, be careful not to press them, otherwise you can spoil the layers that will give rise to the future puff pastry.
- It is important to fold the dough when forming the puff pastry for the palmiers, not to roll it up.
- Puff pastry, if well done, grows a lot during baking. If the pieces are very thin or have many folds, it is easy for them to lose their shape while being baked.
- If you prefer to make an easier puff pastry, you can always opt for this quick/blitz puff pastry.
- Preheat the oven well to ensure that the cooking is carried out correctly.
- The decoration is totally optional and you can adjust it to your tastes.
- The fondant chocolate, once we have it prepared, does not take long to start solidifying. Try to do it just when you are going to cover the palmiers.
- The amount of chocolate we need to cover them, will depend on the thickness of the chocolate when we bathe the palms. And if you decide to bathe them all or leave some with sugar.
- We can keep the in an airtight-container for 4-5 days.


Any day is a good day to get up the courage to eat a good chocolate palmier. So, in case you feel like it this weekend, I leave you How to make puff pastry palmiers with chocolate fondant. These cold days are perfect for making puff pastry because it is much easier for us to control the temperature and work in a cool environment.
But that's not all! A weekend where you can have a breakfast of your own made palmiers... That, that's priceless!
In my case I leave you with a medium size palmier. I would have liked to make them much bigger, but I think I would have had to make more puff pastry to get some big palms with the right thickness. For the next time ;)
I wish you a wonderful weekend!
Big hugs,
Eva