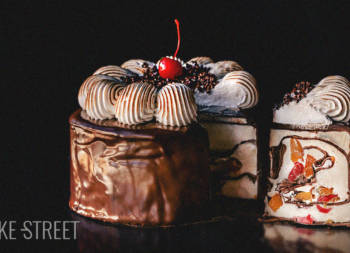
Jelly Roll Cream Cake
tooI must tell you that lately I’m in my element… I love nothing more than recreating retro or vintage elaborations, especially those from the 50s and 60s. I feel very identified with this era and style. After the incredible Pineapple Upside Down Cheesecake, I leave you with this beautiful cake known as Jelly Roll Cream Cake. You could say that it is a cream and cherry cake. But it is much more than that.
Those of you who know me, will know well that the style of this cake was what fascinated me at first. Even without knowing what it was made of or how to make it, I knew I was going to do it. Those sides of sponge cake rolled with a spiral of jam… Fantasy. The filling, the decoration, each and every detail that comprises this cake, made me fall in love with it.
How I discovered the Jelly Roll Cream Cake.
Thanks to Pinterest, as in many other occasions. As soon as you show a minimum of interest in any subject, in my case specific recipes, I keep getting suggestions of dishes that I think I will like. And, for the most part, that’s the way it is..
I fell in love completely.

The cake is part of a cookbook called “Carnation Cook Book” by Mary Blake (if you click on this link, you can see it in the third image of the carousel). I will tell you that, as a curious fact, I spent a long time looking for information about this supposed gastronomic writer, Mary Blake, without finding anything.
I found it very strange that there was nothing on the internet about her and even more so having written so many cookbooks. There are many cookbooks published to surprise your husband, set up festive tables and make the best and most elaborate desserts. Ok, searching a lot I came to a website where it is specified that the Carnation Company, created a pseudonym under the name of Mary Blake.
You can imagine my face, right? Wow, what a disappointment. In my head I had already created the image of this woman who wanted to help women, goddesses and ladies of their homes, to be the best hostesses of their houses, seeking to create unique moments around a table.
But no, I found that Mary Blake was a fictitious characterused by the Carnation Company to promote its evaporated milk product through its published recipe books. All that glitters is not always gold.
The picture on the books featured an image of the supposed writer and chef Mary Blake. “She” was the author of all Carnation cookbooks from 1923 onwards and thus played a vital role in the company’s advertising campaigns.
100 Glorified Recipes was initially published in 1922; an earlier edition entitled 100 Tested Recipes was not attributed to Blake, but was later revised with different recipes and Blake was listed as the author under the name 100 Favorite Recipes. In the 1930s, 100 Glorified Recipes was published with more new recipes and Blake’s name attached to the compilation. This chain of revisions and the initial date of the book’s creation explain why many of the recipes in the book contain expensive and hard-to-get ingredients in the early years of the Great Depression.
Eventually the Carnation Company was purchased by Nestlé.

Evaporated milk, the protagonist of her recipe books.
As you might expect, these cookbooks used evaporated milk in all of their recipes. Absolutely in each and every one of them. This led me to investigate a little more on the subject. Not only because, evidently, they were recipes created by this company, but also because I assumed that there must be a reason behind all this.
The Great Depression of the 1930s hit Canada hard, which depended on agricultural products and the export of raw materials to sustain its economy. Poor economic conditions significantly disrupted the lives of many families due to rising unemployment rates, forcing many women to seek work to supplement family income. At the same time, prices of goods increased and many foods became less affordable.
This meant that during the Great Depression, the demand for foods that provided nutrients became a concern for families. Among some of these, milk came to be considered an indispensable product during the 1930s, especially for feeding young children.
During this time, many dishes and foods were rather bland.
The addition of milk to make creamy sauces, puddings, dressings and desserts was very common.
Unregulated prices caused disparities between local producers and large corporations. The so-called “milk wars” consumed the early years of the Great Depression in Ontario, as milk prices fell dramatically, forcing dairy farmers into financial ruin. In addition, large companies and mass producers dominated the market, forcing small dairies, along with local producers, to lower the price of their products in order to be competitive.
This caused small producers to barely cover their costs. In 1934 the Dairy Control Board was created to regulate prices. These regulations, which were meant to be helpful to small farmers, brought about price inflations. The result was destructive for the unemployed and male-headed families who were forced to work in low-wage factories during the 1930s.

To supplement the demand for whole milk, evaporated milk was considered a suitable substitute.
There were debates about sanitary conditions and the need for a healthy dairy product. Many Canadians spoke in favor of pasteurization of dairy products, while others complained about losing the freedom to choose which products they bought. Evaporated milk came to be seen as a safe option for families when milk prices were rocketing or supplies were limited.
100 Glorified Recipes offered that evaporated milk could be just as nutritious as whole milk because nothing was extracted from the milk except water to make the product, and therefore there was no loss of nutrients.
The evaporated milk industry boomed in the early 20th century, specifically during World War I when soldiers relied on canned and packaged foods to survive on the front lines. Evaporated milk became very popular in Canada and the United States, and continued to be popular during the Great Depression. Large numbers of Canadian farmers relied on evaporated milk, since in some communities the supply of fresh milk was insufficient.
In urban centers, canned milk was also relied upon, especially during the winter months when milk production was greatly reduced. Although fresh milk was desired, families often kept cans of evaporated milk in the pantry for use in times of shortage.
In the 1920s, many households in North America embraced the use of canned foods.
Because they were easy to transport and facilitated activities such as picnicking or camping. Thus, by the time of the Great Depression, families had grown accustomed to relying on packaged foods rather than limiting themselves to fresh, local produce.
100 Glorified Recipes showcases evaporated milk as a great culinary resource, as it could be adapted for use in a multitude of recipes. In addition, evaporated milk could be substituted for milk in any recipe. It only had to be diluted with the same amount of water.
Evaporated milk played an essential role in the economy of the Great Depression, providing families with a healthy food source that could be stored and used as needed, while making it easy to prepare tasty recipes.

Adapting the recipe Jelly Roll Cream Cake.
When I saw how it was carried out, it was clear to me that I was not going to follow the recipe as detailed. I had my doubts about how it would turn out. But, of course, I did keep its essence in order to be as faithful as possible to the recipe.
In the recipe booklet they refer to the evaporated milk as “Condensed Milk”, or at least that is what I assumed at first. It seemed to me to be a very large amount of sugar since condensed milk, at least as we know it today, is made with a high sugar content. I later learned that they meant evaporated milk.
In any case, the elaboration process details using evaporated milk that we must dilute with water, thus obtaining milk. In my case I show you how to make it with whole milk, but know that it can be made with evaporated milk if you wish.
To make the cake roll, since the recipe book I had specified see page 47 (and I don’t have it, hahaha) I used my Swiss Roll recipe that I have left many times and it works great. The filling of the cake is based on the one detailed in the recipe, but I have modified a few things.
The pastry cream I use is not the one specified in the book, I preferred to use my own which never fails and I really like the creamy texture obtained. This does not imply at all that the one in the book is not good, which I am sure it is. I adjusted the amount of gelatin to the amount of total liquids to obtain a smooth but firm texture. I did not want the result to be a hard block, because it would not be pleasant to eat no matter how nice it was…. And I reduced too the total amount of sugar quite a bit and decorated with a mascarpone cream instead of whipped cream.
Final result.
A cake that, in spite of being simple in elements, is very good. The texture is very similar to a mousse, with a custard and vanilla flavor. The moistness of the sponge cake with jam is the ideal point to combine with the softness of the filling. I must say that I thought I would not like the pieces of candied cherries…. But I was quite surprised. In short, I can say that it is a vintage cake that you will love for sure 😉
Jelly Roll Cream Cake recipe
Ingredients for a 18 cm diameter mold (10 servings)
SWISS ROLL:
Recipe by Guai Shu Shu
Egg yolk mixture:
- 4 large egg yolks
- 60 g whole milk, room temperature
- 45 g sunflower oil
- 85 g cake flour
- 3 g baking powder
- pinch of salt
Egg white mixture:
- 4 large egg whites
- 85 g sugar
Filling:
- cherry/berry/strawberry jam
CREAM MOUSSE FILLING:
- 250 g whole milk
- 60 g heavy cream
- 2 large yolks + 2 large egg whites, separated
- 55 g sugar + 30 g sugar, separated
- 20 g cornstarch
- 3 gelatin sheets
- 2 tsp natural vanilla extract
- 15 candied cherries, chopped
FOR DECORATING:
- mascarpone cream (100 g heavy cream + 100 g mascarpone cheese + 30 g powdered sugar)
- candied cherries
- powdered sugar
- mint leaves
MATERIAL WE WILL NEED AND SHOWN IN THE VIDEO:
- rectangular tray 25 x 38 x 2'5 cm (for baking the cake)
- round mold, 18 cm diameter + acetate sheet
- cooling rack
- digital kitchen scale
- saucepan, mine is from DeBuyer*
- bowls
- whisk
- silicone spatula
- pastry spatula
- laddle, this is mine from DeBuyer*
- ceramic container Emile Henry* (where I keep pastry cream)
- bol de la KitchenAid*
- pastry bag + Wilton 6B nozzle
- precision tweezers*, optional
- rotating cake stand (optional)
*You have a 5% discount on the website Claudia&Julia using this code BAKESTREET. Delivers throughout Europe.
Instructions
FIRST DAY
Prepare yolk mixture for the sponge cake.
- Pour sunflower oil to a frying pan and place over medium heat. Let it heat up, but do not let it smoke.
- Once it has reached this point, add the flour and mix with a wooden spoon. Stir until both ingredients are fully integrated, resulting in a dense, crumbly, blond-coloured dough.
- Pour into a glass bowl and leave to cool completely.
- Once it has cooled, add the flour mixture into a large bowl. Pour in the milk and mix with a whisk.
- Incorporate the egg yolks and mix again, to achieve a smoother texture.
- Add the pinch of salt together with the baking powder and the vanilla, mix again until homogenised.
- Set aside.
Prepare meringue for the sponge cake.
- Line a 25 x 38 x 2.5 cm rectangular baking tray with baking paper and set aside.
- In the bowl of the KitchenAid, add the egg whites and begin to whip.
- Once they start to foam, add 1/3 of the total sugar. Start increasing the speed progressively until you reach medium-high speed.
- Add the rest of the sugar in two more batches.
- Whip the egg whites until soft peaks are achieved, we are not looking for stiff peaks. You can see the consistency in the video.
Mix the egg yolk mixture with the meringue.
- Start adding the meringue, in batches and with gentle, enveloping movements. In my case I have used a whisk, it is very easy for both mixtures to integrate well if we work the dough gently and without stirring harD.
Pour into the mould and bake.
- Preheat the oven to 355ºF/180ºC with heat up and down. Remember to preheat it before starting to make the sponge cake.
- Pour the mixture into the baking tray and smooth the surface with a spatula or scraper.
- Place in the oven at medium heat and bake for 15 minutes.
- Remove from the oven, unmould and leave to cool on a wire rack.
Prepare sponge cake to roll.
- Carefully remove the baking paper.
- Cut off the longer ends to obtain a clean cut.
- Spread the surface with cherry, berries or strawberry jam. At our choice.
- Carefully roll it up on itself. Once it is rolled, stretch the paper, as I show you in the video, to adjust it well.
- Cover with plastic wrap and refrigerate for 2-3 hours or until the next day.
SECOND DAY
Prepare the mold to assemble the cake.
- Place baking paper or a cake disc on the base of the mold to facilitate the unmolding process.
- Cover the sides with acetate. If we do not have it, we can use baking paper or Teflon instead. If we use acetate, I advise you to grease the inside very lightly with a little olive oil. Set aside.
Cut the roll and assemble in the mold.
- Remove the sponge cake from the refrigerator.
- Cut the ends to start the cake roll with perfect and well-balanced cuts of filling. The ends always have a little less filling.
- Cut slices about 1 cm thick.
- Line the sides of the mold with slices of the sponge cake that we have cut. We will try to adjust them as well as possible.
- Cover the entire base of the mold with slices of sponge cake. There will be some holes due to the rounded shape of the slices. Cut small portions of the excess slices and fill these holes to cover the base as well as possible.
- Once this part is assembled, cover with plastic wrap to prevent the cake from drying out and proceed to prepare the filling.
Prepare pastry cream.
- Hydrate the gelatine 20 minutes before use. Place in a bowl and cover with very cold water, from the refrigerator. Set aside.
- Pour the milk, cream and vanilla in a medium saucepan. Place over medium heat and let it reach a soft boil.
- Meanwhile, in a large bowl, beat egg yolks with the sugar (55 g) and cornstarch, previously sifted, until completely homogenized.
- Once the milk has come to the boil, pour a little of it over the yolk mixture.
- Whisk quickly with the whisks to temper the yolks and prevent the yolks from curdling into lumps.
- Add the rest of the milk little by little and mixing very well each time.
- Pour the mixture back into the saucepan and place over medium-low heat, stirring constantly. You will notice that the texture will become thicker, but it will take a while. Patience.
- Once the cream has a creamy texture, as shown in the video, remove from the heat.
- Add the gelatin, previously drained, and stir with the whisk until completely integrated.
- Pour into a tray/tupper/bowl (the larger the better because it will cool faster).
- Cover with cling film to prevent it from setting, and let it cool completely at room temperature.
Whip egg whites.
- Once pastry cream has cooled completely, whip the egg whites to make a French meringue.
- Start beating at medium speed, once they start to foam, add 1/3 of the sugar (total 30 g).
- Wait a few seconds and add another part. Repeat the same process until all the sugar is added.
- Whip at medium-high speed until the meringue is firm, but not extremely whipped. This would leave a very dry meringue and, therefore, porous.
Integrate meringue with pastry cream.
- With the help of a whisk, beat the pastry cream to soften the texture.
- Pour into a large bowl and begin to integrate the French meringue. We will do it little by little, mixing with the whisk with enveloping movements to integrate both elements. We will obtain a pastry cream mousse.
- Finally, add the chopped candied cherries (previously drained) and mix with gentle movements to distribute them evenly.
Fill the mold and let stand.
- Pour the filling into the mold, using a ladle. Fill almost to the edge of the sponge cakes.
- Smooth the surface, as far as possible.
- Cover with plastic wrap and refrigerate until the next day.
THIRD DAY
Prepare mascarpone cream.
- The cream must be at least 24 hours in the cold.
- The bowl in which we whip the cream must be cold. I recommend using an aluminum bowl and placing it in the freezer for 20 minutes before whipping the cream.
- Pour the cream together with the mascarpone in the cold bowl and begin to whip with the whisk on speed 1.
- Once it begins to firm up, add the sugar little by little and without stopping beating. Increase the speed gradually, but never reach the maximum speed. The ideal is a medium speed.
- We will beat until we obtain a full-bodied cream. But be careful not to overbeat it or we will make butter...
- Transfer into a piping bag with the chosen nozzle, refrigerate until the time to decorate the cake.
Decora the the cake
- Unmold the cake and place on a rotating cake stand.
- Pipe mascarpone cream on the surface of the cake. In my case I leave you a suggestion of presentation, but of course, you can always carry out the one you prefer.
- Sprinkle with powdered sugar on the edges of the cake. I advise you to do this just before serving because, due to the humidity of the cake, the sugar disappears quite quickly.
- Finish decorating with candied cherries and some mint leaves.
- Serve.


Notes
- The process, in my case, I divided it in 3 days. But it can be done in 2 days without problems.
- If we do not have a baking sheet with the dimensions that I detail, we can pipe the batter on a tray to shape it and bake it. In this post you can see how to do it.
- The sponge cake is very elastic, so it is not necessary to roll it while hot to prevent it from cracking.
- Do not omit the step of cooking the flour with the oil, thanks to this process we obtain a sponge cake of these characteristics.
- The creator of the recipe advises to give a few superficial and longitudinal cuts on the top and at the beginning of the side that we are going to roll to prevent it from cracking. In my case I did not do it and the result was very good, but you can do it if you wish.
- If we exceed the baking time in the oven, we run the risk of drying out the cake. This will not only affect the texture, but will also result in a dry product that will crack easily when rolled.
- The size of the tray or the thickness of the cake, if it is rolled out, will directly influence the final baking time of the cake.
- Do not forget to temper the yolks to prevent them from curdling and forming lumps.
- Be patient when you are making pastry cream, it takes a little while to set and gain consistency. Do not be tempted to increase the heat because you run the risk of burning some part of the base and passing the flavor to the cream.
- When we have to integrate meringue with cream, I advise you to do it with a manual whisk. The result is exceptional, as long as it is done with smooth and enveloping movements. Much better than working it with a silicone spatula.
- In my case I used a mascarpone cream, but you can use whipped cream or Chantilly (whipped cream with vanilla).
- The filling of the cake can be a jam of your choice. Ideally it goes very well with cherry jam or berries, but you can vary it with strawberries, blueberries.... Even if we modify the type of fruit, we can adjust the jam to the cake. Apricot, peach, grapes...
- The decoration can be totally to your liking. In my case I have left you this option based on the original creation.
- It can be kept for 3-4 days refrigerated and in an airtight container. It does not last longer because we add uncooked egg white. If we wish, we can make an Italian meringue instead of French meringue, which could extend the shelf life further. Although in this case, it would not be that way either since the pastry cream should be consumed in 2-4 days maximum.

I can only encourage you to prepare these recipes that, without a doubt, have their charm. This Jelly Roll Cream Cake - Cream and Cherry Cake is not complicated to make, although it is true that it requires several steps.
In my case, for convenience, I made it in 3 days, but it can be done in 2 without any problem. There are certain times that we need to comply with so that the cake settles and acquires the right consistency. The original format suggests the use of Marraschino cherries, which I replaced with candied cherries. In case you don't like them, they can be replaced with peaches in syrup or any other variety of candied fruit that you like better.
I hope to hear from you soon and that you tell me how you did with it!
I wish you a wonderful Sunday.
Lots of love,
Eva
Sources: What Canada Eat
This post contains affiliated links.