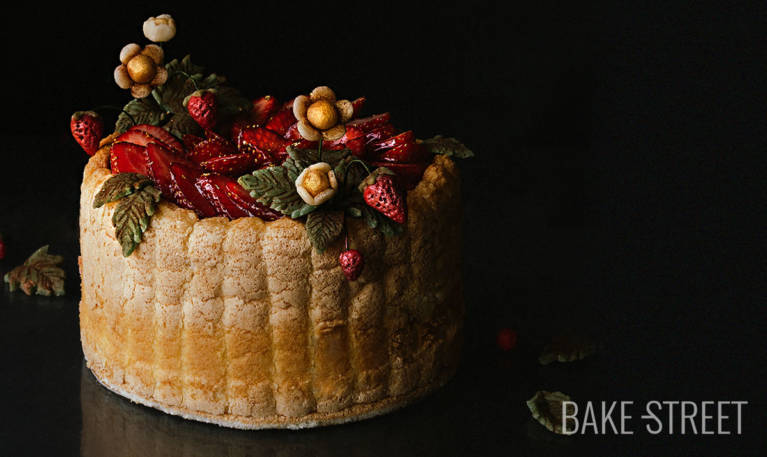
Charlotte aux fraises – Strawberry Mousse Charlotte
I have been wanting to prepare a Charlotte aux fraisesor Strawberry Mousse Charlotte for years. It is one of those elaborations, classic and traditional, that has always caught my attention, but for some reason it has been delayed in time. This year I was very clear that, when strawberries were in full season, I was going to prepare it.
Curiously, I have never really liked strawberries in sweet preparations. I do like them plain, with whipped cream, or in a milkshake. But it has taken me years to enjoy them in sweet recipes. I know it may seem strange, but they have never been one of my favorite options. Now, I guess it’s the passage of time added to the wisdom of the years, I like them. And I enjoy them, very much.
In fact, I could never understand why people liked strawberry ice cream. I think that apart from Frigopie(which was not one of my favorites either, I was more into Copa Brasil or Twister Choc), I have never ordered a strawberry ice cream in my life. When I was little and went to the school lunchroom, when May came, they used to give us ice cream from time to time. I used to pray that I wouldn’t get one with strawberry…. For me it was the horror, hahaha.
Or the strawberry Petit Suisse… Why? where does this dessert come from? what was the “enjoyable” purpose? Because I couldn’t find it anywhere.
But now, I have to eat my words…. I like strawberries, I like strawberry desserts, and I like strawberry-filled life in general. Except petit suisse.
For that reason, today, I bring you a recipe that I have not only enjoyed making, but also tasting. I think it is the strawberry recipe that I have enjoyed the most in years. And I hope you enjoy it as much as I have.
To make this Strawberry Mousse Charlota, we will have to make “Biscuit à la cuillere” sponge cake, strawberry mousse and marzipan. The latter is optional, since it is part of the decoration, but if you like to model and surprise, I recommend you to go for this process as well.

Biscuit à la cuillere.
You may be wondering what a biscuit à la cuillere is, it doesn’t sound like what it really is, our soletilla biscuits. As you may have guessed, they are of French origin.
This elaboration was created in the 18th century by Marie-Antoine Carême, one of the main bases of tiramisu or les charlottes. These cookies are slightly dry on the outside and soft on the inside, elongated in shape and sprinkled with powdered sugar just before baking. Thanks to this step, we achieve a thin crunchy layer on the surface with a crust-like appearance.
They are very similar to boudoircookies, but these are drier and sprinkled with granulated sugar.
It is said that, although Carême invented them, some sources point to the cooks of Catherine de Medici. It seems that they were the ones who had the idea of arranging the batter of these cookies with a spoon to be able to shape and spread it, in order not to damage its texture. This is how they got their name.
Other sources mention that they were invented at the end of the 15th century at the court of the Duke of Savoy. It seems that they were created for the visit of the King of France. Later, Charles Maurice de Talleyrand, Napoleon’s Minister of Foreign Affairs, asked Antonin Carême to lengthen the biscuits so that they could be placed in his Madeira glass and soaked.
In Italy they are called Savoiardi biscuits.
Charlotte origin.
As in many other elaborations, the origin of Charlotte has different versions.
On the one hand, it is said that the name of this preparation could be associated with the feminine name “Charlotte”, which means “free person” or “warrior”. On the other hand, some gourmet specialists claim that the name of this preparation comes from the English word “charlyt”, which means a elaboration made with beaten eggs, sugar and milk. These assumptions were made based on English recipes from the 15th century and later.
Most sources suggest that the origin of this French sweet treat come from the famous English pudding. The first English pudding was a cold dessert, not requiring cooking, consisting of layers of moistened bread interspersed with chopped fruit.
In the 18th century, the wife of King George III of Great Britain and Ireland, Charlotte of Mecklenburg-Streilz was the patron saint of apple growers. It is said that it was she who created the formulation for the famous Charlotte’s apple. She based it on the charlotte recipe and, arguably, improved it.
The old-fashioned fruit charlotte was made in a buttered mold, covered with slices of bread and filled with apple compote or apple jam flavored with lemon and cinnamon. It was then baked and usually served warm with cream on top.
Carême modified this concept, replacing the bread with sponge cakes and the apple compote with a bavarois cream. Its preparation was served cold, unlike the original. He called it charlotte à la parisienne or charlotte parisienne, after the name of Princess Charlotte Augusta of Wales, only daughter of King George IV.
It was Carême himself who later renamed it charlotte à la russe or charlotte russe, when he was in the service of Tsar Alexander I of Russia, something that suggests that the dessert may have been renamed in honor of Tsarina Charlotte of Prussia, wife of Nicholas I of Russia. It seems that at that time, there was a great influence of Russian nobility in Paris.
In the late 19th and early 20th centuries, there were many German bakeries in Russia that made this dessert from leftover bread and pastries, such as brioches. The Russians said that the wives of Germans would do anything to save money, including making cakes from crackers.

In the past, Charlota was an elaboration for wealthy people.
As we already know, refrigeration systems did not exist until a few years ago. Much less was it something within the reach of every household. So at that time, only rich people could afford to make it at home and enjoy it. Since ice was required to make it, an element considered a luxury at that time.
Charlota was made in a specific mold and covered with ice. It was a dessert that had to be consumed at the moment, since the ice would only last a few hours and could not be kept refrigerated afterwards.
In the 20th century, the first metal cabinets for storing ice arrived on the market. This fact allowed a reinterpretation of the famous dessert.
Like all elaborations, over time it has been changing and evolving, until today we can enjoy Charlotas of all kinds; with Bavarian cream, compotes, fruit, strawberry mousse, coffee, chocolate… A wide range of wonderful combinations.
Other mousses that can work very well in the charlotte are: coffee mousse, goat cheese mousse, lemon mousse… Or even a lemon soufflée.
For my part I leave you this version of strawberry mousse charlota that, I hope, you like and encourage you to prepare at home.
Recipe Charlotte aux fraises
SPONGE CAKE, BISCUIT À LA CUILLERE:
- 3 egg whites (105 g)
- 70 g sugar
- 3 large egg yolks
- 50 g cake flour
- 25 g cornstarch
- 55 g powdered sugar
- pinch of salt
STRAWBERRY MOUSSE:
- 400 g strawberry, cleaned + 40 g sugar (in my case, I always flavor the sugar with vanilla pods)
- 11 g gelatin (sheet or powder)
- Italian meringue: 38 g egg white+ 75 g sugar + 25 g water
- 320 g heavy cream (very cold) + 18 g powdered sugar
MARZIPAN:
- green marzipan: 125 g ground almond + 2,5 g honey+ 8 g water + green food coloring paste "Holy Green" - We will use unsweetened cocoa powder for brushing
- red marzipan: 60 g ground almond + 1 g honey+ 4 g water + red food coloring paste "Extra Red" - We will use metallic ruby powder colorant for brushing.
- white marzipan: 60 g ground almond + 1 g honey+ 4 g water - We will use metallic gold powder colorant for brushing
TOP DECORATION:
- 8-10 strawberries
- Gloss for brushing: 75 g water+ 15 g sugar+ 2 g gelatin
- gold leaf (optional)
MATERIAL WE WILL NEED:
- KitchenAid or stand mixer
- bowls
- silicone spatulas
- rolling pin
- smooth nozzle 1 cm in diameter + piping bag
- perforated baking tray
- silpat
- knife
- kitchen scale
- saucepan
- fine-mesh sieve
- digital kitchen thermometer
- turmix or hand blender
- whisk
- pastry brush
- large bowl
- leaf and flower cutters with ejector
- wires for pastry flowers
- coloring brush
- push-pan mold (or similar) 15 cm diameter x 8 cm high
- 15 cm cake base
- acetate strips + adhesive tape
- modeling tools (optional)
Elaboración
FIRST DAY
Prepare marzipan.
- Dissolve a little green paste coloring in the water. Set aside.
- In a large bowl, mix the ground almonds with the powdered sugar, honey and water.
- Start mixing the ingredients with the help of a silicone spatula. Once it begins to acquire a more solid consistency, start working with your hands.
- Knead the mixture very well until a uniform, smooth and manageable consistency is achieved.
- Form a cylinder, wrap it well in plastic wrap and let it rest in the refrigerator for 24 hours.
- Repeat the same process for the red and white marzipan.
- NOTE: In my Princess Semla recipe you can watch the video of how to make it.
SECOND DAY
Prepare, Biscuit à la cuillere.
- In the bowl of the KitchenAid, add the egg yolks and 70 g of sugar.
- Gradually increase the speed until you reach medium-high speed. The yolks should increase in volume and become whitish.
- Once they are whipped, add a pinch of salt along with the flour and cornstarch, previously sifted. We will do it in batches and waiting until the first part has been integrated into the mixture before adding more.
- Do not over mix, just mix until the dry ingredients are perfectly integrated.
- Whip the egg whites with the powdered sugar. We must obtain a firm meringue, but not dry. That is, we must not over whip the egg whites or the texture will become very porous.
- Begin to integrate the meringue into the egg yolk mixture. We will do it in batches, we will not add more until the first part of meringue has been perfectly integrated.
- We must incorporate the meringue with smooth and enveloping movements, never beating or stirring.
Bake sponge cakes.
- Prepare two strips of baking paper approximately 8 x 22 cm. This size fits my 15 cm diameter push-pan. The strips should have the same height as the mold. Place on a silpat, this on a perforated baking sheet and set aside.
- Preheat the oven to 355ºF/180ºC with heat up and down.
- Transfer the sponge cake mixture in a piping bag with a 1 cm smooth nozzle.
- Pipe the batter for the sides. To do this we will create fingers or vertical strips on the strips of baking paper. Ideally, they should protrude a little of the size of the strip to be able to cut the base later and adjust it to the mold in a clean way. It is not necessary to pipe the two whole strips, I show you in the video.
- Sprinkle powdered sugar over the surface of the biscuits.
- Place in the oven at medium heat and bake for 12-14 minutes.
- Remove and place on a wire rack.
- Pipe two discs of 15 cm in diameter that will go in the base and half of the Charlota. As a guide, you can use the cake base by placing it under the baking paper.
- Sprinkle with powdered sugar and bake for 12-14 minutes.
- Remove and place on a wire rack.
Place the sponge cake in the mold.
- Place an anti-slip on the base of the mold and, on top of it, a cake base.
- Line the sides with acetate, fasten the joint with adhesive tape. These strips favor a clean and perfect unmolding. In addition to preventing the cake from sticking to the sides of the mold with moisture and spoil when unmolded.
- With the help of a cake base of the same diameter as the mold, cut the excess of the cake discs. This will ensure clean and even edges.
- Insert a disc of sponge cake into the base, adjust well.
- Before placing the sponge cakes on the sides, cut the base to even it out. In my case, before lining the mold with the acetate, I used the strips to guide me and adjust the width. I recommend that they be a little higher than the mold so that the biscuits protrude slightly.
- Place inside the mold. We will have to adjust the length of these by testing and placing the cake. Do not cut the right size, leave between 1 or 1.5 cm longer to adjust the strips of cake inside the mold and prevent them from being loose.
- Cover with cling film and set aside while you prepare the strawberry mousse.
Prepare strawberry purée.
- Wash the strawberries, remove the stem and cut into pieces.
- Put them in a saucepan with the sugar.
- Place over medium heat and cook for 7-8 minutes. They should release juices, the texture should be slightly soft, not too much.
- Remove from heat and grind with the turmix or hand blender.
- Pass the mixture through a fine mesh sieve. In this way we will remove the "seeds" along with the more solid parts, giving our mousse a very silky texture. Patience, it is a somewhat laborious process.
- Set aside.
Prepare the strawberry mousse.
- Hydrate the gelatin in very cold water for 20 minutes.
- Heat the strawberry puree until it reaches 113ºF/45ºC.
- Add the gelatin, well drained, and mix with a whisk until it is completely integrated. Set aside.
- Prepare an Italian meringue. In a saucepan add 25 g of water together with 75 g of sugar.
- Place over medium heat and let it reach 244,4ºF/118ºC.
- In the meantime, half whip the egg whites.
- Once the syrup is ready, pour over the semi whipped egg whites in a thin, continuous thread while mixing at the lowest speed.
- Once all the syrup is incorporated, gradually increase the speed without reaching the maximum speed. We must obtain a soft peaks meringue. Set aside.
- Whip the cream with the 18 g of powdered sugar.
- Pour the strawberry puree into a large bowl. Add the whipped cream and the Italian meringue alternately, waiting to incorporate completely before adding more.
- To incorporate it, we can use a silicone spatula or a whisk. In my case I prefer the second option, we will do it with smooth movements, not beating or mixing vigorously.
Fill the mold with the strawberry mousse.
- With the help of a ladle, add the strawberry mousse inside the mold lined with the sponge cake. Try to fill it approximately halfway.
- Place the second disc of sponge cake on top of the mousse and adjust well to avoid air or holes.
- Finish filling the mold with the strawberry mousse. Smooth the surface.
- I placed a second strip of acetate to hold the part of the cake that protrudes from the mold and thus keep the same shape. I should have placed this wider strip from the beginning.
- Cover with plastic wrap and refrigerate until the next day.
- NOTE: We will have some strawberry mousse left over, pour inside a glass, cover with film and refrigerate. We can enjoy it as a dessert with a little whipped cream on top or chopped strawberries :)
THIRD DAY
Modelling the marzipan pieces.
- Before working with the marzipan, we must temper for 2-3 hours beforehand so that it has a manageable consistency.
- Cut a piece of green marzipan, cover the rest with cling film to prevent it from drying out.
- Sprinkle some cornstarch on a silpat and roll out the green marzipan with a rolling pin.
- We will create leaves with cutters with ejector of different sizes. If we wish, we can texturize the edges creating cuts and giving shape.
- Place them on a mold to dry with shape and a sense of movement.
- To create the strawberries, we will use the red marzipan. We will shape strawberries of different sizes. Texture the surface of these to create a more realistic effect.
- We will create the stems with green marzipan and small flower cutters. Place them on the strawberries and adjust.
Finally, create the flowers on the strawberries with the white marzipan. We will use a flower-shaped cutter. Shape a small ball to create the central part, the pistil. - If desired, we can color the strawberries with ruby metallic powder coloring, the pistil of the flowers with golden metallic coloring and the surface of the leaves with unsweetened cocoa powder.
- Let dry for 2 hours at room temperature.
- NOTE: Both the strawberries and the flowers can be pierced with edible flower wire to simulate the stems. In this way we also favor to be able to place them on the cake without problems and in a simple way.
Prepare the strawberries for top decoration.
- Wash the strawberries very well, dry and remove the stems.
- Laminate the strawberries vertically.
- Unmold the cake and remove the acetate.
- Arrange the strawberries on the surface of the mousse. In my case I leave this zig zag presentation, but you can choose another if you wish.
- Refrigerate while preparing the gloss.
Prepare the gloss for the cake.
- Hydrate the gelatin in very cold water for 20 minutes.
- In a saucepan, add the water and sugar, place over medium-high heat and bring to a boil. Reduce heat to low and cook for 3 minutes.
- Remove from the heat and let it reduce to 113ºF/45ºC.
- Add the gelatin, previously drained, to the sugar-water mixture and mix well until dissolved.
- Let it stand at room temperature until it acquires some texture and consistency. When it looks like a syrup (it will take about 12-15 minutes), we can proceed to brush the surface of the cake, strawberries.
Decorate the cake.
- With the help of a pastry brush, brush the strawberries with the gloss.
- Decorate the cake with the marzipan pieces.
- Sprinkle a little gold leaf on top of the strawberries.
- Serve.


Notes
- I used a mold of 15 cm diameter x 8 cm high. The quantities that I leave you would also work for a mold of 18 cm in diameter.
- When making the cake, we have to whip well both the egg yolks and the egg whites since the sponginess of this cake, since it does not have leavening agent, will come from these two elements. We must also be careful not to overmix in order to prevent the sponge cake dough from becoming too liquefied and difficult to pipe.
- Powdered sugar sprinkled on top of the biscuits creates a thin crunchy layer very characteristic of this type of biscuit.
- It is not necessary to use syrup or syrup on the cake. With the rest and the humidity of the mousse, the result is extremely tender.
- Although it is a laborious process, I advise you to strain the strawberry puree to make the mousse. This way we avoid finding the "seeds" inside and we obtain a very silky texture.
- If you wish, you can give more color intensity to the mousse by using a pinch of pink food coloring.
- If you do not have acetate, I advise you to line the mold with baking paper or plastic wrap. The sponge cake acquires a very tender texture and we can spoil it when unmolding it.
- I used homemade marzipan. It is very rich in flavor and with a perfect texture. But, if you prefer, you can buy it ready made.
- The gloss I show you is not the original pastry gloss, but it gives very good results. It also helps to preserve the freshness of the strawberries, preventing them from oxidizing or aging.
- The decoration of the cake is completely optional.
- We can keep it refrigerated in perfect condition for 3-4 days. When you cut it, if you do not consume it whole, I advise you to cover it well with plastic wrap to prevent it from drying out. In addition to acquiring possible odors or flavors from other ingredients in the refrigerator.
Undoubtedly, Charlotte aux fraises or Strawberry Mousse Charlota is a dessert that you must try before the end of the strawberry season. Besides, we can leave prepared in advance and it will make us look like kings.
It is very versatile. In case you do not like strawberries, it can be made with another fruit following the same process that I leave you, only varying the fruit itself. Be careful, there are some fruits such as pineapple that do not allow the gelatin to do its job.
And, if you dare to make even marzipan fruits, you will make me happy! Please don't forget to share it with me!
I wish you a wonderful weekend!
Lots of love,
Eva
Sources: Gastropedia, Zenger,Site2read