Red Velvet and goat cheese mousse cake
I’m still in love with cakes. There are seasons in which I usually feel like doing a lot of some kind of preparation and most of my time, or as much as I can, I usually dedicate it to it. But this time something similar to my relationship with bread is happening to me. I feel like making cakes all the time, exploring new decorating techniques, fillings, coverings… And that’s where I am. So you’re going to have cakes for a long time. Today I’m going to leave you a Red Velvet and Goat Cheese Mousse Cake.
The Red Velvet cake is, without a doubt, one of my favourites. It has an incredible taste, texture, juiciness. But it’s also true that it’s one of the least I usually do… Although this is not surprising either since I always try new recipes and, normally, I repeat the one that is more versatile and allows me to combine it better with different fillings.

Red Velvet and Goat Cheese Mousse Cake
This summer I had time to think and make cakes in a more relaxed way than the rest of the year. Looking at one of my bedside books, “Baking and Pastry”, I found a filling that I immediately loved. A goat cheese mousse.
As soon as I read it, I knew it would be the perfect filling to accompany the Red Velvet cake I wanted to make. Also, I was sure that the result in terms of flavor was going to be very different and surprising.
When I make a layered cake, I usually like to combine different fillings, but they follow the same line. It was clear to me that the middle part was going to be a goat cheese mousse and that the other filling, which would be part of the top and bottom layer, would have to have the cheese as an ingredient.
That’s when I remembered the cream I made for the raspberry, strawberry and almond cream tart. It is a type of filling super simple and quick to prepare with a fantastic result; mascarpone cheese, cream and raspberry jam. It already had all the elements that would form part of the inside.

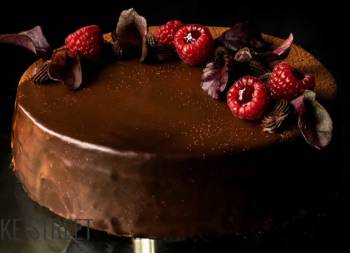
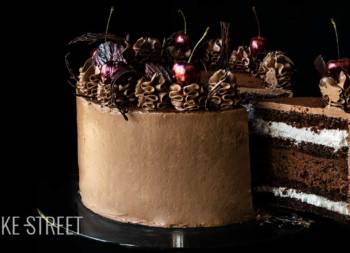
Decorating the cake.
I know all the latest cakes I’m making have one thing in common and that’s the Swiss Meringue Butter Cream (SMBC). I’m trying new coatings so I can leave you more variety at this point in the making. But it is also true that it is a cream that allows you to work very well with it, to give a smooth finish, without forgetting how well it behaves at different temperatures. That’s why I use it a lot.
On this occasion I have used a SMBC flavored with vanilla because I do not want to detract from the flavors of the filling and cake.
We will give an outer layer that covers the whole cake and another in the base flavored with chocolate. It will be a very small strip that will serve to highlight this area along with the rest of the decoration.

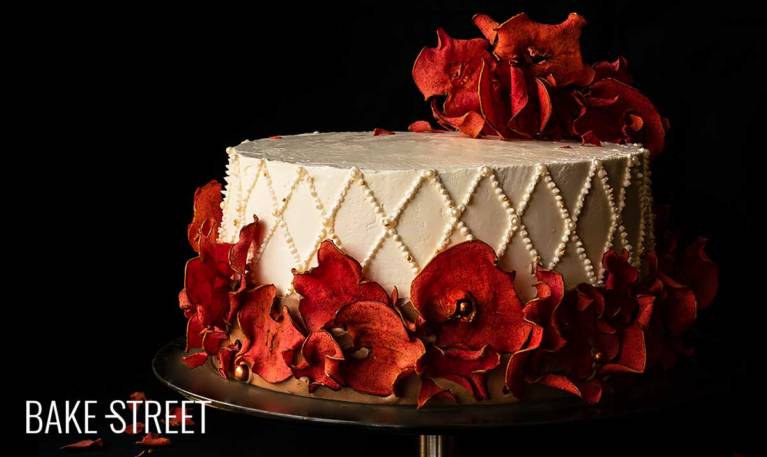
Making apple rose petals.
I like to decorate cakes with dried/dehydrated fruit. In fact, you will remember the pineapple and coconut cake that I left you recently or the banoffee pie, among others that you can find in the blog. I like very much to use them to decorate, not only for the result they leave us (super elegant) but also because it is a more natural option.
On this occasion I wanted to simulate rose petals, so I thought of dehydrating the apple and dyeing it. The result was quite successful, almost as I had it in my head. We know that we always imagined everything infinitely better, but I was quite happy with the results.
To make them what we will do is laminate the apple with a very fine cut (I recommend you use a mandolin), dehydrate them, dye them red in this case and dehydrate again until they are completely dry. But don’t worry, I’ll tell you everything in the making 😉
Ingredientes for a 8 inch cake
FOR RED VELVET SPONGE CAKE:
- 420 g pastry/cake flour
- 380 g sugar
- 143 g unsalted butter at room temperature
- 3 large eggs
- 300 g buttermilk or 300 g whole milk + a dash of lemon juice
- 25 g unsweetened cocoa powder
- 6 g baking powder
- 1 tsp vanilla extract
- 12 g "Extra Red" food coloring paste
- 1 tsp salt
- 1 tsp vinegar (6 g) + 1 tsp bicarbonate (5 g)
FOR GOAT CHEESE MOUSSE:
- 200 g cream cheese
- 65 g goat cheese
- 4 y 1/2 gelatin sheets (9 g) + 90 g warm water 131ºF/55ºC
- 3 large egg whites
- 250 g heavy cream
- 150 g sugar, divided in 2 parts
FOR MASCARPONE AND RASPBERRY CREAM:
- 180 g mascarpone cheese
- 180 g heavy cream
- 100 g raspberry jam, homemade or good quality store-bought
FOR VANILLA SMBC:
- 150 g egg whites
- 285 g sugar
- 375 g unsalted butter at room temperature
- 1 tsp vanilla extract
FOR CHOCOLATE SMBC:
- 250 g vanilla SMBC
- 60 g black chocolate 70%, melted and cooled
FOR APPLE ROSE PETALS:
- 2 firm apples, in my casi I used Fuji variety
- 300 g water + 1 tsp "Extra Red" food coloring paste
FOR DECORATING:
- pearled, gold and copper sprinkles to your choice
Instructions
FIRST DAY
Make Red Velvet sponge cake.
- Prepare the Push-Pan mould, grease with butter, sprinkle with flour and remove the excess. Set aside.
- Preheat the oven to 345ºF/175ºC.
- In a medium bowl, sift the flour together with the baking powder, salt and cocoa powder. Set aside.
- Make the buttermilk. In a glass pour 300 g of milk together with 1 and 1/2 tablespoons of freshly squeezed lemon juice. Let stand for 10 minutes without stirring.
- In the Kitchen Aid bowl incorporate the butter together with the sugar, mix at speed 1 with the help of the flat beater until a smooth and homogeneous mixture is obtained. It will take about 3 minutes.
- Add the eggs one by one and mix well after each addition until they are completely integrated.
- Incorporate the food coloring red paste and mix until the batter has a homogeneous color. Depending on the colorant that you use, after mixing, you will be able to evaluate if adding more quantity in case it is necessary.
- Add the vanilla and mix again for a few seconds.
- We begin to integrate the dry ingredients alternating them with the liquid ingredients. This process is carried out in 3 batches starting with the dry ingredients and ending with them as well.
- We must not overbeat the mixture, this is very important to obtain a spongy result, we will mix only until the ingredients are integrated.
- In a glass mix the baking soda together with the vinegar, you will observe that it will begin to bubble immediately. Quickly add this mixture to the batter and mix for a few seconds.

- Pour the batter into the Push-Pan mould, tap gently on a work surface (on a kitchen cloth) to avoid bubbles inside and encourage the batter to settle.
- Put it in the oven, in the second position starting at the bottom, for 75 minutes or until it comes out completely clean when you prick it with a toothpick.
- Take it out of the oven and let it rest for 10 minutes in the mould. After this time, remove from the mould and let it cool upside down completely on a rack.

Make apple rose petals.
- Wash and dry 2 Fuji apples.
- With the help of a mandolin and using the finest cut, laminate both.
- Place the apple slices on the trays and turn on the dehydrator.
- Place at 158ºF/70ºC and leave for 24 hours. The final time will depend on the thickness of the slices and the drying capacity of our dehydrator.
- Once they are dry, dye them.
- Add water in a bowl together with the food coloring paste. Mix until completely dissolved.
- Immerse the apple slices in the dyed water. We won't put too many at once.
- Leave them submerged for about 30-40 seconds.
- Pull out with a pair of tweezers and place on kitchen paper.
- Repeat the process with the rest of the apple slices.
- Place again in the dehydrator at 158ºF/70ºC and leave until they have dried completely. It will take about 4-5 hours.
- Once they are completely dry, we can store them in an airtight container or a large glass jar, Fido type.
SECOND DAY
Make vanilla Swiss Meringue Buttercream.
- In a heat-resistant bowl, add the egg whites along with the sugar.
- Place on a water-bath at medium low heat. Stirring constantly, leave until the egg whites reach 165ºF/74ºC. For it we will help ourselves of a digital thermometer.
- Remove from the heat, pour the egg whites into the bowl of the KitchenAid or a stand mixer and whip at medium high speed until a firm and shiny meringue is obtained.
- Once we have the firm meringue, begin to add the butter cut into squares little by little and at the same time the mixer continues whipping.
- Once we have all the butter added, increase the speed and finish whipping.
- Stop, scrap the cream with the help of a spatula and add the vanilla extract.
- Whip again at high speed until the ingredients are completely integrated.
- Cover with film and s aside.
Make mascarpone & raspberry cream.
- In a metallic bowl, previously cooled in the freezer, add the mascarpone together with the raspberry jam.
- Beat until a smooth and homogeneous mixture is obtained.
- Pour the cream, very cold, and beat again. You will observe that the cream will begin to acquire consistency and volume. This is due to the fact that the cream will be whipped, so be careful not to exceed the whipping time so that we will get butter.
- Refrigerate for 30 minutes before placing it on the cake.
Make whipped cream for the mousse.
- Before we get ready to whip the cream we must make sure of two things:
- Cream must be cold 24 hours before used it.
- The bowl in which we are going to make whipped cream must be cold. I recommend to use one aluminium bowl and freeze 20 minutes before beat it.
- If you want to know how to make whipped cream, you can do it in this video.
- Pour heavy cream into freeze bowl and beat with an electric mixer into low speed.
- Once cream is becoming to form stiff peaks, add sugar little by little stirring the whole time. Increase speed gradually but without reaches high one. Ideally use medium speed.
- Before finish to beat the cream, add vanilla extract along and beat until get a perfect whipping cream. Be sure not to over-beat, otherwise cream will become lumpy and butter-like.
- Cover with plastic wrap and chill until used it.
Whip egg whites for the mousse.
- Start whipping the egg whites with electric whisk at the lowest speed. As soon as they start to foam we will add the sugar little by little and whipping at the same time.
- Once we have all the sugar incorporated, we will continue whipping until obtaining an almost firm meringue. We don't want it to be too firm and dry.
- Set aside.
Make goat cheese mousse.
- Fill a bowl with very cold water and put the gelatin sheets inside. Let it hydrate for 15-20 minutes.
- In a large bowl add the cream cheese, at room temperature, along with the chopped goat cheese. Soften with a silicone spatula.
- Drain the gelatine and put it in warm water (131ºF/55ºC).
- Dissolve with a spoon.
- Pour over the cheese mixture and mix well until homogenized.
- Add a small quantity of whipped cream and begin to integrate with the help of a silicone spatula. We will do it with soft and enveloping movements, without stirring the mixture.
- Once it is integrated, add another small amount of whipped cream and repeat the same process. We will do this step in several batches and will not add more until the last one is completely integrated.
- Repeat the same process with meringue.
- Set aside.
Assemble the cake.
- With the help of a cake cutter, cut the sponge cake in 4 equal parts. Remove the upper part, which will be slightly curved, and from here we cut the layers. I recommend you to leave this step done before making the mousse because it will start to curdle in the bowl.
- Place some SMBC into a piping bag with smooth tip.
- Place an anti-slip disk on the base of the Push-Pan mould 8 inch/20 cm to fix the cake disc.
- Put the disc and a small amount of SMBC on it, this will help us fix the cake.
- Place a sheet of acetate inside the mould. This will help us to remove the cake in a cleaner way.
- Place one of the sponge cakes and press lightly.
- Soak with some syrup. I only soak this one because I like the base to be very juicy and moist. The sponge cake is juicy enough on its own and doesn't need to be soaked when assembling it.
- Put half of the raspberry cream and mascarpone. Smooth lightly.
- Place another sponge cake and press lightly.
- Pour the mousse and smooth.
- Place another layer of sponge cake.
- Put the other half of raspberry cream and mascarpone, smooth lightly.
- Place the last layer of sponge cake and press carefully.
- Cover the surface with film and refrigerate for a minimum of 4 hours or, if you wish, until the next day. I recommend this last step.
THIRD DAY
Cover the outside of the cake with SMBC.
- Unmould the cake and remove the acetate carefully. Place it on a cake stand.
- Spread the SMBC with a spatula over the entire surface and remove the excess with the help of an edge smoother. This layer will help us to "pick up" possible crumbs from the cake that could come to the surface when we decorate it.
- Be very careful when you arrange the SMBC by the layers of mousse. We must do so with care not to remove part of it and that it integrates with the cream.
- Refrigerate for 30 minutes for the SMBC to harden.
- Remove from the cold, place another layer of SBMC, smoothed removing the excess.
- Refrigerate for 10 minutes.
- Make inclined lines parallel in both directions. Our purpose is to create a grid pattern.
- Put SMBC in a piping bag with a smooth tip JEM nº2 .
- Pipe small dots on the lines that we have created. Be patient, it will take a while.
- Place pearly sprinkles in the joints of the lines and some gold in a random way.
- Refrigerate for 30 minutes.
Make chocolate SMBC.
- In a heat-resistant bowl, we add 70% dark chocolate. Place in a bain-marie and leave until it completely melts, stirring from time to time.
- Remove from heat and set aside.
- We will need, more or less, 250 g of vanilla SMBC.
- Pour the chocolate, we will do it in a fine continuous thread while the mixer is mixing at the slowest speed.
- Beat again at high speed until the ingredients are fully integrated.
Decorate the cake with chocolate SMBC.
- Put a thicker layer of chocolate SMBC on the bottom of the cake. There should be a relief that protrudes from the central part that we already have decorated. We must create depth. Do not worry if it is irregular in height, it is just that which makes it more beautiful and natural. Real things aren't perfect, that's where the real beauty lies.
- Smooth the SMBC of the base.
- Refrigerate for 30 minutes.
Decorate with apple rose petals.
- Place the petals at the base of the cake. We will place some stuck to the cream and others "nailed". In my case I decorated the whole base and I went up by a side until arriving at the upper part. Do it the way you like.
- Decorate with some copper sprinkles, if you wish it.
- Refrigerate for 1 hour or until we are going to consume it.
- Remember that the SMBC is best when we leave for a while at room temperature.

Notes
- I used a Push-Pan 8 inch/20 cm, but this quantity is valid for moulds with a diameter of 9 inch/23 cm.
- The baking time of the sponge cake will vary depending on the size of the mould you use.
- If we refrigerate the sponge cake overnight, we help the flavors ripen as well as facilitating the process of cutting the sponge cake. It crumbles less.
- Follow all the steps to get a good SMBC.
- If we have SMBC leftovers, we can refrigerate it for 2 days or freeze it for 30 days.
- Decoration can be totally to your choice, in my case I have chosen this option that I hope you like.
- Be sure to dehydrate the apple well to prevent it from being damaged by possible moisture when stored in an airtight container.
- To preserve the cake we must keep it refrigerated for 3-4 days.
- The ideal thing before consuming it is to temper it during a while, it will depend on the external temperature.
- As the days go by, the apple slices will soften because they will absorb moisture. The day with the best texture is the first.


This Red Velvet and Goat Cheese Mousse Cake is an ideal choice for all lovers of Red Velvet and cheese. The result is a cake with a very tender, smooth and juicy texture.
The sponge does not need an addition of syrup, removing the base where I decided to pour it because I like it wet. The crumb is very delicate and juicy by itself, really this time you will not need to add anything to keep it well with the passage of days.
The central filling made with goat cheese mousse. The texture is very creamy and airy, much more than other mousses I have left you in cake fillings. In fact, if you cut a very fine piece, it will be hard for you to stand up because of its smoother consistency.
The whole, without a doubt, is a success. I encourage you to try it and tell me what you think.
I wish you a wonderful weekend! See you on Monday :)
Big hugs,
Eva