Baron Cake – Baron Torta
Today I bring you a cake that I fell in love with as soon as I saw it… It joined two things that I love, chocolate and raspberry, in addition to its name that is very powerful. Baron Cake or Baron Torta, don’t tell me why it reminds me of “The Godfather”, and I think that was one more reason why I fell in love with it. Besides, I can’t resist a pretty name, I think it seduces and captivates as much as an image. And that’s what happened to me with this cake. It captivated me.
I have to say that the decoration is not at all like the traditional one or the one you will find in cakes if you look for this name in Google, Pinterest… But you already know that I can’t contain myself to give a personal touch to each elaboration that I prepare. That way I end up creating a connection with everything that comes out of my hands.
I’m sorry, I’m so rude… I arrived so suddenly without asking how was Easter. We have rested, disconnected and done things that we wanted to do, but the work did not allow us. I hope you have enjoyed some fantastic days 😀
Now, we continue.

Baron Torta.
I’ve been looking for what no one knows about this cake and I’m really sorry I don’t have anything to tell you about it. I have found many Croatian, Serbian, Russian websites… with this recipe, but nothing about its origin or information about it. And when these things happen to me, it’s like I’m missing something.
So if any of you know something about its origin, history, tradition… Know that I will be eternally grateful to you for everything you can send me.
In all those recipes that I have consulted (and translated with my wonderful Google Translate), that I assure you have been many, all of them kept the same ingredients and processes to carry it out. They varied small details in the decoration, some different quantity in the ingredients, but the process was faithful in each and every one of them.
The cake consists of 3-4 layers of sponge cake, generally fine although I have seen some with thicker sponge cakes, made with egg whites, sugar, cocoa powder and ground almond or flour. Here I have found two varieties and, in my case, I chose to make it with ground almonds. I preferred to give it a nutty touch to provide juiciness, flavor and try to make a gluten-free cake.

Filling…
Oh, the filling, this is another world’s thing. I gave it the name I thought it should have, because the translations the translator gave me were frightening (mostly, belt). So I decided to call it yolk and chocolate cream. First, because of the two main ingredients with which it is made and, second, because of its texture. Spectacular.
Here I have to admit that you have to be patient. The filling is not complicated, but it does require time and love to carry it out. To make it we will need yolks, sugar, cocoa powder, dark chocolate, cream and butter.

First we will cook the yolks together with the sugar, then we will add the cocoa powder, the cream and the chocolate. Let it rest and cool, and then beat it with the butter. The texture may remind us of an SMBC, but the taste and texture is like eating silk brought from the clouds. Wonderful indeed.
I must point out that it is not a filling that works well in high temperatures, so you should always work with it trying to be cold. When the temperature goes down, you will notice its consistency. Just put it in the fridge for a few minutes will be enough.
The fruity touch.
Chocolate combines very well with many things, but if we join it with a fruit like raspberries, we get a guaranteed success. Part of the filling consists of thin layers of raspberry jam.
In the recipes I have found they make raspberry jam which can certainly be a wonderful option. In my case, you will forgive me, I have used a store-bought jam to speed up part of the process. Yes, I can say that it is of very good quality, but this time it is not homemade.
I also decided to use raspberries filled with raspberry jam to decorate the top.

Finishing the cake.
The most of the cakes I’ve seen, to finish it, they make a ganache to cover the top of the cake and then decorate it to their liking. In my case, I found the option left by Provereni Recepti in her blog much more elegant. In fact, my cake is adapted from hers. The sponge cake is faithful to her recipe, but in the filling I made some changes in ingredients and quantities.
The icing I used to cover the cake is the same as the one I left in the Sachertorte. When I was making the cake I wasn’t entirely clear about the decoration, but I did want a shiny topping.
As always happens to me, the inspiration to decorate it came to me a couple of hours before I got on with it. I thought a lot about how I was going to decorate it, a lot of options, but none of them liked me completely.

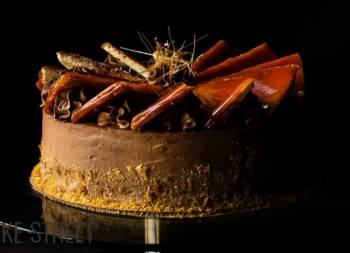
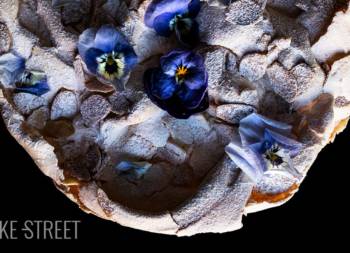
But when I was drinking my coffee, I came up with an option that I really liked. To visualize it better, I took a notebook and drew it. Then I finished seeing it clearly. I would create a template to sprinkle some cocoa powder, decorate with the leftovers of yolk and chocolate cream accompanied by raspberries and purple leaves.
The purple leaves I had a few days ago in the fridge and I kept them, because I knew they would be great for something very good. And thank goodness! I think these leaves give it the rustic, classic and even something still-life I was looking for.
In case you’re wondering what those purple leaves are, they’re oak leaves salad sprouts. I know it may sound weird, but the look is perfect to me. The taste is neutral and the texture is slightly crunchy. Nothing would have been better 😉
Ingredients for 7,8 inches cake
FOR EGG WHITE AND CHOCOLATE SPONGE CAKE:
- 7 large egg whites
- 180 g sugar
- 36 g unsweetened cocoa powder
- 36 g ground almond
FOR YOLK AND CHOCOLATE CREAM (FILLING):
- 7 large yolks
- 150 g sugar
- 30 g unsweetened cocoa powder
- 150 g pure black chocolate
- 260 g fat cream
- 115 g unsalted butter at room temperature
FOR SHINY CHOCOLATE COATING:
- 125 g 70% black chocolate
- 125 g fat cream
- 30 g unsalted butter at room temperature
TO FILL AND DECORATE:
- 250-270 g raspberry jam
- cocoa powder
- fresh raspberries
- oak leaves salad sprouts
- edible ruby powder
Instructions
Make egg white and chocolate sponge cake.
- Preheat oven to 390ºF/200ºC.
- Draw circles 7,8 inches/20 cm in diameter on baking paper. We will be able to draw 2 for each sheet, but to bake them we will have to do it of 1 in 1 unless your trays are very wide.
- Prepare 2-3 templates. If you wish you can make 5, although it is not necessary because we can reuse the first ones. Set aside.
- Separate the egg whites from the yolks.
- Cover the yolks with film and reserve at room temperature. If it is very hot, refrigerate them until the time of use.
- In the bowl of the KitchenAid or of a stand mixer, pour the egg whites and whip with the whisk until the become foamy and frothy.
- Start on low speed and we will gradually increase it, little by little and without reaching the maximum, while we add the sugar in batches.
- Once we have the egg whites whipped, remove the whisk and place the flat beater. Add the cocoa powder and mix at the lowest speed until it has been distributed evenly. It will take a few seconds.
- Stop the KA and add the ground almond. Mix again for a few seconds to distribute evenly.
- Put the mixture in a piping bag.
Pipe and bake.
- To prevent the ends of the paper from lifting or moving when you pipe the batter, place some small amounts of batter in the corners of the paper on the perforated tray. In this way the paper will remain fixed.
- Remember to place the paper with the painted area downwards.
- Cut the tip of the piping bag and pipe the batter. Make a circle following the pattern we have drawn. Then fill the interior trying to exert the same pressure at all times.
- Smooth the surface with a spatula.
- In total we need to make 4 discs. In my case I got 5, will depend on the pressure you exert when piping the batter.
- Place in the oven for 9-10 minutes. We will observe that the surface grows in a non-uniform way. Don´t worry, it´s ok, after leaving the oven will be perfect.
- Take it out of the oven and let it cool completely on a rack.
- Repeat the process with the rest of the cake discs.
- Be careful when removing the baking paper from the cake, it is very delicate.
- If we are going to use them the next day, once they are completely cold, cover them with film and leave them at room temperature.
Make yolk and chocolate cream.
- Place a half-full saucepan with water and heat until it starts to generate steam, but never reach boiling point.
- Place a heat-resistant bowl over the saucepan and pour the yolks together with the sugar.
- Cook in a water-bath stirring constantly until the mixture reaches 149ºF/65ºC. You will notice that the yolks turn whitish and thicken slightly.
- Add the cocoa powder and mix with a whisk until it is completely integrated. Turn off the heat, but keep the bowl on top of the saucepan.
- Heat the cream in a saucepan, but without boiling.
- Add the chopped chocolate together with the hot cream and mix until a smooth and homogeneous mixture is obtained.
- Pour the mixture into a glass container and let it cool down to room temperature. Once it has cooled, refrigerate for 3 hours.
Finish preparing the yolks and chocolate cream.
- In the KA bowl add the butter and mix with the flat beater to soften it.
- Change to the whisk and beat for 3-4 minutes at medium speed.
- Stop, lower the butter from the whisk and the sides. Add a little amount of the chocolate mixture and whisk. Start at the lowest speed and increase until you reach the average speed. You will notice that the mixture is light brown and very creamy.
- Continue adding, little by little, the chocolate mixture to the butter and beating very well after each addition.
- Once we have integrated all the chocolate, whisk for 1-2 minutes at medium-high speed. You will notice that the texture of the cream is very smooth, creamy and aired.
- Pour into a bowl, cover with film and refrigerate for 15 minutes.
Fill.
- Each layer of filling contains 200 g of yolks and chocolate cream + the layer of jam. So we will separate 3 bowls with 200 g of cream and we will have 160-170 g to decorate the cake.
- To give a rounded finish to the sponge cakes, since piping them will not have that luck, place a plate on the cake and cut the edges.
- Place a disc to present the cake on a rotating support for cakes. Under the disc place a piece of non-slip so that it does not move.
- Put a small amount of chocolate cream and place the first disc of sponge cake.
- Place the chocolate cream, more or less half, and spread with the help of a spatula. Put the rest of quantity and spread again trying that it remains as smooth as possible.
- On the creamy layer place a thin layer of raspberry jam, 3 tablespoons more or less. Spread carefully and delicately over the cream layer.
- Place another disc of sponge cake and press lightly. Repeat the same process as the previous time and make this same step with all the layers.
- Refrigerate the cake for 15 minutes.
Cover the cake.
- Distribute the cream with a spatula on the top and sides. Remove the excess by using an edge smoother. This layer will help us to "collect" possible crumbs from the sponge cake that could come to the surface when we decorate it.
- Refrigerate for 15 minutes so that the cream becomes a little firmer.
- Remove from the fridge, spread another layer of cream by all the surface, smooth removing the excess and place in the fridge for 2 hours.
- At this point, we can leave it refrigerated until the next day. In my case that's what I did.
- Cover the rest of the cream with film and refrigerate.
Make the shiny chocolate coating.
- In a bowl add the chopped chocolate together with the butter, set aside.
- In a saucepan pour the cream and heat to medium low heat.
- Remove from the heat and pour over the chocolate. Let it rest for 2-3 minutes and stir until a homogeneous and very bright mixture is obtained.
Cover.
- Place the cake on a rack and, underneath it, a tray that collects the excess chocolate.
- Lightly temper, in a water-bath, the chocolate coating in case it has cooled and pour over the cake.
- Pass a spatula by the surface to remove the excess of chocolate and tap the cake lightly, taking it on the rack, to help to settle the cover.
- Allow the excess to drain for a few minutes.
- Using a spatula, remove the cake from the rack and move to a stand.
Decorate the cake.
- With the help of a disc or plate, create a template to decorate the top of the cake. Cover the desired part and sprinkle the rest with cocoa powder.
- Put the yolks and chocolate cream in a piping bag with a PME 13 tip. Decorate by piping around the inner edge of the cocoa powder design.
- Place raspberries, we can fill the inside with raspberry jam and decorate with some red chard sprouts.
- Sprinkle on the glossy glaze with edible ruby powder.
- Serve.


Notes
- The sponge cakes are very thin, slightly thicker than a pancake. So don't worry if you notice that they are thinner than normal.
- This sponge cake does not need to be syrupy, it is very soft and juicy, as well as very fine.
- The yolk and chocolate cream needs a long process of preparation, plus hours of rest to cool and acquire the desired consistency. If you wish, you can make the cream before the sponge cakes and thus speed up the process.
- The yolk and chocolate cream loses its firmness as soon as it reaches 70º-71ºF/21º-22ºC, so we will have to refrigerate the cake in several moments to be able to work without problems. Bear this in mind also when you want to pipe the decoration.
- Before spreading the raspberry jam, I recommend you whisk it to lighten it and it is easier for you to spread it over the cream.
- The shiny chocolate coating is the same as the one I used to make the Sachertorte.
- The decoration is completely optional. In my case I decided to decorate it like this, but feel free to do it the way you like or feel comfortable.
- We can keep it refrigerated for 3 days from its assembly.


I certainly encourage you, earnestly, to try this Baron Cake or Baron Torte. Really, if you are chocolate lovers, there is no better cake in the world than this one. Well, maybe so, but believe me, you're going to love this one.
The texture of all the elements, the taste, the creaminess, the right point of cocoa, the sweetness of raspberry... I can't find words to describe it better! You have to try it so that you can understand me.
I wish you a wonderful weekend, see you again on Monday!
Big hugs,
Eva