Black Forest Cake – Schwarzwäld Torte
The other day, thinking of new recipes for cakes, I remembered the Black Forest Cake. It’s a cake that I don’t have on my blog and I really wanted to make it. It is true that I have a Black Forest cake, but not the cake itself. So today I’m going to leave you my own version of Black Forest Cake or Schwarzwäld Torte.
Why do I say my own version? Because, despite maintaining the elements that give shape to this cake, the processes and elaborations are not the traditional ones. I have decided to make my own version of this wonderful cake.

Schwarzwäld Torte or Black Forest cake origin.
This cake of German origin emerged during the 1930s and eventually became one of the most popular cakes in Germany. In fact, today, it is considered a classic of its gastronomy.
Its composition consists of a chocolate cake moistened with Kirsch, a filling made with cherries, whipped cream and decorated with chocolate chips.
Its origins are not clear and it is believed that its name does not necessarily have to be linked to the Black Forest. There are several theories.
- The name, Black Forest, could be due to the addition of grated dark chocolate since it reminds of a dark forest.
- The name could also be due to the ingredient Kirschwasser(Kirsch, cherry liqueur) since it is produced mainly in the Black Forest.
- There is a possible predecessor called “Black Forest Pie” which possibly does not come from the Black Forest but from Switzerland.
- Another theory talks about the possibility that the name of the cake is based on the colors of women’s clothing Bollenhut Black Forest.

The combination of cherries, cream and Kirsch was already known in the southern Black Forest in the 19th century.
But not as a cake, but as a dessert. The cherries were cooked and served with whipped cream. Occasionally, Kirsch liqueur was also added.
The Schwarzwäldtorte could have been their forerunner, a cake made with biscuits, cherries, walnuts and often whipped cream, but without Kirsch.
The confectioner Josef Keller (1887-1981), born in Swabian Riedlingen, claimed to have invented the cake in 1915 in the then famous Café Agner (now disappeared) in the city of Bad Godesberg, now the district of Bonn. But this could not be proved.
There is a recipe written by Keller himself in 1927. It is exhibited in the open-air museum of the Black Forest (Schwarzwälder Freilichtmuseum Vogtsbauernhof). His recipe consisted of only one layer and one shortcrust paste, although he insisted that he invented the combination of cherry cream and chocolate, as well as cream with Kirsch.
According to research conducted by Tübingen city archivist Udo Rauch, there is increasing evidence pointing to Tübingen pastry chef Erwin Hildenbrand as the creator of the Black Forest in the spring of 1930 at the Café Walz. His research revealed that Hildenbrand worked in the Black Forest in the 1920s (Furtwangen and Freudenstadt). In addition, there is a hand-dating photo from 1936, showing the master confectioner making a Black Forest cake.
To this day, however, no illuminating evidence has been made public.

In 1934, the Black Forest cake was mentioned for the first time in writing.
“250 pastry specialities and how they are made” by JM Erich Weber, Dresden, 1934. At this time, it was known mainly in Berlin, as well as in good bakeries in German, Austrian and Swiss cities.
In 1949, Black Foresta was the 13th best known cake in Germany.
Today it is the most popular cake in Germany.
It is common to find versions of this cake using local ingredients, even omitting the liqueur.
Since 2006, the Black Forest Cake Festival has been held every 2 years in Todtnauberg, a district of Todtnau in the Black Forest. In it, amateurs and professionals compete for their homemade cherries for the Black Forest.
The term “Black Forest cherry” is nowadays widely used by many producers.
There are state guidelines that must be met to be able to name and sell a cake as Black Forest in Germany.
These cakes should be made with Kirsch cream or butter cream or a combination of both. The filling can consist of whipped cream, butter cream, ganache and cherries. The amount of Kirsch is optional, but will determine the final flavor. The chocolate cake must contain at least 3% cocoa powder. Sometimes the base of the cake can be made with shortcrust. It can be covered with whipped cream or butter cream decorated with chocolate chips.
In 2014 the Federal Agency for Agriculture and Food asked to protect Black Forest cake as a traditional speciality guaranteed by the EU. The requirements are:
- Have a minimum diameter of 17 cm
- Cream must contain at least 30% fat
- Inside must contain at least two layers of sponge cake
- Cherries can be added whole or chopped
- Must contain chocolate or a chocolate topping

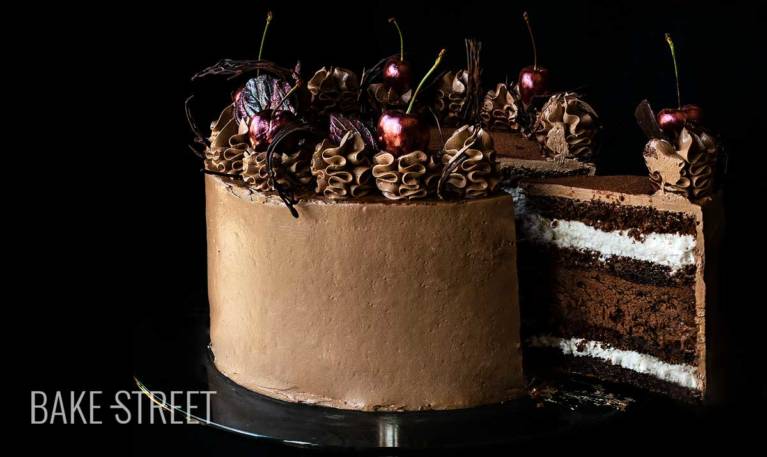
My version is quite different…
To carry out this Schwarzwald Torte or Black Forest Cake, I do keep many basic and traditional elements, but also add new ones that make it a quite different version of the classic.
To make it, I have prepared a chocolate sponge cake which is the same one I used to make the Sachertorte. Only this time, I have reduced a little the amount of ground almond and replaced it with flour. The sponge cake is quite juicy by itself, but even so, I soak it in a syrup made with cherry aroma. I would have used Kirsch instead, but I didn’t stay at home anymore…
The filling consists of 2 elaborations; whipped cream and chocolate mousse with cherries.
I wanted to make a cake in which different layers could be appreciated, as well as a thicker interior with chocolate as the protagonist. That’s why I decided to make a chocolate mousse, only a little denser than usual so that it could support the weight well.
To decorate the cake I opted for a chocolate SMBC. Butter cream with meringue is ideal for decorating cakes, especially if they are high. It also allows us to give a very clean finish and holds very well.
The decoration of the cake consists of fresh cherries decorated with ruby powder, cocoa powder and some leaves and branches made with dark chocolate. Of course, you already know that everything can be adjusted to your tastes and needs. So don’t hesitate to do it if you think it’s appropriate 🙂
Ingredients for 8 inch cake
FOR THE SPONGE CAKE:
- 155 g pastry/cake flour
- 55 ) ground almond
- 110 g unsalted butter at room temperature
- 110 g icing sugar
- 6 large egg yolks
- 6 large egg whites
- 110 g sugar
- 150 g 70% black chocolate
- 10 g baking powder
FOR CHOCOLATE MOUSSE:
- 4 large egg yolks
- 80 g sugar
- 1 Tbsp unsweetened cocoa powder
- 400 g fat cream
- 60 g unsalted butter at room temperature
- 250 g black chocolate 70%
- fresh cherries chopped to taste
FOR CHERRY SYRUP:
- 125 g water
- 125 g sugar
- few drops of cherry aroma or Kirsch, if it's possible for you
FOR CHOCOLATE SMBC:
- 135 g egg whites, at room temperature
- 245 g sugar
- 320 g unsalted butter at room temperature
- 170 g black chocolate 70%
FOR WHIPPED CREAM:
- 400 g fat cream
- 4 Tbsp icing sugar
FOR DECORATING:
- 8 cherries brush with ruby powder
- unsweetened cocoa powder
- chocolate leaves painted with edible metallic powder
- dark chocolate strips
Instructions
FIRST DAY
Make the sponge cake.
- Grease a 8 inch Push-Pan, with butter. Sprinkle flour, remove the excess and set aside.
- Preheat the oven to 340º F/170ºC.
- Sift the flour together with the baking powder, set aside.
- Melt the chocolate in a water-bath, set aside.
- In the bowl of KA add the butter together with the icing sugar. Mix with the flat beater until it takes a whitish and creamy mixture.
- Add the egg yolks and continue mixing for about 5 minutes. We'll get a very creamy batter.
- While the yolks are being beaten together with the butter, whip the egg whites until you get a meringue. Once the egg whites begin to froth and get volume, add the sugar little by little until you get a merengue that makes soft peaks. Set aside.
- Add the ground almonds to the mixture of butter and egg yolks and mix until homogenized.
- Pour the melted dark chocolate and mix again until it is fully integrated.
- With the help of a silicone spatula, we began to add the merengue little by little to the sponge cake mixture. We will do it with soft and enveloping movements to help them integrate with the sponge cake mixture.
- Add the flour and blend into the mixture with gentle, enveloping movements. We'll do it alone until there's no flour left.
- Pour the mixture into the pan, smooth the surface slightly and tap gently to settle the batter.
- Bake for 60-65 minutes or until a toothpick is inserted in the center and comes out clean.
- Remove from the oven and let stand in the pan for 15 minutes.
- We remove the cake from the pan and let it cool completely, with the upper part upside down and resting on the rack so that the base is now up, until it cools completely.
- Once it is completely cooled, wrap it in film and refrigerate overnight.
Make the syrup.
- Pour the water with the sugar in a saucepan. Place at medium heat and let it boil. The sugar should be completely dissolved.
- Once it comes to the boil, turn off the heat and let it cool completely.
- Place the syrup in a bottle with the help of a funnel, add few drops of cherry aroma, close and shake to mix well.
- Set aside at room temperature.
SECOND DAY
Make whipped cream for the filling.
- Before we get ready to whip the cream we must make sure of two things:
- Cream must be cold 24 hours before used it.
- The bowl in which we are going to make whipped cream must be cold. I recommend to use one aluminium bowl and freeze 20 minutes before beat it.
- If you want to know how to make whipped cream, you can do it in this video.
- Pour heavy cream into freeze bowl and beat with an electric mixer into low speed.
- Once cream is becoming to form stiff peaks, add sugar little by little stirring the whole time. Increase speed gradually but without reaches high one. Ideally use medium speed.
- Before finish to beat the cream, add vanilla extract along and beat until get a perfect whipping cream. Be sure not to over-beat, otherwise cream will become lumpy and butter-like.
- Cover with plastic wrap and chill until used it.
Prepare cherries
- Wash the cherries very well and dry with kitchen paper.
- Cut in half, pit them and cut into quarters.
- We will prepare as many cherries as we want, in my case it has been a big handful.
- Place in a bowl, cover with film and refrigerate until the time of use.
Make chocolate mousse.
- Whip the cream following the same process we did to prepare the whipped cream from the filling. Once it is ready, refrigerate in a bowl until the moment of its use.
- Melt the chocolate, the ideal thing is always to do it in a water-bath, and incorporate the butter. Mix well until you get a homogeneous mixture. You will notice that the mixture is slightly dense, this is normal. Set aside.
- Cook the yolks. Place a saucepan with water on medium heat until it starts to generate steam, but never boiling.
- Place a heat-resistant bowl over the saucepan and pour the yolks together with the sugar.
- Cook in a water-bath stirring constantly with a whisk until the mixture reaches 149º-158ºFF/65º-70ºC. You will notice that the yolks turn whitish and thicken slightly.
- Add the cocoa powder and mix until a homogeneous mixture is achieved.
- Remove from heat.
- In a large bowl incorporate the mixture of yolks and pour the mixture of chocolate with butter. Mix until homogenized.
- Add a small quantity of whipped cream and begin to integrate with the help of a silicone spatula. We will do it with soft and enveloping movements, without stirring the mixture.
- Once it is integrated, add another small amount of whipped cream and repeat the same process. We will do this step in several batches and will not add more until the last one is completely integrated.
- Set aside.
Assemble the cake.
- With the help of a cake cutter, cut the sponge cake in 5 equal parts. Remove the upper part, which will be slightly curved, and from here we cut the layers.
- We will need only 4 layers of cake, the other we can enjoy while we assemble the cake ;)
- Place an anti-slip disk on the base of the Push-Pan mould 8 inch/20 cm to fix the cake disc.
- Put the disc and a small amount of cream on it, this will help us fix the cake.
- Place a sheet of acetate inside the mould. This will help us to remove the cake in a cleaner way.
- Place one of the sponge cakes and press lightly.
- Soak with some cherry syrup.
- Arrange 5-6 tablespoons of whipped cream, about half, and smooth lightly.
- Put another sponge cake, press lightly and soak with syrup.
- Arrange 1/3 of the chocolate mousse and smooth lightly. Place few chopped cherries.
- Cover with 1/3 more mousse and smooth. We have more chopped cherries and we finish filling with the rest of chocolate mousse. Smooth with a spoon.
- Place another layer of sponge cake and soak with syrup.
- Spread the rest of whipped cream, will be another 5-6 tablespoons and smoothed again.
- Put the last layer of cake, this will not be soaked with syrup. Press lightly.
- Cover the surface with film and refrigerate for a minimum of 4 hours or, if you wish, until the next day.
Make chocolate Swiss Meringue Buttercream.
- In a heat-resistant bowl, add the egg whites along with the sugar.
- Place on a water-bath at medium low heat. Stirring constantly, leave until the egg whites reach 165ºF/74ºC. For it we will help ourselves of a digital thermometer.
- Remove from the heat, pour the egg whites into the bowl of the KitchenAid or a stand mixer and whip at medium high speed until a firm and shiny meringue is obtained.
- Once we have the firm meringue, begin to add the butter cut into squares little by little and at the same time the mixer continues whipping.
- Once we have all the butter added, increase the speed and finish whipping.
- Stop, scrap the cream with the help of a spatula and add the chocolate.
- Whip again at high speed until the ingredients are completely integrated.
- Set aside.
Cover the cake with SMBC.
- Spread the SMBC with a spatula over the entire surface and remove the excess with the help of an edge smoother. This layer will help us to "pick up" possible crumbs from the cake that could come to the surface when we decorate it.
- Be very careful when you arrange the SMBC by the layers of cream. We must do so with care not to remove part of it and that it integrates with the cream.
- Refrigerate for 30 minutes for the SMBC to harden.
- Remove from the cold, place another layer of SBMC all over the surface, smooth out the excess and cool for 60 minutes.
- At this point, we can leave it refrigerated until the next day. In my case that's what I did.
- Cover the rest of SMBC with film and leave it at room temperature.
THIRD DAY
Prepare the cake decoration.
- Prepare some chocolate leaves and brush with edible metallic powder. In this post I show you how to make them and in this video you can see the process. this timen I have used mint leaves to obtain leaves with more texture.
- Wash the cherries very well, dry with paper and brush with ruby powder.
Make chocolate strips.
- Fill a bowl with very cold water and add ice. Wait until the water is very cold.
- Put some melted dark chocolate in a piping bag.
- Pipe chocolate threads over the iced water.
- Pick up helping ourselves of our hands with care, place on kitchen paper.
- We will prepare as many as we wish. Refrigerate until the moment of its use.
Decorate the cake.
- Place SMBC in a piping bag and with a 2D Wilton tip.
- Decorate the edges the way I show you in the video.
- Put the painted cherries and the chocolate leaves.
- Sprinkle the center of the cake with cocoa powder.
- Finish decorating with the chocolate threads. With these we will simulate small branches that come out near the leaves or the cherries.
I recommend you to manipulate everything that is made with chocolate with tweezers. - Refrigerate for 1 hour or until we are going to consume it.
- Remember that the SMBC is better when we leave for a while at room temperature.


Notes
- I used a Push-Pan 8 inch/20 cm, but this quantity is valid for moulds with a diameter of 9 inch/23 cm.
- The baking time of the sponge cake will vary depending on the size of the mould you use.
- If we refrigerate the sponge cake overnight, we help the flavors ripen as well as facilitating the process of cutting the sponge cake. It crumbles less.
- The consistency of the mousse is a little denser than usual so that it can be used as a filling.
- Follow all the steps to get a good SMBC.
- If we have SMBC leftovers, we can refrigerate it for 2 days or freeze it for 30 days.
- To make the syrup you can use the liquor you want. In my case I have used cherry aroma, but you can use Kirsch or the one you prefer.
- You can make the top decoration completely to your liking.
- To preserve the cake we must keep it refrigerated for 3-4 days.
- The ideal thing before consuming it is to temper it during a while, it will depend on the external temperature.


This Schwärzwald Torte or Black Forest Cake is a very different version of the traditional one, but without a doubt I encourage you to try it. The combination of all the elaborations is fantastic, although I am not going to deny you that with only one portion two people eat perfectly, hahaha.
I admit that I really like making tall cakes, I love it! But it is also true that I can not make many of these because then we have cake for years... Lately I make so many cakes that we don't really keep them whole at home. Almost all of them are taken by my husband to work (not whole, but half), because otherwise we would be rolling around the house!
I hope you like it a lot and if you try it, please, tell me about it!
I wish you a wonderful weekend, see you on Monday.
Big hugs,
Eva
Sources: Hochschwarzwald, Wikipedia
This post contains affiliated links