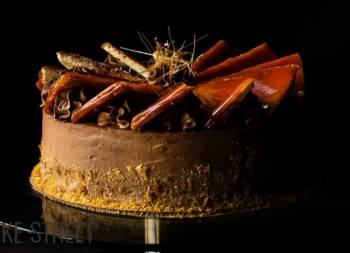
Žerbo Torta – Zerbo Cake
I’ve been researching Hungarian pastries for a while and, I must say, I’m completely fascinated and in love with them. In fact, the more I research, the better recipes I find and the more I get my attention. I’m telling you that I have a very long list of cakes to do and that, each time, I find it more difficult to decide which one I’m going to share with you. In this occasion I have chosen a cake that I liked very much, Žerbo Torta.
Well, I would lie if I told you that I don’t like a cake… It must be frankly horrifying for this to happen.
But I liked this cake for two reasons:
- The wonderful and incredible sponge cake made with egg whites and nuts.
- The layer of caramel over the sponge cake and on which we will have a layer of chocolate and the wonderful filling…
Can anyone tell me how I wouldn’t fall in love?

Žerbo Torta origin.
Today we will be luckier than the previous time (Baron Torta) about the origin or history surrounding the cake. The last one I left you was an impossible mission to know anything about it… But, leaving this aside, it’s a cake that many of you have already tried and you’re liking it a lot. So I couldn’t be happier about it 🙂
The origin of this cake is from Hungary and it seems to be joined to Budapest’s most famous pastry shop “Gerbeaud“. A magical place that stands out for being decorated in marble, wood and bronze. Its ceilings are carefully designed with Louis XV style plaster, accompanied by Maria Theresa style chandeliers.
An idyllic, majestic, delicate and elegant environment that began 160 years ago by the hand of Henry Kugler.
On October 14, 1858, Henry Kugler, the third son of a family of bakers, opened his confectionery in the square of József Nádor and it did not take long to be considered one of the best in Budapest. Kugler acquired his knowledge and experience, especially during his stay in 11 European capitals including Paris.
His specialty was Chinese and Russian teas.
As well as his ice cream creations. They soon became the best of Pest.
In 1870, Kugler moved his confectionery to Vörösmarty Square to be closer to the centre. His customers preferred his coffees, liqueurs, cakes and “Mignon”. For the first time it was possible to take home the cakes carefully wrapped in a paper tray. This was another of Kugler’s innovations.
His most famous clients were, among others, Ferenc Deák, Franz Liszt and Empress Elizabeth of Austria, Queen of Hungary (Sissi). As a curious fact, it seems that Sissi’s favorite cake was the Dobos Torte.
In 1880, Henry Kugler asked Finaz (a Geneva confectioner’s relative) to recommend a young and dedicated professional. This is how he met Emil Gerbeaud (Žerbo), who had worked in England, France and Germany.
In 1882, the two confectioners met in Paris and, a year later, Kugler asked him to come to Budapest to be his business partner. Two years later, Emil moves to Budapest with his wife and daughters, assuming full leadership of the confectionery. His talent and entrepreneurial spirit were so high that he managed to increase the confectionery from 10 to 60 assistants, in addition to 20 clerks, 20 packagers and 5 salesmen. Many of his employees came from different parts of the world to work with him.
He was very innovative and took baking to another level, making very innovative and sophisticated products. At the end of the century there was a lot of interest in his products from abroad.
Emil Gerbeaud was a master chocolatier.
His name became a concept.
In, he opened a restaurant in the garden, “The Royal Pavillon“. It was built for the millennium celebrations in the city park and thus receive the king of Austria, Franz Joseph I and his wife, Queen Elizabeth (Sissi).
Gerbeaud received the gold medal from the National Association of Industry in 1897. He was a member of the jury at the World Exposition in Paris in 1898 and in Brussels in 1900. As the only Swiss-Hungarian confectioner, he could proudly wear the French Honour ribbon.

Gerbeaud died on 8th November, 1919, after having survived the difficult years of war.
So it was his wife, Eszter Ramseyer, who ran the business until 1940 while maintaining its high status. Between 1948 and 1984 the confectionery became state property and changed its name to Vörösmarty. However, from 1984 onwards the name Gerbeaud was recovered and shone above the entrance.
Erwin Müller, a German businessman, bought Gerbeaud’s four-storey building in 1995. He also took over the management of the confectionery, maintaining the spirit of tradition combined with innovation. In 2010 Gerbeaud’s image was renewed along with a new variety of cakes.
Gerbeaud has its own exclusive chocolate Or Noir 1858 with 71.9% cocoa, made by the hand of Cacao Barry and in collaboration with its master chocolatiers.
To celebrate Gerbeaud’s 160th birthday, the Gerbeaud 160 cake was created. To do so, its 1858 Or Noire chocolate was used in addition to classic Hungarian ingredients such as walnuts and peaches.

Making Žerbo Torta.
From what I’ve read, this cake is inspired by the famous Žerbo cubes. They are small square or rectangle shaped cakes made with layers of sponge cake, chopped walnuts, homemade peach jam and a chocolate topping.
The recipe has evolved and taken the form of a cake, but finding some variants in its process. However, I would not know if this evolution comes from the hand of the pastry shop or from the people who make it in their homes. I have looked at many recipes, from different websites, Youtube videos… And all of them kept the elements that I share with you in the recipe:
- Sponge cake made with egg whites and nuts
- Caramel layer
- Chocolate layer
- Filling made with yolks and chocolate
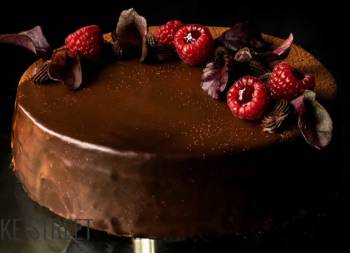
- Chocolate coating
Quantities varied greatly from recipe to recipe, especially in sugar, nuts and chocolate. After reading many recipes, writing down quantities, ingredients and processes, I unified everything into one summed up in my way of doing it. That is, considering the way I should do it, I did what I thought would be the right process with the right amounts I saw.
But, the best help I get was from Gagarsce.
So it’s possible that the cake isn’t 100% faithful to the preparations I’ve seen and much less to that of Gerbeaud pastry, but the final result maintains the traditional essence, as well as being very good 😉
Ingredients
FOR THE SPONGE CAKE:
- 12 large egg whites
- 230 g sugar
- 125 g walnuts
- 75 g hazelnuts
- 1 Tbsp lemon juice
- 1 tbsp vanilla extract
- 60 g cake/pastry flour
FOR THE SYRUP:
- 140 g water
- 140 g sugar
CARAMEL LAYER:
- 350 g sugar, to make caramel + 65 butter
- 155 g black chocolate + 75 g butter
FOR CHOCOLATE AND YOLKS CREAM:
- 12 large egg yolks
- 255 g sugar
- 40 g unsweetened cocoa powder
- 255 g 70% black chocolate
- 390 g fat cream
- 200 g unsalted butter
FOR PEACH LEAVES:
Recipe adapted from Christophe Felder "Piece Unique"
- 30 g egg whites
- 20 g sugar
- 0,5 g pectin
- 10 g honey
- 50 g peach jam
- 1 Tbsp olive oil
Instructions
Make walnuts and egg whites sponge cake.
- Preheat oven to 245ºF / 175ºC.
- In a food processor add the walnuts together with the hazelnuts and blend. Set aside.
- Separate the egg whites from the egg yolks.
- Cover the egg yolks with film and set aside at room temperature. If it is very hot, refrigerate them until needed.
- In the bowl of the KitchenAid or of a stand mixer, pour the egg whites together with the lemon juice and whip with the whisk until the become foamy and frothy.
- Start on low speed and we will gradually increase it, little by little and without reaching the maximum, while we add the sugar in batches.
- Once we have the egg whites whipped, add the vanilla and mix again until completely homogenized.
- Add the flour, in batches, and mix with the help of a silicone spatula. We will do it with a lot of care making enveloping movements to avoid that the meringue from deflating.
- Add nuts and mix again in the same way as we did with the flour.
- Prepare a baking tray lined with baking parchment and spread the mixture over it. We will try to smooth the surface as much as possible.
- Bake for 35 minutes, you will see that it acquires a beautiful golden color.
- Take out and let it cool, face down, on a rack. In this way, it will be smooth on both sides.
Make the syrup.
- Add all the ingredients in a saucepan. Place at medium heat and let it boil. The sugar must be completely dissolved.
- Once it comes to the boil, turn off the heat and let it cool completely.
- Put the syrup in a bottle with the help of a funnel, close and shake to mix well.
- Set aside at room temperature.
Make yolk and chocolate cream.
- Place a half-full saucepan with water and heat until it starts to generate steam, but never reach boiling point.
- Place a heat-resistant bowl over the saucepan and pour the yolks together with the sugar.
- Cook in a water-bath stirring constantly until the mixture reaches 149ºF/65ºC. You will notice that the yolks turn whitish and thicken slightly.
- Add the cocoa powder and mix with a whisk until it is completely integrated. Turn off the heat, but keep the bowl on top of the saucepan.
- Heat the cream in a saucepan, but without boiling.
- Add the chopped chocolate together with the hot cream and mix until a smooth and homogeneous mixture is obtained.
- Pour the mixture into a glass container and let it cool down to room temperature. Once it has cooled, refrigerate for 3 hours or overnight, if you wish.
Finish preparing the yolks and chocolate cream.
- In the KA bowl add the butter and mix with the flat beater to soften it.
- Change to the whisk and beat for 3-4 minutes at medium speed.
- Stop, lower the butter from the whisk and the sides. Add a little amount of the chocolate mixture and whisk. Start at the lowest speed and increase until you reach the average speed. You will notice that the mixture is light brown and very creamy.
- Continue adding, little by little, the chocolate mixture to the butter and beating very well after each addition.
- Once we have integrated all the chocolate, whisk for 1-2 minutes at medium-high speed. You will notice that the texture of the cream is very smooth, creamy and aired.
- Pour into a bowl, cover with film and refrigerate for 15 minutes.
Prepare the sponge cakes.
- Remove the baking paper from the cake.
- Cut into 3 equal rectangular portions. Each will be approximately 11 cm x 28 cm.
- Pour syrup over them and let stand for 15 minutes.
Make the caramel layer.
- Place the sponge cakes on a silpat or teflon sheet. Set aside.
- In a medium saucepan or a large saucepan, add the sugar.
- Place at medium-low heat and let it begin to melt. Once it begins to caramelize, stir often to prevent some areas from burning. Reduce the heat if necessary.
- Once we have a golden caramel, add the butter and stir well until completely dissolved.
- Remove from the heat and pour over the sponge cakes. Spread with the help of a spatula or spoon to help cover the entire surface and prevent the top layer is too thick. I recommend you to do it little by little, because the caramel solidifies immediately.
- Let it cool completely.
Make chocolate layer.
- In a bowl add the chopped chocolate together with the butter.
- Fill 1/4 of a saucepan with water and place at medium low heat. Place the chocolate bowl on top to melt in a water-bath.
- Leave until the chocolate is completely melted.
- Whisk to homogenize the mixture.
- Spread the chocolate over the caramel layers with a spatula.
- Leave to cool at room temperature and refrigerate for 20 minutes.
Assemble the cake.
- Prepare a tray and line it with paper or place the cake directly on a board or cake stand.
- Put a small amount of chocolate cream and place the first sponge cake.
- Spread the chocolate and yolk cream, about 3-4 tablespoons, with the help of a spatula trying to make it as smooth as possible.
- Place another sponge cake and press lightly. Repeat the same process as the previous time and make this same step with all the layers.
- Refrigerate the cake for 15 minutes.
Cover.
- Distribute the cream with a spatula on the top and sides. Remove the excess by using an edge smoother. This layer will help us to "collect" possible crumbs from the sponge cake that could come to the surface when we decorate it.
- Refrigerate for 15 minutes so that the cream becomes a little firmer.
- Remove from the fridge, spread another layer of cream by all the surface, smooth removing the excess and place in the fridge for 2 hours.
- At this point, we can leave it refrigerated until the next day. In my case that's what I did.
- Cover the rest of the cream with film and refrigerate.
Decorate.
- Put the yolks and chocolate cream in a piping bag with a Wilton 199 tip. Decorate by piping around the edge.
- Sprinkle the centre with cocoa powder, trying to cover the side edges of the cake.
- Place in the fridge.
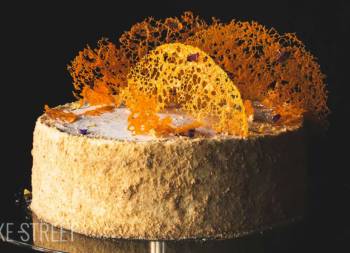
Make peach leaves.
- Preheat the oven to 240ºF/170ºC. Place the tray on which we are going to bake inside and at medium height.
- Meanwhile, in a medium bowl, mix all the ingredients with the help of a whisk.
- Brush a sheet of Teflon with 1 tablespoon of olive oil.
- Spread the mixture over the Teflon with the help of a spatula. We will try to make it as fine as possible.
- Place in the oven on the tray inside. Reduce the temperature to 212ºF/100ºC and bake for 14 minutes.
- Remove from the oven, place on a rack and handle as quickly as possible. The reason is that it cools really fast and it hardens.
- Cut the sheet with a knife to make portions and model lightly to our liking. Brush some parts with edible gold powder.
- Take the cake out of the fridge, decorate and serve.


Notes
- The sponge cake does not need baking powder. We only have to whip well the egg whites so that the final result is spongy.
- Only one type of nut can be used. In my case I decided to mix it with hazelnuts because I like the taste very much.
- The yolk and chocolate cream needs a long process of preparation, plus hours of rest to cool and acquire the desired consistency. If you wish, you can make the cream before the sponge cakes and thus speed up the process.
- The yolk and chocolate cream loses its firmness as soon as it reaches 70º-71ºF/21º-22ºC, so we will have to refrigerate the cake in several moments to be able to work without problems. Bear this in mind also when you want to pipe the decoration.
- Spread a very thin layer of caramel, otherwise it will hard to cut the cake.
- The decoration is completely optional. In my case I decided to decorate it like this, but feel free to do it the way you like or feel comfortable.
- Peach leaves should be made just before serving the cake. The reason is that they stay crunchy for a short period of time, a few hours, and then begin to soften.
- If you prefer, you can make a round format. To make round cakes, you can do it the way I show you in other videos like the Baron Torta or Dobos Torte.
- Due to the caramel and the chocolate layer, the ideal is to cut the cake with a large serrated knife (bread knife).
- We can keep it refrigerated for 3 days from its assembly.


Another marvel that adds to my cake collection. This Žerbo Torta is undoubtedly another one of those wonders that you will have to try someday... There are many magnificent elaborations hidden in different parts of the world.
Sometimes I think, "there doesn't seem to be much more to discover" or "we already know almost everything". But then comes a new discovery that opens doors to another dimension and allows you to see that this is not the case. There is much new to discover and enjoy. So we'll keep researching so we can enjoy most of them.
For my part, if you have come this far, I congratulate you because I have let you a long text today! hahaha. And on the other hand, I encourage you to taste this marvel of Hungarian gastronomy.
With today's recipe I have not only enjoyed it, but I have also added one more place to visit and I hope and wish it will be very soon. I wish you a wonderful weekend, see you on Monday!
Big hugs,
Eva
Sources:Gerbeaud, Magazinsana, Politika