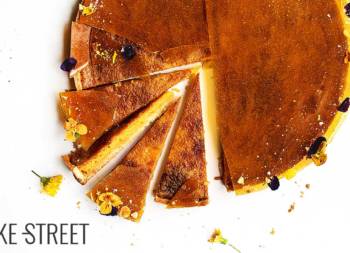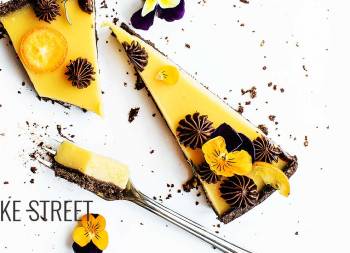
Lemon Soufflé Tart
Today’s recipe is very special for me for several reasons, but the main one is that it takes me back to a wonderful part of my childhood. For me it is the sweet that predominates when I was a child and whenever I can taste it I am invaded by good memories. And the one responsible for my happiness at important moments is the Lemon Soufflé Tart. My father’s favorite cake, mine since he made it known to me and the one that has always accompanied me on each and every one of my birthdays.
I have memories of when I was very little in which my father, every Sunday, bought a small cake. I don’t know, a custom that he had and that I really loved. He used to bring different types of cakes, but the one he almost always bought was this one. I loved it! Its taste, its airy texture… I wanted it to be Sunday to see if my father would bring it back.

Sometimes I accompanied him and I remember that it was a huge and beautiful bakery. The floor was brown marble with white streaks and had a huge exhibitor of U-shaped full of showcases. There was an immense amount of cakes, pies, sweets, biscuits… A visual and olfactory paradise. I remember that it had golden metal adornments, the walls were made of mirrors and were filled with shelves with different types of chocolates. I loved going there with my father.
It was at this stage of my life that some memories and feelings were forged that, fortunately, I can still enjoy today.
Souflée tart.
I’m sure many of you know this cake and have eaten it on more than one occasion. But it’s been like a couple of years now that it’s pretty hard to find a bakery that make it. The last time my parents bought it for me was just 2 years ago, in a bakery that was close to where they work. That year the owner retired, closed the bakery and there has been no way to find it anywhere.
My mother always asked in different bakeries if they could made it and they always answered no… They told her that it was a very laborious cake and that it didn’t compensate them. That’s why I decided to learn how to make it so I could enjoy it whenever I wanted. In fact this year the Souflée tart of my birthday was made by me 🙂

Laura Ashley porcelain cake server from Claudia & Julia
I have to say that it has not been easy to find the recipe because with the name I knew it, there was not a single recipe anywhere. All the images I saw were of bakeries and the description they gave did not guide much that the filling could be made.
But one day, watching a program by Paco Torreblanca, I saw that he was preparing a chiboust. He also mentioned the word “souflée” and “lemon” This was what I was looking for! Chiboust cream!
Chiboust origin.
This cream came from the hand of a French pastry chef called Fauvel Chiboust in 1846. The reason why Fauvel created this elaboration was to achieve a more consistent filling for the Saint-Honoré Cake, a cake he made to honor the Saint.
Originally, this cake was made with a brioche dough and filled with pastry cream in winter and Chantilly cream in summer. This type of filling required the cakes to be filled as the orders arrived because after a couple of hours they softened.
So Fauvel created a cream made from a base of pastry cream and Italian meringue, to which some gelatine would also be added to get stability. It was a great success.
Today, Chiboust cream is a great resource in confectionery, widely used in different types of preparations.
A small variation.
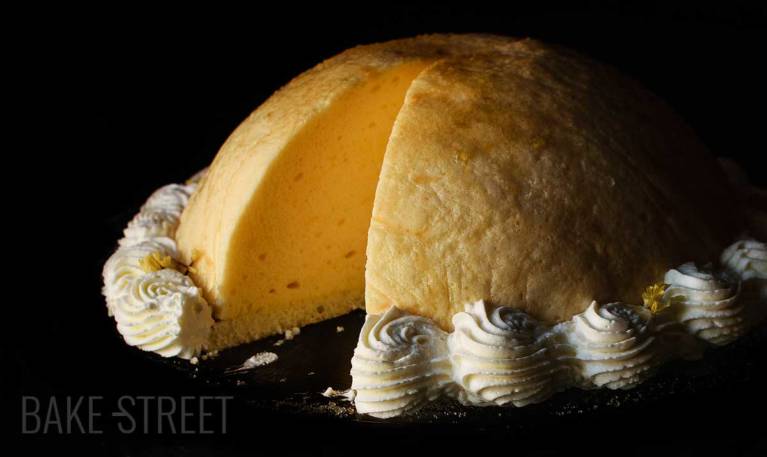
I have always known this cake with an interior that combined chiboust with a center of whipped cream. On my birthday I made it this way, but at home they prefer it only with cream on the outside.
In case you want to do it, you will only have to whip cream and place it in a hemisphere mold that is appropriate to the size of the cake. It should not be too big, it should occupy 1/4 of its volume. Then freeze the cream until the time to assemble the cake.
When you have the chiboust in the bowl, place the frozen cream in the center and press to equal the height. Then place the sponge cake, in the same way that I show you in the video, and proceed as I show you in the recipe.
Ingredients
FOR GENOISE SPONGE CAKE:
- 4 large eggs
- 100 g pastry flour
- 100 g sugar
- 20 g cornstarch
- pinch of salt
FOR LEMON CHIBOUST:
Lemon pastry cream:
- 250 g whole milk
- 8 large egg yolks
- 30 g cornstarch
- 40 g sugar
- 4 gelatine sheets (8 g)
- peel and juice from one lemon
Meringue:
- 175 g sugar + 50 g water
- 175 g egg whites + 45 g sugar
FOR WHIPPED CREAM:
- 150 g fat cream, very cold
- 1 y 1/2 Tbsp icing sugar
FOR DECORATE:
- demerara sugar for caramelize
Instructions
FIRST DAY
Make genoise sponge cake.
- Sift the flour and mix with the cornstarch and salt. Set aside.
- Separate the egg yolks from the egg whites. Incorporate the yolks in a bowl that supports the heat, along with half of the sugar.
- Place the bowl on a saucepan in the water-bath without boiling at medium low heat.
- Whisk them with the electric whisk until they are whitened. We will observe that they acquire a whitish color.
- Remove from heat and set aside.
- Assemble the egg whites with the other half of sugar until a firm and shiny meringue is obtained.
- Incorporate the whitened yolks with the meringue and mix with soft and enveloping movements.
- Begin to add the flour little by little and integrating in the mixture with enveloping movements. We must never beat or stir the mixture, otherwise we will lower the meringue.
- Transfer the mixture to a piping bag.
Bake.
- Preheat oven to 390ºF (200ºC).
- Line a perforated tray with baking paper. To prevent the ends of the paper from rising or moving when you put the batter, place small ponits of batter in the corners. In this way the paper will remain fixed.
- Cut the tip of the pipping bag and place the batter in the tray as I show you in the video. Make a rectangle and then fill the inside trying to exert the same pressure at all times.
- If we have more batter in the pipping bag, we will create lines around the rectangle.
- Bake for 8-10 minutes. We will see that it acquires a light golden color on the surface. In addition, if we press the surface of the cake, it will return to its initial state.
- Remove from the oven and let it cool completely on a rack.
Make the pastry cream for the chiboust.
- Fill a bowl with very cold water and submerge the gelatine. Let it hydrate for 10 minutes.
- In a saucepan pour the milk together with the lemon peel, place at medium heat and leave until it comes to a gentle boil.
- On the other hand, in a bowl whisk the yolks together with the sugar, the cornstarch and the lemon juice (in the video you don't see when I add the juice just after the sugar, the camera stopped...). Mix well with a whisk.
- Once the milk has reached boiling point, pour a little (with the help of a strainer to prevent cream and/or lemon peel from seeping into the mixture of yolks).
- Whisk well to temper them and prevent lumps from forming.
- Pour the remaining milk and mix again.
- Pour the mixture into the saucepan and place at medium heat while stirring. You will notice that the texture will become denser.
- Cook until the cream has a creamy and slightly dense texture.
- Remove from the heat and add the hydrated gelatine. Remember that we must drain the gelatine very well so that we do not incorporate any water.
- Stir very well, and vigorously, with the whisk so that the gelatine dissolves and integrates completely.
- Set aside while we prepare the Italian meringue.
Make Italian merengue.
- In a medium saucepan pour the water together with the sugar and, without stirring, place at medium heat.
- Leave until it reaches a temperature of 250ºF (121ºC), the ideal would be to help us with a digital thermometer.
- While the syrup is cooking, whisk the egg whites together with the 45 g of sugar until obtaining a meringue that forms soft peaks.
- Once it reaches 250ºF (121ºC) remove from the heat and begin to integrate on the egg whites in a fine and continuous thread. We will do it at the same time that we beat the meringue to a medium speed. The final appearance will be a firm and very shiny meringue.
Prepare the chiboust.
- In a large bowl trasnfer the pastry cream, which must be warm, together with the freshly made Italian meringue. This one will still be hot.
- Add a small amount of meringue and mix with the help of a spatula. We will do it with soft and enveloping movements, never stirring or beating with a lot of energy. Otherwise the souflée will deflate.
- Keep adding more meringue and smoothly integrating into the chiboust until we've integrated everything.
- Set aside.
Transfer into a bowl.
- Cover an aluminium bowl with a diameter of 8 inches/20 cm (an Ikea bowl) with film. Make sure the whole surface is completely covered.
- Pour the chiboust inside and smooth the surface.
Cut the genoise sponge cake.
- Separate the cake from the baking paper, we will do it carefully so as not to break it. Turn it over so that the toasted side is facing down.
- With the help of another aluminium bowl of the same diameter as the previous one, cut a circle of sponge cake.
- Place on top of the chiboust cream, which we already have inside the bowl, with the whiter side looking inside.
- Press gently to make sure there are no air bubbles between the cream and cake.
- Film the surface and refrigerate for 6-7 hours.
- Once it is cold, freeze it until the next day.
SECOND DAY
Caramelizes the surface.
- Take the bowl out of the freezer and remove it carefully.
- Place a plate or disc for a cake, where we are going to serve it, on the bowl and turn. Remove the film.
- Sprinkle white sugar or demerara sugar (the latter much better) and burn with the torch. Do not stay too long in an area to avoid that an excess of heat can spoil it.
- Refrigerate until the moment of serving. If we are going to serve them in 2-3 hours, I recommend you to refrigerate it 30 minutes after burning with the torch and then leave it at room temperature to finish defrosting.
Make whipped cream.
- Before we get ready to whip the cream we must make sure of two things:
- Cream must be cold 24 hours before used it.
- The bowl in which we are going to make whipped cream must be cold. I recommend to use one aluminium bowl and freeze 20 minutes before beat it.
- If you want to know how to make whipped cream, you can do it in this video.
- Pour heavy cream into freeze bowl and beat with an electric mixer into low speed.
- Once cream is becoming to form stiff peaks, add sugar little by little stirring the whole time. Increase speed gradually but without reaches high one. Ideally use medium speed.
- Before finish to beat the cream, add vanilla extract along and beat until get a perfect whipping cream. Be sure not to over-beat, otherwise cream will become lumpy and butter-like.
- Cover with plastic wrap and chill until used it.
Decorate.
- Put the cream in a pipping bag and use a wide star-shaped tip. I have used 6B Wilton tip.
- Decorate with cream all the inferior edge that surrounds the cake. You can do it the way you like the most.
- Decorate with flowers or yellow petals, if desired, and serve.


Notes
- To help the meringue whip better, we can add a few drops of natural lemon juice or a pinch of cream of tartar. Keep in mind that the latter brings a bit of flavor.
- The smell of the pastry cream will remind you a lot of lemon curd, only that the taste of this cream is much softer.
- You can use lemon extract if you wish instead of juice.
- The pastry cream and the Italian meringue must be hot still when we integrate them. The cream will be warm while the meringue will be a little warmer since we will use it as soon as we finish it.
- We must freeze the cake to avoid that the chiboust melts when we caramelize it with the blowtorch. Remember that the gelatine is thermo-reversible and when heat is applied it will lose its characteristics until it cools again.
- If you wish, you can moisten the Genovese sponge cake with syrup just before placing it on the chiboust.
- I know that the top roast of the tart should be all over the surface and more remarkable. But I was afraid to reach the melting point of the gelatin and that the cake would melt... if you are brave and want to try, that´s ok!
- We can keep it in the fridge for 3-4 days.


I can only tell you that it is one of the recipes that makes me feel happier and more satisfied when I make it and share it with you. This Lemon Souflée Tart is one of the most wonderful delicacies you can imagine. The taste, texture, sweetness point ... It is extraordinary.
I hope you dare to try it and that, if you are as much a lover of it as I am, you will enjoy it very much. I wish you a happy weekend, see you on Monday.
Big hugs,
Eva
Sources: L´express Styles
This post contains affiliate links