Torte Eszterházy
I know I always tell you the same thing, and the next week I come back with another new cake, hahaha. Now seriously, I promise you I’ll do more than just cake. Just as long as there aren’t any irresistible beauties that get in my way. Or any crazy ideas of my own. Of course, you can imagine how I refuse to make a cake like today’s, for example. It’s just that no matter how many recipes I have prepared or programmed, it takes absolute priority even if I want to resist. And that’s what happened to me this week, I discovered a marvel of Austro-Hungarian pastry and I had to make it. Torte Eszterházy or Eszterházy Cake.
But I’m sure many of you will understand me. There are things that no matter how much we want to ignore them or leave them for another time, without us wanting to, they make their way. And I won’t play hard to get either. Because these things brighten up the days and the life.

Origin Tarta Eszterházy.
This cake, called “Eszterházy torta” in Hungarian and “Esterházy-Torte” in German, takes its name from Count Pál Antal Esterházy (1776-1866), a member of the Esterházy family and Foreign Minister of the Austro-Hungarian Empire.
Apparently, the pastry chef who created this cake made with hazelnuts and a unique and different exterior decoration. His intention was to please the diplomat and he succeeded.
According to the original recipe, the batter of the cake layers is not made with yolks or flour. They are made with a meringue with ground hazelnuts (although we can also find many versions made with almonds), also known as Dacquoise. The layers of sponge cake, which are traditionally 5, must be very thin. Between each layer of cake, you will find a cream made from yolks and butter.
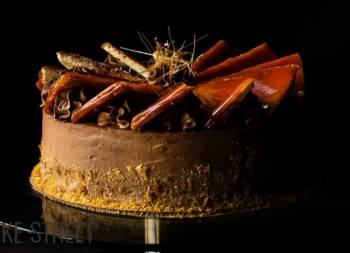
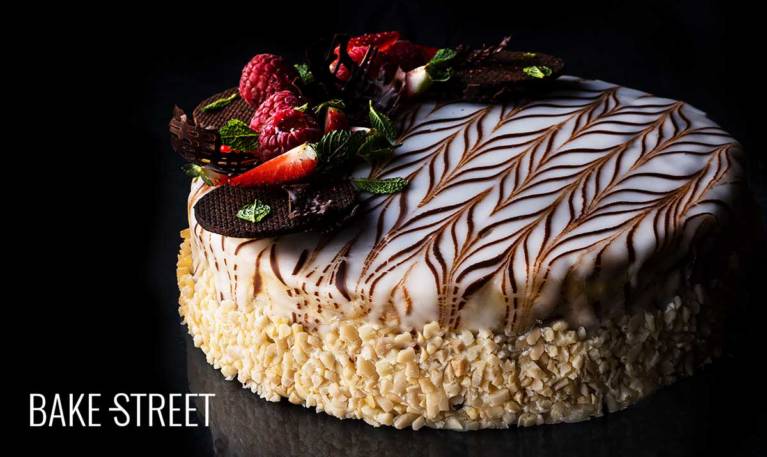
The most characteristic feature of this cake is its top decoration. It is made with a layer of fondant glaze and melted chocolate, an ingredient that will serve to create the very characteristic pattern. Finally, the sides are decorated with sliced or chopped almonds and are usually accompanied by candied fruit.

Making Eszterházy Torta.
While the cake may seem complicated, it’s not. It does, however, require patience and following the steps perfectly so that the whole process goes well. I’ll tell you how I made it and the small changes I made.
In my case, the meringue or dacquoise sponge cakes, I have made them with ground almonds and a little bit of cocoa powder. The reason why I decided to add the cocoa, very little so that the taste would not be perceived, was to make it possible to differentiate the layers when cutting. If you prefer, you can omit the cocoa powder. If you use ground roasted hazelnuts, you will manage to give a slight roasted or marbled shade to the sponge cakes.
Instead of having 5 layers, I made the cake with 7 layers of sponge cake. I found the cake too low and I wanted to give it a little more height. Not much more, though. With the amount of ingredients that I leave you, you will get 9-10 thin sponge cakes.

The easiest way to make these sponge cakes is to pipe them with a piping bag and then smooth the batter with a spatula. This process requires a little patience, but it is certainly worth it.
The cream is quite simple to make. A buttercream with egg yolk cream.
When you are about to make the yolk cream, it is very important to add the hot boiling milk little by little and stirring it at the same time. Otherwise the yolks will curdle and we will find small lumps. In the recipe I give you some tips to solve it in case this happens to you.

The upper decoration.
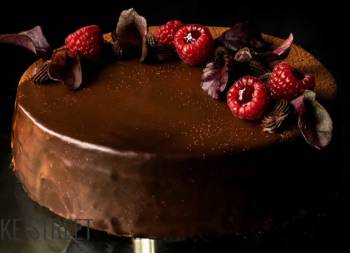
The top of the cake consists of two layers: a very thin layer of apricot jam with rum and a second layer of fondant glaze and chocolate.
Something that is important to know and that I have not found detailed anywhere… To get a perfect finish on the decoration we must work with the freshly made icing and the freshly melted dark chocolate, not tempered. Why? Because if we let the icing start to dry (which it will in a few minutes) and the chocolate loses temperature, after pipping the chocolate strands, they will start to harden very quickly.
So when we try to create the pattern, what we’ll do instead is break up those threads of chocolate. If you are wondering why I know this is happening, it is because I suffered it in the first person. That’s a real bummer.

You will also notice that both the icing and the chocolate have a small amount of almond oil. This ingredient will help us achieve a smoother, silkier finish.
Once we have made the top decoration, we must let it dry in the air for about 1 hour and refrigerate it for at least 12 hours. This way we can ensure that the cake is well impregnated with the flavours and acquires the right texture.
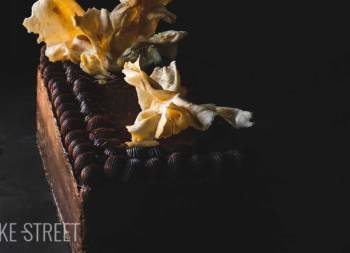
Finally we only have to decorate the cake as we like it best. In my case I have chosen raspberries, strawberries, chocolate bowls and sablées cookies (in this post you can see how to make them). But you can simplify it if you want covering the sides with almonds and decorating with some fruit or nuts 😉
To make the cake I followed the recipes from Also the Crumb please & Korena in the Kitchen. Thank you so much!
Ingredients for a 8 inch cake
FOR ALMOND AND MERINGUE SPONGE CAKES (DACQUOISE):
- 10 large egg whites, about 385 g
- 250 g sugar
- 245 g ground almonds
- 15 g cocoa powder
FOR EGG YOLK BUTTERCREAM:
- 10 large egg yolks
- 170 g icing sugar
- 70 g pastry/cake flour
- 20 g cornstarch
- 225 g whole milk
- 280 g unsalted butter at room temperature
- 1 Tbsp vanilla extract
FOR JAM LAYER:
- 75 g apricot jam
- 1 Tbsp rum
FONDANT GLAZE & CHOCOLATE:
- 300 g icing sugar
- 1 Tbsp lemon juice
- 2 tsp almond oil
- 60 g hot boiling water (more or less, add little by little)
- 50 g black chocolate 70% + 2 tsp almond oil
DCORATE:
- raspberries
- strawberries
- fresh peppermint
- bowls made with dark chocolate (in NOTES I tell you how to make them)
- chocolate sablée cookies (you can read the recipe in this post)
- bronze edible food poder
Instructions
FIRST DAY
Make almonds and egg whites sponge cakes.
- Preheat oven to 374ºF/190ºC.
- In a bowl mix ground almonds and cocoa powder, previously sieved. Set aside.
- Draw circles 7,8 inches/20 cm in diameter on baking paper. We will be able to draw 2 for each sheet, but to bake them we will have to do it of 1 in 1 unless your trays are very wide.
- Prepare 2-3 templates. If you wish you can make 5, although it is not necessary because we can reuse the first ones. Set aside.
- We can also place a cake disc under the baking paper and use it as a template.
- Separamos las claras de las yemas.
- Separate the egg whites from the yolks.
- Cover the yolks with film and reserve at room temperature. If it is very hot, refrigerate them until the time of use.
- In the bowl of the KitchenAid or of a stand mixer, pour the egg whites and whip with the whisk until the become foamy and frothy.
- Start on low speed and we will gradually increase it, little by little and without reaching the maximum, while we add the sugar in batches.
- Once we get the egg whites whipped, stop.
- Start integrating the almond mixture into the meringue. We'll do it little by little. Integrate it with the help of a silicon spatula making enveloping movements.
- Once we have all the ingredients integrated, put the mixture into a piping bag.
Pipe and bake.
- To prevent the ends of the paper from lifting or moving when you pipe the batter, place some small amounts of batter in the corners of the paper on the perforated tray. In this way the paper will remain fixed.
- Remember to place the paper with the painted area downwards.
- Cut the tip of the piping bag and pipe the batter. Make a circle following the pattern we have drawn. Then fill the interior trying to exert the same pressure at all times.
- Smooth the surface with a spatula.
- In total we need to make 7 discs. In my case I got 95, will depend on the pressure you exert when piping the batter.
- Place in the oven for 8-9 minutes. We will observe that the surface grows in a non-uniform way. Don´t worry, it´s ok, after leaving the oven will be perfect.
- Take it out of the oven and let it cool completely on a rack.
- Repeat the process with the rest of the cake discs.
- Be careful when removing the baking paper from the cake, it is very delicate. If we bake them on Teflon sheets, they would separate very easily.
- Once they've cooled, cut the outer edge. To do this, I used a plate with a diameter of 18-19 cm. Put it on the cake and cut the edges. In this way we will achieve a cleaner and more perfect finish. If you have a ring/cutter with those dimensions, perfect, you can use it to carry out this step.
- If we are going to use them the next day, once they are completely cold, cover them with film and leave them at room temperature.
Make egg yolk cream for buttercream.
- Heat the milk until it boils, then set aside.
- Add the yolks in a bowl along with the icing sugar.
- Mix until completely homogenized.
- Add the flour and the cornstarch and mix again until they are fully integrated.
- Pour in the hot milk, little by little, and mix quickly at the same time. We must do it in this way to avoid the yolk curdling and forming lumps.
- Pour the mixture into a saucepan, place it on low heat and cook, constantly mixing. Cook until the yolk mixture thickens, which will take about 5 minutes.
- In case you have any lumps, you can use the turmix in the cream and pass it through a sieve. But, if you carry out the process as I tell you, everything will be fine.
- Pour the mixture into a container and cover it with film.
- Let it cool down completely at room temperature.
- Once it has cooled down, refrigerate it until the next day.
SECOND DAY
Make egg yolk buttercream.
- First thing in the morning, remove the egg yolk cream from the fridge to be tempered. At least 2 hours before working with it.
- In the bowl of the KitchenAid add the butter and beat at medium-high speed. We should get a white, aerated, creamy butter.
- Remember to stop the KA and lower the butter from the sides whenever necessary. This way we will churn all the butter equally without leaving any leftovers.
- Start adding the egg yolk cream little by little at the same time as we churn together with the butter at speed 2. We can incorporate it in 3 batches.
- Once we have introduced all the yolk cream, add the vanilla extract and mix again at high speed for 20 seconds.
- Set aside.
Assemble the cake.
- Place a disc to present the cake on a rotating support for cakes. Under the disc place a piece of non-slip so that it does not move.
- Put a small amount of buttercream and place the first sponge cake.
- Place a thin layer of buttercream and spread with the help of a spatula trying to be as smooth as possible.
- Put another sponge cake and press lightly. Repeat the same process as the previous time and do this same step with all the layers.
- Spread the rest of the buttercream on the sides. Remove the excess using an edge smoothing tool.
- Refrigerate the cake for 15 minutes.
Make jam layer.
- Heat the jam and passed through a sieve. Press well to avoid wasting as little as possible. In this way we remove the possible pieces of fruit that may have and we will obtain a soft and fluid consistency. No lumps or pieces.
- Add the rum and mix well.
Cover the cake.
- Remove the cake from the fridge.
- Pour the jam on the surface of the cake and spread it with a spatula. We must cover the entire top.
- Set aside.
Prepare the chocolate for the decoration.
- Melt the chocolate in a bain-marie.
- Add the almond oil and mix until completely homogenized.
- Keep in the bowl with the heat of the water, but the fire off, until we have the fondant glaze is ready. It is important that the chocolate is hot when we decorate the cake.
Make fondant glaze.
- In a bowl mix the icing sugar with the lemon juice, almond oil and 2 tablespoons of hot water.
- Add hot water little by little and mix at the same time until you get the desired consistency. In my case I added almost all the water, except for 1 Tbsp.
- Mix well to achieve a homogeneous and smooth glaze.
Cover the cake.
- At this point it is important that we have everything ready because we have to work quickly to make sure that the superior decoration looks good.
- Place melted chocolate in a piping bag with a delineation tip. If you don't have this type of tipe, make a small cut at the end of the piping bag.
- Place baking paper or a Teflon sheet on the rotating cake stand. This way we will avoid staining the stand.
- Put the anti-slippery on the Teflon and place the cake on it.
- Pour the icing on the cake, you can use a spoon or spatula to distribute it over the surface.
- Next, draw chocolate lines on the fondant icing. Don't worry if they are not straight or some of them are intermittent, then it won't be noticed.
- With the help of a toothpick or knife, create the pattern that I show you in the video. We must clean the knife every time we draw a line on the surface. Otherwise, we will leave traces every time we pass the knife again.
- Let it dry for 1 hour at room temperature.
- Remove the excess from the base and refrigerate until the next day or at least for 12 hours.
THIRD DAY
Decorate.
- Decorate the surface with cut strawberries, raspberries, chocolate sablée cookies, chocolate bowls and mint leaves.
- Sprinkle bronze coloring powder and serve.
- I recommend tempering the cake for 1-2 hours before serving.


Notes
- The sponge cakes are very thin, slightly thicker than a pancake. So don't worry if you notice that they are thinner than normal.
- This sponge cake does not need to be syrupy, it is very soft and juicy, as well as very fine.
- Traditionally, the cakes do not contain cocoa powder, only ground almonds or hazelnut flour. In my case I wanted to give them a note of colour so that the layers would be well differentiated. For that reason I added some cocoa powder.
- The yolk buttercream can be made on the same day. In my case I decided to divide the process so that I could record the videos with calm. Also, I preferred not to leave the cream done to avoid having to leave it at room temperature overnight. Despite having cooked the yolks, I preferred to refrigerate the yolk cream, temper it in the morning and assemble the buttercream a couple of hours later.
- You won´t have yolk buttercream leftovers. Do not overdo the filling so that there is enough for all the layers and the outside of the cake.
- Apricot jam can be replaced by peach jam. I recommend heating it and passing it through a sieve to obtain the consistency and texture you see in the video.
- It is very important to work with the freshly made fondant glaze, otherwise it will start drying and hardening, and the hot chocolate. If we don't do it this way, after piping the chocolate, it will harden quickly and we won't be able to create the pattern in the drawing because the chocolate will have solidified.
- If you don't want to use lemon juice in the icing, omit it and use only water with the almond oil.
- Almond oil can be replaced by another variety of vegetable oil that provides little flavor such as grape seed or sunflower oil.
- The decoration is completely optional. In my case I decided to decorate it like this, but feel free to do it the way you like or feel comfortable. The most traditional way, cover the sides with laminated or chopped almonds.
- To make the little chocolate bowls what I did was to melt 70% dark chocolate, put it in a piping bag and pour it over a silicone mold. Let them cool down completely and carefully unmold them.
- We can keep it refrigerated for 3 days from its assembly.


Without a doubt this Eszterházy Torte is one of those elaborations that you have to dare to do at least once in your life. I know that there are recipes that look very elaborate and this can make us feel a bit backward. But, if we divide the work over several days, we will hardly notice it and we will be able to enjoy an exquisite cake.
In my case I did the whole process in 3 days, but it can be reduced to 2 without problems. I like to do things calmly, quietly, and I can record the videos without rushing. All this added to the fact that I have to combine it with many other things! You can always organize your agenda and take out time to do these wonders.
I hope that you will encourage it very soon and tell me what you think. Although I'm sure you'll love it. I wish you a wonderful weekend!
Big hugs,
Eva
Sources: Sute Meny Receptek