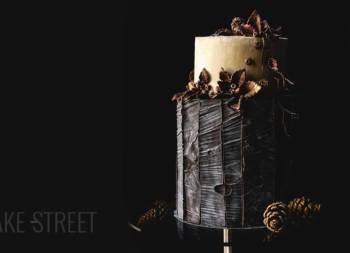
Circus of Horrors Cake
I know that right now is not a time when we’re preparing cakes at home… Or yes, who knows. It depends on the situation. The fact is that I’ve had this cake on my mind for a few weeks now (almost since the beginning of the quarantine). If there’s one thing I love to do, besides baking and photographing, it’s creating things. That’s why I thought that sharing this Circus of Horrors Cake, besides learning how to make it for some moment in our lives, will also help us to disconnect from this situation for a while.
It happens to me a lot, there are seasons that happen to me more than others. Ideas come to me suddenly and I need to transform them into something physical. When I was younger, I needed to draw them, being a little older I liked to make videos and now I need to make them edible. And then I need to photograph them.
The Circus of Horrors.
I have always liked the circus, but not from the point of view of working with animals, but more focused on “Cirque du Soleil“. I find it magical to see how these people express themselves through acrobatics, dancing… And with those fascinating costumes and make-up. But if we go further, if you read me long ago you’ll know, everything that has to do with terror drives me crazy. I like it very, very much.

That’s why I’m very attracted to shows like “The Circus of Horrors” which combines theater, circus and cabaret. The staging, the idea, the way of carrying out each character… It’s absolutely fantastic. There you can find a show that combines terror, with black comedy, rock and roll and a costume that is created through a fusion of steampunk and gothic style. Besides referring to Victorian freak shows and burlesque. I mean, it’s got everything to grab your attention. At least mine.
Out of all that brainstorming came this cake that I’m sharing with you today. I must also say one thing… In my head it’s always infinitely better than how it ends up being, hahaha. Many times I lack tools to make things, besides having to use tons of chocolate… For that reason you will see parts of the cake (more like the top of the tent), which are mixed with cardboard (base and central column) to be able to hold it. The ideal would have been to make everything from chocolate, but I would have had to use a lot of it. Perhaps at another time I will repeat it by modifying that detail.
Creating the interior of the Circus of Horrors Cake.
One thing was clear to me and that was that the interior could not be anyway… It had to have something that reminded us of this wonderful show. So I decided to combine two types of cakes to create a picture effect inside. A chocolate and banana sponge cake, which is the same one I left you in this post, and the classic vanilla sponge cake that I have already used in many of my cakes and that is from Julián from “Historias del Ciervo“. It gives a wonderful result and I don’t see the need to change it 😉
What I did was to intercalate layers of chocolate and vanilla cake, but I also cut circles inside to achieve an interspersed effect with them. That way when we cut it we’ll find something that reminds us of a chess board. I saw the method of doing this a million years ago at Sugar Geek School in their famous “Lumberjack Cake“. I remember being fascinated by how incredibly original this cake was. And, a few years later, it helped me create this Circus of Horrors Cake.
For the filling I used a whipped ganache made with dark chocolate. I’ve never worked with a filling of this kind before, and I’ve been really surprised by its taste, texture and versatility. I see a lot of possibilities with different flavours, so you will see this filling more than once.

Creating the outside.
To cover the outside, I used a milk chocolate ganache. The same one I made to make this Autumn Cake. At that time, it was one of my first cakes, I left a much thicker outer covering… Ideally, we should have a thin layer like this one.
Now it was time to shape the tent, so peculiar, of the Circus. Surely made with fondant it would have been much better because it is easier to shape. But you know I don’t like it very much (well, I don’t like it at all) so I modelled the whole exterior with modeling chocolate. It’s not the first time I work with it, I’ve already left you other cakes like this Monster Pumpkin or this Hocus Pocus Book Cookie.

I like it a lot because the taste is better, the texture, the finish… Only that modeling it can be a little more laborious. To paint it I used powdered dye dissolved in vodka (this way it doesn’t add flavor and it can be dissolved very well). Finally, some detail made with melted chocolate, like the poster of “Circus”, decorated with golden sprinkles.
It is a laborious cake, not so much because of its complexity, but because it takes several days to make. In fact, it took three days to make the whole thing. The chocolate that can be molded must be worked and left to dry in the air for at least 12 hours so that it hardens and can be painted without problems.
But everything has its reward and that is that, after all this work, we will be able to enjoy it 😉
Ladies and gentlemen, welcome to the Circus of Horrors!
Recipe Circus of Horrors Cake
Ingredients for a 15 cm diameter cake
FOR THE BATTER CAKE:
- 170 g pastry/cake flour
- 20 g cocoa powder
- 130 g sugar
- 2 large eggs
- 95 g crème fraîche
- 68 g unsalted butter, melted and cooled
- 1 ripe banana, ( about 85 g)
- 5 g baking powder
- pinch of salt
FOR VANILLA SPONGE CAKE:
- 180 g cake/pastry flour
- 110 g sugar
- 135 g unsalted butter at room temperature
- 135 g egg whites (about 3 large eggs)
- 110 g whole milk
- 8,5 g baking powder
- 2 tsp vanilla extract
- pinch of salt
FOR BLACK CHOCOLATE WHIPPED GANACHE:
- 350 g heavy cream, very cold + 2 Tbsp icing sugar
- 130 g heavy cream, hot
- 135 g black chocolate 70%
FOR MILK CHOCOLATE GANACHE (COVER):
- 300 g milk chocolate
- 200 g heavy cream
MODELING CHOCOLATE (DECORATION):
- 200 g black chocolate 70%
- 100 g glucose or corn syrup
PAINT AND DECORATE:
- vodka to dissolve food coloring
- white powder food coloring
- red paste food coloring
- sprinkles, pearled and golden
Instructions
FIRST DAY
Prepare the modeling chocolate.
- Add the chocolate in a water-resistant bowl and melt in a water bath.
- Remove from the heat and add the corn syrup. Mix very well until completely integrated.
- We will obtain a dense and slightly oily paste. Don't worry about the latter.
- Store the pasta in a freezing bag. Stretch lightly, remove all the air from inside and refrigerate for 2-3 hours or until next day.
Model the cake decoration, we start with the top of the tent.
- Take, more or less, 1/3 of modeling chocolate. Keep the rest in the bag to prevent it from drying out.
- Place it inside a Teflon sheet and stretch it with a roller pin. Try to stretch the chocolate paste until it has the diameter of the cake (15 cm). The dough should not be thick, but rather thin.
- Cut a circle, we can help us with a cake base from the base of the mould. And cut triangles, in the same way as if we were cutting a cake.
- Give shape to the tent, this step I show you in the video. In my case it was difficult for the triangles to stay together, but don't worry about this. We'll work it out later.
- Put it on a plate and let it dry for 12 hours.
Model the curtains, the sides of the tent.
- Take, more or less, 1/3 of moldable chocolate. Keep the rest in the bag to prevent it from drying out.
- Place it inside a Teflon sheet and stretch it with a roller pin. Try to stretch the chocolate paste until it is almost the height of the cake. In my case it is 11 cm high, ideally it should be a little shorter.
- Model the curtains to your liking. In my case I wanted to make pieces of tattered curtain. As if they were broken.
- To make the flap of the tent, we will cut strips and with the help of a 2 cm diameter tip, we will create the wavy effect.
- Put it on a plate and let it dry for 12 hours.
SECOND DAY
Paint the decorations of modeling chocolate.
- Prepare two shot glasses and add some vodka (or a white liquor that does not provide flavor).
- Dissolve the tip of a knife in white powder.
- In the other, add a little red colouring paste and dissolve as well.
- Paint the whole decoration with a white base, so that the red will be brighter and more intense.
- Let it dry completely.
- Once it is dry, paint the corresponding part in red. The curtains with red strips and the top tent alternating red and white triangles.
- Let them dry completely.
Prepara banana chocolate sponge cake.
- Preheat oven to 320ºF/160ºC.
- Grease and line a 15 cm diameter Push-Pan with baking paper. Set aside.
- In a medium bowl sieve the flour along with cocoa powder, baking powder and salt, mix with a silicon spatula. Set aside.
- Cut and smash ripe banana until get a puree.
- In the KA bowl or a bowl from a stand mixer mix sugar with eggs using wire whip attachment on low speed until lightly puffy.
- Add mashed banana along with crème fraîche and mix again until get an homogeneous mixture.
- Change the wire whip for the flat beater and add flour.
- Pour one third from the flour and mix on low speed for a few seconds. Stop, scrape down the sides of the bowl and pour other one third from the flour and repeat. Do not over mix, only until combined.
- Finally, pour melted butter little by little and mix at a time.
- Pour into the pan and bake for 60-65 minutes or until a cake tester comes clean when inserted into the center.
- Let sit on the pan for 5 minutes.
- Remove the cake from the pan and let cool completely on the racks.
Prepare vanilla sponge cake.
- Preheat the oven to 320º F/160ºC.
- Grease a 5,9 inch Push-Pan, with butter. Sprinkle flour, remove the excess and set aside.
- Sift the flour together with the baking powder and salt. Set aside.
- In a bowl add the egg whites together with the vanilla and milk, whisk until the mixture is homogenized.
- In the bowl of the KA or of a stand mixer, add the butter together with the sugar. Beat with the flat beater at medium speed, until a creamy, aerated and white texture is achieved.
- Begin to integrate the dry ingredients alternating them with the liquids.
- Add 1/3 of the egg white mixture and beat at the lowest speed for a few seconds. Stop, lower the mixture from the sides and add 1/3 more of the dry ingredient mixture. Mix again at low speed for a few seconds.
- Repeat the same process with the rest of the egg whites and dry ingredients mixture. Mix at low speed only until the mixture is homogenized.
- Pour the mixture into the mould and place in the oven at medium height.
- Bake for 60-65 minutes or until you prick it with a toothpick and it comes out clean.
- Remove and let stand 5 minutes in the pan.
- Unmould and leave to cool completely on a rack.
- Once it is completely cold, wrap in plastic film and refrigerate until the next day.
THIRD DAY
Make milk chocolate ganache.
- To work perfectly with this ganache, we will need a texture like Nutella®. It must be cold but not from the fridge, it has to cool at room temperature. So, I like to make them early in the morning the same I am going to decorate the cake. It will take 5-6 hours.
- Chopped finely milk chocolate, set aside.
- In a saucepan pour heavy cream medium heat until takes temperature but without boil.
- Remove from the heat and add chopped chocolate, mix until smooth.
- Pour in a medium bowl and let cool completely at room temperature.
- When mixture will be slightly cooled, cover and let a little opening to not condense.
Make the filling, whipped chocolate ganache.
- Before we get ready to whip the cream, we must make sure of two things:
- The cream must be at least 24 hours in the fridge.
- The bowl where we put the cream must be cold. I recommend you use an aluminium one and put it in the freezer 20 minutes before preparing to whip the cream.
- Pour the cream (350 g) into the cold bowl and start to whip it with an electric mixer at speed 1.
- Once it starts to whip, add the sugar little by little and without stopping beating. We will increase the speed gradually but without ever reaching the maximum. The ideal is an average speed.
- Be careful not to over whip it or we'll make butter...
- Cover the bowl with film and refrigerate it until we use it.
- On the other hand, in a saucepan add 130 g of heavy cream and place it at medium heat.
- Leave until it reaches a gentle boil.
- Remove from heat, add the chocolate in pieces and mix until it is evenly mixed.
- Transfer the mixture to a large bowl and leave to stand for 20 minutes to lose heat.
- Add a little whipped cream and mix, making smooth and enveloping movements, with the help of a silicone spatula.
- Continue adding whipped cream, little by little, and integrating following the same process.
- Transfer to a smaller bowl, cover with film and refrigerate until use.
Cut the sponge cakes.
- With the help of a cake cutter, cut one of the marbled sponge cakes in 3 equal parts. On this occasion, I recommend that you start at the bottom and, from there, proceed to cut the layers.
- With the help of two smooth cookie cutters, cut each layer of sponge cake into 3 circles of different sizes (4.5 cm and 9.5 cm in diameter). The idea is to intersperse chocolate and banana sponge cake with vanilla sponge cake.
- Once we have all the discs cut and separated, we proceed to intercalate them.
- Take a big disc of vanilla and put inside it a medium disc of chocolate. Fill the central hole with a circle of vanilla cake.
- Repeat the same process with the rest of the sponge cakes.
- Cover with film and place in the fridge for 30 minutes.


Assemble the cake.
- Place an anti-slip at the base of the cake stand to fix the cake disc.
- Put the disc and a small amount of cream on it, this will help us to fix the cake.
- Place one of the two-colored cakes and press lightly. Make sure you put a sponge cake on the base that has the lower part of the base baked, as well as reserving the other one to put it on the top.
- Spread a layer of the chocolate filling and smooth it.
- Put another bicolor sponge cake, this must have the colors placed unlike the one we put previously, and press slightly.
- Spread a layer of the chocolate filling and smooth it.
- Repeat this same process with the rest of the sponge cakes.
- Put the last layer of cake and we will do it placing the most golden part upwards (the same thing we did in the base only this one, was placed downwards). Press carefully.
Cover the outside of the cake with the leftover filling.
- Spread the chocolate filling over the entire surface of the cake and remove the excess using a border smoother. This layer will help us "pick up" possible crumbs from the cake that could come to the surface when we decorate it.
- Refrigerate for 30 minutes so that the outside hardens.
Cover the outside with the milk chocolate ganache.
- Place the ganache all over the surface. We start at the top and continue on the sides.
- Smooth, removing the excess, and refrigerate for 30 minutes.
- Spread another layer of ganache. Smooth the entire surface and refrigerate until you are ready to decorate. Ideally, we should have a thin layer of ganache.
Assemble the tent.
- To assemble the top of the tent I used a cake disc of the same size as the cake. In addition, I made myself out of cardboard, you will find useful the cardboard roll from a kitchen roll, (lined later with aluminum foil) a central pillar that could contain the tent.
- Spread some ganache on the edge of the cake disc, it will help us to hold the pieces of the tent, and we put the cardboard pillar in the center.
- Place the tent pieces around the disc.
- Refrigerate for 30 minutes.
- Pull a ganache cord on the edge of the tent and place the flap. This time, we will place the tent on a bowl to be able to refrigerate it and not to spoil it.
- Place in the fridge for 30 minutes.
Decorate the cake.
- To stick the curtains on the sides, we will help us with milk chocolate ganache.
- Put small points and place the curtains as you like.
- Place the top of the tent and the "Circus" sign.
- Serve our terrifying Horror Circus Cake.

Notes
- I used a Push-Pan 5,9 inch/15 cm.
- The baking time of each cake will vary depending on the size of the mould you use.
- Créme fraîche can be replaced by unsweetened Greek yoghurt.
- If we refrigerate the sponge cake overnight, we help the flavors ripen as well as facilitating the process of cutting the sponge cake. It crumbles less.
- To cut the inner cake discs I used two smooth cookie cutters of 4.5 cm and 9.5 cm in diameter.
- To make the modeling chocolate you can use chocolate for desserts, coating, black chocolate...
- Respect the rest time of the modeling chocolate to be able to work with it. If it is very cold, you can give it warmth with your hands or a slight heat stroke in the microwave (1 or 2 seconds).
- Remember to cover every piece of chocolate paste. When they are in contact with the air for a long time, they begin to dry out.
- The modeling chocolate can be stretched between two sheets of Teflon to work better with it. In addition it will help us to contribute final texture. If you do not have Teflon sheet, stretch it with baking paper or some material that allows us to work in this way.
- We must let modeling chocolate dry in order to paint it well, otherwise the surface will repel the paint.
- The decoration can be totally to your choice, in my case I have chosen this option that I hope you like.
- To preserve the cake we must keep it refrigerated for 3-4 days.
- Ideally, before consuming it, it should be tempered for a while, depending on the outside temperature.


I hope you enjoyed the Circus of Horrors Cake recipe by reading and watching it, as much as I enjoyed making it. For me this kind of cakes are always a challenge, I still have a lot to improve and perfect. But I keep the best and that's all that allows me to learn, improve and perfect.
I hope to be able to make many more of these kinds of cakes because they are without a doubt a new way of expressing myself and sharing with you everything that goes through my mind.
I wish you a wonderful Sunday!
Big hugs,
Eva