Kanagawa Cake
I couldn’t start the year and not have a new cake on the blog. I really have a lot of new recipes that I’m looking forward to posting, but there are times when ideas come up and I have to materialize them. I can’t resist. That’s what happened to me with this Kanagawa Cake that I’m leaving you today. I saw some pictures, and then a lot of ideas popped into my head. So, I had to do with it as soon as possible!
I’ve always said that blue candies don’t attract my attention because they’re not very appealing when you eat them. You see, there is always an exception that confirms the rule. I never thought I’d be making any blue pastry.

Kanagawa Cake.
I’m sure many of you have immediately linked the name of the cake to its appearance. But for those of you who don’t know where it came from, I’ll tell you.
The inspiration for this cake came from the famous illustration or print by Katsushika Hokusai, published between 1830-1833. “The Great Wave off Kanagawa” (神奈川沖浪裏 Kanagawa oki nami ura) which literally means “Under a Wave in Kanagawa“).
Katsushika Hokusai, was a Japanese painter who specialized in ukiyo-e (浮世絵), “paintings of the floating world” or “Japanese prints”. This is a genre of woodcut prints, a technique of woodblock print, produced in Japan between the seventeenth and twentieth centuries, from China. It was used, from that moment on, mainly in the illustration of Buddhist texts. From the 17th century onwards, this technique was used to illustrate poems and romances.
It is during this period that the style of ukiyo-e properly emerged, which reflected the life and interests of the lower strata of society: merchants, artists and rōnin (masterless samurai).
Ukiyo.
It refers to the impetuous culture chōnin that boomed in the urban centres of Edo (now Tokyo), Osaka and Kyoto. It was a world within itself. It is an ironic allusion to the homonymous term “Sorrowful World” (憂き世), the earthly plane of death and rebirth on which the Buddhist religion is based.
This art form reached its peak of popularity in the Edo metropolitan culture during the second half of the 17th century. At first, only Indian ink was used to make them, and later some prints were colored by hand with brushes. In the 18th century, Suzuki Harunobu developed a polychrome printing technique to produce nishiki-e (brocade print).
Thanks to movements like ukiyo literature and printmaking, citizens began to have more contact with artistic movements.

The Great Wave off Kanagawa.
This print is Hokusai’s best known work and the first in his famous Fugaku series sanjūrokkei (富嶽三十六景”Thirty-six views of Mount Fuji”), as well as being the most famous print of its kind and one of the most famous images in the world. Several thousand copies were made of the mould used, many of which were handed over to European collectors. From the 1870s it became very popular among French artists and collectors.
Transforming inspiration.
One thing I don’t know if I’ve ever told you is that I’ve always felt a special attraction to Eastern culture, ever since I was very young! I still remember when my parents gave me a super soft and colorful kimono when I was 5 years old. I always wanted to wear it.
When I was older, that interest was still with me. When I was 18, I had a tattoo of a dragon on my back (not exactly a small one), my parents almost had a heart attack, hahaha. And as time went by, I discovered more and more things that made me completely fall in love. Well, you’ll think I’ve let you a super long text… But for me it was important because it is the union of many feelings and likes collected over the years.
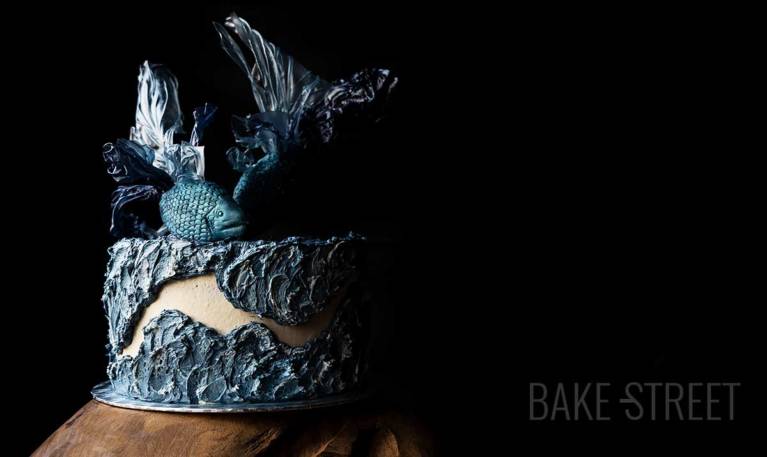
The cake is inspired by that great wave, together with many more illustrations of waves of that style and finished with some fishes that I like very much for their style and elegance, Betta fishes.

Since the protagonist was the sea, the cake had to have blue components.
I made two types of sponge cake to carry it out; a blueberry sponge cake and a vanilla sponge cake. The filling consists of a mascarpone cream, blueberry jam and a white chocolate SMBC exterior decoration.
To make the fishes, since I don’t like fondant, I thought of making them with marzipan. The interior is homemade marzipan, just like the one I left for the marzipan eel, but the exterior is made with store-bought marzipan. I wasn’t sure if I could color it well and I knew that the one I bought would have a much “cleaner” finish.
To make the fins, I followed the wonderful process Pauline shared in her Instagram (thank you very much!). Colored and dried rice wafers, simply SPECTACULAR I don’t know if she follows this same drying process. In my case I tried to dry them at a very low temperature in the oven, since at room temperature they would take millions of years…
With the wafers you not only manage to create results with different colors, but also a special and wonderful movement is achieved.
To finish the cake, some glitter that always gives that magic touch 😉
Ingredients for a 8 inch cake
FOR BLUEBERRY SPONGE CAKE:
- 300 g cake/pastry flour
- 180 g sugar
- 225 g unsalted butter at room temperature
- 225 g egg whites
- 180 g whole milk
- 14 g baking powder
- pinch of salt
- few drops blueberry extract
- blue paste food colouring "Navy", to your taste
FOR VANILLA SPONGE CAKE:
- 300 g pastry/cake flour
- 180 g sugar
- 225 g unsalted butter at room temperature
- 225 g egg whites
- 180 g whole milk
- 14 g baking powder
- 2 tsp of vanilla extract
- pinch of salt
FOR THE SYRUP:
- 250 g water
- 250 g sugar
FOR MASCARPONE CREAM:
- 400 g mascarpone cheese
- 400 g fat cream
- 105 g icing sugar
- 2 tsp vanilla extract
FOR WHITE CHOCOLATE SMBC, WHITE AND BLUE:
- 235 g egg whites
- 475 g sugar
- 680 g unsalted butter at room temperature
- 215 g white chocolate, good quality
- blue paste food colouring, "Navy"
FOR MARZIPAN FISH (2 pieces):
- 125 g ground almond
- 120 g icing sugar
- 5 g honey
- 17 g water
- 100 g store-bought blue marzipan
- dush food colouring, Navy
- dush food colouring "Jade"
- dush food colouring "Iris"
- blue-green edible glitter
FOR FISH FINS:
- rice wafers (the ones we bought to make Spring Rolls)
- water + food colouring paste, Navy
FILLING TO ACCOMPANY MASCARPONE CREAM:
- 250 g blueberry jam
DECORATION:
- dush food colouring "Iris"
Instructions
FIRST DAY
Make blueberry sponge cake.
- Grease a 8 inch Push-Pan, with butter. Sprinkle flour, remove the excess and set aside.
- Preheat the oven to 320º F/160ºC.
- Sift the flour together with the baking powder and salt. Set aside.
- In a bowl add the egg whites together with milk, whisk until the mixture is homogenized.
- In the bowl of the KA or of a stand mixer, add the butter together with the sugar. Beat with the flat beater at medium speed, until a creamy, aerated and white texture is achieved.
- Add the food colouring paste together with blueberry extract and mix again.
- Begin to integrate the dry ingredients alternating them with the liquids.
- Add 1/3 of the egg white mixture and beat at the lowest speed for a few seconds. Stop, lower the mixture from the sides and add 1/3 more of the dry ingredient mixture. Mix again at low speed for a few seconds.
- Repeat the same process with the rest of the egg whites and dry ingredients mixture. Mix at low speed only until the mixture is homogenized.
- Pour the mixture into the mould and place in the oven at medium height.
- Bake for 70-75 minutes or until you prick it with a toothpick and it comes out clean.
- Remove and let stand 5 minutes in the pan.
- Unmould and leave to cool completely on a rack.
- Once it is completely cold, wrap in plastic film and refrigerate until the next day.
Make vanilla sponge cake.
- Grease a 8 inch Push-Pan, with butter. Sprinkle flour, remove the excess and set aside.
- Preheat the oven to 320º F/160ºC.
- Sift the flour together with the baking powder and salt. Set aside.
- In a bowl add the egg whites together with the vanilla and milk, whisk until the mixture is homogenized.
- In the bowl of the KA or of a stand mixer, add the butter together with the sugar. Beat with the flat beater at medium speed, until a creamy, aerated and white texture is achieved.
- Begin to integrate the dry ingredients alternating them with the liquids.
- Add 1/3 of the egg white mixture and beat at the lowest speed for a few seconds. Stop, lower the mixture from the sides and add 1/3 more of the dry ingredient mixture. Mix again at low speed for a few seconds.
- Repeat the same process with the rest of the egg whites and dry ingredients mixture. Mix at low speed only until the mixture is homogenized.
- Pour the mixture into the mould and place in the oven at medium height.
- Bake for 70-75 minutes or until you prick it with a toothpick and it comes out clean.
- Remove and let stand 5 minutes in the pan.
- Unmould and leave to cool completely on a rack.
- Once it is completely cold, wrap in plastic film and refrigerate until the next day.
Make the syrup.
- Pour the water with the sugar in a saucepan. Place at medium heat and let it boil. The sugar should be completely dissolved.
- Once it comes to the boil, turn off the heat and let it cool completely.
- Place the syrup in a bottle with the help of a funnel.
- Set aside at room temperature.
Prepare the marzipan.
- In a large bowl mix the ground almond with icing sugar, honey and water.
- Start mixing the ingredients with the help of a silicone spatula. Once it begins to acquire a more solid consistency, knead it with our hands.
- Knead the dough very well until a uniform, smooth and manageable consistency is achieved. It will take a while.
- Flatten, wrap very well in film and let stand in the refrigerator for 24 hours.
SECOND DAY
Make white chocolate Swiss Meringue Buttercream.
- In a heat-resistant bowl, add the white chocolate. Place in a water-bath and leave until it completely melts, stirring occasionally.
- Remove from heat and reserve.
- In another heat-resistant bowl, add the egg whites along with the sugar.
- Place on a water-bath at medium low heat. Stirring constantly, leave until the egg whites reach 165ºF/74ºC. For it we will help ourselves of a digital thermometer.
- Remove from the heat, pour the egg whites into the bowl of the KitchenAid or a stand mixer and whip at medium high speed until a firm and shiny meringue is obtained.
- Once we have the firm meringue, begin to add the butter cut into squares little by little and at the same time the mixer continues whipping.
- Once we have all the butter added, increase the speed and finish whipping.
- Stop, scrap the cream with the help of a spatula and add the melted white chocolate. We will do it in a fine continuous thread while the mixer is mixing at the slowest speed.
- Whip again at high speed until the ingredients are completely integrated.
- Cover with film and set aside.
Make mascarpone cream.
- Cream must be cold 24 hours before used it.
- The bowl in which we are going to make whipped cream must be cold. I recommend to use one aluminium bowl and freeze 20 minutes before beat it.
- Pour heavy cream along with mascarpone cheese into freeze bowl and beat with an electric mixer into low speed.
- Once cream is becoming to form stiff peaks, add sugar little by little stirring the whole time. Increase speed gradually but without reaches high one. Ideally use medium speed.
- Before finish to beat the cream, add vanilla extract and beat until get a perfect whipping cream. Be sure not to over-beat, otherwise cream will become lumpy and butter-like.
- Cover with plastic wrap and chill until used it.
Assemble the cake.
- Put the mascarpone cream into a piping bag. We do the same with the blueberry jam on one side and some SMBC. Set aside.
- With the help of a cake cutter, cut the sponge cake in 4 equal parts. This time, I recommend you start at the bottom and, from here, proceed to cut the layers.
- Place an anti-slip disk on the base of the cake stand to fix the cake disc.
- Put the disc and a small amount of SMBC on it, this will help us fix the sponge cake..
- Place one of the blueberries sponge cakes and press lightly.
- Generously moisten the cake with lime syrup.
- Pipe a SMBC cord, that way it will help to hold the filling better. Pipe mascarpone cream around it, then a thread of blueberry jam, to finish with a central part of mascarpone cream. Smooth slightly.
- Place a vanilla sponge cake and press lightly.
- Pipe a SMBC cord, that way it will help to hold the filling better. Pipe mascarpone cream around it, then a thread of blueberry jam, to finish with a central part of mascarpone cream. Smooth slightly.
- Repeat this process with the rest of sponge cakes. In total we will use 3 blueberries sponge cakes and 3 vanilla sponge cakes.
- Place the last layer of sponge cake, which will correspond to a vanilla one, and we will do it placing the golden part upwards. Press carefully.
- Moisten, lighty,with syrup.
Cover the outside of the cake with white chocolate SMBC.
- Spread the SMBC with a spatula over the entire surface and remove the excess with the help of an edge smoother. This layer will help us to "pick up" possible crumbs from the cake that could come to the surface when we decorate it.
- Refrigerate for 30 minutes for the SMBC to harden.
- Remove from the cold, place another layer of SBMC, smoothed removing the excess.
- Refrigerate for 30 minutes.
Prepare the blue-colored SMBC.
- While we have our cake refrigerated, we will prepare different tones of blue SMBC.
- Add the entire amount of SMBC, which we have left over after giving our cake a second layer, in the KitchenAid bowl. Add a small amount of food colouring Navy paste and whisk at medium-high speed. Make sure the food colouring is well distributed throughout the cream.
- Remove a small amount and set aside in a bowl.
- Add more blue food colouring and beat again at medium-high speed. Take a small amount and add more color.
- In total I made 4 tones of blue, from a very light color to simulate the foam of the waves, to a darker shade (which I achieved with blue and a pinch of black food colouring) to make the sea bottom.
Decorate the outside of the cake with SMBC in blue tones.
- Place dark blue SMBC on top of the cake, smooth.
- Start creating the waves with the dark blue SMBC. We will do it randomly at the top and at the base, in the same way that we decorate a Fault Line tart. Only this time, we won't have to worry about the finish being smooth.
- Put SMBC, combining the different tones of blue we have created, for the blue base.
- When placing it, help yourself with a small spatula and try to create the movement of the waves.
- The lighter shades will be used for the tip of the wave and/or the foam.
- Once we have it decorated, sprinkle it with "Jade Green" dush food coloring.
- Refrigerate for 60 minutes or until the next day.
Shape the fish.
- Divide the marzipan into 2 equal pieces. Cover with film the one we are not going to work with while we modeled the first fish.
- Model the marzipan trying to give it the shape of a fish. In my case I have been inspired by the Betta fish variety. But you can do it on the one you like best.
- Take 50 g of bought blue marzipan and stretch it with the help of a roller pin. To prevent it from sticking to the work surface, use cornstarch for sprinkling.
- We must stretch it until it's very thin.
- Wrap homemade marzipan in the blue marzipan. To help it adhere to the marzipan, moisten it slightly with water. Press gently and adjust. Cut out the excess.
- With the help of a filling tip, create the scales over the entire surface.
- Model the mouth and place a pearl blue sprinkle in the eyes.
- Finally, colour the fish. For this I have used blue dush food colouring "Navy", dush food colouring "Iris" (to create an iridescent effect), dush food colouring "Jade Green" and blue-green edible glitter.
- Repeat the same process to make the other fish.
- Once we have them ready, let them dry at room temperature for 24 hours.
- NOTE 1: In the video I make a bigger fish than I use later. I decided to reduce the size after making them.
- NOTE 2: In this case it is not necessary to bake the marzipan because it contains NO eggs, only sugar, honey and water.


Make the fins/tails of the fish.
- Fill a deep tray with water and dissolve some blue paste food colouring. In my case I have made fins of 2 shades. So first I made the lighter ones and then I added more colorant to make the darker ones.
- I recommend you to use gloves to avoid dyeing your hands.
- Dip a rice wafer in the water, we will do it for several seconds so that it gets well moistened. We should be able to shape it without any problem.
- Take it out and put it on a Teflon sheet. Give the desired shape.
- Repeat the process with the rest of the wafers in both colours.
- To create volume and relief, we can place a silpat underneath. This will help us to shape it. We can also place underneath different utensils that allow us to achieve this effect.
- Place them in convection oven with air at 140ºF/60ºC for 90 minutes. They should be completely dry.
- When 45 minutes have passed and we observe that they maintain their shape without problems, we can stretch the silpat and turn the fins over. That way we can dry them well on both sides.
- Once they are dry, take them out, place them on a tray and keep them in a dry place (that is not humid) until the next day.

THIRD DAY
Assemble the fish.
- Put the fins and tail on the marzipan fish.
- For the pieces that are not too big, we can stick them directly into the marzipan.
- For those that are bigger, the ideal is to use a toothpick to stick them. Place one end in one of the folds of the fin and insert the other end into the marzipan.
- Repeat the same process with the other fish.
Decorate.
- Finally, decorate with the fish we have made from marzipan. To place them I used cake pop sticks. We will try to make the fishes "move" visually. Sprinkle some "Jade Green" dust on the fins.
- Serve.
- Remember that the SMBC is better when we leave it at room temperature for a while. In case you have to refrigerate the cake, I recommend placing the fishes just before serving.

Notes
- I used a Push-Pan 8 inch/20 cm, but this quantity is valid for moulds with a diameter of 9 inch/23 cm.
- The baking time of the sponge cake will vary depending on the size of the mould you use.
- If we refrigerate the sponge cake overnight, we help the flavors ripen as well as facilitating the process of cutting the sponge cake. It crumbles less.
- Follow all the steps to get a good SMBC.
- If we have SMBC leftovers, we can refrigerate it for 2 days or freeze it for 30 days.
- Decoration can be totally to your choice, in my case I have chosen this option that I hope you like.
- If you don't like blueberry jam, you can substitute another one of your choice; blackberries, raspberries...
- As this marzipan does not contain eggs, there is no need to bake it.
- The quality of the ground almond is very important. Not only for the taste, but for the final texture. If it is of poor quality, the almond will be very dry and the dough will need more water to be added. I leave this to your choice because I know we are talking about an expensive ingredient, but it is certainly worth using a good quality. You can even grind it at home, buying Marcona almonds, for example.
- We must let the figure dry at room temperaturß so that it is easier to handle when we place it on the cake. It will not harden much, so it is pleasant to eat.
- In case you don't like marzipan, you can make the fishes with fondant if you wish.
- The rice wafers are too hard to eat, they cannot be consumed. But they can be used in decoration without risk since everything used to make them is edible.
- To preserve the cake we must keep it refrigerated for 3-4 days.
- The ideal thing before consuming it is to temper it during a while, it will depend on the external temperature.


With this Kanagawa Cake I wish you a wonderful weekend. Calm, relaxed, magical, captivating, simple, serene and... yours. Enjoy every moment and transform them into beautiful memories.
I do not know if it will be the age, but with time you realize that this is the true recipe for happiness. Enjoy every moment of your life and create beautiful memories that accompany us every day. Create magic and live it.
Ok, today I am emotional, hahaha. Of course, for those of you who dare to do it, don't stop sharing it with me because I love to see your creations!
I send you a big hug! Happy weekend,
Eva
This post contains affiliate links.