Dark Forest Cake
Many times, in our heads, we imagine things in one way, but as we are doing them they end up in another way that has nothing to do with it… Well, this cake was supposed to be a Christmas cake, but instead I got a Tim Burton style cake. I see it a little creepy… So, given its decoration, I thought it would be better to call it Dark Forest Cake.
Yes, I know, the change of idea and name has been very radical. But I think we should call things by their name, hahaha. Christmas style has very little, well, maybe Tenebrous Christmas. Lol.

Dark Forest Cake.
I had never baked a tall cakes or extended height cakes before and, to tell you the truth, it was something I had been wanting to do for a long time. I know that there are things to improve, but since it’s not going to be the last one I do, I’ll keep practicing.
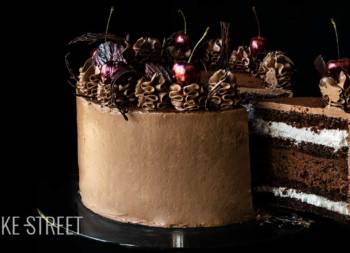
To carry it out, and how it was going to be Christmas, I thought of making an interior that combined the colors red and white. But I also wanted to change the interior format and present it in a different way.
So I decided to make a vanilla cake to put at the base of the cake and at the top of the first height, a Joconde sponge cake (it’s similar to a Genoise cake, but this one has ground almond, I left it for the first time in the Opera Torte) only this time in red color and, finally, some marbled sponge cakes, red and white, with a smaller diameter to make the second height.
The filling is a mascarpone cream with a touch of vanilla and, at the top, also added a central part of blueberry jam. Of course this can be replaced by raspberry, strawberry, gooseberries … The one that best suits your tastes.
To make the base of the cake, I decided to put a vanilla cake, a roll of Joconde cake filled with cream and another vanilla cake. The idea was that when cutting the cake we would find vertical layers instead of horizontal as we usually see them. This step was a little more laborious than I thought, I must improve the process of rolling the cakes with the filling and make sure that the layers remain of uniform thickness.

Decorating.
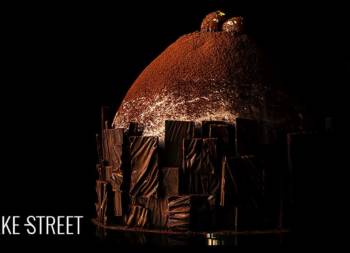
Since my idea was to decorate the cake with “wooden boards” made of chocolate, I decided to make an exterior SMBC decoration. The main reason is that it’s a cover that stands up very well to the passage of days and, second, that you can “stick” elements to it.
To make the decorations, I used modeling chocolate. I really like working with this element because it allows you to model it very well and it’s not fondant… Oh, I’m sorry, I don’t like fondant. I know it’s really cool for some things, but I can’t. I’m sorry, I don’t like fondant. I’m always looking for alternatives, even marzipan paste, rather than making use of this ingredient.
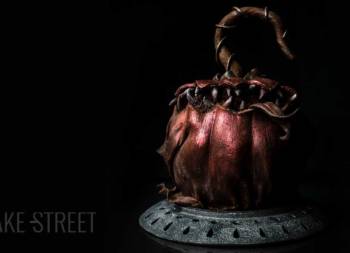
I’m sure you’re familiar with it because I’ve left you a couple of recipes on the blog carried out with it, the last one was this pumpkin cake. Once again, my “Tim Burton” style comes out, hahaha. Will I be a little creepy?
I think if I had painted the leaves and fruits in more intense colors and omitted the branches, the final result would have been more in keeping with what I had in mind. I also thought of decorating it with fresh gooseberries and some aromatic herbs to accompany them, but I wanted to model and here’s the change of style.
The result is a cake with a very juicy interior, a lot. However, you have to feel like eating a good piece of cake or choose which floor you prefer to eat, hahaha.
Ingredients for a 5,9 inch cake
FOR VANILLA SPONGE CAKE (5,9 inches / 15 cm):
- 180 g cake/pastry flour
- 110 g sugar
- 135 g unsalted butter at room temperature
- 135 g egg whites (about 3 large eggs)
- 110 g whole milk
- 8,5 g baking powder
- 2 tsp vanilla extract
- pinch of salt
FOR RED JOCONDE SPONGE CAKE (2 sheets):
- 1/4 cucharadita de sal
- 280 g ground almond
- 90 g pastry/cake flour
- 340 g egg, about 6 large eggs
- 170 g sugar
- 230 g egg whites
- 140 g icing sugar
- 60 g unsalted butter, melted and cooled
- food colorant paste "Extra Red"
FOR MARBLED SPONGE CAKE (2 pieces, 4,7 inches/12 cm):
- 185 g pastry/cake flour, divided in 2 parts
- 85 g unsalted butter at room temperature
- 120 g sugar
- 1 large egg
- 200 g whole milk
- 8 g baking powder, divided in 2 parts
- 1 tsp vanilla extract
- pinch of salt
- food colorant paste "Extra Red"
FOR SYRUP:
- 150 g water
- 190 g sugar
PARA LA CREMA DE MASCARPONE:
- 500 g fat cream
- 500 g mascarpone cheese
- 120 g icing sugar
- 2 tsp vanilla extract
FOR VANILLA SMBC:
- 150 g egg whites
- 285 g sugar
- 375 g unsalted butter at room temperature
- 1 tsp vanilla extract
FOR DECORATING CHOCOLATE (WOODEN BOARDS):
- 350 g black chocolate 72%
- white powder foo colorant
FOR MODELING CHOCOLATE (LEAVES AND ORNAMENTS):
- 100 g black chocolate 70%
- 50 g glucose or corn syrup
- metallic edible powder, red and gold
- orange edible powder
Instructions
FIRST DAY
Make vanilla sponge cake.
- Preheat the oven to 320º F/160ºC.
- Grease a 5,9 inch Push-Pan, with butter. Sprinkle flour, remove the excess and set aside.
- Sift the flour together with the baking powder and salt. Set aside.
- In a bowl add the egg whites together with the vanilla and milk, whisk until the mixture is homogenized.
- In the bowl of the KA or of a stand mixer, add the butter together with the sugar. Beat with the flat beater at medium speed, until a creamy, aerated and white texture is achieved.
- Begin to integrate the dry ingredients alternating them with the liquids.
- Add 1/3 of the egg white mixture and beat at the lowest speed for a few seconds. Stop, lower the mixture from the sides and add 1/3 more of the dry ingredient mixture. Mix again at low speed for a few seconds.
- Repeat the same process with the rest of the egg whites and dry ingredients mixture. Mix at low speed only until the mixture is homogenized.
- Pour the mixture into the mould and place in the oven at medium height.
- Bake for 55-60 minutes or until you prick it with a toothpick and it comes out clean.
- Remove and let stand 5 minutes in the pan.
- Unmould and leave to cool completely on a rack.
- Once it is completely cold, wrap in plastic film and refrigerate until the next day.
Make marbled sponge cakes.
- Preheat the oven to 345ºF/175ºC.
- Grease and line two 12 cm diameter moulds with baking paper. Set aside.
- In the bowl of KitchenAid add the butter together with the sugar and beat with the flat beater. Start at speed 1 and gradually increase until you reach a medium-high speed. We will obtain a creamy, aerated and white butter.
- Sift the flour together with the pinch of salt, stir and divide into two equal parts. Add 4 g of baking powder in one and 4 g of impeller in the other. Set aside.
- Whisk the milk along with the egg and vanilla. Divide into two equal parts. Set aside.
- Take the butter out of the bowl, divide into two equal parts.
- Leave one of the parts of butter and sugar in the KitchenAid bowl. Beat at speed 1 while adding, alternately, the dry ingredients with the liquids.
- Mix only until no flour remains.
- Transfer the mixture to a bowl.
- Prepare the red batter. Add the mixture of butter and sugar in the bowl of the KitchenAid and add red paste food coloring. Mix with the flat beater at medium speed until is fully integrated.
- Beat at speed 1 while adding, alternately, the dry ingredients with the liquids.
- Mix only until no flour remains.
- Transfer the mixture to a bowl.


Pour into the molds and bake.
- With the help of a spoon, place a small amount of vanilla batter in the mould and, on top of it, a small amount of red batter.
- Tap the mold on a work surface to settle the batter.
- Repeat the process alternating one of vanilla and another one of red color trying that it is a disc inside another one. We will fill without reaching the edge.
- Repeat the same process in the other mold.
- Place in the oven at half height and bake for 40 minutes or until inserting a toothpick in the center comes out clean.
- Remove and leave to cool inside the moulds on a rack for 10 minutes.
- Unmould, let them cool completely, wrap in film and refrigerate until the next day.
SECOND DAY
Make vanilla Swiss Meringue Buttercream.
- In a heat-resistant bowl, add the egg whites along with the sugar.
- Place on a water-bath at medium low heat. Stirring constantly, leave until the egg whites reach 165ºF/74ºC. For it we will help ourselves of a digital thermometer.
- Remove from the heat, pour the egg whites into the bowl of the KitchenAid or a stand mixer and whip at medium high speed until a firm and shiny meringue is obtained.
- Once we have the firm meringue, begin to add the butter cut into squares little by little and at the same time the mixer continues whipping.
- Once we have all the butter added, increase the speed and finish whipping.
- Stop, scrap the cream with the help of a spatula and add the vanilla extract.
- Whip again at high speed until the ingredients are completely integrated.
- Cover with film and s aside.
Make mascarpone cream.
- Cream must be cold 24 hours before used it.
- The bowl in which we are going to make whipped cream must be cold. I recommend to use one aluminium bowl and freeze 20 minutes before beat it.
- Pour heavy cream along with mascarpone cheese into freeze bowl and beat with an electric mixer into low speed.
- Once cream is becoming to form stiff peaks, add sugar little by little stirring the whole time. Increase speed gradually but without reaches high one. Ideally use medium speed.
- Before finish to beat the cream, add vanilla extract and beat until get a perfect whipping cream. Be sure not to over-beat, otherwise cream will become lumpy and butter-like.
- Cover with plastic wrap and chill until used it.
Make the syrup.
- Pour the water with the sugar in a saucepan. Place at medium heat and let it boil. The sugar should be completely dissolved.
- Once it comes to the boil, turn off the heat and let it cool completely.
- Place the syrup in a bottle with the help of a funnel, close and shake to mix well.
- Set aside at room temperature.
Make Joconde sponge cake.
- Preheat oven to 400ºF/205ºC.
- Line a perforated tray with baking paper. Set aside.
- Sift the flour, set aside.
- Sift the ground almond, set aside.
- In the bowl of the KitchenAid or a stand mixer, add the eggs along with the sugar and salt. Beat, increasing progressively the speed without reaching the maximum, until reaching the rippon stage* (see in NOTES).
- Once this point has been reached, add red paste food colorant and beat again at medium speed until it dissolves completely.
- On the other hand, in a bowl we add the egg whites. Begin to whip them at the lowest speed and gradually increasing the speed without reaching the maximum.
- As soon as they start to foam we will add the icing sugar little by little and whipping at the same time.
- Once we have all the icing sugar incorporated, we will continue whipping until obtaining a firm and brilliant meringue. Set aside.
- Mix the almonds with the sifted flour.
- Begin to add the dry ingredients, little by little, to the whipped eggs. We will do it with enveloping movements helping us with a spatula.
- Integrate the whipped egg whites to the mixture and homogenize with enveloping movements.
- Finally, add the melted butter and integrate again with enveloping and soft movements.
- Place the mixture in a piping bag.
Bake.
- To prevent the ends of the paper from lifting or moving when you pipe the batter, place a few small "points" of batter in the corners. In this way the paper will remain fixed.
- Cut the tip of the piping bag and pipe the batter. Make a rectangle and then fill the inside trying to exert the same pressure all the time.
- If we have more batter in the piping bag, we will create lines around the rectangle.
- Place in the oven for 9-10 minutes. We will see that it acquires a light golden color for the surface. Also, if we press the surface of the cake, it will return to its initial state.
- Remove from the oven and let it cool completely on a rack.
- If we are going to use it the next day, once it is completely cold, cover it with film and leave it at room temperature.
Assemble red Joconde sponge cake.
- With the help of a cutter or knife, cut the ends of the sponge cake from one of the sheets.
- Divide the sponge cake into two equal parts, they should be 12 cm wide. The length will be the length of the sponge sheet.
- Place the cake on a sheet of baking paper.
- Wet generously with syrup. We will do it on the side that has been upside down during baking. Wait for the sponge cake to absorb the syrup.
- Spread a layer of mascarpone cream over the entire surface of the cake. Smooth.
- Roll the sponge cake on itself. We will do it with care to avoid that it breaks. The ideal thing is to help us with the paper of oven to go turning it.
- Set aside.
- Repeat the same process with the other sponge cake.
- Place the rolled cake on top of the one we have just prepared and roll it back on itself.
- Wrap in film and refrigerate until the time of use.
Assemble the first part of the cake.
- With the help of a cake cutter, cut the vanilla sponge cake in 2 equal parts.
- Begin by cutting the upper part to remove the domed part.
- We will not remove this part so that when we cut the rest of the cake we do not press the crumb and it clumps.
- Place an anti-slip at the base of the cake stand to fix the cake disc.
- Put the disc and a small amount of cream on it, this will help us to fix the cake.
- Place one of the vanilla sponge cakes and press lightly.
- Generously moisten the cake with syrup.
- Spread a thin layer of mascarpone cream.
- Remove the roll of Joconde sponge cake from the fridge. Place on the vanilla sponge cake.
- We will do it with care trying that it is centered.
- Cover the surface of the red sponge cake with mascarpone cream. This layer will be thicker. Leave the thickness of one of the Joconde sponge sheets unfilled/covered up to the edge of the vanilla sponge cake. Later we will place it here.
- Cross the cake with a wooden stick to help it stay together.
- Place the other vanilla cake on top of the red Joconde cake roll.
- Refrigerate for 30 minutes.
Assemble marbled sponge cakes.
- With the help of a cake cutter, cut one of the marbled sponge cakes in 2 equal parts.
- Begin by cutting the upper part to remove the domed part.
- We will not remove this part so that when we cut the rest of the sponge cake we do not press the crumb and it becomes clumped.
- Repeat the same process with the other cake.
- Place an anti-slip at the base of the cake stand to fix the cake disc.
- Put the disc and a small amount of cream on it, this will help us to fix the cake.
- Place one of the sponge cakes and press lightly.
- Generously moisten the cake with syrup.
- Spread a layer of mascarpone cream leaving a hole in the center.
- Fill the hole with blueberry jam.
- Place another sponge cake on top and press lightly. Fill in the same way as above.
- Follow the same process until you use the 4 layers of marbled sponge cake.
- Cover the whole surface with mascarpone cream.
- Refrigerate for 30 minutes.
Continue with the cake assembly.
- Cut the other Joconde red sponge sheet in the same way and with the same measurements as the previous one.
- Place one of the parts on the cake, covering the white part of the filling. In the event that we have an uncovered piece, which is very likely to occur, cut the exact measure we need of the piece of cake we have left and place on the cake.
- Press gently to adjust.
- Cover with film and refrigerate until the next day.

Prepare the modeling chocolate.
- Add the chocolate in a water-resistant bowl and melt in a water bath.
- Remove from the heat and add the corn syrup. Mix very well until completely integrated.
- We will obtain a dense and slightly oily paste. Don't worry about the latter.
- Store the pasta in a freezing bag. Stretch lightly, remove all the air from inside and refrigerate for 2-3 hours or until next day.
THIRD DAY
Finish assembling the cake.
- Place the small cake, made with marbled sponge cakes, on top of the larger cake (made with vanilla sponge cakes and red Joconde).
- Cover the whole cake with SMBC vanilla.
- Arrange a thin first layer to cover the cake and prevent the crumbs from coming out.
- Refrigerate for 30 minutes.
- Place a second layer of SMBC.
Make chocolate decoration.
- Melt the chocolate in a bain-marie, set aside.
- Place a silpat on an oven tray.
- Pour the chocolate on it and spread with the help of a spatula.
- Place film on it and wrinkle the surface, this way we will be able to create a finish similar to the tree bark.
- Refrigerate until it hardens completely. Ideally it should be stored for 30-40 minutes in the freezer.
- Take it out of the fridge and remove the film from the chocolate.
- Cut the chocolate "boards" with the help of a knife. We will give the length that has the bottom of the cake.
- Paint the surface with white powder food colorant.
- Refrigerate until the moment of use.
- Since we need to prepare many "chocolate wooden tables", divided the amount of chocolate in 2 and I do it in 2 different batches.
Make the decorations with modeling chocolate.
- To decorate the cake we will make leaves and forest fruits.
- To make the leaves, stretch a portion of modeling chocolate between a sheet of Teflon and with the help of a rolling pin.
- Cut the leaves using specific cutters and shape.
- Let them harden a little at room temperature.
- Brush with edible powder.
- Repeat the same process with the fruits and even branches of tree if we want it.
- Set aside.
Decorating the cake.
- Arrange on the bottom of the cake the chocolate wooden boards. We will do it with care and pressing lightly so that it remains adhered.
- Decorate with leaves and ornaments made with modeling chocolate.
- Sprinkle the surface with icing sugar and edible glitter.
- Serve.

Notes
- The ribbon stage is obtained by beating the eggs together with the sugar for several minutes. The mixture takes on a whitish colour and the texture becomes very thick to the point of lifting the whisk and being able to form a cord or ribbon over the mixture without deforming it. Hence the name.
- I used a Push-Pan 5,9 inch/15 cm.
- If we refrigerate the sponge cake overnight, we help the flavors ripen as well as facilitating the process of cutting the sponge cake. It crumbles less.
- Follow all the steps to get a good SMBC.
- If we have SMBC leftovers, we can refrigerate it for 2 days or freeze it for 30 days. this time we will not have leftovers.
- In my case I have used red paste food coloring because is that it contributes a more alive and intense tonality. But, you can use another type if you prefer.
- If you don't want to add food colorant, you can omit it and do it without it.
- To make the modeling chocolate you can use chocolate for desserts, coating, black chocolate...
- Respect the rest time of the modeling chocolate to be able to work with it. If it is very cold, you can give it warmth with your hands or a slight heat stroke in the microwave (1 or 2 seconds).
- Remember to cover every piece of chocolate paste. When they are in contact with the air for a long time, they begin to dry out.
- The modeling chocolate can be stretched between two sheets of Teflon to work better with it. In addition it will help us to contribute final texture. If you do not have Teflon sheet, stretch it with baking paper or some material that allows us to work in this way.
- To paint it I have used metallic powder food colorant, but another type of food colorant can be used.
- The decoration can be totally to your choice, in my case I have chosen this option that I hope you like.
- To preserve the cake we must keep it refrigerated for 2 days.

Of course, in order to make this Dark Forest Cake you have to be willing to eat a cake or some nearby celebration to be able to share it with others. Because although it has a smaller diameter than others I have left you, it has height.
It is true that lately I am making cakes with a smaller diameter because at home my family do not eat almost anything sweet. Some don't because they don't like it, but at the moment they don't even want to look at it!
So I'm making a somewhat more measured format and, even so, a pretty big cake comes out.
Oh! And you'll also need a lot of space in the fridge I had to remove a shelf and the bottle rack in order to keep it refrigerated on the days I was making it.
I wish you a wonderful weekend, see you next week!
Big hugs,
Eva