Mont Blanc Cake
Today I come with a cake that, at first, was not going to be like this… I’ll tell you. It’s been a long time since I’ve wanted to make the classic Mont Blanc, it’s a cake that has always caught my attention powerfully and I’ve decided that this year it won’t happen. But, as I want to make my own homemade chestnut cream, I thought of making a first contact with this Mont Blanc Cake.
My idea was to make a cake inspired by this traditional sweet, but with some varieties that I wanted to introduce. The classic preparations would be part of the cake; meringue, mascarpone cream and cream of chestnuts. The latter is not 100% the same as the traditional pastry, since for the classic noodle decoration a mixture of chestnut puree, brown glacés and cream or crème fraîche is made. We’ll talk about this later 🙂

Mont Blanc Cake.
It’s not the first time that I’ve had an idea in my head and when I’m ready to materialize it, it changes completely. On this occasion what happened to me was that in my head it “looked nice”, but when I saw it… Buff, I didn’t like anything, hahaha.
To begin with, the consistency of the cream (since it wasn’t the original) didn’t behave as far away as I thought it would. So when I got ready to decorate it I found a cream that didn’t keep its shape well. At least as I wished.
To this we must add that decorating a small cake is easy because you can move and rotate it. But… A cake/tart? Oh, my God, impossible. As I say to you, and as you will see in the video, a horror! So I had to improvise a new decoration for it.
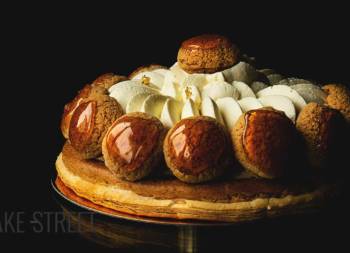
The noodles (frightful) that I had on the dome, I decided to smooth them. Less is more, so it was with all those strands. To give it a more elegant finish, I thought of sprinkling it with cocoa powder, without covering the entire surface, trying to create a gradient on the bottom and decorate it with marrons glacés and gold leaf. This part was going well, now I had to think about the lower decoration.
I had several options: dehydrated meringues, some hemispheres that I made of chocolate and, for what I finally decided, the chocolate squares. This idea is inspired by one of Tortik Annuchka,‘s cakes, I have already recommended them to you on occasion, but I do it again. Their cakes are extraordinary.

The inside…
It’s one of the most delicious cakes I’ve ever made, really. You are going to think – Ok, you always say the same thing! – Well, you’re right, but this cake is really good. I promise.
The base are layers of vanilla sponge cake soaked in rum syrup. The interior consists of two fillings; chestnut cream and a cream of mascarpone that we will accompany with pieces of marrons glacés (remember that almost 4 years ago I left you how to make them at home, you have the recipe in this link, only available in Spanish because is an old recipe) or chestnuts in syrup, as you prefer.
We will cover the cake with mascarpone cream to crown it with the meringue dome. The texture will be crunchy on the outside, but creamy on the inside. By covering the baked meringue with the cream and, after the night’s rest, it acquires a soft, creamy consistency… perfect.

Finish by decorating with squares of chocolate, cocoa powder and marrons glacés… A real delicacy from which, moreover, I never thought anything beautiful could ever come out.
Moral: If something doesn’t turn out as you expected, improvise and change it as you go along, but never give it up.
Ingredients for a 5,9 inch cake
FOR VANILLA SPONGE CAKE:
- 180 g cake/pastry flour
- 110 g sugar
- 135 g unsalted butter at room temperature
- 135 g egg whites (about 3 large eggs)
- 110 g whole milk
- 8,5 g baking powder
- 2 tsp vanilla extract
- pinch of salt
FOR RUM SYRUP:
- 100 g water
- 125 g sugar
- rum to taste
FOR MASCARPONE CREAM:
- 250 g mascarpone cheese
- 250 g fat cream
- 60 g icing sugar
- 1 tsp vanilla extract
FOR MERINGUE:
- 180 g egg whites
- 170 g sugar
- 170 g icing sugar
FOR CHESTNUT & MASCARPONE CREAM:
- 135 g mascarpone cheese
- 145 g fat cream
- 140 g chestnut cream
FOR INSIDE FILLING:
- 200 g chestnut cream
- chestnut in syrup marrons glacés (link recipe, only Spanish)
FOR CHOCOLATE DECORATION:
- 300 g black chocolate 70%
FOR DECORATE:
- cocoa powder
- marrons glacés or chestnuts in syrup
- gold leaf
Instructions
FIRST DAY
Make vanilla sponge cake.
- Preheat the oven to 320º F/160ºC.
- Grease a 5,9 inch Push-Pan, with butter. Sprinkle flour, remove the excess and set aside.
- Sift the flour together with the baking powder and salt. Set aside.
- In a bowl add the egg whites together with the vanilla and milk, whisk until the mixture is homogenized.
- In the bowl of the KA or of a stand mixer, add the butter together with the sugar. Beat with the flat beater at medium speed, until a creamy, aerated and white texture is achieved.
- Begin to integrate the dry ingredients alternating them with the liquids.
- Add 1/3 of the egg white mixture and beat at the lowest speed for a few seconds. Stop, lower the mixture from the sides and add 1/3 more of the dry ingredient mixture. Mix again at low speed for a few seconds.
- Repeat the same process with the rest of the egg whites and dry ingredients mixture. Mix at low speed only until the mixture is homogenized.
- Pour the mixture into the mould and place in the oven at medium height.
- Bake for 55-60 minutes or until you prick it with a toothpick and it comes out clean.
- Remove and let stand 5 minutes in the pan.
- Unmould and leave to cool completely on a rack.
- Once it is completely cold, wrap in plastic film and refrigerate until the next day.
Make the syrup.
- Pour the water with the sugar in a saucepan. Place at medium heat and let it boil. The sugar should be completely dissolved.
- Once it comes to the boil, turn off the heat and let it cool completely.
- Place the syrup in a bottle with the help of a funnel, add rum to taste, close and shake to mix well.
- Set aside at room temperature.
SECOND DAY
Make the meringue.
- Preheat oven to 32,2ºF/90ºC.
- Add the egg whites to the KitchenAid bowl along with a little sugar and whisk at medium high speed until you get a meringue that forms soft peaks.
- Add the rest of the sugar, little by little, as it continues to whisk until you get a firm and shiny meringue.
- Remove the bowl from the KitchenAid and add the icing sugar. We'll do it in two batches.
- Mix with the help of a spatula making soft and enveloping movements.
- Once the meringue is ready, prepare it for baking.
Put the meringue on a tray and we'll bake.
- Place a sheet of Teflon on a perforated tray. In my case, I have placed a 5,9 inch/15 cm diameter cake base as a template to form the meringue dome.
- Put meringue on the template, enough to form a dome the size I show you in the video.
- With the help of a spatula, we give shape trying to give a smooth finish.
- Introduce the rest of meringue in a piping bag with a smooth tip 0,4 inch/1 cm in diameter.
- Pipe strands on the tray.
- Place in the oven at medium height and bake for 2 hours.
- After that time, reduce to 26,6ºF/80ºC and leave for 30 minutes more.
- Turn off the oven and let them cool inside.
- To dry the rest of the meringue that I had on the piping bag, I did it in the food dehydrator.
- I put strips of paper on the trays and piped the meringue.
- Let meringue dry at 21ºF/70ºC for 4-5 hours.
Make chocolate decoration.
- Melt the chocolate in a bain-marie, set aside.
- Place a silpat on an oven tray.
- Pour the chocolate on it and spread with the help of a spatula.
- Place film on it and wrinkle the surface, this way we will be able to create a finish similar to the tree bark.
- Refrigerate until it hardens completely. Ideally it should be stored for 30-40 minutes in the freezer.
- Take it out of the fridge and remove the film from the chocolate.
- Cut squares and rectangles of different sizes with a knife.
- Refrigerate until the moment of use.
Make mascarpone cream.
- Cream must be cold 24 hours before used it.
- The bowl in which we are going to make whipped cream must be cold. I recommend to use one aluminium bowl and freeze 20 minutes before beat it.
- Pour heavy cream along with mascarpone cheese into freeze bowl and beat with an electric mixer into low speed.
- Once cream is becoming to form stiff peaks, add sugar little by little stirring the whole time. Increase speed gradually but without reaches high one. Ideally use medium speed.
- Before finish to beat the cream, add vanilla extract and beat until get a perfect whipping cream. Be sure not to over-beat, otherwise cream will become lumpy and butter-like.
- Cover with plastic wrap and chill until used it.
Make chestnut & mascarpone cream.
- Cream must be cold 24 hours before used it.
- The bowl in which we are going to make whipped cream must be cold. I recommend to use one aluminium bowl and freeze 20 minutes before beat it.
- Pour heavy cream along with mascarpone cheese and chestnut cream into freeze bowl and beat with an electric mixer into low speed.
- Increase speed gradually but without reaches high one. Ideally use medium speed.
- Beat until get a perfect whipping cream. Be sure not to over-beat, otherwise cream will become lumpy and butter-like.
- Cover with plastic wrap and chill until used it.
Assemble the cake.
- With the help of a cake cutter, cut the sponge cake in 4 equal parts.
- Start by cutting from the bottom, with the smallest cut you can get from the cake cutter.
- Put the mascarpone cream in a piping bag. Set aside.
- Put the chestnut cream in a piping bag, set aside.
- Place an anti-slip disc on the base of the cake stand to fix the cake disc.
- Put the disc and a small amount of cream on it, this will help us fix the cake.
- Place one of the sponge cakes and press lightly.
- Generously moisten the cake with syrup.
- Pipe a spiral of chestnut cream in the middle.
- Surround this pipingo the mascarpone cream covering the rest of sponge cake.
- With the help of some tweezers, place pieces of marrons glacés on top.
- Place another sponge cake, press lightly and moisten with syrup.
- Repeat the same process as in the previous layer.
- Cover with the last layer of sponge cake and moisten generously.
- Pipeh the mascarpone cream over the surface of the cake and the sides.
- Using a spatula, smooth the top and sides.
- Refrigerate for 20 minutes.
Finish assembling the cake.
- Place the meringue dome on top of the cake, adjust carefully.
- Cover the dome with the rest of mascarpone cream. We try to give a smooth finish all over the surface.
- On this, place a layer of chestnut cream.
- Cover the entire surface of the dome and smooth.
- Refrigerate for 30 minutes.
Decorate the cake.
- Decorate the entire lower with squares and rectangles of chocolate.
- To be able to create several levels, we will super put some of them. Stick them with a little melted and tempered chocolate in the back.
- Once we have placed all the chocolate, refrigerate for 20 minutes.
- Sprinkle the surface with cocoa powder.
- Decorate with marrons glacés on top and, on top of these, gold leaf.
- Brush the chocolate sheets with cocoa powder to give it a matte finish.
- Serve.


Notes
- I used a Push-Pan 5,9 inch/15 cm.
- If we refrigerate the sponge cake overnight, we help the flavors ripen as well as facilitating the process of cutting the sponge cake. It crumbles less.
- If we don't have a cake disc with the specified diameter, we can draw it on baking paper. Remember to put face down the mark made with pencil or marker to avoid that it is in direct contact with the meringue.
- Dry meringue can be stored in an airtight container for several months. It is important that it is very dry, when split it should be crunchy and have no moisture at all. Otherwise, it will have a chewy texture.
- The chestnut cream I have used is store-bought, but I have yet to leave you a homemade recipe soon.
- The decoration can be totally to your choice, in my case I have chosen this option that I hope you like.
- The cake, once assembled, is better after resting overnight in the refrigerator. In my case to make it, I take 3 days. But you can have it ready in two days.
- I recommend that you sprinkle the cocoa powder just before serving. The humidity of the cream causes it to lose its finish and texture.
- Marrons glacés can be replaced by chestnuts in syrup.
- If you want to make homemade marrons glacés, you can do it following this recipe I left you some time ago.
- To preserve the cake we must keep it refrigerated for 3-4 days.


This Mont Blanc Cake invites you to the cold autumn days of cloudy skies. Those in which, if I could, I would enjoy next to a fireplace wrapped with a knitted blanket. I love cooking at any time of the year, but I enjoy it even more when this time of year arrives.
I always encourage you to try each of the elaborations that I leave you, but this is one of those that (for God's sake!) do not let pass. I know that when you read the process you will put your hands on your head and tell me that it is very long and laborious. It may be, but all that is worthwhile requires a little effort on our part. Cheer up, you won't regret it ;)
I wish you a wonderful weekend, see you on Monday!
Big hugs,
Eva
This post contains affiliate links.