Monster Pumpkin Cake
I couldn’t resist… Those of you who have known me for a long time know that I love Halloween. I know it’s a festivity that doesn’t correspond to Spanish culture and customs, but I also believe that life is about enjoying and celebrating as much as possible. That’s why I’m one of those people who “aim for everything” in order to have a good time and make good memories and experiences. These are the things that we really take with us everywhere. So I couldn’t let this Halloween go by without sharing this Monster Pumpkin Cake with you.
I know I’m a little late to share it with you, but lately I don’t get the time for everything I want to do! But we already know that it is never too late if the joy is good.

Where my inspiration comes from.
Not long ago, I discovered a girl who does some spectacular work. She specializes in creating and designing monster-inspired cakes and pastries. I fell in love with her work and imagination. It’s a mixture of fantasy combined with a style that reminds me a lot of Tim Burton, it makes me crazy. Her name is Mélanie Launay and her blog is Qui a Volé les Tartes? She also has a book that catches my attention and I think I’ll buy it soon.
She has really fantastic and very original recipes, none of them will leave you indifferent. My recipe today is inspired by one of its elaborations, this pumpkin pie “Mister Citrouille & Compagnie“. I liked it very, very much, so I had to make my version for this monster pumpkin cake, but in a much smaller format.

Monster Pumpkin Cake.
This time I decided to make a cake with a much smaller format than in other occasions. But if you want to do it with a bigger format, I think it’s great! However, it will require a little more time.
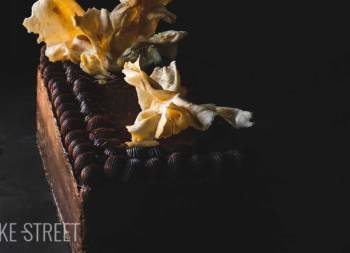
To make it I have prepared marbled sponge cakes 3,9 inch/10 cm in diameter. I have used a Bundt type mould, but in the video I show you other types of moulds that could be perfectly worth to you changing a little the external appearance.
To join the two cakes, I used a chocolate ganache and to cover the outside with chocolate SMBC. This cream, besides being perfect for modeling and shaping, transmits very little or zero moisture. This will go great for sustaining the coverage of the cake, modeling chocolate.

It is not the first time that I use this elaboration to decorate, in fact I left it to you in the Hocus Pocus cookie. It is very easy to make, is molded very well and is much richer than the fondant… Personally, I don’t like it at all. But, of course, for those who prefer it, you can do it with that ingredient if you prefer.
Now we will only have to arm ourselves with much patience, love and dedication. As if we were doing handicrafts.

What is the origin of pumpkins on Halloween?
Since today’s recipe is inspired by a pumpkin, I wanted to share with you the true origin of one of the most famous and widespread traditions.
The carving of this fruit has its origin in the legends and traditions of the Celtic peoples of Scotland and Ireland, where the villagers used to carve turnips and some other vegetables to scare away the spirits.
From there also comes the story of Jack, a cheap English farmer, who received a curse for trying to deceive the devil and was condemned to roam the Earth with a turnip lantern and only a coal lit inside, according to the organization English Heritage.
According to legend, Jack invited the devil for a drink and convinced him to turn himself into a currency to pay for the drink, thus catching him. In exchange for his freedom, the devil promised that he would “never look for him again”.

After several years Jack died, but he was rejected in heaven and when he reached hell the devil did not want to receive him either. He condemned him to wander the dark ways of purgatory.
Before he left, Jack asked him for one last favor: a light that could light his way. Then the devil gave him an ember. The farmer took one of the turnips he had in his bag, made a hole in it and placed the ember inside the tubers.
Since then, in Ireland, the story ofJack of the Lantern.
With the arrival of Irish immigrants to the United States, the celebration took on great importance and became a tradition. However, since there was no turnip plantation, but an excess of pumpkins, the Americans decided to change it.
Since then, terrifying faces have been carved into pumpkins. They were placed in the windows of houses to, according to beliefs, chase away the devil.
Ingredients
FOR MARBLED SPONGE CAKES (7 small pieces):
- 210 g pastry/cake flour
- 150 g unsalted butter at room temperature
- 2 1/2 large eggs
- 60 g whole milk
- 4 g baking powder
- 190 g sugar
- 1/2 Tbsp vanilla extract
- 35 g cocoa powder + 55 g water + 45 g sugar
- 2 g salt
FOR CHOCOLATE SMBC ( 3-4 pieces):
- 68 g egg whites, at room temperature
- 122 g sugar
- 160 g unsalted butter at room temperature
- 85 g black chocolate 70%
FOR CHOCOLATE GANACHE (3-4 pieces):
- 225 g black chocolate 70%
- 220 g fat cream
FOR MODELING CHOCOLATE (3 pieces):
- 200 g black chocolate 70%
- 100 g glucose or corn syrup
FOR BRUSH AND DECORATE:
- edible food colorant metallic powder red and green
- cocoa powder
- edible food colorant powder orange and white
- edible glitter
Instructions
FIRST DAY
Make the marbled sponge cakes.
- Grease the moulds and sprinkle with flour removing the excess, set aside. In my case I have used small bundt moulds 3,9 inch/10 cm in diameter, brioche moulds 10 cm in diameter and small pandoro moulds.
- Preheat the oven to 345ºF/175º C.
- Sift the flour together with the baking powder and salt, set aside.
- In a medium bowl mix 45 g of sugar together with the cocoa powder and water, mix until completely homogenized and set aside.
- In the bowl of Kitchen Aid or in a large bowl if we are going to do it by hand, incorporate the butter along with 190 g of sugar. Mix with the flat beater at medium-high speed until a creamy and aerated mixture is obtained.
If we do it by hand we will help ourselves with a whisk to obtain this result. - Add the vanilla and mix again for a few seconds.
- Incorporate the eggs one by one, mixing well after each addition and without adding the next until it has been completely integrated.
- To add half of an egg, what we will do is pour it into a bowl, beat it and add only half to the bowl of KitchenAid. Mix again until homogenized.
- Once we have the eggs incorporated beat at medium-high speed about 2 minutes to soften the mixture.
- We will begin to incorporate the dry ingredients and milk alternately. We will do it in 3 batches and we will not add the next one until the first one has been completely integrated.
- Once we have the mixture ready we will distribute in two bowls. We must take into account the amount of chocolate mixture.
- The total batter weighs about 860 g, the cocoa mixture weighs about 115 g, so in the cocoa bowl we will incorporate 315 g of white batter to be proportional.
- Mix the cocoa mixture and the white batter until a homogeneous mixture is obtained.
Fill the moulds and bake.
- With the help of a spoon, put a small amount of vanilla batter in the mould and, on top of it, chocolate batter.
- Tap the mold on a work surface to settle the batter.
- Repeat the process alternating one of vanilla and another of chocolate trying that a disc remains inside another one.
- Repeat the same process in all the moulds.
- In my case I have filled 2 bundt moulds, two pandoro moulds and 3 brioche moulds.
- Place in the oven at half height and leave for 35 minutes or until inserting a toothpick in the center comes out clean.
- Remove and let cool inside the molds on a rack.
- Unmould, wrap in film and refrigerate until the next day.
Make chocolate ganache.
- Chop the chocolate, set aside.
- Pour the cream into a heat-resistant bowl and place in a water-bath. Leave until it acquires temperature but without reaching boiling point. Remove from the heat.
- Add the chocolate and let stand for a few minutes.Mix until completely homogenized.
- Pour the ganache into an airtight container and let it cool down to room temperature. It will take about 2 hours.
- We need it to have a spreadable consistency, we can refrigerate it for 2-3 hours once it has cooled. If it's very cold outside, it's likely to get that consistency sooner.
Make chocolate Swiss Meringue Buttercream.
- In a heat-resistant bowl, add the egg whites along with the sugar.
- Place on a water-bath at medium low heat. Stirring constantly, leave until the egg whites reach 165ºF/74ºC. For it we will help ourselves of a digital thermometer.
- Remove from the heat, pour the egg whites into the bowl of the KitchenAid or a stand mixer and whip at medium high speed until a firm and shiny meringue is obtained.
- Once we have the firm meringue, begin to add the butter cut into squares little by little and at the same time the mixer continues whipping.
- Once we have all the butter added, increase the speed and finish whipping.
- Stop, scrap the cream with the help of a spatula and add the chocolate.
- Whip again at high speed until the ingredients are completely integrated.
- Set aside.
Prepare the modeling chocolate.
- Add the chocolate in a water-resistant bowl and melt in a water bath.
- Remove from the heat and add the corn syrup. Mix very well until completely integrated.
- We will obtain a dense and slightly oily paste. Don't worry about the latter.
- Store the pasta in a freezing bag. Stretch lightly, remove all the air from inside and refrigerate for 2-3 hours or until next day.
SECOND DAY
Assemble the cake.
- With the help of a saw knife, cut the base of the sponge cakes. Make sure that they are as straight as possible and that, when they are joined together, they seal well.
- Take one of the cakes and spread it generously with the chocolate ganache.
- Place another cake on top and press lightly.
- Refrigerate for 30 minutes so that the ganache hardens slightly.
- Place a first layer of SMBC on the entire surface of the cake. Make sure it is as smooth as possible. Refrigerate for 30 minutes.
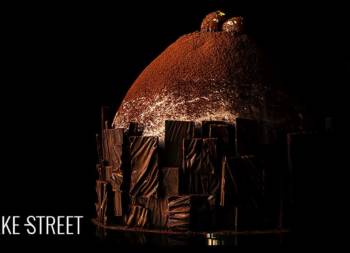
- Cover the entire surface with a second layer of SMBC. On this occasion we will try to shape the pumpkin in a rounded shape.
- Refrigerate for 30 minutes for the SMBC to harden.
Stretch modeling chocolate.
- Take, more or less, 2/3 of modeling chocolate. The rest is kept in the bag to prevent it from drying out.
- Place inside a Teflon sheet and stretch with the help of a roller. Try to stretch the chocolate paste until it slightly exceeds the size of our biscuit. The dough should not be thick, but rather thin.
- Place the chocolate sheet on top of the cake and adjust.
- With the help of a long wooden stick, make folds in the corners (this part is better seen in the video).
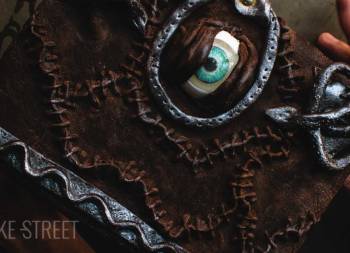
- Model the moldable chocolate to give the shape we want.
- With the help of a toothpick, we create the characteristic grooves of the surface of the pumpkins.
Create the details to decorate the pumpkin.
- Model all the decorative parts of the pumpkin. In the video I show you how I have carried them out, but you can make your own.
- To join them I use melted and cooled chocolate.
- Cut the upper part giving a serrated shape without cutting it all.
- Carefully lift and fill the inside, corresponding to the mouth, with crumbled chocolate sponge cake.
- Place the teeth inside, so that they are united, we will spread the base with melted chocolate.
Paint the monster pumpkin.
- Paint each part of the pumpkin as I show you in the video. Just like each of the details.
- Refrigerate until serving time.


Notes
- If you want the cake to have a zebra-like appearance instead of being marbled, you have to add the butter previously melted and cooled into the mixture instead of using it at room temperature. In my case I preferred to do so to introduce air into the butter, beating it, and get a very smooth and spongy result.
- You can use the molds that you have at home, they do not have to be these in concrete. The important thing is that they have similar sizes.
- I have used several moulds so that you can see that they can be made in different sizes and formats.
- The filling, in my case, is a chocolate ganache. You can use SMBC if you want, some homemade or purchased chocolate cream or other type of ganache or cream that ensures that we will keep well after assembling the pumpkin.
- To make the modeling chocolate you can use chocolate for desserts, coating, black chocolate...
- Respect the rest time of the modeling chocolate to be able to work with it. If it is very cold, you can give it warmth with your hands or a slight heat stroke in the microwave (1 or 2 seconds).
- Remember to cover every piece of chocolate paste. When they are in contact with the air for a long time, they begin to dry out.
- The modeling chocolate can be stretched between two sheets of Teflon to work better with it. In addition it will help us to contribute final texture. If you do not have Teflon sheet, stretch it with baking paper or some material that allows us to work in this way.
- To paint it I have used metallic powder food colorant, but another type of food colorant can be used.

I wish you a very happy Halloween! Wait, trick or treat? hahaha. In any case, you are more than invited to a piece of this Monster Pumpkin Cake, not very big... I made an almost individual format.
By the way, I was very sorry to cut the cake and I couldn't do it... In the process you have been able to see the inside with what is done. So sorry... It's still in the fridge for tonight! hahaha
I hope you spend some fantastic days, enjoy your costumes, rest, eat typical and traditional things of these dates and wherever you are... And that you share great moments with your friends and family.
I send you a big kiss and see you next week!
Big hugs,
Eva