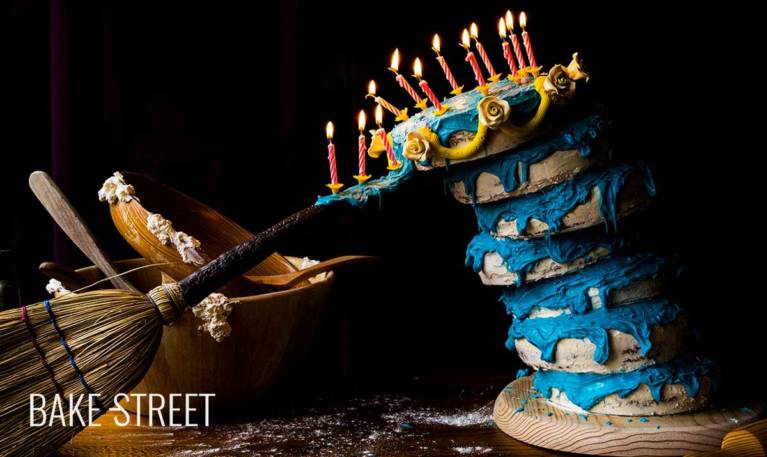
Sleeping Beauty Cake
One of the celebrations that I like and enjoy the most is Halloween. To tell you the truth, I like them all! But this one especially. It is possible that it is because it unites themes of terror and fantasy, I would not know how to tell you. But I love dressing up and decorating my house for this day. This year I was sure that the recipe I was going to leave with you would be Sleeping Beauty Cake and that my costume would be the 3 fairies; Flora, Fauna and Spring.
I am aware that there is nothing terrifying about it, such as last year’s Monster Pumpkin Cake, perhaps just the thought that the cake might fall apart. But beyond this, it can only convey magic, fantasy and innocence. I’m sure many of you have seen this film hundreds of times. I have. My favorite part has always been the moment when the fairies prepare Aurora’s 16th birthday party.
It’s absolutely great! When Flora tries to sew the dress over Spring and it says ; – It looks horrible – to which Flora responds ; – That’s because it’s on you, dear -. Hahaha, they’re great! For my part, besides that scene, I wanted to recreate the part where Fauna makes the cake (including me as Fauna!). That moment when she holds the cake with the broom, added to her face of kindness, is priceless. I could watch this scene along with the battle with the wands in that same scene, for hours.
I saw this cake, some months ago, to Brandon Hardy. He did it to his sister for her birthday. From the moment I saw it, I knew that one day I would do it. From here I thank you for your stories that helped me to carry it out 😀

Sleeping Beauty.
Sleeping Beauty was the sixteenth animated feature film created and produced by Walt Disney. It premiered on January 29, 1959 and was distributed by Buena Vista. The film is based on the fairy tale of the same name by Charles Perrault, Jacob and Wilhelm Grimm (the Grimm brothers) and Giambattista Basile.
This film was the last one produced by Walt Disney based on a fairy tale, besides being the last one inked by hand before the xerographic process arrived. The aesthetics of the film that Disney wanted to capture and transmit was like a moving tapestry, not the traditional one of other films of the company.
It is the first animated feature film shot in Super Technirama 70, a large format widescreen process (there is only one other animated feature film shot like this, The Black Cauldron). The film was produced throughout most of the 1950s. Work on the script began in 1951, the voices were recorded in 1952, the animation was produced between 1953 and 1958, and the stereo soundtrack was recorded in 1957. A formidable work carried out with much love, illusion and dedication.
The silhouette of Princess Aurora is based on Audrey Hepburn, and the actress Helene Stanley was used as a reference model to capture her movements on screen. As for the three fairies; Flora, Fauna and Spring, Disney wanted them all to be similar, but veteran animators Frank Thomas and Ollie Johnston thought it would be much better if they had different physiques and personalities. And they were certainly right.
Before starting to produce the animation, a shoot was done with real actors to serve as a reference for the film’s animators. Disney wanted the film to be as similar as possible to the real image.

Making Sleeping Beauty Cake.
When I started designing how to make the cake, the first thing I needed to create was a stand that could hold the cake. Not only because of the inclination, but also because of the weight.
For this, my husband (thanks love for helping me in all my crazy stuff!!), made me a stand with a wooden base and a wooden stick. This one has a diameter of 1 cm approximately. We need it to be a little thick to be able to support the weight, but not extremely thick so as not to spoil the sponge cakes too much. It is important to measure the height of the stick to hold 6 cakes. The last one, we will place it differently.
In addition, the stick should be cut at an angle to facilitate the insertion of these.
Once we have our stand, it is our turn to get to work. Bake lots of sponge cakes. In my case I made them with a diameter of 18 cm. The recipe that I leave you in the list of ingredients is the right amount to bake 2 sponge cakes. I think they have the perfect diameter and height to make the cake.
So we will need to make two batches of two sponge cakes and a last one of three (the amount I leave you + half of the recipe).
Assembling and decorating the cake.
Here we go!
To assemble the cake, the stand will not be enough. Since the cakes will be placed in a disorganized way and, in many occasions defying gravity, we need to place under each cake a disc for cakes. This will be a support and will prevent some of them from being broken by the weight.
I recommend you to make a cake tower before placing them on the stand. This way you can see how you want to place them and have a pattern to set it.
To decorate the exterior I used SMBC (Swiss Meringue Buttercream) and blue Candy Melts. They are two ingredients that work very well with them and can stand several hours at room temperature without spoiling.
What’s good about this cake? It doesn’t have to be perfect, hahaha. In fact, the beauty of it is just that, that you can see that it is not perfect, that it has flaws, that it has been made by inexperienced hands, but that its purpose was to make it well.
The final details, such as the top trim, will be done with yellow-colored SMBC, yellow sugar flowers and candles.
Oh! And the broom
If I told you how many costume stores, bazaars I’ve been to, you wouldn’t believe it. As well as online shops. In the end I bought 3 different brooms and adjusted two of them to make the one you see in the video. On one hand I liked the handle of one of them and on the other the part of the brush. My husband, once again, joined them together and cut them to create my perfect broom for this Sleeping Beauty cake.
I had to refrigerate the cake for one night after setting up and decorating it without putting on the last sponge cake or broom. You can imagine my fridge dismantled, I had to remove a shelf and the bottle rack to be able to store it. Luckily, at home they support me in everything I do, hahaha.
Recipe Sleeping Beauty Cake
FOR VANILLA SPONGE CAKE (we will bake 7 pieces):
With this amount 2 sponge cakes of 18 cm in diameter come out, we will make this amount 3 times and one more with half of the ingredients
- 300 g pastry/cake flour
- 180 g sugar
- 225 g unsalted butter at room temperature
- 225 g eggs, about 4 units
- 180 g whole milk
- 14 g baking powder
- 2 tsp vanilla extract
- pinch of salt
FOR VANILLA SWISS MERINGUE BUTTERCREAM:
- 150 g egg whites
- 285 g sugar
- 375 g unsalted butter at room temperature
- 1 tsp vanilla extract
- yellow food coloring for the final decorations of the top
TO DECORATE + MATERIAL:
- 680 g blue Candy Melts
- 8 yellow sugar flowers
- candles + holders and a broom
- support for holding the cake
- 7 cake base discs, 18 cm diameter
- 3 wooden skewers
Instructions
FIRST DAY
Make sponge cakes.
- Preheat oven to 320ºF/160ºC.
- Grease a 18 cm pan, with butter. Sprinkle flour, remove the excess and set aside.
- Sift the flour together with the baking powder and salt. Set aside.
- In a bowl add the eggs together with the vanilla and milk, whisk until the mixture is homogenized.
- In the bowl of the KA or of a stand mixer, add the butter together with the sugar. Beat with the flat beater at medium speed, until a creamy, aerated and white texture is achieved.
- Begin to integrate the dry ingredients alternating them with the liquids.
- Add 1/3 of the egg white mixture and beat at the lowest speed for a few seconds. Stop, lower the mixture from the sides and add 1/3 more of the dry ingredient mixture. Mix again at low speed for a few seconds.
- Repeat the same process with the rest of the egg whites and dry ingredients mixture. Mix at low speed only until the mixture is homogenized.
- Pour the mixture into 2 moulds and place in the oven at medium height.
- Bake for 45 minutes or until you prick it with a toothpick and it comes out clean.
- Remove and let stand 5 minutes in the pan.
- Unmould and leave to cool completely on a rack.
- Once it is completely cold, wrap in plastic film and refrigerate until the next day.
- You need to bake a few... May the force be with you, hahaha
SECOND DAY
Make vanilla Swiss Meringue Buttercream.
- In a heat-resistant bowl, add the egg whites along with the sugar.
- Place on a water-bath at medium low heat. Stirring constantly, leave until the egg whites reach 165ºF/74ºC. For it we will help ourselves of a digital thermometer.
- Remove from the heat, pour the egg whites into the bowl of the KitchenAid or a stand mixer and whip at medium high speed until a firm and shiny meringue is obtained.
- Once we have the firm meringue, begin to add the butter cut into squares little by little and at the same time the mixer continues whipping.
- Once we have all the butter added, increase the speed and finish whipping.
- Stop, scrap the cream with the help of a spatula and add the vanilla extract.
- Whip again at high speed until the ingredients are completely integrated.
- Cover with film and set aside.
Assemble the cake.
- Prepare our cake stand.
- This time we will use the uncut cakes, just as we took them out after baking.
Place the cake on the cake stand, in case it protrudes, we will have to cut it so that it will not be seen (I did this). - The first disc will be placed in the center. Mark the disc with a knife and make a hole. In my case I used a knife sharpener to create the hole.
- Place the disc on the cake and go through it to create the hole in the same place as the disc.
- Pass the disc through the support we have created for the cake and then the cake. Do it carefully because the top part can crumble.
- We will repeat this step with all the cakes except the last one. That is, we will go through 6 cakes and the seventh one will be placed on the cake in a different way.
- When you prepare to place the rest of the cakes, you must go through them in different parts to create a collapsing effect. Some will go at the ends, others at the side... I advise you to create the tower of cakes before placing them on the stand so that you know exactly how you want to place them.
- Once we have all the cakes placed in the stand, except for the seventh one, we will cover the cake with SMBC.
Cover the cake with SMBC.
- Spread SMBC over the entire surface of the cake and remove the excess with the help of an edge smoother. This layer will help us "pick up" possible crumbs from the cake that could come to the surface when we decorate it.
- We will have to arrange the SMBC cake by cake. It will not be easy to smooth all the parts because there will be areas that the rest of the sponge cake will not allow us to work comfortably.
- The "good" part of this cake is that it must not be perfect. We can afford to have areas that are less smooth or with a more polished finish. If you want you can give two layers of SMBC, in my case I preferred to give this more imperfect finish. If you do, cool it down 30 minutes before giving the second coat.
- The last cake, we will cover it with SMBC separately. And we will refrigerate it separately to place it the next day.
- Once we have arranged all the SMBC, refrigerate for 60 minutes or until the next day. I had to remove a shelf from the fridge plus the drinks rack to be able to store the cake in the fridge.
Decorate with Candy Melts.
- Melt Candy Melts, there are many ways to do it. In my case I prefer in a bain-marie because it allows me to control the melting point much better without exceeding the time of exposure to heat. Since this step, it thickens the mixture instead of liquefying it. We will not melt everything at once, because these tablets (once melted) solidify quite quickly.
- In my case I melted 340 g the first time, to decorate all the edges of the cakes, and the second bag, I melted it in two batches. The first one to cover the last cake and the other one to finish off details.
- To arrange the melted Candy Melts, I used a piping bag with a smooth tip of 1 cm in diameter. Then, with the help of a palette, I distributed the sides to give the finish I was looking for. In addition to a "badly done" look.
- Once we have covered all 6 cakes with the Candy Melts mixture, place the last cake.
- To do this, we will use 3 wooden skewers. Cross the cake by joining it to the one below. We can not because we have the base discs (very important to help maintain the structure of each cake without falling apart).
- We will cut the excess of each skewer so that it is not visible.
- Cover the last cake with the melted Candy Melts.
The moment has come to place the broom.
- In my case I was able to superimpose it by holding it between the last two cakes. But, in case it was necessary, try to fix it with sticks.
- The second batch of melted Candy Melts, the one we used to give details, we will also use it to attach the broom to the last cake. We will create a cream fall that descends through the broom.
- Once the mixture begins to harden, we will place the candles. To hold them well, I cut the spike that is used to fix them on the cakes.
Finish decorating.
- Colored a small amount of SMBC with yellow food coloring. In my case I have used in Sugarflair paste "Extra Yellow".
- Transfer into a piping bag with curly tip, Wilton 199.
- Decorate the sides creating arches, in the video you will see this part better.
- Place yellow sugar flowers at the union of each arch.
- Finally, place the candles on top. We will try to simulate the inclination with them as if they were falling.
- And we have it ready! We only have to light the candles and ask that the next one comes out a little better and less crooked, hahaha


Notes
- The baking time of each cake will vary depending on the size of the mould you use. In my case I used removable molds of 18 cm in diameter.
- Refrigerate the cakes all night long, it helps them to be firm and to be handled better.
- It is important that the stand supports the weight of the sponge cakes, make sure that the base has a larger diameter to prevent it from tipping over and that the stick is not too thin, to prevent it from being crushed and broken.
- Follow all the steps to obtain a good SMBC.
- If we have SMBC left over, we can refrigerate it for 2 days or freeze it for 30 days. In this case we will not have almost anything left over.
- The flowers, in my case, I bought them ready-made. But you can make them yourself if you want.

With this Sleeping Beauty Cake I wish you a very happy Halloween! I do not know if you are to celebrate this holiday or not, maybe Castañada, All Saints Day... Whatever the festivity that is part of your customs, I hope that you will live it to the fullest!
Send you love!
Eva
Sources: Wiki