San Marcos Cake, Spanish traditional cake
The best way to start posting on the blog after Christmas is with a cake. Yes, I know we’re tired of eating sweets… But who can refuse a piece of this San Marcos Cake? That’s right, nobody. For that same reason today we will see how to prepare this traditional and classic Spanish pastry cake.
At the end of last year, in November, I shared a photo of this cake in my IG profile. I didn’t have time to record the process because I prepared it for the birthday of my “half lemon”, and since it was the first time I made it I wanted to see how I could do it. Many of you wrote me to share the recipe, but at that time I had already programmed all the posts I was going to publish. Added to Christmas and the short holiday break, the recipe has been delayed until today. But I think the wait is worth it 😉

Before I continue, the recipe I have followed is that of my dear friend Raúl El Oso con Botas that he prepared for María Lunarillos. Those of you who know him already know that he is a true artist, but for those who don’t, I recommend that you don’t miss anything he does 🙂
San Marcos Cake.
San Marcos cake has its origin in Castilla y León, Spain, and dates back to the 12th century. It was first made in the Convent of San Marcos when Queen Doña Sancha de León founded a temple and hospital for Jacobean pilgrims. It is currently a hostel.
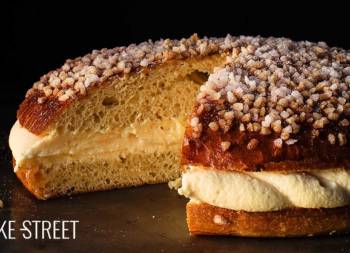
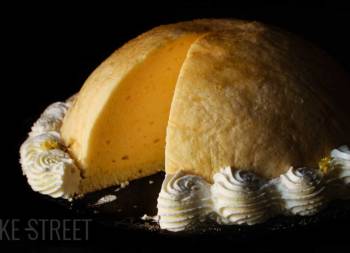
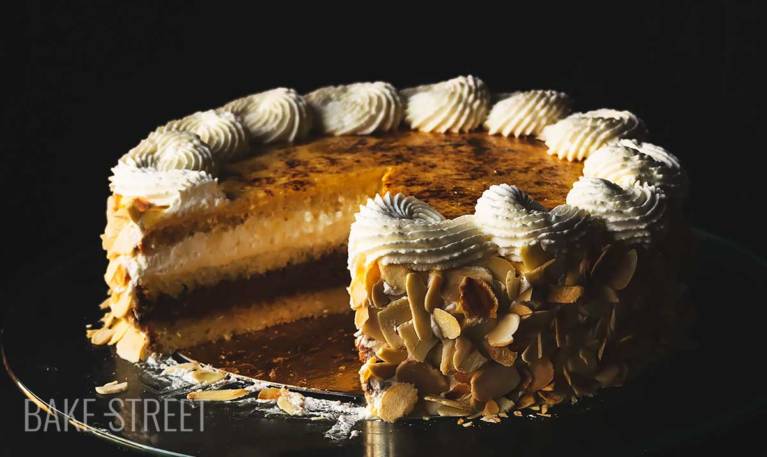
The cake is composed of very classic preparations, but not for that reason it does not cease to be attractive. In fact I thought of giving it a different design when decorating it, as I did for example in the Sachertorte, but this time I preferred to be faithful even to its presentation.

To make it, we prepare a Génoise sponge cake (classic and indispensable for many cakes), a syrup to moisten the sponge cake and give it that characteristic juicy touch, whipped cream, whipped cream with cocoa and sweet egg yolk. The whole, as you well know, is spectacular.
In spite of having to prepare several elaborations, I consider it to be a quite simple cake. Even though it may seem the opposite. In my case I have divided the process in 2 days, this way you will be much more bearable.

Sweet egg yolk.
Without a doubt, one of the most outstanding elaborations of the nuns is the sweet yolk. It is one of the most wonderful and exquisite elaborations that exist.
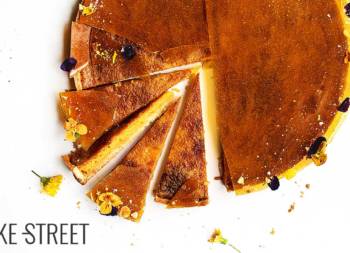
Of all the cake process, it may take the longest, and will not take more than 15 minutes. The only thing that demands us is to be patient while we prepare it, since we will have to remove it constantly until acquiring the desired consistency. The result is wonderful. Undoubtedly the most characteristic part of the cake, the top layer of caramelized toasted yolk.
The rest of the preparation is not complicated at all. As simple as making a sponge cake, whipping cream and decorating with almonds. Easy, right? With just a few steps we will have the perfect dessert to enjoy during the weekend.
Ingredients for a 7,85 inch pan
FOR GÉNOISE SPONGE CAKE:
- 4 large eggs
- 145 g sugar
- 165 g pastry/cake flour
- 60 g unsalted butter melted and cooled
- pinch of salt
FOR THE SYRUP:
- 200 g sugar
- 200 g water
- a drizzle of lemon juice
- 2-3 rum shoots
FOR THE FILLING:
- 600 g heavy/fat cream
- 160 g sugar
- 2 tsp vanilla extract
- 2 Tbsp cocoa powder (18 g)
FOR THE SWEET YOLK:
- 4 yolks from large eggs
- 7 g cornstarch
- 180 g sugar
- 60 g water
- 1/2 tsp vanilla extract
- a drizzle of lemon juice
PARA DECORAR:
- sugar for caramelize
- 70 g sliced and roasted almonds
Instructions
FIRST DAY
Make the sponge cake.
- Preheat oven to 355ºF/180ºC.
- Grease a 7,85 inch/20 cm diameter removable pan with butter, sprinkle with flour and turn to remove the excess. Set aside.
- Sift the flour, set aside.
- In the bowl of the KitchenAid or a stand mixer, add the eggs along with the sugar and salt. Beat, increasing progressively the speed without reaching the maximum, until reaching the rippon stage* (see in NOTES).
- Add the flour little by little as we integrate with enveloping movements helping us with a spatula.
- Incorporate the butter and integrate again with enveloping and soft movements.
- Pour the mixture into the pan, tap gently to settle the batter and place in the oven.
- Bake for 30 minutes or until a toothpick in the center comes out clean.
- Remove from the oven, let it rest for 15 minutes and unmold.
- Let it cool completely on a rack.
- Once it has cooled completely, wrap with film and refrigerate until the next day.
Make the syrup.
- Add all the ingredients in a saucepan except the rum. Place at medium heat and let it boil. The sugar must be completely dissolved.
- Once it comes to the boil, turn off the heat and let it cool completely.
- Put the syrup in a bottle with the help of a funnel, add the rum, close and shake to mix well.
- Set aside at room temperature.
SECOND DAY
Whip the cream.
- Before we get ready to whip the cream we must make sure of two things:
- Cream must be cold 24 hours before used it.
- The bowl in which we are going to make whipped cream must be cold. I recommend to use one aluminium bowl and freeze 20 minutes before beat it.
- Pour heavy cream into freeze bowl and beat with an electric mixer into low speed.
- Once cream is becoming to form stiff peaks, add sugar little by little stirring the whole time. Increase speed gradually but without reaches high one. Ideally use medium speed.
- Before finish to beat the cream, add vanilla extract along and beat until get a perfect whipping cream. Be sure not to over-beat, otherwise cream will become lumpy and butter-like.
- Divide the cream into two parts. Take 230 g of cream to add the cocoa, keep the rest to fill the inside of the cake and decorate the outside.
- Add the cocoa powder to the 230 g of whipped cream. Integrate first with gentle movements to prevent the formation of a cocoa cloud, then finish beating with the electric whisk.
- Cover the two bowls with film and refrigerate until we are going to decorate the cake.


Fill the cake.
- With the help of a cake cutter, cut the sponge cake in 3 equal parts.
- Place the first sponge cake and moisten well with the syrup. To prevent the sponge cake from moving over the disc, we can place a small amount of cocoa cream.
- Put a first layer with the cocoa cream, we will use all the quantity that we have made.
- Place another disc of sponge cake, press gently and moisten again with the syrup.
- Put another layer of whipped cream, we will try to have the same thickness as the layer of cocoa cream.
- Place the last disc of sponge, press carefully and moisten again. This last one we will moisten it a little less than the previous ones.
- Using a spatula, smooth the edges with the excess filling.
- Refrigerate the cake while preparing the sweet egg yolk.
- We also refrigerate the whipped cream until we need it again.
Make the sweet yolk.
- In a saucepan pour the water together with the sugar, lemon juice and vanilla. Place in a medium-high heat and let it come to the boil.
- Once it boils, lower to low heat and leave for 5 minutes.
- Turn off the heat and let it rest for 3-4 minutes so that it tempers lightly.
- Meanwhile, beat the yolks with the cornstarch until completely homogenized.
- Pour the syrup into a fine continuous thread and mix with the whisk. Do not stop stirring to avoid lumps.
- Place the bowl with the yolks in a water-bathe, with a medium low heat, and beat constantly until it thickens. It will take a few minutes.
- Remove from the heat.
Decorate with the sweet yolk and caramelize.
- With the help of a spoon pour the sweet yolk on the surface of the cake. We will help ourselves with a spatula to extend it trying to arrive at the edges of the cake. You will have some sweet yolk leftovers.
- Sprinkle the surface with sugar and caramelize with a blowtorch.
- Refrigerate for 5-10 minutes.
Finish decorating.
- Put a thin layer of whipped cream around the cake. Smooth with a spatula.
- Put the rest of the cream in a pastry bag with a star tip. I used Wilton's 6B tip.
- Decorate the sides with toasted laminated almonds.
- Finish decorating the cake with the whipped cream around the edge.
- Refrigerate for 2-3 hours before serving.

Notes
- The ribbon stage is obtained by beating the eggs together with the sugar for several minutes. The mixture takes on a whitish colour and the texture becomes very thick to the point of lifting the whisk and being able to form a cord or ribbon over the mixture without deforming it. Hence the name.
- I have decided the process in 2 days to make it easier and bearable. But if you wish, you can do the whole process in just one day.
- If we refrigerate the sponge cake overnight, we help the flavors ripen as well as facilitating the process of cutting the sponge cake. It crumbles less.
- To make the syrup you can use the liquor you want. You will have leftovers syrup, you can keep it refrigerated inside the bottle for a long time.
- It is important to moisten cakes, otherwise they may be dry. Don't be afraid to be generous, the result will be a very juicy cake.
- I like to refrigerate the cake at several times to prevent the cream from coming down and to make it firm throughout the whole process.
- We can keep it refrigerated for 3-4 days. Cover it or inside an airtight container to prevent the cream from drying out.
- As the days go by, it will be much delicious.


This San Marcos Cake is perfect to enjoy during the weekend, to take it as a dessert to a friend's or family's house, or to surprise in a birthday. In spite of being a classic, it is one of those types of cakes that never fail.
As I mentioned above, it improves with the passing of time. The flavors mature, the texture becomes more juicy and appetizing, but without losing consistency. Personally, I like it much better after 24 hours in the fridge from the moment we have finished assembling it. But you can eat sooner without any problems!
I wish you a wonderful weekend, see you again on Monday.
Big hugs,
Eva