Romance Cake
There are things we cannot control or predict, such as emotions or love. That feeling that escapes any ability to be manipulated, organised or governed. It is possibly our greatest madness, unpredictable sensations that emerge without notice and from which it is very difficult to escape. All this comes from the name I decided to give to this elaboration, Romance Cake.
From the first moment I started to make it, nothing was as I expected. From the preparation, presentation and even the moment of sharing it with you. Everything was changing, altering and taking its own path. These things happen sometimes and it is just those actions that make something take its own place. Or name, as on this occasion.
This cake was supposed to be published long before Valentine’s Day. In fact, it was the recipe that I wanted to leave you for that date… But it couldn’t be. Today is also a good day to share it and enjoy it with all of you. Because if there is something we should never deprive ourselves of, it is that feeling that helps us with everything.

Designing Romance cake.
When I began to design the cake, I based it on one of Iginio Massari. In fact, in the first instance, I actually wanted to prepare his torta Elena. But everything was altering. I looked up his recipe and decided to keep the look of his presentation, but using a different type of sponge cake and other fillings.
- He makes it with a sponge cake soaked in Alkermes (red herbal liqueur), Bavarian cream with vanilla and nougat and a dark chocolate mousse cream. Finish the decoration with a cocoa glaze and chocolate cannoncini.
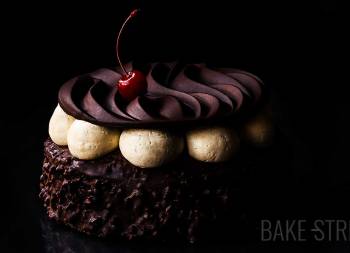
- In my case I made it with a red Joconde sponge cake syruped with Amaro syrup (Italian herbal liqueur, I tell you about it in this post), French buttercream, chocolate whipped ganache and chocolate SMBC exterior together with chocolate and dulce de leche cones.
When I had the cake assembled, I decided to change the outside look as well…. I wanted to give it the appearance of a renaissance column, within my possibilities, of course. At most the base of it maybe, hahaha.

This is when I finally put to use one of my texturing scrapers that I bought almost two years ago. When I finished texturing the outside, I liked the uneven top edge. So I decided to leave it as it was. Rustic, even ruin-like.
From I.Massari’s cake, I not only liked the inside, but the chocolate cones… These I had to keep. I really wanted to give them that “whimsical” look and, perhaps, with a nod to childhood or to that inner child we all have inside. But, I wanted to keep an elegant look.
I made them with chocolate following this tutorial by María Lunarillos, I thought they were very simple and very good! The filling? Something creamy, sweet, soft… Dulce de leche without a doubt. It also adds a colour that I love, it reminds me of caramel ganache.
To finish, I had to give it texture, so I covered the top with caramelised chocolate nibs, some cocoa powder on top of the chocolate cones and edible gold glitter on top of the dulce de leche.

Why Romance cake?
The word romance has different meanings: it can refer to a set of languages derived from Latin, to a sub-genre of medieval literature, or to a unique form of affective expression between lovers. As such, the word comes from the Latin romanĭce, meaning ‘in Romanesque‘.
The word Romance, as we have just seen, can be used to designate a loving relationship, albeit a passing but very intense one. Passing may not sound attractive or nice, but it refers to something ephemeral, fleeting, momentary… Like food.
Yes, we have a relationship with everything that crosses our lives, be it people, animals or things. And all of them generate an emotion or feeling in us, what happens is that we are so used to living it day after day that we don’t enjoy it the way we should. We’re rushing forward, thinking we’re heading somewhere, when in reality we’re just living fast and missing out on everything along the way.
When I finished the cake, after shooting the video, taking the pictures and tasting it, I realised how many emotions it had made me feel during the whole process. Illusion, changes, some disappointment, happiness and pleasure. In short, what a relationship is, fleeting or not. That’s why no word could fit her name better than “Romance“.
Recipe Romance Cake
RED JOCONDE SPONGE CAKE:
- 140 g ground almond
- 45 g cake/pastry flour
- 170 g egg (about 3 pieces)
- 115 g egg whites
- 70 g powdered sugar
- 23 g unsalted butter, melted and cooled
- food colorant paste, Extra-Red
- 1/8 tsp salt
WHIPPED CHOCOLATE GANACHE:
- 265 g fat/heavy cream, cold+ 20 g powdered sugar
- 100 g fat/heavy cream, warm
- 105 g dark chocolate 70%
FRENCH BUTTERCREAM:
Patê à bombe:
- 3 large yolks
- 75 g sugar
- 75 g water
- 1/4 vanilla pod, seeds
For finishing:
- 125 g unsalted butter at room temperature
CHOCOLATE SWISS MERINGUE BUTTERCREAM:
- 70 g egg whites
- 100 g sugar
- 70 g dark chocolate 70%
- 140 g unsalted butter at room temperature
SYRUP:
- 100 g water
- 125 g sugar
- 1 Tbsp Amaro, liquor, you can use another one to your choice
CHOCOLATE CONES:
- 50 g dark chocolate 70%
- dulce de leche for filling
FOR DECORATING:
- unsweetened cocoa powder
- edible glod glitter
- caramelized cocoa nibs
MATERIAL WE WILL NEED:
- KitchenAid or stand mixer
- colander
- bowls
- digital kitchen thermometer
- pastry brush
- perforated tray + baking paper
- rotating cake stand
- piping bags
- curved pastry spatula
- silicone spatula
- 15 cm cake base/disc
- small pastry brushes
- cake smoother
- textured cake scraper
Instructions
FIRST DAY
Prepare red Joconde sponge cakes.
- Preheat oven to 400ºF/205ºC.
- Line a perforated tray with baking paper. Set aside.
- Sift the flour, set aside.
- Sift the ground almond, set aside.
- In the bowl of the KitchenAid or a stand mixer, add the eggs along with the sugar and salt. Beat, increasing progressively the speed without reaching the maximum, until reaching the rippon stage* (see in NOTES).
- Once this point has been reached, add red paste food colorant and beat again at medium-high speed until it dissolves completely.
- On the other hand, in a bowl we add the egg whites. Begin to whip them at the lowest speed and gradually increasing the speed without reaching the maximum.
- As soon as they start to foam we will add the icing sugar little by little and whipping at the same time.
- Once we have all the icing sugar incorporated, we will continue whipping until obtaining a firm and brilliant meringue. Set aside.
- Mix the almonds with the sifted flour.
- Begin to add to dry ingredients, little by little, the whipped eggs. We will do it with enveloping movements helping us with a spatula.
- Integrate the whipped egg whites to the mixture and homogenize with enveloping movements.
- Finally, add the melted butter and integrate again with enveloping and soft movements.
- Place the mixture in a piping bag.
Bake.
- To prevent the ends of the paper from lifting or moving when you pipe the batter, place a few small "points" of batter in the corners. In this way the paper will remain fixed.
- Cut the tip of the piping bag and pipe the batter. Place a 15 cm diameter disc or tart base under the baking paper. We will make a circle, trying to exert the same pressure at all times. We will make the circle a little larger than the diameter of the disc, the reason is that we will cut the outer edge to achieve a clean finish and uniform height.
- In my case, I baked the sponge discs 2 by 2. The piping bag, between each piping, is placed in a tall glass with the end tip folded upwards to prevent the mixture from spilling out.
- Bake in the oven for 8 minutes. Make sure the sponge cake is baked before taking it out; when pressed, it will be tender, but it will recover its shape.
- Remove from the oven and leave to cool completely on a wire rack.
- Once they are completely cool, pile them up on the baking paper, cover with cling film and refrigerate until the next day.
Make the syrup.
- Add the sugar followed by the water in a saucepan. Place over medium heat and bring to the boil. The sugar should be completely dissolved.
- Once it comes to the boil, reduce the heat to very low, leave for 2 minutes and turn off the heat.
- Add the liqueur and allow to cool completely.
- Pour the syrup into a bottle using a funnel.
- Set aside at room temperature, if it is not too hot, or refrigerate.
Prepare French buttercream.
- To see how to make the French buttercream, you can see it in this post.
- Once it is ready, put it in an airtight container and refrigerate it until the next day.
- We will have to temper it for 2 hours before we get ready to fill the cake.
- I advise you to whip the cream in the KitchenAid, once it has been tempered, for about 3-4 minutes before using it. This will give it its silky, airy texture again.
Prepare chocolate cones.
- With the help of a 6 cm cookie cutter and an edible marker, create 5 circles on baking paper. Cut with a pair of scissors.
- Take a circle of paper and shape it into a cone, hold the peak of the cone with the help of clothes pegs. I tried to stick the paper together with several different types of tape and they all peeled off.... So I ended up attaching them with clothes pegs. Not aesthetically pleasing, but effective.
- Melt 50 g of chocolate in a bain-marie.
- Using small pastry brushes, brush the inside of the cones with chocolate, trying to reach all the nooks and crannies.
- Place the cone on its side because, as the chocolate is melted, if you place the wide part of the cone on its side, it will lose its shape. Brush all the cones with chocolate and refrigerate until it hardens.
- Give 2-3 layers more, until we reach a thickness that allows us to manipulate the cone without any problem, but not too thick.
- Once all the layers have been made, refrigerate until the next day.
- The next morning, carefully remove clothes peg and the baking paper. Be careful not to leave fingerprints on the chocolate.
- Keep in the fridge until you need them.
SECOND DAY
Prepare whipped chocolate ganache.
- Before we get ready to whip the cream, we must make sure of two things:
- The cream must be at least 24 hours in the fridge.
- The bowl where we put the cream must be cold. I recommend you use an aluminium one and put it in the freezer 20 minutes before preparing to whip the cream.
- Pour the cream (265 g) into the cold bowl and start to whip it with an electric mixer at speed 1.
- Once it starts to whip, add the sugar little by little and without stopping beating. We will increase the speed gradually but without ever reaching the maximum. The ideal is an average speed.
- Be careful not to over whip it or we'll make butter...
- Cover the bowl with film and refrigerate it until we use it.
- On the other hand, in a saucepan add 100 g of heavy cream and place it at medium heat.
- Leave until it reaches a gentle boil.
- Remove from heat, add the chocolate in pieces and mix until it is evenly mixed.
- Transfer the mixture to a large bowl and leave to stand for 20 minutes to lose heat.
- Add a little whipped cream and mix, making smooth and enveloping movements, with the help of a silicone spatula.
- Continue adding whipped cream, little by little, and integrating following the same process.
- Transfer to a smaller bowl, cover with film and refrigerate until use.
Prepare chocolate SMBC .
- In this post, you can read how to make chocolate SMBC and in this video you can watch the process to make SMBC.
- Once done, cover with cling film and store at room temperature until ready to use.
Cut sponge cakes.
- Take the sponge cakes out of the refrigerator and place a 15 cm diameter disc on one of the sponge cakes as a template.
- With the help of a sharp knife, cut off the excess of the sponge cake.
- Repeat this process with all the sponge cakes in the cake, in total you will need 7 units.
Assemble the cake.
- Put the French buttercream in one piping bag and the whipped chocolate ganache in another.
- Place a non-slip pad on the base of our rotating cake stand to secure the cake disc.
- Put the disc/base and a small amount of filling cream on it, this will help to secure the sponge cake.
- Place one of the sponge cakes and press down lightly. Syrup the surface with the liqueur syrup.
- Pipe a layer of the chocolate ganache filling and smooth with a spatula. Use a piping bag to pipe the fillings, thus achieving a uniform thickness in all the layers.
- Place another sponge cake, press lightly and syrup it.
- This time pipe a layer of French buttercream and smooth it with the help of a spatula.
- Continue alternating layers of sponge cake with the two types of filling.
- Once we place the last layer of sponge cake, we syrup it.
- Place a very thin layer of whipped ganache on the surface and refrigerate for 30 minutes.
Cover the outside with SMBC.
- Spread SMBC with a spatula over the entire surface of the cake and remove the excess with the help of an edge smoother. This layer will help us to "collect" possible crumbs of the cake that could come to the surface when we decorate it.
- Refrigerate for 30 minutes to allow the SMBC to harden.
- Remove from the refrigerator, spread another layer of SBMC over the entire surface, thicker, and smooth the excess.
- At this point, if we wish, we can texturise the outside with a decorative cake scraper, in my case I used this one.
- Place the scraper at an angle of 15-20º and slide it over the surface while turning the stand. This is the right way to achieve texture and create volume in the SMBC. Don't be afraid to correct and rectify parts, as well as add more SMBC in the areas where it is necessary to pass the squeegee again. The good thing about this type of cream is that it stands up very well to working with it several times.
- Refrigerate for 1 hour.
- Pipe 5 points with SMBC on the surface to hold the cones.
Finish decorating the cake.
- Fill the chocolate cones with dulce de leche and place on the SMBC dots on the surface of the cake. Adjust and centre.
- Cover the surface with caramelized cocoa nibs.
- Sprinkle the cones with cocoa powder and the dulce de leche with edible gold glitter.
- Refrigerate for 1 hour or we can leave it refrigerated until the next day. In my case that is what I did.
- It can be served straight from the cold or tempered for 30-45 minutes before serving if you prefer the SMBC to be softer.


Notes
- The ribbon stage is obtained by beating the eggs together with the sugar for several minutes. The mixture takes on a whitish colour and the texture becomes very thick to the point of lifting the whisk and being able to form a cord or ribbon over the mixture without deforming it. Hence the name.
- Follow all the steps to get a good SMBC.
- If we have SMBC leftovers, we can refrigerate it for 2 days or freeze it for 30 days. this time we will not have leftovers.
- In my case I have used red paste food coloring because is that it contributes a more alive and intense tonality. But, you can use another type if you prefer.
- If you don't want to add food colorant, you can omit it and do it without it.
- To make patê à bombe, the egg yolks must be at room temperature. Otherwise, when the syrup is added, lumps will form.
- When preparing the syrup for French buttercream, do not exceed 250ºF/121ºC under any circumstances. Otherwise we will obtain a dense syrup which, when poured over the yolks, will easily solidify and form lumps.
- The syrup should be added in a thin, continuous thread while beating at medium speed and always pouring it over the sides of the bowl, not over the whisk. If we do it this way, the syrup will cool and solidify. In contact with patê à bombe, it will create small lumps of sugar that will spoil the final texture of it.
- The butter must be at room temperature or in an ointment texture before it is incorporated into the patê à bombe.
- Before incorporating the butter, patê à bombe must have cooled down completely. Otherwise, it is very likely that we will reach the melting point of the butter and it will become liquid. The result will be a curdled cream.
- Excess buttercream can be kept refrigerated for 7-10 days.
- If you don't have a scraper to texturise the SMBC, you can leave it smooth or decorate the outside with cocoa nibs instead of placing them on the surface.
- We can keep the cake refrigerated for 3-4 days.
- Ideally, it should be tempered for a while before serving, depending on the outside temperature.

I know that this Romance Cake is a laborious cake.... It has work and requires several elaborations to prepare it. But it is true that, if we want to make it, we can organise it in several days and make the process really very bearable.
The end result is a spectacular cake, a very moist sponge cake with two incredible fillings. The cones... I loved them. I ate almost all of them! It's hard not to be tempted by something that contains chocolate and dulce de leche.
Try to prepare it for that special occasion, birthday, dinner... You will be surprised not only by its interior, but also by the combination of all the elements that make it up.
I wish you a wonderful weekend!
Lots of love,
Eva