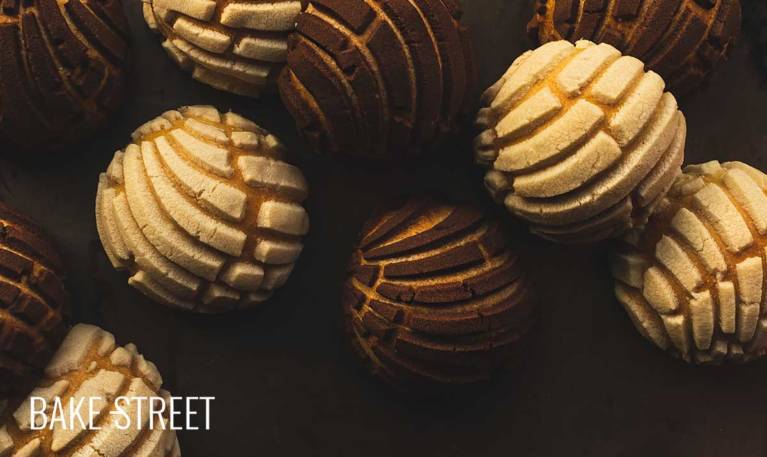
Mexican Conchas {Sweet Breads}
If you are lovers of sweet, tender, spongy breads, but also with history, then you can not miss today’s recipe. I’ve been wanting to prepare the famous Mexican Conchas for a long time, but I’m going to tell you that I haven’t told you before…There are so many recipes that I want to prepare that, in spite of myself, they are always queued until their turn comes.
In any case, I’ve finally been able to prepare them and I’m only going to tell you one thing. You have to make them. I have prepared many types of dough over the years and this recipe has stolen my heart. The texture, the aroma, the sponginess, the exceptional topping… It’s almost impossible to describe in words. You have to try them so that you can understand me.
What do Mexican Conchas have that make everyone fall in love?
I’m sure it’s not the first time you’ve read this, that passion for these sweet breads. If you have already tried them, I have nothing new to discover to you. But if you are one of those people who have not yet been able to enjoy them, I recommend that you do not let it pass for much longer.
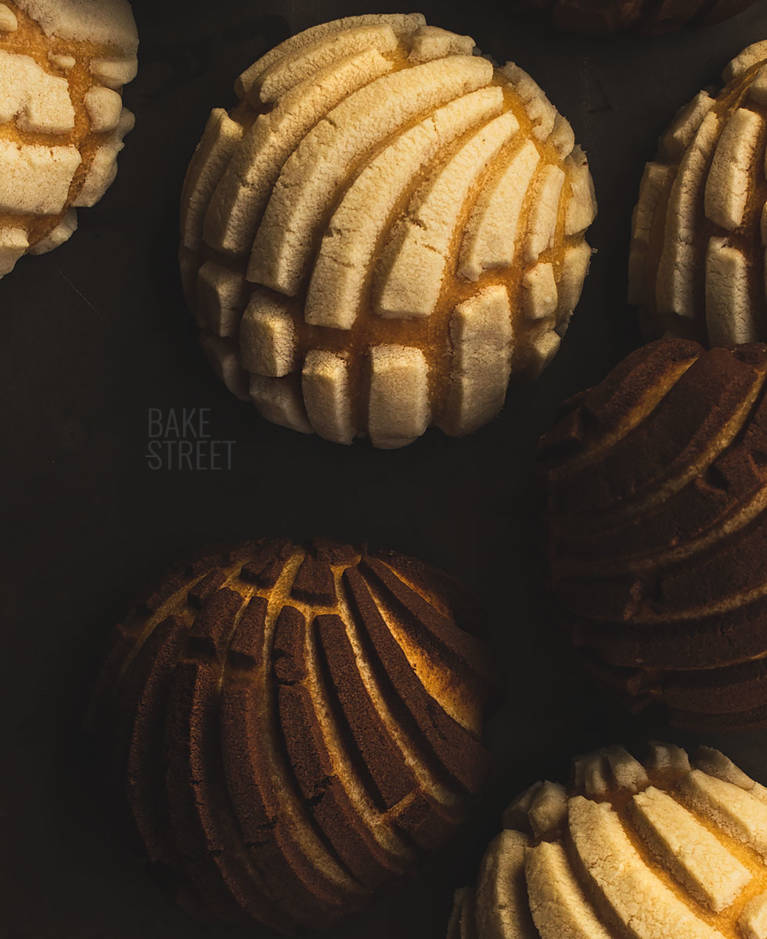
Mexican Conchas are made with two types of preparations; a very spongy dough similar to a brioche and a topping made with a cookie dough. When we eat these sweet breads we find a contrast of textures and simply extraordinary flavors.
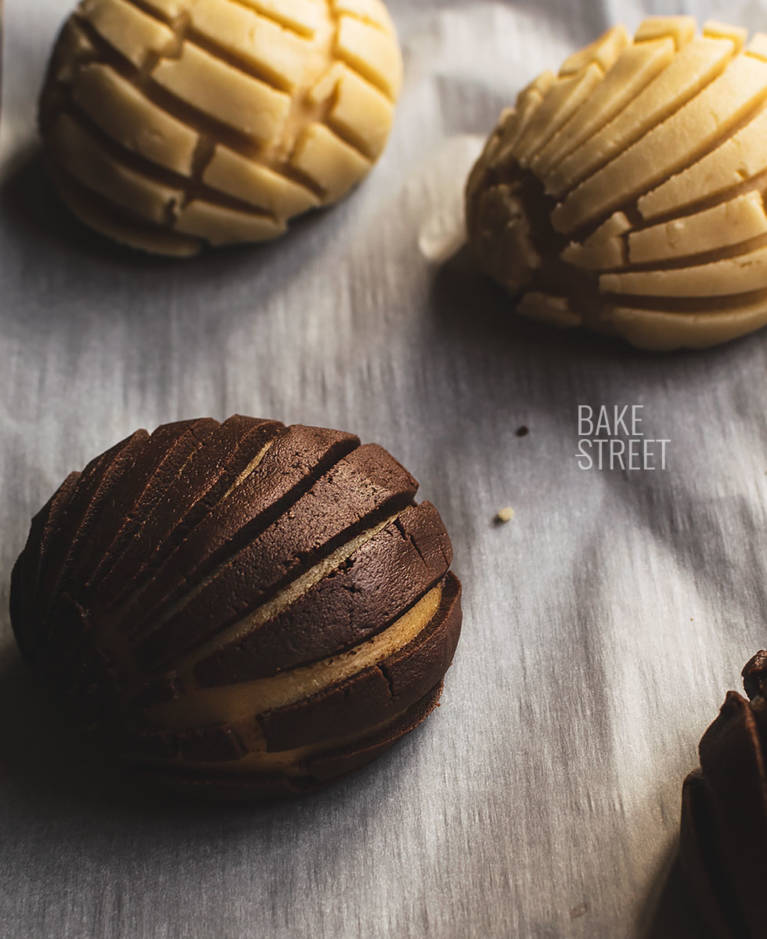
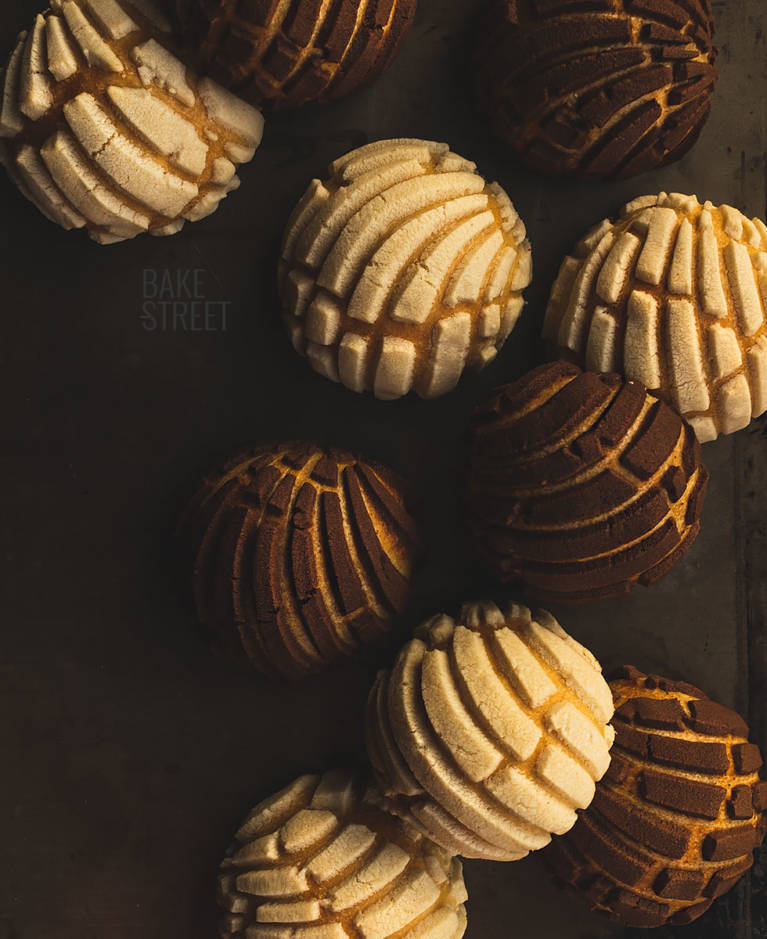
There are two dough toppings that are the most traditional or classic that are the ones I will show you how to make; vanilla and cocoa. But today you can find a wide assortment of both color and flavor.
Mexican Conchas origin.
Wheat arrived in Mexico with the Colony, it is said that after the Sad Night, Juan Garrido (an African freedman enrolled in the Spanish militia) received from Hernán Cortés a piece of land, which today is the Riviera de San Cosme, as gratitude for his services in the construction of the Hermitage of the Martyrs (San Hipólito). In this place were buried many Spaniards fallen in battle.
Garrido used the land of San Cosme as a plot where he would plant the first wheat plants in Mexico. But…
Where did Garrido get the wheat grains? According to Francisco López de Gomara in his Historia General de las Indias, they were found mixed in a shipment of rice that he was cleaning by orders of Cortés himself. Eventually, the first wheat mills appeared and the bread began to expand.
There were two kinds of bread:
- Pan florido, florido bread, made with “flor de harina“, a variety of flour that was white and only within reach of nobles, viceroys and bishops.
- Common bread or pambazo which comes from “pan”/”bread” and “basso”, i.e. “poor bread”. Made with darker and poorer quality flours. This was the bread that poor people had access to.
According to Cristina Barros and Marco Buenrostro, Mexican researchers, at that time there were regulations for flours according to their quality, weight, place of sale and water to make the breads. The breads were marked with a carved wood stamp and those badges were registered in the town hall of the towns. This information is published in the Mexican Academy of Sciences.
Many of the sweet breads made in Mexico originated in convents. If there is one thing that promotes creativity, it is the need to create something from very few resources. This is what happened to them, they managed to invent thanks to their ingenuity, ability to create and cook with what they had at hand. On the other hand, indigenous and Creole women also contributed their creativity, giving rise to a much broader repertoire.
The labor of those who made bread, at that time, were indigenous. But the owners of the bakeries and pastry shops were Spaniards. It was in this way, fusing the knowledge and creativity of some and others, that unique elaborations began to originate.
In the 18th century European, French and Italian bakers began to emigrate to Mexico.
There they opened bakeries giving rise to a wide variety of breads of very good quality and, today, are part of their cuisine as the Mexican Conchas, garibaldi or choux. In the 19th century, the Mexican concha was already part of the Ambriz bakery.
It is not known why a bread dough and a coating of sugar cookie dough came together in the same production.
It may be that this dates back to colonial times when European bakers tried to make their breads much tastier for the indigenous population by adding sugar. But wasn’t it enough to sweeten the bread itself? Perhaps it was a practical necessity that this cookie dough cover served as a protection for the sweet bread dough and thus preserve it by prolonging its shelf life.
French bakers learned a lot from German bakers who used streusel (a type of cookie dough) generously laid out on top of cakes and breads. Could it be that a Franco-German baker had a surplus of streusel and dough, and decided to combine it into one? Or is that a more recent invention? It’s still a mystery.
The same thing happens with the union of a sweet bread and a thin layer of cookie dough.
What is really interesting is that this particular type of sweet bread is found in another region of the world: Asia.
There is an elaboration that could be said to be the sister of the Mexican Concha and is the melonpan. It is a Japanese concha of very similar aspect. A very spongy dough with a cookie topping, but harder, and a pattern at the top reminiscent of a trellis.
Daniela Galarza, editor at Eater, mentions bread historians Steven L. Kaplan and Linda Civitello who comment on the possibility that both breads originated on different continents, independently of each other.
Civitello affirms that it is the result of the “dispersion of the Iberian Peninsula”. The Portuguese sailed east and the Spaniards sailed west. The latter invaded the Americas at the beginning of the 16th century and the Portuguese invaded Japan.
Neighbouring European countries used the same type of baking techniques and probably used a wide variety of recipes to convince their respective colonies to adopt wheat bread making in their customs, despite the wheat aversion among the conquered population and the preference for rice in Japan and corn in Mexico.
The mystery still persists today. Unfortunately, most conchas in Mexico (and in many Mexican bakeries in the United States) are not very appetizing since they are produced in dough for large productions, with artificial flavors, resulting in dry/hard textured and unflavored breads. The ideal thing is to acquire them in artisan bakeries or to encourage you to prepare them at home 😉
Ingredients for 16 pieces
Recipe adapted from one of my fav books “Le Grand Livre de la Boulangerie“
FOR THE DOUGH:
- 325 g bread flour, W=300
- 125 g plain flour, W=200
- 175 g egg (about 3 large eggs)
- 130 g whole milk
- 120 g sugar
- 100 g unsalted butter at room temperature
- 1 tsp vanilla extract
- 7 g dry yeast
- 5 g salt
FOR WHITE TOPPING:
- 70 g bread flour
- 70 g unsalted butter at room temperature
- 70 g icing sugar
FOR COCOA TOPPING:
- 60 g bread flour
- 10 g unsweetened cocoa powder
- 70 g unsalted butter at room temperature
- 70 g icing sugar
Instructions
Make the dough for Mexican Conchas.
- In the bowl of the stand mixer/kneader, add the 2 types of flour together with the milk, eggs, dry yeast, vanilla extract, salt and sugar. Knead at speed 1 for about 8-10 minutes. We will have to get a semi-developed dough.
- Stop the stand mixer/kneader and start adding the butter little by little. Let it fully integrate into the dough before adding more.
- Knead the dough until the gluten is well developed. It should be elastic, soft, smooth and not break.
- Make a ball with the dough and place inside a bowl or hermetic container. Cover with film or with its corresponding lid.
- Let it rise until it almost triples in volume, a little more than doubling. Depending on the temperature may take more or less time. In my case it was 5 hours at 87ºF/30.6ºC.
- If we want to divide the process in 2 days, once it has grown 1/3 of its volume, refrigerate until the next day.
Make the toppings for conchas.
- In a bowl add the ingredients for the white topping and mix with the help of your hands. The result will be a homogeneous mixture.
- Repeat the same process to make the cocoa topping.
- Once we have them ready, cover them with film and let them rest while the dough fermentation takes place.
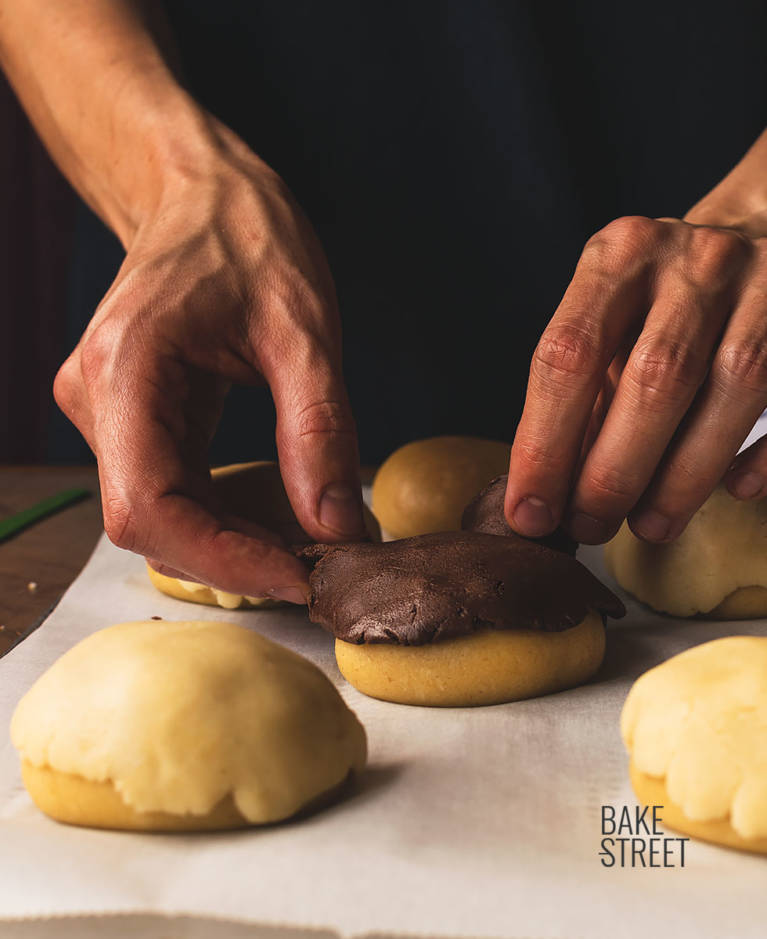
Prepare the toppings to place on the conchas.
- Before we shape the pieces, we'll leave the toppings ready.
- Divide the white topping into 25 g pieces and make ballsy. Repeat the same process with the cocoa topping.
- Place inside a bowl and cover with film to prevent drying.
- Refrigerate for 30-40 minutes. This step will facilitate the stretching of each piece without sticking to the hands and / or work surface.
Divide and shape.
- If you have decided to put the dough in the fridge, remember to remove it 1-2 hours before to shape the buns. If it has not reached the desired volume, leave until it reaches this point.
- Divide the dough into 16 pieces of 60-65 g each.
- Shape smoothly, without exerting too much tension. The softer you manipulate the dough, the more tender the final result will be. Remember that if you have created leftovers when dividing the dough, they should always remain in the centre of the piece.
In this case I decided not to preshape the dough, but to shape it directly. My intention was to check that the less we manipulate the pieces, the better the final result we will obtain. And so it was. A very tender crumb and no compact. - Place the pieces on a perforated tray lined with baking paper. You will need two trays.
Put the toppings on the conchas and make the final proof.
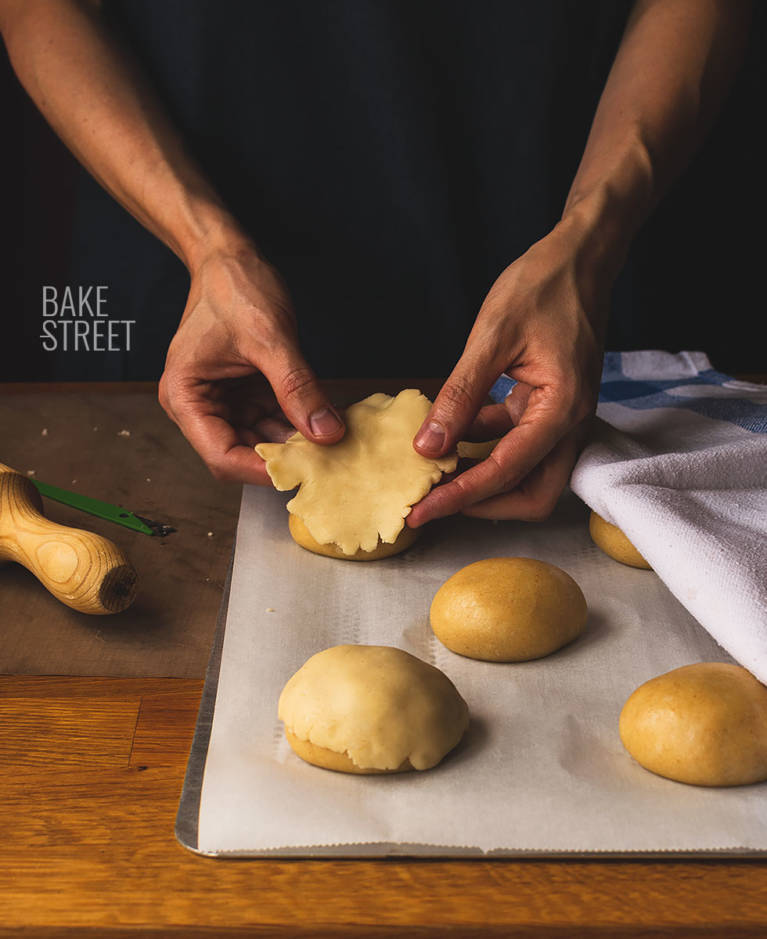
- Stretch with the help of a roller pin or with your hands a topping piece. Ideally, it should have a slightly larger diameter than the piece of dough.
- Place on the shaped piece and adjust.

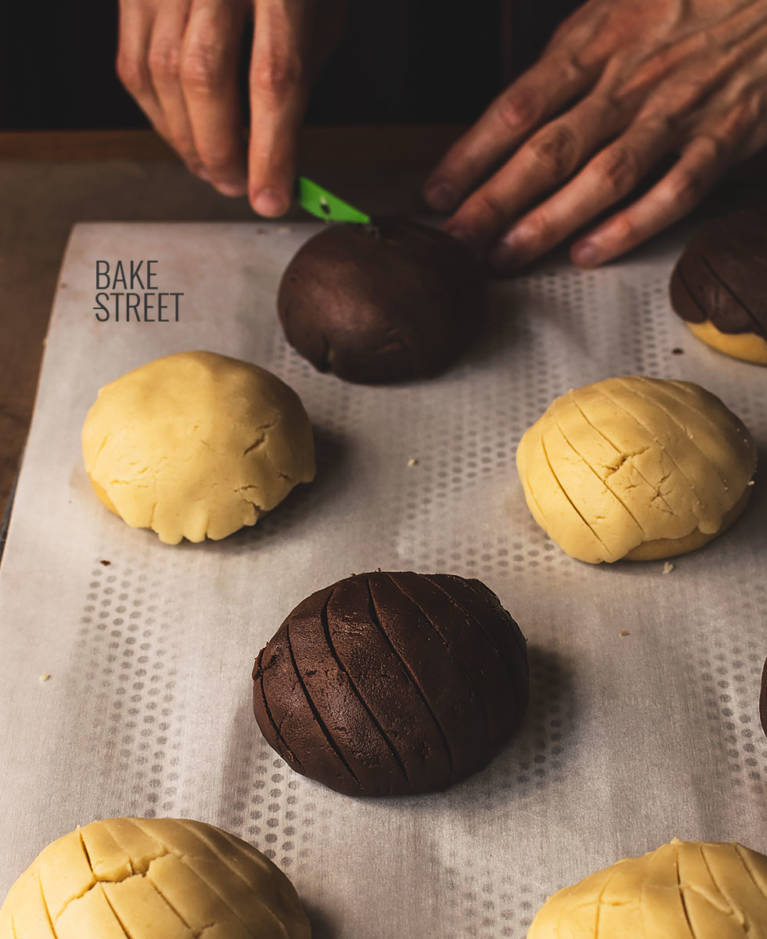
- With the help of a blade, draw lines that simulate the exterior appearance of a shell. Be careful not to cut the piece of dough, just the covering.
- Repeat the same process with the rest of the pieces.
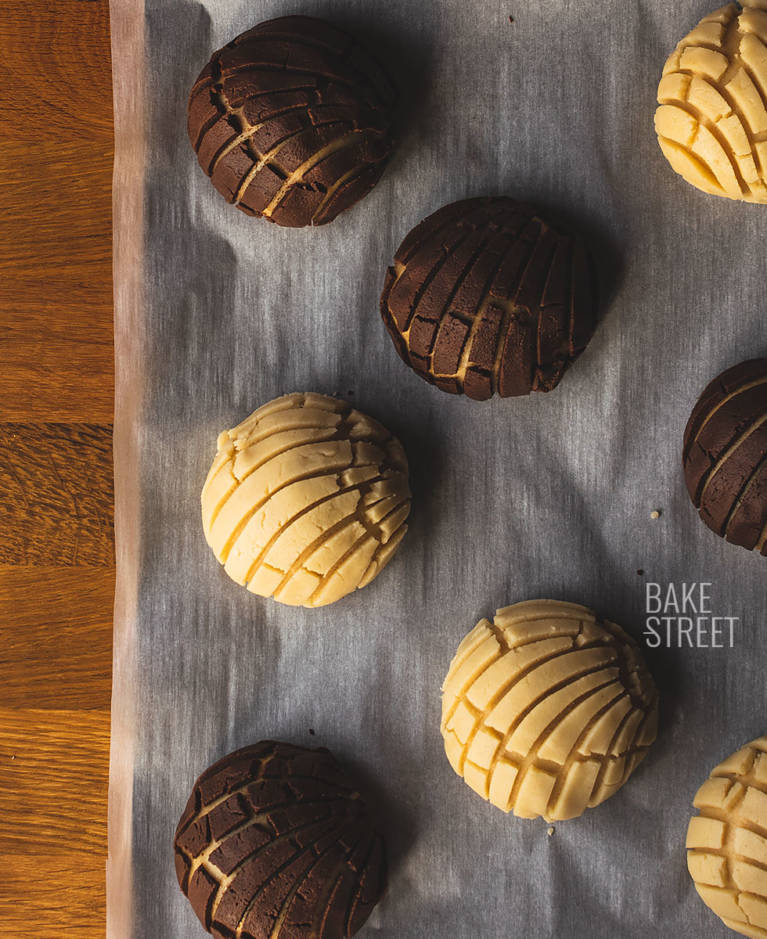
- Cover with film and let them rise until they double in size. In my case it was 3 hours at 86ºF/30ºC. Now that it is less hot, it will take them longer to rise. You will notice that the cuts that you have made on the topping, have opened and you will be able to appreciate depth in them.
Bake.
- Preheat oven to 320ºF/160ºC.
- Bake at medium height for 20 minutes. Remember that the inside temperature must reach 190º-194ºF/88º-90ºC for the baking to be finished.
- Remove from the oven and let it cool completely on a rack.
- In the NOTES section, I tell you how to keep them for a long time.

Notes
- Respect all the steps, rests and rising time to obtain a good result as much in flavor as in texture and sponginess.
- I recommend you to use a good quality butter because this will affect the final taste of the dough.
- The toppings I have made them with vanilla and cocoa, but you can give it color and aroma if you want. For example with matcha tea, beet powder, turmeric... Or if you prefer to use food colorants, you can also do it.
- They last in perfect condition for 4 days stored in a zip-type bag at room temperature (if it's not too hot). From here, they will begin to lose tenderness.
- If we want to preserve the Mexican conchas for several days/weeks while maintaining the same freshness as the day we baked them, we will do the following. Once they have cooled completely, store them in zip-type freezer bags of 2 in 2 (or more if you wish) and freeze. When we want to consume them, remove them from the freezer the night before and leave them at room temperature. The next morning they will be as freshly baked, very tender.
- If it is a time of the year when it is very hot, in 2-3 hours they will be thawed and ready to eat.
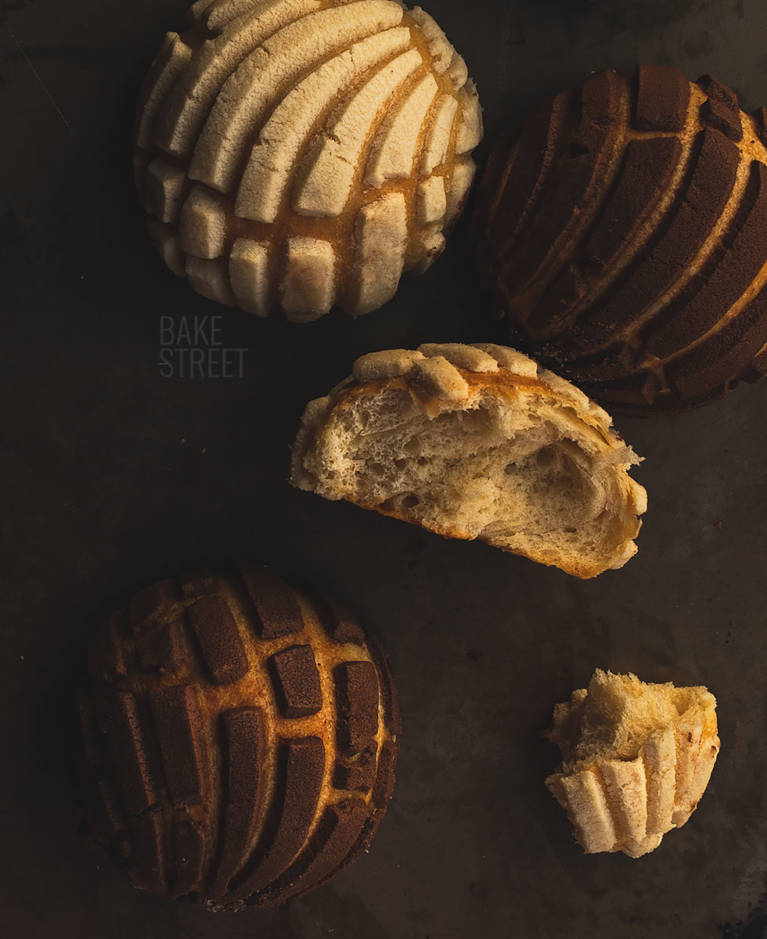
If you want to get off to a good start every day, then do it with these Mexican Conchas. At home I have prepared them several times since I made them in these 2 lasts summer months. What I liked the most is how well they keep frozen, the texture, tenderness, flavor... It's exactly the same as the day I baked them. I tell you that I've been having this marvelous breakfast for several days accompanied by a good coffee.
Maybe you find them more laborious than they are, but I promise you that carrying them out is quite easy. And it's definitely worth it.
I wish you a good start to the week!
Big hugs,
Eva
Sources:Eater, Blog Sección amarilla, Blog sección amarilla (2)