Cuña de crema y chocolate – Buns 80s-90s
After giving you a couple of weeks ago the recipe to make the famous Cuernos de chocolate, you have asked me a lot to let you know how to make Cuña de crema y chocolate – Buns 80s-90s, Cream and Chocolate Wedge, also known as Triángulo de chocolate – Chocolate Triangle. Ok, it’s been said and done! You can now go back to the frenzied moments of madness, full of happiness and joy like those of your childhood with these cream triangles.
If there is one thing that stands out about them, it is that they were eternal and infinite buns. There was no end to them, it was as if Mary Poppins had taken them out of her handbag. I was commenting on Instagram the other day. If there was something that you didn’t mind sharing with others, without putting your fingers to mark how far they could bite, it was this bun. It was never finished. Something that is normal because it was the biggest and most immense bun in the whole world, or at least that’s how I remember it.

Pastries from the 80’s and 90’s.
In addition to having asked me for the recipe for these cream and chocolate wedges or chocolate triangles (we all call them differently, even if we live in the same city), you have suggested that I make many other recipes for buns from that time. But if you look closely, there wasn’t a great variety of buns. Especially in patisseries/bakeries.
The other day, talking to my husband about this, we started to think about and collect buns from our childhood that didn’t come in bags or factory packaging. Well, unless our memory fails us (which could be anything), we only remember doughnuts, cuña de chocolate – chocolate wedges or triangles, chocolate horns (cuernos de chocolate), cream buns and… Not much else. It’s true that if you went to a café with your parents, there were the classic cream fried buns (which could be covered in sugar or chocolate). But apart from that, along with croissants, napolitanas and palmiers…. The pastries were quite limited.
How I remember those big palmiers, giant, very fluffy and with fondant chocolate coating…. It brings tears to my eyes!
Of course, I’m leaving aside the classics like Phoskitos, Pantera Rosa, Bollycao, Tigretón… Rather, we are focusing on those pastries that were given to you with paper napkins (to eat on the spot) or wrapped in brown paper.
It is possible that there are some more that we have left out, so if so, I will be happy to read you 😉
Memories of my adolescence.
When I was 13-14 years old, just as I was passing from the eighth year of EGB to the third year of ESO (we were caught in the middle of the educational reform), we had to divide up the children from all the schools where I lived into the secondary schools that existed at the time. They were building new ones, but they didn’t have time to finish them by that time.
So many of us had to go to school in the afternoon and evening. It was horrible. It was hard to get up early because you didn’t have school, but between getting up, having breakfast, doing your homework…. You almost had to eat to go to class because you got in at 3 o’clock in the afternoon. You might be thinking, why are you telling us all this? Well, it’s true, but the fact is that I wanted to go to this point.
We had our break at 18:00 in the afternoon. Near the school there was a café called “Canela”. I don’t know how many times we went there to have a snack at break time and, on some occasions and without any malice, we missed the time to go back at fourth hour and we arrived at fifth hour… hahahaha.
All, or almost all of us who went there, would take some doughnuts (huge, about 15 cm in diameter) to share. They were covered in chocolate and filled with whipped cream. How marvellous. What good memories and good times we had in those years thanks to the wonderful educational reform and the night timetable. By the following year we had a normal timetable and our luck ran out… But they can’t take away what we enjoyed!

Short Collaborative Musical Break.
You already know that many times I like to share with you some song in the post that I have carried out. But, on this occasion, I have decided to create Collaborative playlist on Spotify where we will be able to gather together songs that accompanied us during our childhood and adolescence.
For my part I have added a few, 35 to be exact hahaha, but I could have added many more! The thing is that these are just to break the ice, I prefer you to add the songs of that time that you like the most.
In this link you can see, listen and add songs to the playlist I have created “Música años 80-90’s {Bake-Street}” so you can dance and sing while you prepare these buns. I plan to do it 😉
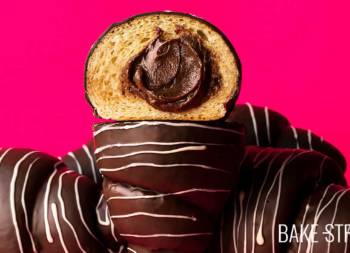
Cuña or triángulo de chocolate.
To make these buns, we will follow a fairly simple process. The dough I have used is slightly adapted from bollos de mantequilla from Bilbao. It is a dough that is very tender and spongy, so I thought it would be a very good option to make them.
The filling cream, instead of being the classic and traditional one that I leave you with in many preparations, is the one I made to make the Flan Pâtissier. Unlike the classic one, this one is made with a part of heavy cream, leaving a very soft and delicate texture. I thought it was a good option to change one for the other, but of course, you can use the classic one if you wish. Just a detail about the cream we use in this recipe: it takes longer to set and acquire the desired consistency. So be patient.
For the coating, on this occasion, I have used a larger quantity of milk chocolate instead of dark chocolate. I also added a small amount of cocoa butter to soften and lighten the consistency of the chocolate. I really liked the end result. A very soft and fluffy bun, with a very smooth cream filling and a thin layer of chocolate on the outside that adds just the right amount of sweetness. Wonderful, wonderful!
Recipe cuña de chocolate
Ingredients for 6 buns
DOUGH:
- 200 g bread flour
- 300 g plain flour
- 100 g sugar
- 100 g unsalted butter at room temperature
- 125 g whole milk
- 3 large eggs
- 3,5 g dry yeast
- 4 g salt
PAASTRY CREAM:
- 500 g whole milk
- 170 g heavy cream
- 6 large egg yolks (110 g)
- 110 g sugar
- 53 g corn starch
- 2 tsp vanilla extract
CHOCOLATE COATING:
- 245 g milk chocolate
- 255 g dark chocolate 70%
- 20 g cocoa butter
- 50 g white chocolate
MATERIAL WE WILL NEED:
- rolling pin
- cake cutter (optional) + serrated knife
- perforated trays
- pastry brush
- racks
- bowls
- piping bags
Instructions
FIRST DAY
Prepare the dough.
- Keep 2 tablespoons of milk.
- In a bowl add the flour together with the eggs, milk, salt and half of sugar. Mix with your hands to amalgamate the ingredients.
- Start to integrate the butter into the mixture and work to start mixing it. We will alternate the addition of butter with part of the reserved sugar, kneading after each addition so that the ingredients begin to amalgamate.
- Dissolve the yeast in the milk we had reserved and pour it to the dough. Knead again until it is completely integrated.
- Once we have added all the butter, knead until you get a good gluten development. The dough must be elastic and not cracked. It will take us a long time to reach this point, we must make an intensive kneading. About 40 - 50 minutes.
Make bulk fermentation.
- Once we have a perfect gluten development, make a ball with the dough.
- Grease a tupper or hermetic container, place the dough inside and let it rise until it has grown 1/3 of its volume. In my case it took 2 hours and 20 minutes at 71,6º F (22ºC).
- Put it in the fridge and let it stand overnight.
SECOND DAY
Atemperamos la masa y preformamos.
- Remove the dough from the cold 2 hours before preshaping.
- Turn the dough out onto a clean, flourless surface. Gently turn out the dough.
- Preshape the dough. To do this, bring the ends of the dough towards the centre and roll. Leave to rest for 15 minutes covered with cling film.
- With the help of a rolling pin, roll out the dough to a diameter of 25 cm.
- Cover with cling film and leave to rise until it has almost tripled in volume. In my case it took 4 hours at a controlled82,4ºF (28º C).
Bake.
- Preheat the oven to 320ºF/160ºC with heat up and down.
- Brush with beaten egg and bake in a medium-high oven for 20-22 minutes.
- Remember that the interior temperature must reach 190-194ºF/88-90ºC for the baking to be complete.
- Remove from the oven and leave to cool completely on a wire rack.
Make pastry cream.
- In a medium saucepan pour the milk together with the cream and vanilla. Place at medium heat and leave until it reaches a gentle boil.
- Meanwhile, in a large bowl, beat the yolks together with the sugar and the cornstarch, previously sieved, until completely homogenized.
- Once the milk has reached boiling point, pour a little over the egg yolk mixture with the help of a sieve to prevent cream or vanilla seeds from seeping in.
- Beat quickly with the whisk to temper the yolks and prevent them from setting into lumps.
- Add the rest of the milk little by little and mix well each time.
- Pour the mixture back into the pot and place on medium-low heat, stirring constantly. You will notice that the texture will become denser, but it will take a while. Patience.
- Once the cream has a creamy texture, like the one I show you in the video, remove it from the heat.
- Pour into a pan/bowl (the wider the pan, the better because it will cool down faster).
- Cover with transparent film and let it cool completely.
Cut and fill cuñas de crema y chocolate.
- With the of a cake cuttert, mark the entire outside of the bun. This will give us a guide to cut it straight.
- Cut lengthwise with the help of a serrated knife. In my case, I realised after cutting it that I should have cut higher to balance the amount of bun at the top and bottom.
- With the help of the cake cutter, mark the top and divide the bun into 6 equal portions or as similar as possible.
- Cut the triangles with a serrated knife.
- Put the pastry cream into a piping bag.
- Fill each of the wedges with the custard.
Prepare the coating and cover the cream wedges with the chocolate.
- Melt the dark chocolate together with the milk chocolate in a bain-marie. On the other hand, melt the white chocolate in a bain-marie. Put the white chocolate into a piping bag with a smooth piping tip.
- Place a chocolate rack on a serving dish, so that we can collect the excess to continue coating the buns.
- Place one of the buns on the rack and cover with the dark chocolate mixture. In my case I used a spoon to avoid pouring too much all at once.
- Tap gently to settle the chocolate and help it form a thin layer.
- Next, place the rack with the bun on a different bowl and finish decorating. Create lines of white chocolate on the surface of the bun.
- Transfer the bun to a wire rack and repeat the same process with the rest of the pieces.
- Let the coating harden at room temperature or refrigerate for 20-30 minutes.
- Serve.


Notes
- Can I use fresh yeast instead of baker's dry yeast? Yes, of course. In this case remember that the proportion is 3 g of fresh yeast for every 1 g of dry yeast.
- Knead a lot and very well, developing well the gluten you are guaranteed to get a very spongy crumb bun.
- Respect the rising times so that the pieces acquire the correct volume, do not explode creating a crack and their texture is very spongy. Don't be anxious! :D
- Can I speed up the rising process in any way? I have never been in favor of placing dough into the oven at low temperatures, for example 86ºC (30°C). This will always tend to be higher and we run the risk of spoiling the taste of our dough. If you want to help the dough in a very cold season, you can place the dough inside the oven only with the light on, nothing else. In my case I manage to reach 75º-82º F (24-28ºC).
- Is the mandatory to make the process in 2 days? No, not at all. But it is much more comfortable and practical so that you don't have to worry about the dough all day long. And baking at dawn...
- Try not to exceed the baking time of the buns, otherwise they will be dry and not very soft.
- This time I decided to make the custard I made for the Flan Pâtissier, but if you wish, you can make the traditional custard (recipe at this link).
- Do not forget to temper the yolks to prevent them from curdling and forming lumps.
- Be patient when you are making the pastry cream, it takes a while to curdle and acquire consistency. Don't be tempted to increase the heat because you run the risk that some part of the base will burn and transfer the taste to the cream.
- I advise you to raise the cut of the bun a little higher than mine. The external reference I took seemed to be correct, but I didn't take into account the height of the dome.
- The coating solidifies quickly between each coating and this will make it difficult to cover the bun well and achieve a thin, even layer. I advise you to place the bowl with the chocolate in a bain-marie between each coating. Or keep the bowl in a bain-marie, with the heat turned off, during the whole process. Between each coating, collect the excess chocolate that falls into the bowl so that you can coat the next buns. If necessary, turn on the heat tofacilitate the chocolate to melt again.
- To prevent the white chocolate from hardening in the piping bag, do the following. Place a small saucepan with water and bring it to the boil. Turn off the heat and place a thick plastic cup or a container that can withstand the heat. Between each decoration of our buns, leave the piping bag with the soft chocolate inside the glass that is in the pan of hot water. This ensures that the chocolate has a good consistency throughout the whole process. Remember to place a zip clip at the end of the piping bag and another one just above the tip (once you have decorated the bun) to prevent the chocolate from coming out of the piping bag.
- They will keep in perfect condition for 4 days wrapped in film and kept in the fridge. Before eating them, I recommend tempering them for 1-2 hours.

What can I tell you that you don't already know? This cuña de crema y chocolate - cream and chocolate wedge or chocolate triangle is one of those wonders that, within its simplicity, make us enjoy a lot and in a big way.
I really like to remember moments when I have been really happy. That little logbook of our life that is stored in our memories. There we keep the best moments of our path and that, many times, guide us when we get lost or deviated as adults.
Curiously, the great majority of them are surrounded by simple and easy things. Because those are the things that really fill us up and make us better people.
You may think that a bun can do all this, but it is not the bun itself, but everything that goes with it; breaks between classes, friends, afternoons in the park, shared secrets, discoveries, children's scientific experiments, hours playing, jumping and running, playing "heights" with the rubber band, coming home exhausted to have a bath and dinner... Anything that was part of these moments directly creates a direct link to the experience and its emotions. For the same reason, all these things connect us directly with those beautiful and innocent experiences.
I can't wait to see yours! I wish you a wonderful weekend.
Big hugs,
Eva