Cuerno de Chocolate – 80’s-90’s bun
I am sure that many of you have eaten this Cuerno de Chocolate (Chocolate Horn) – 80’s-90’s bun countless times throughout your childhood…. There are things that, just by seeing them, immediately take you back to a moment in your life and, for a few moments, you relive emotions, feelings, experiences, memories and even aromas and textures. I find it fascinating how we are able to store memories and relive them just by looking at an image.
That is what I feel every time I see one of these pastries that accompanied us at break time or on the way home from school, when we passed by the bakery in your neighbourhood and you ate them while watching Sesame Street, the Crystal Ball or on the way to the park. It’s true that my mother didn’t always buy me these industrial buns, even though I asked for them countless times. She always used to make me sandwiches or fruit, but when she bought them for me I was very happy. You had the feeling that it was the best day of your life, hahaha.

I have created a collaborative playlist on Spotify with songs from the 80-90’s so we can add songs from those years and enjoy while we cook. You can check it out and join in at this link.
Remembering buns from the 80’s and 90’s.
I have an image in my memory of each and every day that I went to school and we passed by the bakery in my neighbourhood. It was a big shop in a narrow street between housing blocks, with big glass doors and signs hanging on them. Whenever you passed by there was that wonderful smell of doughnuts and bread. Who wouldn’t want to eat one of those as you walked past? It was very difficult. But your mother was already there to say no to you. Except for the days when you managed to get her to say yes.
Without a doubt, my favourite sweet treat was glacé doughnuts that they sold in yellow cardboard boxes (very big and with a lot of doughnuts inside) that they brought every day. That’s why they were so incredibly tender. They were wrapped in brown paper in which the sugar got soggy and moist when you held them in your hand. I liked them so much… They are no longer like those of those years. Later, whenever I was allowed to, I ate many other buns such as Bollycao, Donettes, chocolate palmiers… And others that I ordered just for the dolls, like Phoskitos, hahaha. Damn, I didn’t like them at all! But I wanted to have the “Dragons & Dungeons” dolls that came with them.
I was very little and, therefore, very innocent. I never ate these buns, because I didn’t like them at all, and I left them in my backpack. One day my mother opened it and found a pile of smashed buns in there…. They scolded me a lot and, of course, I told them that I wanted and needed to have those dolls. Hahaha, my goodness. They never bought them from me again.
It is possible that in each country there were some typical buns, apart from the ones we surely share everywhere because they are well known brands. So if you want to share them with me, I would be delighted to read and learn about these sweets that accompanied you in your childhood.
Musical break.
Without a doubt the music that surrounds the 80’s and 90’s is simply great, at least in my opinion. I still have 4 hour VHS tapes with video clips recorded. I really liked to record videoclips with the songs I liked so I could dance at home and learn the dances with my friends, when there were dances of course haha.
It’s a poem to imagine us in my room, dressed up and making video clips singing songs… Great memories!
It’s hard for me to choose a song from those years because I like so many of them. But there was one group I listened to a lot and that was Roxette. Of all their songs, I think the one I listened to most was “It must have been love“. So I leave you with this song 🙂
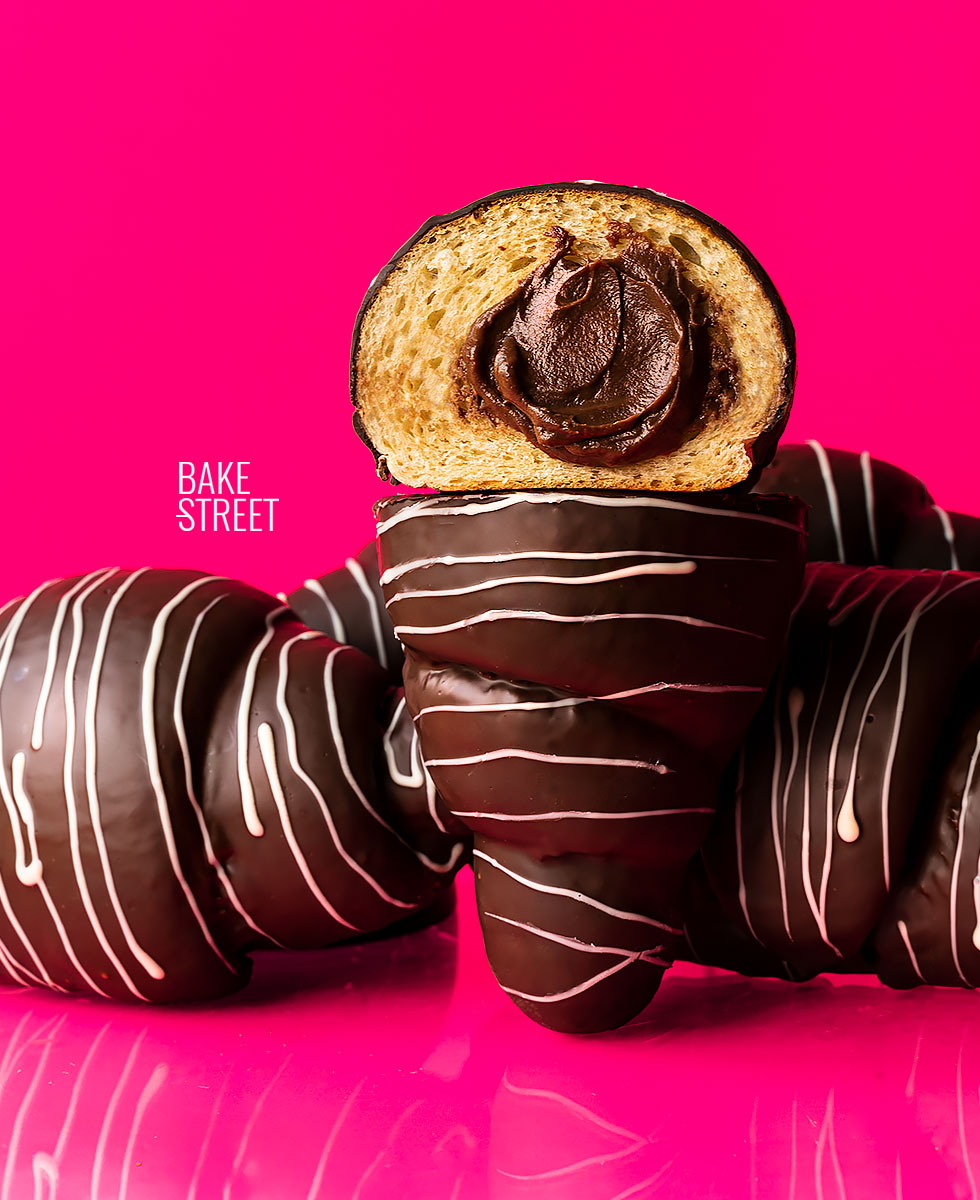
Cuernos de chocolate.
It is possible that these buns were already sold when I was a child, although I don’t remember them very much if I’m honest. I almost have a better image of them when I was finishing school and going to high school. It was one of those buns that were always in the cafeteria and that many people bought along with the chocolate horn I’m leaving you with today, huge palmiers, napolitanas, croissants and sandwiches of all kinds. Ok, and the famous chocolate triangle filled with custard.
This bun, which weighed at least half a kilo or more, was immense. I could never eat a whole one. In fact, several of us bought it to eat it because there was no end to it…. At home they have already told me that I have to make it because they liked it so much, so I will bring it to you for sure 😉
To make these cuernos de chocolate I have based them on my recipe for Mexican conchas, but I have modified a few things. It’s a dough that is very tender and spongy, but at the same time holds its shape very well. So it was ideal for making them. The shape, which resembles a conch, is the same as the one we use to shape a croissant.
I had doubts about the filling for the bun, I didn’t know which option to choose, but in the end I decided on a chocolate custard. I know it’s not the traditional filling, as it fell out and dripped when I took a bite. But the result is so great, that I think it’s well worth a change.
The chocolate custard is much smoother, creamier and not so sweet, and the end result is not at all cloying. Finally, I decided to make the coating by mixing 70% dark chocolate and milk chocolate to give it a sweet touch, but just enough. The end result is an incredibly tender, fluffy bun, with a rich, silky and creamy filling, accompanied by a thin, very crunchy coating that makes you melt with love at the first bite.
Cuerno de Chocolate recipe
DOUGH:
- 325 g bread flour
- 125 g all purpose flour
- 170 g egg (about3 large eggs)
- 135 g whole milk
- 80 g sugar
- 85 g unsalted butter at room temperature
- 6 g dry yeast or 18 g fresh yeast
- 1 tsp vanilla extract
- 5 g salt
CHOCOLATE CUSTARD:
- 500 g whole milk
- 2 tsp vanilla extract
- 2 large eggs
- 125 g sugar
- 50 g cornstarch
- 150 g dark chocolate 70%
- 30 g unsalted butter at room temperature
COATING:
- 150 g milk chocolate
- 300 g dark chocolate 70%
- 50 g white chocolate
MATERIAL WE WILL NEED:
- roller pin
- scraper
- perforated trays
- pastry brush
- cooling racks
- chocolate rack
- bowl or pan
Instructions
FIRST DAY
Make the dough for cuernos de chocolate.
- In the bowl of the mixer/kneader add the 2 types of flour together with the eggs, milk, dry yeast, vanilla, salt and sugar. Knead on speed 1 for about 8-10 minutes. You should have a semi-developed dough.
- Stop the mixer and start adding the butter little by little. Allow the butter to fully integrate into the dough before adding more.
- Knead the dough until the gluten has developed well. It should be elastic, soft, smooth and not break.
- Make a ball with the dough and put it in an airtight bowl or container. Cover with film or a lid.
- Leave to rise until it has risen to 1/3 of its volume. At this point, refrigerate until the next day.
Make chocolate custard.
- In a medium pot pour the milk together with the vanilla, place over medium heat and bring to a gentle simmer. The milk should not boil.
- Meanwhile, in a bowl, beat the eggs together with the sugar and the previously sieved cornflour. Mix well with the help of a whisk.
- Once the milk has come to a gentlesimmer, add a little milk to the egg mixture.
- Beat well with the whisk to temper the eggs and prevent lumps from forming.
- Add the rest of the milk and mix again.
- Pour the mixture into the pot and place over medium-low heat, stirring constantly. You will notice that the texture becomes thicker after a few minutes.
- Once it thickens, turn off the heat and add the chopped chocolate. Stir well until it is completely integrated.
- Finally, add the butter and mix again until completely homogenised. The result will be a smooth cream with a very creamy texture.
- Transfer the cream to a bowl or container, cover with cling film (touching the surface) to prevent a crust from forming on top, and leave to cool completely.
- Once completely cooled, refrigerate until the next day.
- NOTE: Before filling the buns, the cream should ideally be tempered for 2 hours. Or we can make the cream the same day we bake the buns, it is up to you.
SECOND DAY
Divide and preshape.
- Take the dough out of the fridge and leave it at room temperature for 1-2 hours (depending on the outside temperature). The dough should quadruple its initial volume. The mark you see in the video on the tupper is the volume of the dough once I put it inside and left it for 20 minutes to set.
- Divide the dough into 6 pieces of approximately 145 g each.
- Preshape the dough gently, without exerting too much tension, in the shape of an isosceles triangle. Remember that if you have created pieces when dividing the dough, these should always remain in the centre of the piece.
- Cover the pieces with cling film and leave to rest for 10 minutes.
Shape cuernos de chocolate.
- Lightly dust the work surface with a little flour. Roll out one piece with a rolling pin, the total length should be 28-30 cm.
- Roll the piece in the same way as you would a croissant. Once it is formed, seal the ends to prevent them from opening.
- Place the pieces on a perforated tray lined with baking paper. You will need two trays.
- Brush lightly with oil if the environment is very dry, cover with cling film and leave to rise until it doubles in volume. In my case it took 3 hours at 77ºF/25ºC.
Bake.
- Preheat the oven to 320ºF/160ºC with heat up and down.
- Brush the pieces with beaten egg and bake in a medium-high oven for 22 minutes.
- Remember that the interior temperature must reach 190-194ºF/88-90ºC for the baking to be complete.
- Remove from the oven and leave to cool completely on a wire rack.
Fill cuernos de chocolate.
- Put the custard into a piping bag with a wide filling tip.
- To fill the buns, in my case, I decided to insert the tip through one of the folds at the top of the bun. You can do it from the ends if you wish, but this way it will be more difficult for the filling to reach the centre.
- Fill each piece very generously.
- Once stuffed, each bun weighed around 300 grams... To give you an idea.
Make chocolate coating.
- Melt the dark chocolate together with the milk chocolate in a bain-marie. On the other hand, melt the white chocolate in a bain-marie. Put the white chocolate into a piping bag with a smooth piping tip.
- Place a chocolate rack on a serving dish, so that we can collect the excess to continue coating the buns.
- Place one of the buns on the rack and cover with the dark chocolate mixture. In my case I used a spoon to avoid pouring too much all at once.
- Tap gently to settle the chocolate and help it form a thin layer.
- Next, place the rack with the bun on a different bowl and finish decorating. Create lines of white chocolate on the surface of the bun.
- Transfer the bun to a wire rack and repeat the same process with the rest of the pieces.
- Let the coating harden at room temperature or refrigerate for 20-30 minutes.
- Serve.


Notes
- Respect all the steps, resting and rising times to obtain a good result in terms of flavour, texture and sponginess.
- I recommend using a good quality butter because this will affect the final flavour of the dough.
- Preshaping should be gentle and we should not exert too much tension or manipulation on the pieces. This will make the subsequent shaping much easier to carry out, as well as achieving better results.
- You can't watch it in the video, but in the end I decided to brush each piece with olive oil before carrying out the final fermentation. The environment was dry and I wanted to prevent the surface from drying out, which would prevent the leavening from taking place properly. In this way, the surface remains moisturised and elastic.
- The filling can be changed for another type of cream, although I highly recommend you try this option. You can use a smooth chocolate ganache, pastry cream, Nutella... Your choice.
- Do not fill the buns at the base, otherwise the filling will come out easily and you will have to make many holes to fill the whole piece. The ideal is to do it from the first round of dough and pressing generously. In this way we fill the bun reaching the centre of the bun.
- The coating solidifies quickly between each coating and this will make it difficult to cover the bun well and achieve a thin, even layer. I advise you to place the bowl with the chocolate in a bain-marie between each coating. Or keep the bowl in a bain-marie, with the heat turned off, during the whole process. Between each coating, collect the excess chocolate that falls into the bowl so that you can coat the next buns. If necessary, turn on the heat tofacilitate the chocolate to melt again.
- To prevent the white chocolate from hardening in the piping bag, do the following. Place a small saucepan with water and bring it to the boil. Turn off the heat and place a thick plastic cup or a container that can withstand the heat. Between each decoration of our buns, leave the piping bag with the soft chocolate inside the glass that is in the pan of hot water. This ensures that the chocolate has a good consistency throughout the whole process. Remember to place a zip clip at the end of the piping bag and another one just above the tip (once you have decorated the bun) to prevent the chocolate from coming out of the piping bag.
- They will keep in perfect condition for 4 days wrapped in film and kept in the fridge. Before eating them, I recommend tempering them for 1-2 hours.

If you feel like travelling back in time and remembering those years when we enjoyed this Chocolate Horn - Cuerno de Chocolate or if you have never tried it and want to know what was that marvel that accompanied us running in the park with our scraped knees, then this is the moment. Go for it now, don't think twice and get your hands in the dough.
The result is an absolutely delicious bun that has a certain similarity to the original, but I decided to change it a bit to improve it in my opinion. Remember that you can always modify what you consider necessary to adapt it to your tastes.
I wish you a wonderful Sunday and a great start to the week!
Big hugs!
Eva