Shibari Bread
Since I started with this type of shaping in breads, I have been practicing and searching for new weaves to carry out. The truth is that I enjoy learning new techniques and knots, but even more so by putting them into practice and knowing their origin. On this occasion, the braiding that I’m going to show you is a little simpler than the previous one, but undoubtedly very elegant. Shibari bread with cocoa.
The type of shape I show you today is inspired by a Japanese knot, so I decided to call it this way. You probably wonder where this name comes from and why I decided to use it. Don’t worry, I’ll explain everything in detail.
The meaning of Shibari.
Shibari or Kinbaku is the name commonly used to describe an erotic art developed in Japan. What we most closely know in the West as bondage. Although in Japan it did not develop along the same path but as a means of expressing art.
The origin of Kinbaku dates back to medieval times and was known as Hojōjutsu (捕縄術) a martial art of immobilizing the opponent by binding him.
This technique was dominated and taught by the samurai and was used to show respect for their prisoners. The Tokugawa period came to an end (warrior and founder of the Shogun dynasty, one of the most important figures in Japan) and this art became even more cruel and even inflicted pain. As time went by, it transformed into what we know it today, an artistic expression that focuses its attention on how knots are held over the body.
The term shibari – 縛り means “to bind” in Japanese, is a word used for everyday contexts that have nothing to do with erotic issues. Everything that encompasses the strings (nawa) and ties/knotting (shibari) has a strong connotation within Japanese culture.
Yukimura Haruki (雪村春樹) Sensei says in the book “The Beauty of Kinbaku”:”… The shibari is not about knowing how to do this or that bondage, but about how the rope is used to communicate emotions”.
That’s what I really wanted to convey, emotions through a braid inspired by their culture and art.

Shaping my idea.
The type of shaping that I teach you today, traditionally, is done with cane and carried out on stones. The elegance and simplicity of their braids are really pleasing to the spectator, at least that’s what they are able to convey to me in my case.
They don’t need to make many knots, braided… or even cover the whole piece they are decorating to captivate the spectator. With only a small working space, they create a very elegant piece.
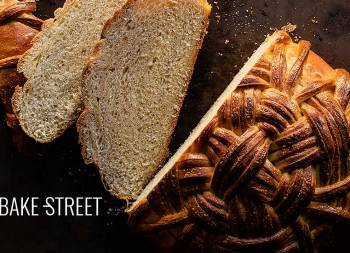
In my case I wanted to imitate one of these stones, for that reason I decided to make the bread in two colors and use cocoa on one of them. In spite of making the strands with “white” dough, we know that after baking they will acquire color, for that reason we must cover the bread in the middle of baking to prevent them from getting too brown.

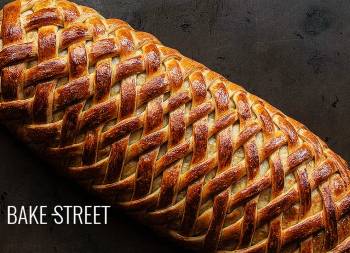
The final result.
The dough I have used is the same as the dough I have made to make the chain-mail bread and flechtkorbbrot. It is a dough that I know 100% that gives good results, both when it is worked and once we have shaped and baked the bread. Its result is tender, soft and spongy, within which a dough of cocoa allows us to obtain with a hydration that is not excessive to maintain its shape.
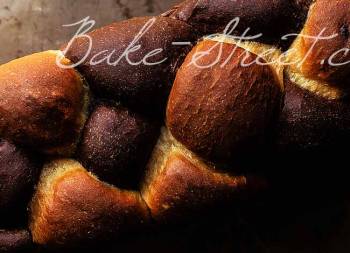
The flavor is particular, by this I mean that we perceive a slight bitterness due to the presence of cocoa. If this flavor is not to your liking, add a little more sugar/ honey than I leave in the ingredients.
For those of you who want to make this Shibari bread with sourdough, I attach below the amounts in baker´s percentage.
| INGREDIENTS | BAKER´S % | SOURDOUGH | REST | TOTAL |
|---|---|---|---|---|
| Bread flour | 10,8% | 65 g | 65 g | |
| Rye flour | 4,2% | 25 g | 25 g | |
| T45 flour | 85% | 510 g | 510 g | |
| Water | 15% | 90 g | 90 g | |
| Milk | 42,5% | 255 g | 255 g | |
| Egg | 9,1% | 55 g | 55 g | |
| Butter | 12,5% | 75 g | 75 g | |
| Honey | 6,67% | 40 g | 40 g | |
| Cocoa powder | 6% | 36 g | 36 g | |
| Salt | 1,6% | 10 g | 10 g |
Ingredients
- 21,1 oz (600 g) T45 flour
- 10,5 oz (300 g) whole milk at room temperature
- 1,27 oz (36 g) cocoa powder + 1,6 oz (45 g) whole milk
- 0,12 oz (3,5 g) dry yeast
- 1 large egg (55 g)
- 2,65 oz (75 g) unsalted butter at room temperature
- 1,4 oz (40 g) honey
- 3/4 tsp natural chocolate extract (I use Nielsen Massey' s)
- 0,35 oz (10 g) salt
Instructions
Make the dough.
- In a bowl add the flour together with milk, egg and dry yeast.
- Mix the ingredients in the bowl until a homogeneous dough is obtained.
- Add the honey and knead until it is fully integrated. Add salt and mix again.
- Transfer to a work surface and start kneading. We will have to obtain a smooth, silky and developed dough.
- Once we have a medium-developed gluten, add the butter. The ideal is to do it little by little, waiting for the dough to absorb it and facilitate the kneading process.
- Knead for about 15-20 minutes to develop the gluten well and obtain an elastic, soft and very well developed dough. The dough, always after a rest, must pass the membrane test. Here's how to do it.
- If we do rest we must always cover the dough to prevent it from drying.
Divide the dough into 2 pieces to integrate the cocoa.
- Divide the dough into two pieces, one of 870 g and the other of 200 g. Remember that if there are any pieces of dough left, these will always be in the centre of the dough before pre-shaping.
- Make a ball with the small piece and place in a bowl previously greased with olive oil. Cover with film and set aside to make bulk fermentation.
- Work the largest piece of dough. Add the cocoa powder together with milk and chocolate extract.
- Knead until both ingredients are completely integrated. We must obtain a dough with a uniform chocolate colour.
- Make a ball with the piece and place in a bowl previously greased with olive oil. Cover with film and set aside to make bulk fermentation.
Make bulk fermentation.
- Let rise at room temperature for 3 hours, in my case at 21.6ºC or until it doubles in size.
- If we want to retard the dough in cold, let it rise 1-2 hours at room temperature, until it grows 1/3 of its volume and place in the fridge until the next day.
If we have retarded the dough cold, temper before working.
- Remove the dough from the cold and let it warm for 2 or 2 1/2 hours. It's likely to even triple its size.
Shape the bread.
- Dump the cocoa dough on a clean surface and degass gently.
- Shape the same way we shape a batard.
- Set aside and cover with film.
- Take the other piece of dough and stretch it with a roller. We will form a rectangle of approximately x 9,8 inches (35 x 25 cm).
- Using a sharp cutter or knife, cut parallel strips with a thickness of 0,4 inch (1 cm), the length of which is the longest side of the rectangle. We'll need about 15 strips, but we'll need a few more. Better, in case something happens.
- Braid the bread, this process is better seen in detail in the video.
- Once we have the bread shaped, with great care, transfer to the baking tray lined with baking paper.
- Lightly grease the surface of the bread with olive oil, cover it with film and let it rise until it doubles in size. In my case it was 3 hours at 71,6ºF.


Bake.
- Preheat oven to 355ºF.
- Brush the bread with whipped yolk with milk and salt, place it in the oven for 40 minutes. Watch the final minutes of baking, if the bread gets very colorful, cover it with a sheet of aluminum foil.
- Remove and allow to cool completely in a rack.

Notes
- For those of you who make the bread with sourdough, the bulk fermentation must be until the dough grows 1/3 of its volume and there, place in the fridge until the next day. Follow the process in the same way that I detail you in the recipe. The final proof will last much longer, it can be around 5-6 hours.
- T45 flour is equivalent to a special wheat flour for puff pastry, with a W=280 and good elasticity.
- Can honey be replaced by sugar? Yeah, no big deal. Just bear in mind that invert sugars speed up the proofing process compared to normal sugar.
- The cocoa powder I use is sugar-free, so the flavor will be bitter. For that reason, for those of you who don't tolerate that flavor very much, I recommend increasing the amount of sugar or honey a little.
- The chocolate extract I use is this, of course it is optional. It gives us a more marked and intense flavor of chocolate. If not, you can also choose vanilla.
- The weaving is simple, but it requires a little attention to avoid getting involved. Do not hesitate to watch the video as many times as necessary before preparing to form it. Even practice with shoelaces, all help will be welcome.
- To know if our bread has finished the cooking time, remember that with a digital thermometer and checking its temperature we will know. It must be around185-195ºF.
- Preservation: This bread can be kept in an airtight bag for 4 days. If you prefer, you can freeze it in film wrapped portions.


This Shibari Bread joins the saga of breads that are woven or inspired by craftsmanship/basketwork that have kept me totally trapped and in love lately. Without a doubt, not only are they enjoyed once we have baked them, but their elaboration process is highly rewarding.
I encourage you to try it and show me! The last bread I left for you was put into practice by many of you and you showed it to me with really incredible results. Thank you for trusting me and being so cool!
Have a wonderful weekend, see you on Monday!
Big hugs,
Eva
Sources: Conoce Japón, Kinbaku Manía, Wikipedia.