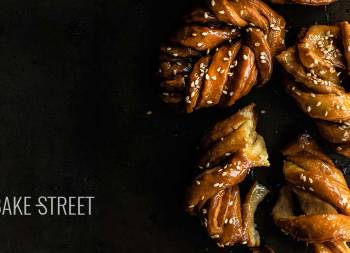
Knidlette – Traditional Algerian Cake
Today’s recipe, this wonderful dessert called Knidlette – Traditional Algerian Cake, has been waiting for several months on my “To Make” list. A list that, by the way, does not stop growing…. Every day I keep new things that I see, that I come across, that you suggest to me…. I don’t have enough hours in the day to make everything, hahaha.
I would love to be able to make more recipes every day, but I get so involved in each one, that makes it impossible if I want it to turn out well. So we’ll do it little by little. We are not in a hurry either 🙂
I love these cakes. Although I’m sure you already know it because I’ve told you countless times. Besides, I have left you a few recipes of this type. And the ones you have left. They are so elegant, so beautiful and so incredible…. It would be impossible for me not to leave you a recipe from time to time.
I know that when you see them, you might feel a little embarrassed…. You think it is very complicated or laborious. Not the first, the second yes, a little. But it is worth it, I assure you.
They are pastries that you really enjoy when you taste them, not only in their flavor and aroma (orange blossom water, lemon zest, honey…) but also in their texture, crunchy on the outside and moist on the inside, and of course, their appearance. They are incredibly beautiful!

Knidlette origin.
It seems that the authentic recipe for Knidlettes d’Algiers or Qnidlette à l’ancienne is made without eggs, just a marzipan flavored with lemon zest. This typical and traditional sweet could be said to be the emblem of Algiers’ finest confectionery which, over time, became an Algerian specialty in its own right.
These pastries were originally made by cooking the almonds in a syrup, something that is not done in this way today. The main reason seems to be to reduce costs. In addition to adding more sugar than almonds. This causes the result to be a very dry cake.
With the process that I leave you, the result is very good, but certainly nothing to do with the original. I have to look for a good elaboration with this method to try it.
Traditionally, these cakes are not dipped in honey syrup. In my case, I have brushed them with it, forgive me if I have committed a barbarity …. This step is carried out with a very similar sweet called Dziriettes.
The decoration for this cake I have seen it carried out this way in several pictures on Google and Pinterest, but the first one I found was the one from Delice D’ Orient and I was inspired by them.
Traditions.
This type of sweets are usually served during the holy month of Ramadan or Eid festivities (such as gazelle horns), for weddings or other festive occasions.
If you want to know more about the customs of these two Eid festivals throughout the year: Eid Al Fitr and Eid Al Adha, you can do so in this post.
The tradition to celebrate Algerian weddings is a ritual consisting of several steps. First of all there is the “khotba“, the proposal of hand. Then comes the “kti echert“, the dowry agreement, the wedding date…. After these events, and during the religious festivities preceding the wedding, the mother-in-law offers the bride the “m’hiba” her share of cakes (for aïd el fitr) or her share of meat (for aïd el adha and mouloud) and a gift that can be a jewel, a garment or another gift.
From this moment on, the wedding is celebrated, although its preparations can last up to a week. Apparently, the celebration begins when the women of the family begin to elaborate the sweets and cakes, during two days, based on almonds.
All these sweets are arranged in “mehbes“.
This piece is a white or red copper pot or bucket, with different sizes and decorated rims. It is considered a very old bucket dating back hundreds of years.
Some historians say that the Mehbes is of Ottoman origin and that they were the first to use it in 1594, as a tradition, during their occupation of Algeria. On the other hand, other historians say that it is of Andalusian origin and that it was known since the 8th century. Despite differences of opinion about its origin, Algerian families adopted it and continue to use it as a tradition to this day.
In the past it was made of red copper, was very heavy, without handle and with simple decorations. Today, it comes in different shapes and colors vary from yellow to white.
Mehbes is a custom that is part of the bride’s ritual.
Many families try to keep it despite the reluctance of some brides.
The Mehbes has three functions:
- Originally it was used to save water, hence it is related to the bride’s previous bath. The bride takes it to the bath full of utensils for this purpose, soap, shampoo….
- The second function begins when the bride returns from the bath. It fills it with honey, dried fruits or pastries(like the one I leave you with today) and takes it to her husband’s house.
- As a decorative element, after eating what is inside, she cleans it and places it on top of the cupboard or on the cabinet to decorate her house and, whenever she wants to go to the bathroom, she takes it with her.
Recipe Knidlette - Traditional Algerian Cake
Ingredients for 12 pieces
DOUGH:
- 150 g cake/pastry flour
- 35 g unsalted butter, room temperature
- 48 g orange blossom water
- pinch of salt
MARZIPAN (FILLING):
- 250 g ground almonds
- 150 g powdered sugar
- zest of one lemon
- 10 g unsalted butter, room temperature
- 20 g orange blossom water + 20 g water
- 7 g maltose or honey
MARZIPAN (DECORATION):
- 125 g ground almonds
- 100 g powdered sugar
- 18-20 g water
- yellow coloring paste
- holly green coloring paste
- white powder coloring
- gold and pearl sprinkles for decoration (optional)
HONEY SYRUP:
- 75 g honey
- 75 g water
MATERIAL WE WILL NEED:
- roller
- pasta machine (optional, can be done with a rolling pin)
- 2 silpat, one of them perforated
- perforated tray
- cooling rack
- curly cutter (9-10 cm diameter)
- leaf-shaped and heart-shaped cutters with ejector
- pastry brush
- saucepan
- bowls
- scraper
- grater
- cling film
Instructions
Prepare dough for Knidlette.
- In a bowl add the flour together with the powdered sugar and butter. Mix lightly with the help of a silicone spatula.
- Start adding the orange blossom water little by little and mixing at the same time. In my case I have been able to add 40 g of orange blossom water, but it will depend on the absorption capacity of your flour. This quantity can vary (being slightly higher or lower).
- We must obtain a soft dough, not sticky and very pleasant to handle. Important, it must not be dry either, when kneading, we must be able to do it easily and the dough must adhere to itself without leaving folds.
- Knead for a few minutes until the gluten has almost developed.
- Round, flatten slightly, cover with film and refrigerate while preparing the filling.
Prepare almond filling or marzipan.
- Incorporate ground almonds together with powdered sugar and half of the liquids in a bowl. Mix lightly.
- Grate the peel of one lemon and add it to the almond mixture along with the butter and maltose or honey and the rest of the liquid ingredients. Mix.
- Begin to mix with our hands. We must obtain a manageable almond paste that does not crumble.
- Shape a cylinder, cover with film and let it rest for 30 minutes.
- After this time, divide the almond paste into 14 pieces of approximately 30-33 g each.
- Shape into a slightly oval shape and cover with plastic wrap to prevent it from drying out.
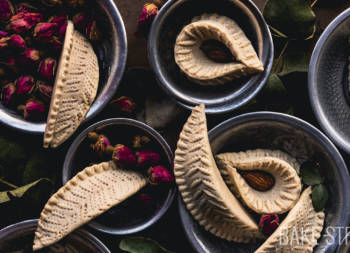
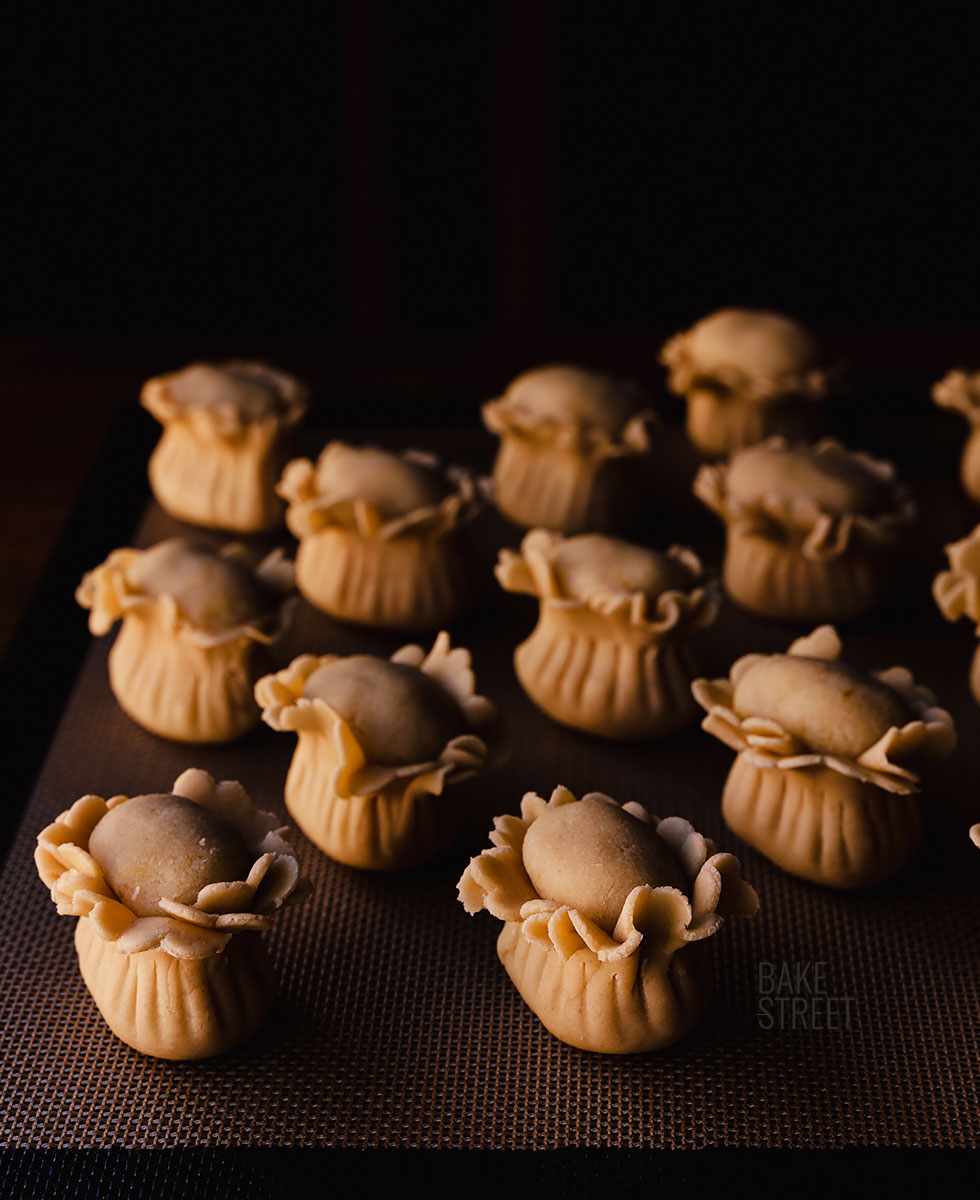
Shape Knidlette.
- With the help of a scraper, cut half of the dough. The rest of the dough is covered with plastic wrap to prevent it from drying out.
- Flatten with the help of a rolling pin, fold the dough like a triptych, flatten again with the rolling pin and repeat the process. Repeat this step 3-4 times, it will help us to refine the dough and obtain a smooth and homogeneous finish.
- To stretch the dough, we can do it with the rolling pin or using a pasta machine. To give the final thickness to the dough we can use level 2, the ideal is that the dough is thin, but without overdoing it so that it does not break when handling it or when forming the pastries.
- Place the dough on a clean work surface.
- With the help of a curly cookie cutter, 9-10 cm in diameter, cut out pieces that will be the base of our cakes.
- The diameter of the pieces should be large enough to cover the sides of the marzipan piece. In my case, after cutting each piece, I stretched a little more with the rolling pin to achieve a much thinner dough.
- Place the marzipan piece on top of the cut dough and wrap it around, trying to create folds.
- Press with your fingers, a little above the middle of the piece (to give it the shape of a basket or bag).
- Place on a tray lined with a perforated mat, silpat or Teflon.
- Shape the rest of the pieces in the same way as the first one.
Rest.
- Once our pieces are shaped, we will have to let them dry overnight at room temperature.
- Cover them with a cotton cloth to prevent dust from falling on them. Our purpose is that the outer dough hardens.
Prepare marzipan.
- In a large bowl, mix the ground almonds with the powdered sugar, honey/maltose and water.
- Start mixing the ingredients with the help of a silicone spatula. Once it begins to acquire a more solid consistency, we move on to work with our hands.
- Knead the mixture very well until a uniform, smooth and manageable consistency is achieved.
- Divide into 3 pieces; two 110 g pieces and one 30 g piece. The 110 g pieces are for the green and white color, the 30 g piece is for the yellow color.
- Take one of the pieces and add the coloring, mix very well to obtain a marzipan of uniform color. If we notice that it is too dry, add a few drops of water. Cover with cling film and set aside.
- For the green color I made two shades, one with more coloring than the other.
- Let stand in the refrigerator for 24 hours.
- NOTE: In my Princess Semla recipe you can see the video of how to make it.
NEXT MORNING
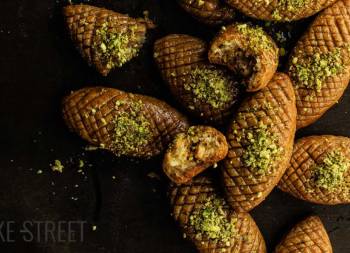
Bake.
- Preheat the oven to 340ºF/170ºC with heat up and down.
- Prepare the honey syrup, for this put the honey and water in a saucepan. Place over medium-high heat and bring to a boil, remove from heat and set aside.
- Using a new needle, prick the base of each piece and the top (as shown in the video). Since the outer dough is hard and dry, we need to create "escape routes" for the steam that will be released during baking to prevent the pieces from cracking or bursting.
- Bring to medium high and cook for 12-14 minutes. The pastries will be white, they should not brown.
- Remove and let cool completely on a wire rack.
Modelling the marzipan pieces.
- Before working with the marzipan, we must temper for 2-3 hours beforehand so that it has a manageable consistency.
- Cut a piece of white marzipan and cover the rest with cling film to prevent it from drying out.
- With the help of a cutter with a heart-shaped ejector, we will cut hearts that will be our future flowers.
- With the yellow marzipan, we will create the pistils. In the video I show you how to make them.
- To form the flowers, we take a heart and sharpen the edges. Place the yellow pistil in the center and wrap the heart around it. Repeat the same process with the rest of the pieces. We need 3-4 flowers for each cake, so we will have to model about 42 - 56 flowers, depending on how many we want to use.
- Cut a piece of green marzipan, cover the rest with cling film to prevent it from drying out.
- Sprinkle some cornstarch or powdered sugar on a silpat and stretch the green marzipan with the help of a rolling pin.
- We will create leaves with cutters with ejector of different sizes. Each cake needs about 4-5 sheets, so we will cut about 56 - 70 leaves.
- I advise you to cover all the pieces so that the marzipan does not dry out and allows us to place them in the cakes easily, being able to model them without breaking them.


Decorating the pastries.
- Place 4-5 leaves on each cake alternating with flowers.
- Finally, if desired, we can arrange some golden and pearl sprinkles. To help them adhere, brush with a little honey syrup and arrange a few.
- Serve.

Notes
- The quality of the almond will influence the flavor and final result. The better it is, the better our final product will be.
- If the almond is old, it will be very dry, so it will need a little more water in the mixture.
- The quality of the orange blossom water is also very important to achieve a good aroma and final flavor.
- If we do not like orange blossom water or we want to aromatize in another way, we can use rose water.
- I recommend not omitting the lemon zest, it adds a very fresh aroma.
- If we make the almond paste a few days in advance, we will help the flavors and aromas to intensify. In this case, wrap it well in plastic wrap and keep it refrigerated until ready to use. You will have to temper it to be able to work well with it.
- The flour I used for the dough is common wheat flour with 9 g of protein. Remember that if we vary the type of flour, this will directly influence the absorption capacity. This will make our dough need more or less hydration. This step we will be able to value it as we add the hydration and knead.
- The pasta machine is not essential, but it does help us to achieve a uniform thickness, besides being able to refine the dough quite a lot. In case of not having it, we can stretch with a rolling pin until obtaining a thin dough that allows us to work well with it.
- The final drying of the gazelle horns will ensure that we obtain a very crispy texture on the outside and tender and moist on the inside.
- We must prick the pieces before baking them. Do not forget this step to prevent them from cracking or bursting during baking.
- This type of pastry should have a light color after baking. Do not brown or toast them.
- Honey syrup is optional, but I recommend it. In my case I decided to brush the pieces generously, but they are usually dipped in the syrup and left to dry on a rack before arranging the final decoration.
- I used homemade marzipan. It is very rich in flavor and with a perfect texture. But, if you prefer, you can buy it ready made.
- Marzipan flowers are optional, but they look beautiful.
- Its flavor improves when it has rested for 1-2 days.
- They can be kept in an airtight container for 15-20 days.

I know you see them as very laborious and, well, I can't take away your reason. But I assure you that it is one of those elaborations that you will not regret at all. This Knidlette- Traditional Algerian cake is a real treat for the senses.
I can hardly find words to express how wonderful it is to enjoy a bite like this. So I hope you will try them and tell me about your experience.
I send you lots of loveg, happy weekend!
Eva
Sources: About Algeria, Algeroises