Vanitas, edible still life
This year has been one of the hardest for me to decide what to do for the Halloween post. I had several ideas on the table and I think that’s exactly why it was more difficult for me to choose one. I finally decided to recreate a scene from Vanitas, still life, but oriented towards this witches’ night.
I had been wanting to make a cake that was stacked books for some time. Don’t ask me why, but it was certainly something I wanted to recreate at some point. Then I started coming across images on Pinterest of a skull perched on a mountain of books and I knew that had to be this year’s choice.
When it came to organising the process, I have to say that I had a pretty clear idea of how I was going to do it all. To make the books we will make vanilla sponge cakes, simple but wonderful. In fact I leave you two types of sponge cake that give very good results, they are very tender and moist.
To create the books we will make rectangular sponge cakes. You will also see that I use a mould in the shape of a book, it was given to me when I started my website (in 2012!!) and I think it was about time to use it for the first time. It is undoubtedly the mould I have taken the longest to use. If you have it or want to buy it, perfect. Otherwise you can bake a sponge cake with a little height and shape it with a knife. In this girl’s video you can see how to do it.
You must take into account the size of the open book, which will be placed at the top, so that it fits perfectly with the two closed books that will be placed at the bottom. In my case, the closed books measure 13 x 18 cm and the open book measures 24 x 17 cm.
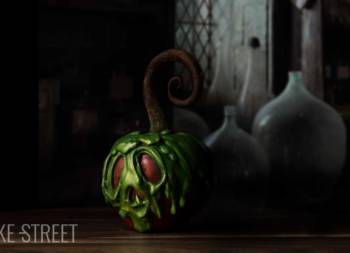
To make the skull-pumpkin (I decided to make a hybrid of these two shapes to suit Halloween) I used two 10 x 4 cm bundt moulds. They might look a bit familiar because I already used them to make the monster pumpkin. It is not necessary to have two of the same moulds, they can be of similar characteristics. Also, remember that you can always shape the cakes with the help of a serrated knife.

Decorations.
Those of you who have been following me for a long time know that I’m not a fondant fan… I don’t like it at all. It’s true that it’s easy to model, but then it’s impossible to eat. That’s why I always prefer to use plastic chocolate or modelling chocolate to create or model figures. Some time ago I showed you how to do it, but today I am going to show you again how to prepare it at home in two formats; white chocolate and dark chocolate. I can already tell you that white chocolate is infinitely easier to work with than dark chocolate. It moulds VERY WELL.
Since this cake needs to be at room temperature for many hours due to the modelling work, we must use fillings that stand up well to the passing of the hours. In my case I have used Swiss Meringue Buttercream (SMBC), but we can also use ganaches or even jams if we want to give a filling to the closed books.
The leaves of the open book will be made with wafer paper or rice paper. My intention was to have printed old texts on rice paper, but I was a bit short of time to order them. I’m telling you about it in case you want to do it, because it’s a very attractive option. To paint both the skull and the books, I used colouring powder and unsweetened cocoa powder.
Vanitas, still-life.
Often the most complex part is the naming of the elaboration. Normally you want to make it easy to get across what you have done through words… But I didn’t like the idea of putting “Edible Skull and Book” or something similar. Since my intention was to express exactly what this genre conveys, what better way than this to call it. Of course, without forgetting the word “edible”.
The term “Vanitas” refers to a genre of works of art that flourished during the Baroque period and represent the art of still life. These representations are intended to recall the transience of life, the futility of earthly pleasures, as well as to evoke the fragility of existence.
Vanitas paintings remind viewers of their own mortality by including objects that symbolise both life and death; skulls (memento mori), lit and extinguished candles (extinction of light), books (pride in learning), wilted flowers (ephemeral beauty and decadence), jugs or wine glasses (momentary pleasures), playing cards, jewellery, laurel leaves or cobs (symbols of eternal life and resurrection), conch shells and broken musical instruments (end of life’s harmony).
Many of the symbols shared convey a sense of excessive wealth and therefore vanity. The message they were intended to convey is that death makes rich and poor alike.

Two points of view.
Vanitas painting was perceived in two ways; hopeful for the hereafter or rooted in the present.
The more hopeful approach compares the vain nature of mortal life with the possibility of eternal life while the second focuses on the pleasure that earthly goods and experiences bring while one is alive.
However, in this reminder of the transience of life, the enjoyment of its pleasures was encouraged, following the example of the Romans with the figure of the larva convivialis and the motif of the skeleton as cupbearer as a memento mori to remind us that death is inevitable, the transience of life (Tempus Fugit) and to encourage us to celebrate it and make the most of it.
The theme of the vanitas is also inspired by medieval macabre dances, which emphasised the approach of the Lady in Black and the triumphs of death, highlighting the wickedness of human actions and the futility of worldly pleasures.
Vanitas origin.
During the Dutch Golden Age in the 17th century, vanitas painting emerged as a tradition within Dutch still-life painting. These paintings tended to depict highly realistic still lifes and sometimes incorporated human figures.
Vanitas still-life painting flourished in the Low Countries in response to the growth of wealth in the society of the time. Its purpose was to convey the transience, ephemerality and finiteness of life through common, recognisable symbols.
- Vanity through objects: symbolising pleasure, wealth and power.
- Fugacity of human life: represented through skeletons, withered flowers or clepsydras (water clocks).
- Religion or Spirituality: They send us messages of resurrection through symbols linked to eternal life such as crosses, laurels or butterflies.

Terminology.
The term “vanitas” has Latin roots and is related to the first two lines of the Old Testament Book of Ecclesiastes in the Bible: “Vanitas vanitatum… et omnia vanitas” (Eccl. 1:2), which translates as “Vanity of vanities… all is vanity“.
The Vanitas paintings emphasised the futility of earthly pleasures and the eternal nature of what transcends. In a sense, this “vanity of vanities” was perceived as a distraction from the spiritual and even a failure of humanity.
Although vanitas paintings are known for their impressive detail, early depictions of vanitas were not always obvious. Before the late Renaissance, these images appeared as simple depictions of skulls and similar symbols on the back of portraits. Later, in the mid-16th century, vanitas became established as an independent genre of art.
Today, despite the morbidity inherent in depictions of death and decay, vanitas painting still retains a legacy of hopeful aspirations that extend beyond earthly life.
Recipe Vanitas, edible still life
SPONGE CAKE FOR THE SKULL AND CLOSED BOOKS:
- 300 g cake flour
- 180 g sugar
- 225 g unsalted butter, room temperature
- 225 g egg whites (approx. 6 large eggs)
- 180 g whole milk
- 14 g baking powder
- 2 teaspoons vanilla extract
- pinch of salt
SPONGE CAKE FOR THE OPEN BOOK:
- 5 large eggs, whites and yolks separated
- 150 g sugar, separated in two equal parts (75 g + 75 g)
- 70 g cake flour
- 90 g cornstarch
- 60 g unsalted butter, room temperature
- 4 g baking powder
- pinch of salt
SWISS MERINGUE BUTTERCREAM:
- 110 g egg whites, room temperature
- 200 g sugar
- 260 g unsalted butter, room temperature
- 1 teaspoon vanilla extract
MODELING DARK CHOCOLATE:
- 500 g dark chocolate 70%
- 190 Corn Syrup
MODELING WHITE CHOCOLATE:
- 400 g white chocolate
- 150 g Corn Syrup
DECORATION:
- wafer paper
- unsweetened cocoa powder
- edible black powder colouring
- edible bronze metallic powder colouring
MATERIAL WE WILL NEED AND SHOWN IN THE VIDEO:
- KitchenAid mixer*
- KitchenAid crystal bowl*
- saucepan, this is mine from DeBuyer*
- bowls
- rectangular pan, Naturals Nordic Ware 25 x 18 x 2,8 cm*
- 2 bundt molds 10 x 4 cm
- book mold 24 x 17 x 3 cm, this one from the link is larger (optional, you can do it with a rectangular pan)
- modelling tools
- pastry spatula
- rolling pin
- scraper*
- silicone spatula
- digital kitchen scale
- digital kitchen thermometer
- cooling rack
- silpat + teflon sheets
- perforated tray, mine is DeBuyer*
- brushes for edible use
- silicone mould for chocolate shaping (optional)
- chocolate cooling spray (optional)
*You have a 5% discount on the website Claudia&Julia using this code BAKESTREET. Delivers throughout Europe.
Elaboración
FIRST DAY
Prepare sponge cake for opened book.
- In the bowl of the KitchenAid, add the egg yolks and 75 g of sugar. Whisk on medium-high speed until whitish in colour and creamy, you will notice that it gains some volume.
- Add the butter and beat again until smooth.
- Begin to add the flour, a little at a time. Integrate while mixing on low speed.
- Add baking powder together with salt, mix.
- Finally, add the cornflour. Do it in the same way, little by little and mixing at the same time.
- Once everything is integrated, set aside.
Whip meringue.
- In another bowl, add the egg whites and begin to whip. Once it begins to foam, add the sugar (the remaining 75 g).
- Whip with the whisk at medium-high speed until the meringue is firm, a little more soft peaks, but not dry. In other words, do not over whip the meringue until it is very stiff.
Add the meringue to the egg yolk mixture.
- Start incorporating the meringue, little by little, into the egg yolk mixture.
- Add a little, mix with a spatula until completely integrated and continue adding more. The first part of meringue will help us to smooth the mixture. As we add more, the mixture will become smoother and lighter.
Pour the batter in molds and bake.
- Preheat the oven to 355ºF/180ºC, with heat up and down.
- You will have prepared the mould in the shape of a book, greased with butter and sprinkled with flour, removing the excess. In my case, I also used another rectangular mould measuring 25 x 18 x 2.8 cm. The result was very thin and I did not use it to make a book. You can pour the whole quantity into the book mould.
- Bake for 24-28 minutes.
- Remove from the oven, leave to cool on a wire rack and turn out. Leave to cool completely on a wire rack.
- Wrap tightly in cling film and store in the fridge.
Prepare sponge cake for closed books.
- Preheat oven to 347ºF/175ºC heat up and down.
- Line a rectangular mold 25 x 18 x 2,8 cm with parchment, previously greased.Grease bundt molds and sprinkle with flour removing the excess. Set aside.
- Sift the flour together with the baking powder and salt.
- In a bowl add the egg whites together with the vanilla and milk, whisk until the mixture is homogenized.
- In the bowl of KA or a stand mixer, add the butter together with sugar. Beat with the flat beater at medium speed, until a creamy, aerated and white texture is achieved.
- Begin to integrate the dry ingredients alternating them with the liquids.
- Add 1/3 of the egg white mixture and beat at the lowest speed for a few seconds. Stop, lower the mixture from the sides and add 1/3 more of the dry ingredient mixture. Mix again at low speed for a few seconds.
- Repeat the same process with the rest of the egg whites and dry ingredients mixture. Mix at low speed only until the mixture is homogenized.
- Pour the mixture into the moulds and bake for 35 minutes or until you prick it with a toothpick and it comes out clean.
- Remove and let stand 5 minutes in the pan.
- Unmould and leave to cool completely on a rack.
- Once it is completely cold, wrap in plastic film and refrigerate until next day.
Prepare modeling chocolate.
- The process for preparing the white and dark plastic/modeling chocolate is the same. Prepare both separately.
- Add the chocolate to a waterproof bowl and melt in a bain-marie.
- Remove from the heat and add the warm corn syrup. Mix until completely homogenised.
- You will get a thick, slightly oily paste. This is fine.
- Store the chocolate paste in a freezer bag or cling film. Stretch slightly, remove the air and set aside at room temperature until firm. It will take about 8 hours.
- NOTE: To preserve it we can keep it refrigerated if it is very hot or in a cupboard, cool and dry. Always wrap tightly in cling film and put it in a zip bag to prevent it from drying out.
SECOND DAY
Prepare Swiss Meringue Buttercream (SMBC).
- In a heat-resistant bowl, add the egg whites along with the sugar.
- Place on a water-bath at medium low heat. Stirring constantly, leave until the egg whites reach 165ºF/74ºC. For it we will help ourselves of a digital thermometer.
- Remove from the heat, pour the egg whites into the bowl of the KitchenAid or a stand mixer and whip at medium high speed until a firm and shiny meringue is obtained.
- Once we have the firm meringue, begin to add the butter cut into squares little by little and at the same time the mixer continues whipping.
- Once we have all the butter added, increase the speed and finish whipping.
- Stop, scrap the cream with the help of a spatula and add the vanilla extract.
- Whip again at high speed until the ingredients are completely integrated.
- Cover with film and set aside.
Assemble the skull.
- With the help of a serrated knife, cut out the base of the bundt cake.
- Make sure they are as straight as possible and fit together well.
- Spread the base of one of the bundt cakes generously with SMBC.
- Join the two sponge cakes together and press down lightly.
- Spread a first layer of SMBC over the entire surface of the cake. Make sure it is as smooth as possible. Refrigerate for 30 minutes.
- Cover with a second layer of SMBC over the entire surface. This time try to shape the SMBC as you lay out the SMBC to form a skull shape.
- Refrigerate for 30 minutes to allow the SMBC to harden.
Stretch white modeling chocolate for the skull.
- Stretch out about half of modeling white chocolate. Keep the rest in the bag or with cling film to prevent it from drying out.
- Place on a silpat and roll out with a rolling pin. Try to dimension the chocolate paste until it is big enough to cover the whole skull. The chocolate should not be thick, the sheet should be rather thin.
- Place the chocolate sheet on the sponge cake with SMBC and adjust.
- Shape the plastic chocolate into the desired shape, in this case a skull.
- With the help of a knife, remove the excess from the base and trim to a smooth finish.
Create the details to decorate the skull.
- Model all the decorative parts of the skull; eye sockets, nasal septum... In the video I show you how I have done them, but you can make your own.
- Once you have the skull, place strips of plastic chocolate to give the appearance of a pumpkin. To model, texture and join the pieces together, I use modelling tools.
- With the excess from the top, create the stem of the pumpkin. Use texturing tools or a texturing knife.
- Paint the eye sockets, the inside of the septum and the joints of the pumpkin's grooves with black powder colouring. These will give depth.
- With the help of a brush, blend the excess.
- Once you have the finished skull, keep it refrigerated while you form the books.
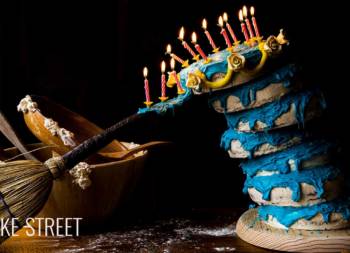
Shape opened book.
- Cover the entire surface of the cake book with SMBC. It is not necessary to apply a very thick layer.
- To create the pages of the book, use wafer paper or rice paper. Cut the pages to the same dimensions on each side of the book. You can cut as many pages as you want.
- For the sides, cut strips that will simulate the pages closed one on top of the other.
- Place rice paper, both on the sides and on the surface. The first layer will fit perfectly over the SMBC. The following pages, you should join them together with a small amount of water. Be careful not to overdo the water brushing.
- Curve the corners of the leaves and brush the entire surface with cocoa powder to age them.
- Finally, stretch a piece of dark chocolate modeling to create the cover of the open book. It should be larger than the size of the book.
- Spread a thin layer of SMBC over the chocolate and place the book cake with the leaves on it. Cut off the excess chocolate and set aside. You can keep it refrigerated if you prefer.
Form the closed books.
- To create the two closed books, I used the sponge cake baked in the rectangular mould.
- Divide it into two pieces as similar as possible. In my case I have obtained two rectangles of 13 x 18 cm.
- Cover the surface of both sponge cakes with SMBC.
- To create the covers of the books, stretch modeling dark chocolate. You can either make one piece to cover both the cover and the book spine or you can make two pieces, one for one cover and the book spine and one for the other cover.
- Cover the sponge cake with the chocolate and adjust to create the cover.
- If you wish, you can create details for the book spine or the top cover. In my case I have used a silicone mould where I have created decorative details for the spine of the book.
- To join these pieces together, use melted chocolate. If you wish, you can speed up the hardening process of the chocolate by using a chocolate cooling spray.
- To create the sides that correspond to the pages part, use modeling white chocolate. Stretch pieces with the dimensions to fit these parts and texture with a scraper to simulate the reliefs of the pages. Place the pieces in the books.
- Paint both the sides and the surface with cocoa powder to achieve an aged look.
- Finally, you can paint the details or reliefs with bronze-coloured metallic powder colouring.
- NOTE: You can create a page marker with modeling dark chocolate to place in the opened book. It gives a decorative touch and disguises the union of the pages. You can paint it if you wish.
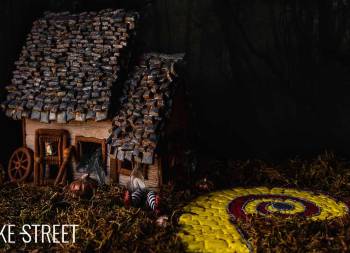
Assemble Vanitas cake.
- Choose a surface on which to present the cake.
- Place the closed books, one on top of the other, and on top of these, the open book.
- On top of these books, place the skull. It stands on its own very well, but you can use a stick if you prefer to hold the skull in place. Insert it into the books and then into the skull.
- Serve and enjoy.


Notes
- To make the skull you can use moulds that you have at home, they don't have to be these or the same as these in particular. The important thing is that they have similar sizes and characteristics.
- To make the open book we can use this mould or we can use a rectangular sponge cake and shape it.
- The baking time of the sponge cakes will vary depending on the size of the mould you use.
- To line the moulds, we can grease the base and sides with butter to help the baking paper stick to it. The butter can be replaced with release spray.
- Refrigerating the sponge cakes overnight helps when cutting them because they will not crumble or will do so to a lesser extent. Or when assembling.
- In my case I decided not to fill the sponge cakes, but of course they can be filled. Always choose fillings that can stand a long time at room temperature.
- You can use corn syrup or glucose to make modeling chocolate.
- Respect the resting time of modeling chocolate in order to be able to work with it. If it is very cold, you can heat it with your hands or with a slight heat in the microwave (1 or 2 seconds).
- Remember to cover all the scraps of modeling chocolate that come out. When they are in contact with air for a long time, they start to dry out.
- Modeling chocolate can be stretched between two sheets of Teflon to make it easier to work with.
- To paint the chocolate I have used metallic powder colouring and cocoa powder, but other types of colouring can be used.
- It is important to follow and respect all the steps to obtain a good SMBC.
- If you have leftover SMBC, you can refrigerate it for 7 days or freeze it for 30 days. However, in this case we will not have any leftovers.
- It is important to be patient in the modelling process. The use of modelling tools helps favourably to achieve a good finish.

With this representation of Vanitas, edible still life, I wish you a very happy Halloween night. For those of you who do not celebrate this holiday, I wish you a happy All Saints' Day or Happy All Souls' Day.
The most important thing of all is to enjoy, to do whatever we like and what nourishes us inside.
Lots of love!
Eva
Sources: Artlex, Muy interesante
This post contains affiliated links.