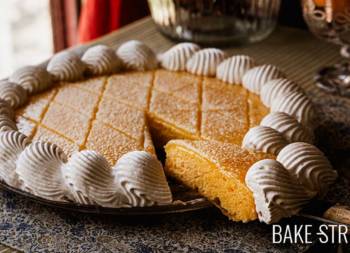
Tocino de cielo Cake
I’m going to repeat myself hundreds of thousands of times… But today’s cake is the perfect cake. Simple, magical, captivating, classic, traditional and wonderful. Today I will show you how to make this fascinating Tocino de Cielo Cake which, I must say, I don’t know how I have been able to live for so many years without knowing about it. How is it possible that it has not crossed my path before? How?
At least I can say that I am very grateful that it has crossed my path so that I could make it, enjoy it (very much) and share it with all of you. Because… I am not going to get fat on my own, hahaha. No, seriously, it’s a cake that you really can’t miss at home. I know in advance that you will be doing the wave for several months in a row.
Although the cake is very simple in terms of the elements that make it up, it does have its point of difficulty, which lies in the tocino de cielo. It is not difficult in itself, if you follow all the steps that I detail without varying any of them. In fact, the step that can be most complicated is the unmoulding of the cake. But don’t panic, because I will tell you everything you need to know to achieve a wonderful result.
Some time ago I showed you how to make homemade Tocinillo de cielo in an individual format, but today we will go a step further and prepare it to top a cake.

Tocino de Cielo origin and history.
Tocinillo de cielo is an apparently easy-to-make sweet that is around half a millennium old. It is a recipe that consists only of egg yolks, sugar and water, but of which everyone has and will always have wonderful memories.
It originated in the Cádiz city of Jerez de la Frontera, where the nuns of the Espíritu Santo convent invented this dessert to make use of the large quantities of egg yolks they received from the many wine cellars in the area. These donations of huge quantities of yolks come from the ancient tradition of using egg whites to clarify the wine and free it from impurities and residues before bottling. This method is still used in some wineries.
The exact date of the birth of this sweet is not known for certain, but some date it back more than 500 years. There is evidence of documents attesting to these ancient donations of yolks. Apparently two dozen eggs were used for a thousand litres of wine.
In the historical archives of González Byass, in one of the inventory books of 1837, the purchase of a thousand eggs a month is detailed, for which 50 reales de vellón were paid.
The name ‘tocino de cielo’ comes from its appearance and colour, similar to pork fat. The name of the dessert comes from the place where it was made.
If you want to know a bit more about the wine clarification process and the use of egg whites, I tell you about it in this post.
Today’s cake is made with a very spongy sponge cake, which I left for you to prepare this fruit tart, whipped cream, toasted almonds and all topped with this emblematic convent sweet.

Tocino de cielo cake is a modern evolution of the traditional sweet known as tocinillo de cielo.
While the tocinillo de cielo originated in Jerez de la Frontera, created by the nuns of the Espíritu Santo convent more than 500 years ago, the tocino de cielo cake is a later creation that combines this sweet with other pastry elements.
It is usually made with a base of spongy sponge cake, the recipe for which may vary depending on the hands that make it, which is complemented with layers of whipped cream, toasted almonds and, of course, tocinillo de cielo as a distinctive element. This tart represents a way of integrating the traditional tocinillo de cielo into a more complex and attractive presentation, adapting to modern preferences and offering a richer and more surprising taste experience. Very surprising indeed, on a higher level.
The combination of different textures and flavours in the tocino de cielo tart allows you to enjoy the characteristic flavour of the tocino de cielo in a new context, making this tart a contemporary homage to a conventual dessert that has endured over the centuries. And one that I am sure will remain with us for many thousands of years to come.
Recipe Tocino de cielo Cake
SPONGE CAKE:
- 4 large eggs, whites and yolks separate
- 20 g water, room temperature
- 140 g sugar, separated in two equal parts (70 g + 70 g)
- 120 g cake flour
- 60 g cornstarch
- 4 g baking powder
- zest of one lemon
- pinch of salt
SYRUP:
- 200 g water
- 160 g sugar
- 7 g whisky/rum
CARAMEL:
- 260 g sugar
- 30 g water
TOCINO DE CIELO:
- 12 egg yolks large, at room temperature
- 350 g sugar
- 150 g water
- all the caramel
WHIPPED CREAM FOR THE FILLING:
- 500 g whipping cream, very cold
- 75 g sugar
WHIPPED CREAM FOR THE DECORATION:
- 300 g whipping cream, very cold
- 45 g sugar
- 100 g toasted chopped and sliced almonds
- unsweetened cocoa powder (optional)
- Maraschino cherries (recipe at this link)
MATERIAL WE WILL NEED AND SHOWN IN THE VIDEO:
- KitchenAid mixer or stand mixer
- round cake tin 23 cm diameter
- cake cutter or serrated knife
- rotating cake stand
- bowls
- pastry spatula
- digital kitchen scales
- saucepan
- wide frying pan
- digital kitchen thermometer
- whisk
- colander
- metalic pan or mold (for bain-marie)
- blowtorch (optional, but recommended)
- cooling rack
- pastry brush
- piping bag + Decora S/F18 nozzle
REMEMBER TO ENJOY SWEETS IN MODERATION. SUGAR SHOULD BE CONSUMED OCCASIONALLY AND NOT BE PART OF YOUR DAILY DIET TO MAINTAIN A HEALTHY LIFESTYLE.
Instructions
FIRST DAY
Prepare sponge cake.
- In the bowl of the KitchenAid, add the egg yolks, water and 70 g of sugar. Beat with the whisk at medium-high speed until a whitish color and a creamy texture is achieved, you will notice that it gains some volume.
- Begin to incorporate the flour, little by little. Integrate while mixing on speed 1.
- Add the baking powder along with the salt, mix.
- Once everything is combined, set aside.
Whip the meringue.
- In another bowl, add the egg whites and begin to whip. Once it begins to froth, add the sugar (the remaining 70 g).
- Whip with the whisk at medium-high speed until you have a semi-whipped meringue. At this point, add the cornstarch, in two batches.
- Add half of the cornstarch and beat until incorporated. Add the rest of the starch and whip the egg whites to stiff peaks.
Fold the meringue into the egg yolk mixture.
- Start incorporating the meringue, little by little, into the egg yolk mixture.
- Add a small amount, mix with a spatula until fully integrated and continue adding more. The first part of meringue will help smooth the mixture. As you add more, the mixture will become smoother and lighter.
- When adding the last batch of meringue, add the lemon zest along with the meringue and mix with the whisk using gentle, encircling movements to integrate it.
Pour in the mold and bake.
- Preheat the oven to 356ºF/180ºC, heat up and down.
- Grease and line a 23 cm diameter baking pan with baking paper.
- Pour the mixture into the mold and tap gently to settle the mixture.
- Bake for 25 minutes.
- Remove from the oven, let stand for 5 minutes in the pan and remove from the mold.
Place on a cooling rack, upside down to make the dome as smooth as possible, and let cool almost completely. - Wrap the sponge cake in plastic wrap when warm and let it cool completely. Refrigerate until the next day.
- NOTE: Wrapping the sponge cake in film, warm to cold, helps the cake to remain very moist and tender. Refrigerating the cake makes the cutting process much easier. This time, I let the sponge cake at room temperature.
Prepare caramel for the mold.
- In a large frying pan, add the sugar and water, in that order. Place over medium heat and let it start to melt without stirring.
- Once it starts to caramelise, stir often to prevent some areas from burning, which would leave a bitter caramel. Reduce the heat a little if necessary.
- Once you have a golden caramel, pour into the mould. Make sure to cover both the base and the sides, this will make it much easier to unmould tocino de cielo.
Set aside. - NOTE: When you pour the caramel into the mould, it will start to heat up. Be careful not to burn yourself, place it on a cloth or rack. It is important that the mould is flat, not tilted, as the caramel will harden in a few minutes.
Prepare syrup for tocino de cielo.
- In a saucepan add the sugar and water, in this order.
- Place over medium-low heat and allow the sugar to dissolve completely.
- Once it has dissolved and the water starts to bubble, turn the heat up to medium-high and leave until it reaches 230ºF/110ºC.
- At this point, remove from the heat and leave to stand for 8-10 minutes.
Preheat the oven.
- Preheat the oven to 347ºF/ 175ºC, heat up and down.
- Place a metal dish/pan on a rack, in the second position from the bottom, with hot water.
- Let the water continue to heat while you prepare the egg yolk mixture.
Prepare the yolks.
- In a heat resistant bowl, add the egg yolks and mix, gently, with the help of a whisk.
- After the syrup has rested, begin to pour the syrup over the yolks in a thin, continuous thread while mixing with the whisk. The movement must be smooth and continuous, we must not beat with force or speed, otherwise we will incorporate air and this is not what we are going for.
- Once we have incorporated all the syrup, stir for about 30 seconds with the whisks, but always with soft and delicate movements.
Pour into the molds and bake.
- Using a colander, pour the egg yolk mixture into the mold (previously caramelized).
- Line the surface with aluminum foil, remembering to put the shiny side down (which is the polished side), and place in the tray with hot water in the oven.
- Bake for 1 hour and 55 minutes* or until set when pricked.
- Remove from the oven and leave to cool completely on a wire rack.
- Cover with cling film and refrigerate until the next day or a minimum of 12 hours.
- *NOTE: The baking time will be influenced by the oven, the material of the baking dish in which you bake the tocino de cielo and even the pan in which you have the water to bake in a bain-marie (it should cover more or less half of the pan and the water should be very hot, never cold. It is possible that, if conditions change, cooking times may also vary.
SECOND DAY
Prepare syrup.
- Add the water and sugar to a saucepan. Place over medium heat and bring to the boil. The sugar should be completely dissolved.
- Once it comes to the boil, reduce to medium heat, cook for 5 minutes and turn off the heat.
- Stir in the whiskey or rum, mix to blend and allow to cool completely.
Cut the sponge cake.
- Cut the cake into three equal parts with the help of a cake cutter.
- In my case, I also removed a small part of the dome to make the top as straight as possible.
- Set aside wrapped in cling film to prevent it from drying out.
Whip the cream to fill the cake.
- The cream must be at least 24 hours in the cold.
- The bowl in which the cream is whipped must be cold.
- Pour the cream into the chilled bowl along with the powdered sugar. Whip with the whisk at medium speed.
- Increase the speed gradually, but never reach maximum speed. The ideal is a medium-high speed. Be careful not to overbeat it or it will be cut and you will get butter...
- Divide the cream into two bowls, to create two layers of filling, and set aside in the refrigerator until ready to use.
Assemble the cake.
- Before you start to assemble the cake, make sure that tocino de cielo is separated from the sides of the cake tin. Ideally, you should tilt the bacon pan after baking and allow it to cool. It will release very easily without the need to slide a knife down the side.
- Place the first sponge cake on top of tocino de cielo and brush generously with syrup.
- Cover this cake with a layer of whipped cream, smoothing it out as much as possible.
- Place the second sponge cake on top of the whipped cream and brush generously with syrup.
- Spread the second layer of whipped cream and smooth.
- Finally, place the third and last sponge cake. Adjust carefully, cover with cling film and refrigerate for at least 4 hours or until the next day.
- NOTE: Keep the excess syrup to brush the sponge cake base before unmoulding the cake.
Unmold the cake.
- Brush the top cake, which will be the base of the cake, generously with the syrup.
- Slide a cake spatula down the side of the cake tin, reaching even to the base of the tin.
- Place a cake base on top of the cake and place a wide plate on top.
- Carefully turn it upside down.
- With the help of a blowtorch, apply heat to the base and sides of the cake tin. This will soften the caramel and make it easier for the bacon to release from the pan. Be careful not to apply too much heat as this can spoil the texture of tocino de cielo.
- Be very patient when unmoulding the cake, in my case it took quite a while. Carefully tilt the mould to allow air to come in and release from the base without damaging it.
- Combine this with applying heat with a blowtorch.
- Once it is unmoulded, place the cake on a rotating cake stand.
- Cover the side of the cake with the excess whipped cream from the day before and smooth.
- Refrigerate for 1-2 hours.
Whip the cream to decorate the outside of the cake.
- The cream must be at least 24 hours in the cold.
- The bowl in which the cream is whipped must be cold.
- Pour the cream into the chilled bowl along with the powdered sugar. Whip with the whisk at medium speed.
- Increase the speed gradually, but never reach maximum speed. The ideal is a medium-high speed. Be careful not to overbeat it or it will be cut and you will get butter...
- Reserve in the refrigerator until ready to use.
Finish decorating the cake.
- Cover the side of the cake with a second thin layer of whipped cream.
- Transfer the rest of whipped cream into a piping bag with an S/F18 nozzle.
- Pipe the cream around the top outer edge of the cake. You can do it the way I show you in the video or with another decoration of your choice.
- Cover the sides of the cake with the toasted almonds.
- Sprinkle a little cocoa powder over the crumbled whipped cream, being very careful not to get it on tocino de cielo.
- When serving the cake portions, you can decorate it with a Maraschino cherry.


Notes
- To line the baking pan, you can grease the base and sides with butter to help the baking paper stick to it. The butter can be replaced with release spray.
- You can use a 22 cm or 24 cm baking pan, take into account this small modification for the final baking time.
- The cake is extremely tender, but the syrup gives it a moist touch.
- This sponge cake is the same as the one I used to make the fruit cake with nougat cream. However, on this occasion, I decided to vary one step of the process. I incorporated the cornflour into the meringue, in the same way as I showed you in the Ladyfingers of the Malakoff Cake, to obtain a less dense texture of the whipped egg yolks with the integrated flour. I must tell you that this change is a real success, as it makes the sponge cake easier to work with and the result is incredible.
- To make the syrup I added a little whiskey, but if you wish, you can omit it or change it for another liqueur.
- When whipping the cream, remember that it must be very cold to whip well. Also be careful when whipping it so as not to over whip it and spoil it. Whenever you do not use it, keep it refrigerated so that it does not lose its firmness.
- Yolks have a short shelf life once they are removed from the egg shell, unlike egg whites. They should be used within a maximum of 24 hours from the time they are removed from the inside of the egg. They can be frozen, but the result after thawing will not be a creamy texture. In fact, it is recommended to add a little salt or sugar, depending on the purpose to be served after thawing. For that reason, whenever I have surplus (which is not very often), I make recipes that require a lot of yolks; tocino de cielo (although I had not done it before, but it becomes a must when I have a lot), pastry cream, French butter cream, butterbeer, ice cream, tonnato sauce, spun egg...
- Yolks should be at room temperature, never cold. Otherwise, with the change of temperature, they may curdle. Be cautious and temper them in time, about 2-3 hours before use.
- If we wish, we can use vanilla flavored sugar. In my case, I always keep the seedless vanilla pods in the sugar. In this way, little by little, it will be flavored and will give that "special taste" to your elaborations.
- The syrup should be a little lighter than a syrup at the strand point (this is around 244º-250ºF/118º-121ºC). We need it at 230ºF/110ºC, we should not exceed this temperature because when it cools, the syrup will begin to solidify and this will make it difficult to integrate with the yolks. Nor should it have a lower temperature because, if so, the syrup will be very watery and will give us problems with the consistency of tocino de cielo.
- Before adding the syrup with the yolks, we must wait for the syrup to reduce its temperature a little to prevent the yolks from coagulating.
- The syrup must be integrated in a thin and continuous thread to help the yolks to gradually temper and the final texture to be homogeneous and without lumps.
- We should NEVER mix or beat the yolks with the syrup in a mixer or electric whisk. If we do so, we will incorporate a lot of air into the mixture and this is NOT what we want. It can cause bubbles inside the tocino de cielo. This step should always be done manually.
- Before pouring the mixture into the molds, pass it through a strainer to remove any curdled yolk or chalaza.
- We must cover with aluminum foil to prevent water from falling into the mixture, in addition to toasting the top of the dessert.
- It is important that the water in the tray, where we will place the molds, is not more than half of the height of these. The water must be hot or almost boiling, if we add it cold, it will take a long time to reach temperature and this will prolong the final cooking time.
- The oven temperature should not be too high. It is important that they are baked with moderate heat so that the final texture is creamy, soft and without bubbles inside.
- The final baking time will always depend on each oven and the size of the mold + material used. Although it is very approximate, it is important to control the process to avoid excessive curdling and loss of creaminess or, on the contrary, to take them out too early and the final result is a custard.
- I advise you to check the consistency of tocino de cielo during baking. Carefully remove the foil and observe the consistency. If it is set and you can poke a knife/stick and pull it out, without an overflow of liquid or fluid mixture, but still see that it is creamy, it is ready. It should not be too firm, hard and dry.
- In many recipes I have seen that they detail 40 minutes of cooking time for a tocino de cielo with the same amount of yolks and a mould of a very similar size to this one. That time is not correct, it is much less than the right time for it to set properly. Trust me.
- If you don't have a blowtorch, you can proceed to assemble and unmould the cake in less time, which will ensure that it unmoulds better. Instead of refrigerating the tocino de cielo for 12-24 hours, you can refrigerate it with the sponge cake and cream (the assembled cake) for only 3-4 hours. The caramel will not have hardened as much and it will be easier to unmould.
- I recommend always using toasted almonds, as they have a unique flavour and aroma.
- Once the cake has been assembled, from the day you unmould it, you can keep it refrigerated for 3-4 days.


With this Tocino de Cielo Cake you are not only going to leave everyone speechless, but you are also going to enjoy an absolutely exquisite and wonderful delicacy. Although I have been working as a pastry chef for many years, I continue to be amazed at how we can obtain incredible creations with so few elements. For me, these sweets are the result of magical ingenuity.
I can't wait for you to try them and let me know the results!
I remind you that you can watch all my videos on my YouTube channel. If you subscribe and turn on the little bell, I will be eternally grateful!
I wish you a wonderful Sunday afternoon!
Lots of love,
Eva
Sources: Heraldo, Torre Milanos