Malakoff Cake
Today I am very happy because I bring you two recipes that I am in love with. Actually, it is a recipe, this wonderful Malakoff Cake. But one of its main elements are the famous Lady Fingers, Löffelbiskuits, also known as soletilla biscuits or Savoiardi and I show you how to make them with a formula that has fascinated me.
I had previously left you a recipe for soletilla biscuits, a recipe from 12 years ago, but I assure you that it has nothing to do with the recipe that I share with you today. This time the result is magnificent, cookies with volume, crunchy and with an incredible flavor. It is true that buying them made advances work and time, but it is one of those recipes that I believe should never be missing in our recipe book.
Malakoff Cake, history and origin.
This is a dessert with a fascinating history dating back to the 19th century in Austria. It seems to have been created in honor of the Russian fortress of Malakoff during the Crimean War in 1855. The French, allied with the Turks, captured the fortress, and as a result, the name “Malakoff” became quite well known in Western Europe at the time.
The connection between the Malakoff fortress and the dessert is established through a story that relates that the French soldiers, celebrating their victory, improvised a cake using ingredients available on the battlefield. Apparently, they used almonds, cream and other ingredients to create a cake that was intended to represent the Malakoff Fortress.
In 1860, a fictional story written by Robert Barnabas Brough mentioned the recommendation of a Malakoff tea cake to greet Crimean War officers. However, in reality, this cake was a Sally Lunn or Solilemmes baked in a dish that mimicked the appearance of a crenellated fortress. Later, baking pans known as Malakoff boxes, made of tinplate and designed in the shape of a fortress, became popular. These boxes were used to create cakes with a thematic presentation related to the Malakoff fortress.

Other versions.
A recipe for Gâteau Malakoff cake is found in the 1882 cookbook of French chef Urbain Dubois. Dubois created a cylinder of hazelnut sponge cake, placed on an apricot cake base, filled with buttercream and covered with vanilla fondant.
The name Malakoff is now applied to various cakes, many of which contain nuts. In most cases, Malakoff cakes consist of two thick, round layers of dacquoise (nutty meringue) cake filled with coffee mousse; the top is covered with icing. Other variations of Malakoff cakes include a choux pastry ring filled with chantilly or ice cream and candied fruit.
Although Malakoff cake is little known in France, it is common in Viennese cuisine and is believed to have its roots in Bohemian cuisine, based on the Czech word for milk (mléko).
Malakoff Cake, the original recipe.
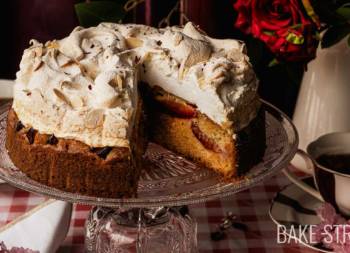
It consisted of layers of almond sponge cake, whipped cream and toasted almonds. This combination of textures and flavors proved to be an instant hit and became a classic Austrian pastry.
Over time, the Malakoff Torte recipe has evolved, and variations have been introduced that include additional ingredients such as chocolate, fruits, liqueurs or different types of nuts, although the essence of its structure has remained the same.
In the past, it was filled with a German butter cream, made with pastry cream and butter (better known as mousseline cream) which is the version I leave you with, nowadays whipped cream is more commonly used. Another curious detail is that the sponge cakes used to be soaked in a mixture of milk and rum. Nowadays, most of the elaborations soak the cookies in a syrup with rum.
Today, Malakoff Torte remains a popular element in Austrian pastry making and can be found in bakeries throughout the country. It has also gained international recognition and is served in restaurants and cafés around the world as a delicacy of Austrian cuisine.

The essence of the cake, Löffelbiskuits.
Also known as “bizcochos de cuchara” (spoon biscuits) in Spanish, they have their origin in Germany and Austria.
The history behind Löffelbiskuits dates back to the 17th century in Germany and Austria, where they developed as a variant of traditional sponge cakes. Their elongated shape makes them ideal for dipping in coffee, tea or any hot beverage, making them a popular accompaniment to these drinks.
They originated in the late 15th century at the court of the Duchy of Savoy and were invented to mark a visit by the King of France. They were later introduced as official court cakes and were particularly popular with young members. The cookies were also offered to visitors as an example of local gastronomy.

Today they are widely used in pastry making for the preparation of desserts such as tiramisu, trifle and other dishes that require layers of biscuits soaked in liquid and topped with cream or other ingredients. Their versatility and mild flavor have made them a popular ingredient in a variety of desserts around the world.
This version of Malakoff Cake has been a wonderful discovery and very easy to make, although I admit that it is somewhat laborious as it requires several steps in the process.
Malakoff Cake recipe
LÖFFELBISKUITS OR LADY FINGERS:
Recipe from Streusel
Ingredients for 55 pieces, approx
- 100 g egg yolk (approximately 6 units) + 60 g sugar
- 180 g egg white + 120 g sugar
- 170 g cake flour, sifted
- 100 g corn starch, sifted
To decorate the cookies:
- 120 g, 70% dark chocolate
- 5 g cocoa butter
GENOESE SPONGE CAKE:
- 4 large eggs
- 100 g sugar
- 100 g lcake flour, sifted
- 20 g corn starch, sifted
- pinch of salt
CRÈME MOUSSELINE:
Pastry cream
- 500 g whole milk
- 4 egg yolks, large
- 120 g sugar
- 45 g cake flour
- 45 g cornstarch
- 1 vanilla pod or 3 generous teaspoons of vanilla extract
Final cream
- 50 g ground almonds
- 250 g unsalted butter at room temperature + 50 g powdered sugar
WHIPPED CREAM:
- 500 g whipping cream
- 75 g powdered sugar
SYRUP:
- 100 g water
- 100 g sugar
- 50 g rum
GARNISH:
- 100 g toasted flaked almonds
MATERIAL WE WILL NEED AND VISIBLE IN THE VIDEO:
- stand mixer/kneader
- round mold 23 cm diameter
- acetate sheet
- rotating cake stand
- bowls
- whisk
- pastry spatula
- piping bag + 2 cm smooth nozzle
- cooling rack
- piping bag + Decora S/F18 nozzle
- chocolate rack
- tray Naturals Nordic Ware 33 x 24 cm (in the video I specify 40 x 28 cm, it is a typo)
Instructions
FIRST DAY
Prepare the cookies, löffelbiskuits or Lady fingers.
- To make the cookies, I divided the quantity I leave in two to make them in two batches. The reason is that we have to bake them right after the dough has been piped, they cannot rest outside. In my case I could not bake 4 trays at the same time, so I made two trays in two batches.
- Preheat the oven to 392ºF/200ºC fan.
- Whisk the egg yolks with the sugar until you have a whitish, voluminous and airy mixture. Refrigerate this yolk mixture while whipping the meringue.
- Start to whip the egg whites, once they start to foam, add the sugar. Whip until you get a semi-whipped meringue, you can see the consistency in the video.
- Add half of the cornstarch and whisk until incorporated. Add the remaining starch and whip the egg whites to stiff peaks.
- Incorporate the egg yolk mixture, which you had reserved in the refrigerator, and mix until smooth.
- Finally, add the flour. Do it in two batches, incorporating it with the help of a silicone spatula using smooth and enveloping movements.
- Transfer the mixture into a piping bag with a 2 cm smooth nozzle.
Bake the cookies/biscuits.
- Prepare two perforated trays and line them with silpat, mat or Teflon sheet.
- Pipe the biscuits , trying to give a length of 8-9 cm long. A tip when piping, press gently at the beginning to fix the first point of batter on the tray, lift slightly and lower the sleeve again pressing gently so that the batter is fixed on the mat and does not lose its shape.
- Sprinkle the surface with sugar.
- Bake, two pans, for 5 minutes. Open the door slightly to release steam and leave the door ajar, bake for 5 more minutes with the door ajar.
- Remove and cool completely on a wire rack.
- NOTE: The biscuits are very delicate when they come out of the oven, they are very tender. You must let them cool completely to harden.


Prepare the Genoese sponge cake.
- Mix the flour together with the corn starch and salt. Set aside.
- Separate the egg yolks from the egg whites. Put the yolks in a bowl, which can withstand the heat, together with half of the sugar.
- Place the bowl over a saucepan with a little water in a bain-marie, without bringing it to a boil, and cook over medium-low heat.
- Whisk until they whiten. You will notice that they acquire a whitish color. Remove from heat and set aside.
- Whip the egg whites with the other half of the sugar until you obtain a firm and shiny meringue.
- Incorporate the whipped egg yolks into the meringue and integrate with smooth and enveloping movements.
- Begin to integrate the flour, little by little, mixing with the help of a silicone spatula in an encircling motion. Never beat or stir the mixture, otherwise the meringue will lose air and the cake will be denser and less fluffy.
- Pour the mixture into a 40 x 28 cm pan, previously lined with baking paper, and smooth the surface.
- Bake for 10-12 minutes.
- Let it cool on a wire rack inside the mold, remove from the mold and let it cool completely.
Prepare the pastry cream for the crème mousseline.
- In a medium saucepan pour the milk along with the vanilla. Place over medium heat and let it come to a gentle boil.
- Meanwhile, in a bowl, beat the egg yolks with the sugar and the cornstarch, previously sifted, until completely homogenized.
- Once the milk has come to the boil, pour a little of it over the yolk mixture.
- Whisk to temper the yolks and prevent them from curdling into lumps.
- Add the rest of the milk little by little and mixing very well each time.
- Pour the mixture back into the saucepan and place over medium-low heat , stirring constantly. You will notice that the texture will become thicker, but it will take a while. Patience.
- Once the cream has a creamy texture, it is ready.
- Pour into a bowl (the larger the better because it will cool faster).
- Cover with cling film to prevent it from setting and let it cool completely.
- If you wish, you can make it the day before and refrigerate it until the next day.
Prepare crème mousseline.
- Add the butter in the bowl of the KitchenAid and whisk on medium-high speed.
- Once it is smooth, add the powdered sugar. To avoid a sugar cloud, place a cloth over the mixer during the first few seconds of beating. Beat the mixture on medium-high speed until you obtain a fluffy, white and very airy butter. It will take about 10-12 minutes.
- While the butter is being beaten, soften the pastry cream by beating it with a whisk.
- Add the ground almonds to the pastry cream and mix until homogeneous.
- For the KA and with the help of a silicone spatula, remove the butter from the sides of the bowl.
- Add the pastry cream to the butter mixture, little by little, while beating.
- Beat on medium-high speed until smooth and creamy.
Prepare the syrup.
- Add the sugar and water to a saucepan. Place over medium heat and bring to a boil. The sugar should be completely dissolved.
- Once it comes to a boil, reduce heat to low, cook for 5 minutes and turn off the heat.
- Stir in the rum, mix to homogenize and let it cool completely.
Assemble the cake.
- Divide the crème mousseline into three equal parts to create three evenly sized layers of filling.
- Use the base of the mold you are going to use as a template to cut the cake. The excess cake can be enjoyed while assembling the cake.
- Line the inside of the mold with a sheet of acetate and, at the base, place an anti-skid along with a cake base.
- Place the sponge cake inside the mold and brush generously with the syrup.
- Fill the first layer with one part of the crème mousseline. Smooth as much as possible to make it level.
- Cover the surface of this with Lady Fingers, if large gaps remain uncovered, fill with biscuit pieces.
- Brush the cookies generously with the syrup.
- Cover the cookies with the second cream filling, smoothing the surface as much as possible.
- Cover this second filling with another layer of cookies in the same way as before. Brush the cookies generously with the syrup. If you wish, you can dip the cookies instead of brushing them.
- Finally, cover the surface with the third layer of cream. Smooth as much as possible, cover with cling film over the acetate, without touching the surface, and refrigerate until the next day.
SECOND DAY
Whip the cream to decorate the outside of the cake.
- The cream must be at least 24 hours in the cold.
- The bowl in which the cream is whipped must be cold.
- Pour the cream into the chilled bowl along with the powdered sugar. Whip with the whisk at medium speed.
- Increase the speed gradually, but never reach maximum speed. The ideal is a medium-high speed. Be careful not to overbeat it or it will be cut and you will get butter...
- Reserve in the refrigerator until ready to use.
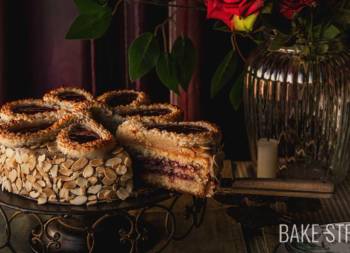
Decorate the outside of the cake.
- Cover the outside of the cake with a layer of whipped cream, smooth with a spatula.
- Place the remaining whipped cream in a piping bag with a Decora S/F 18 nozzle.
- If desired, mark the surface to guide you when piping the top decoration and mark the portions to be cut later.
- Decorate the sides with the toasted flaked almonds.
- Pipe the remaining whipped cream on the surface. In the video I leave you a suggestion of presentation, but you can do it the way you prefer.
- Refrigerate the cake while you coat the cookies with chocolate.
Dip the cookies in chocolate.
- Melt the chocolate with the cocoa butter in a bain-marie, mix gently so that both ingredients are perfectly integrated.
- Cut the cookies lengthwise and slightly inclined.
- Dip the side of the cookie in the chocolate, drain the excess and place on a chocolate grid. Let it cool completely.

Finish decorating the cake.
- Place the cookies on the surface of the cake, in my case I used a glove to avoid marking fingerprints on the chocolate of the cookie.
- Fill the center with flaked almonds and, if desired, a small chocolate decoration.
- Refrigerate until ready to eat.

Notes
- I have never used this formula to make Lady Fingers before and it gives wonderful results. I want to thank Judith from the Streusel website, since I followed her recipe and I was fascinated by it, it is very good. I hope you like it as much as I do. I recommend you to follow the process as it is detailed to achieve a good result. It is important to follow the baking process to encourage steam to come out and remain crispy.
- It is true that many more cookies are made than we need, but with half of the recipe we will not have enough, for that reason I leave you double the amount.
- The Lady Fingers can be made the day before if you wish. That way, if you leave them at room temperature, you will make them firmer and, therefore, they will hold very well in the cake.
- If you don't want to make the cookies or Lady Fingers, you can buy them. But I recommend you to make them at home and try how wonderful they are.
- Pastry cream can also be made the day before if you wish to advance a little work.
- It is advisable to use good quality butter because it will influence the final taste of the crème mousseline.
- The acetate helps the cake to keep the perfect shape and, in case of using liquid or wet ingredients (not on this occasion), to stay in place. It also favors a perfect unmolding.
- When whipping the cream, remember that it must be very cold to whip well. Also be careful when whipping it so as not to over whip it and spoil it. Whenever you do not use it, keep it refrigerated so that it does not lose its firmness.
- I recommend soaking the Lady fingers well so that they do not remain firm and, on the contrary, are tender when eating the cake.
- You can omit the rum in the syrup if you wish.
- The decoration can be done as you wish, I leave you a suggestion of presentation for your help or inspiration.
- Once the cake is finished and assembled, it can be kept refrigerated for 2-3 days.


If you like classic cakes, this classic and traditional Austrian Malakoff Cake will fascinate you. The flavor is delicate, subtle and soft, with notes of vanilla, butter and that characteristic cream flavor. The texture is very creamy, fresh and accompanied by tender biscottes, thanks to the syrup, with a touch of rum.
In short, wonderful.
I remind you that you can watch all my videos on my YouTube channel. If you subscribe and turn on the little bell, I will be eternally grateful!
I wish you a wonderful Sunday afternoon!
Lots of love,
Eva
es: De.Wikipedia, Wikipedia