Sicilian Cassata
I have been wanting to give you the recipe for Sicilian Cassata for a long time and, once again, it has been one of those recipes that I have been putting off for one reason or another. As expected, from the first spoonful I tasted, I thought over and over again why I hadn’t made it before. But of course, this happens to me with a lot of recipes… In the end, there are few recipes that I repeat at home because I prepare new things every week.
This has its good side, you try a lot of different things, and its bad side… When they like something a lot or I like it a lot, there are occasions when it takes me a while to repeat them. Not because I don’t want to, but because I don’t have time to fit in with the rest of the preparations.
Coming back to today’s elaboration, I loved it. Very much so. It’s one of those old-fashioned looking desserts, which I don’t have a problem with, but it might put some people off, but it’s enjoyable from start to finish. Of course, it is a recipe that brings together many elements that, if you don’t like them separately, you might not like the dessert as a whole.
I don’t have a problem because I like practically everything, but I know that there are not many marzipan or candied fruit lovers. And it has a lot, very, very much.
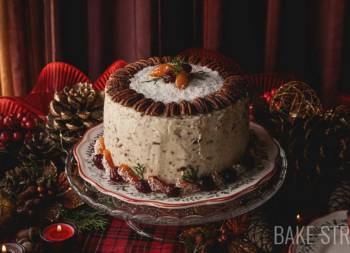
This Sicilian treasure is made with two thin, orange-flavoured sponge cakes that are joined by a filling made with ricotta cheese, sugar, cinnamon, chocolate and candied orange. The outside of the cake is made of green marzipan and the topper is characterised by its decoration; icing, decoration with royal icing and lots of candied fruits. For me, paradise.

Origin of Sicilian Cassata.
As its name suggests, Sicilian cassata originates from Sicily, a region in southern Italy. Its history dates back to Arab times, when Sicily was under Muslim rule for several centuries, a period from the 9th to the 11th century.
The Arabs brought sugar cane, lemon, lime, bitter orange, tangerine and almonds to Palermo. These ingredients were incorporated into the cheese produced in Sicily, giving rise to the classic Sicilian cassata filling. This variety of cassata was later than the traditional one, made with a baked dough containing this ricotta cheese filling. Like this one I left you some time ago.
It is said to have been presented by court chefs around the year 1000 to the ruling Emir in the Kalsa palace in Palermo. Its preparation was later perfected in Sicilian nunneries.
In Norman times, in the convent of Martorana in Palermo, the nuns created a sweet pastry, very similar to marzipan, from which they made small pieces in the shape of fruit.
Frutta martorana or frutta di Martorana is a typical Sicilian sweet treat, more specifically from Palermo, which is very popular and is traditionally prepared to celebrate All Souls’ Day.
It owes its name to the Church of Santa Maria dell’Almirante or della Martorana, erected in 1143 by George of Antioch, Admiral of the Norman King Roger II, near the neighbouring Benedictine monastery, founded in 1194 by the noblewoman Eloisa Martorana, from whom it took its name, and that of Santa Caterina in the historic centre of Palermo. There, the nuns prepared and sold it until the middle of the 20th century. Unfortunately, this tradition does not continue today.
According to tradition, the frutta martorana was born because the nuns of the Martorana convent, in order to replace the fruit picked from their garden, created new ones with almonds and sugar to decorate the monastery for the visit of the pope of the time.
This marzipan, or royal paste, was dyed green and incorporated into the cassata to create the sides of the cake. This replaced the original baked dough to create the cold Sicilian cassata.
Later, the Spanish introduced chocolate and sponge cake to Sicily. Hence, in many recipes we see ‘Bizcocho de España’ or ‘Spanish sponge cake’ detailed in the preparation. Finally, during the Baroque period, candied fruit was also added.

Convent confectionery.
Originally, Sicilian cassata was considered a traditional confectionery product of the nuns and was usually eaten during Holy Week. An official document of the first synod of Sicilian bishops in Mazara del Vallo in 1575 states that cassata is ‘essential during the feasts’.
A Sicilian proverb states that ‘Tintu è cu nun mancia a cassata a matina ri Pasqua‘, ‘He who does not eat Sicilian cassata on Easter morning is to be considered bad‘. The characteristic decoration of Sicilian cassata with candied pumpkin was introduced in 1873 on the occasion of an event in Vienna. The Palermo pastry chef Salvatore Gulì, who had a patisserie in the centre of Palermo’s Corso Vittorio Emanuele, introduced the cassata.
The word ‘cassata‘ has Arabic roots, derived from the Arabic word ‘quas’at‘, and refers to a container used to hold food or a large round basin. This refers to the classic flared mould in which it is still traditional to make cassata today.

Over the years, the recipe for cassata has evolved, and each region of Sicily may have its own variations. Today it is considered an emblematic dessert of the region, much appreciated by locals and visitors alike.
Sicilian Cassata is very simple to make, apart from the top decoration. Here we can complicate or simplify as much as we wish. But there is one thing to bear in mind, and that is organisation. It takes 3 days to prepare it:
- First day, sponge cake, marzipan and filling.
- Second day, assembly.
- Third day, icing and decoration.
Recipe Sicilian Cassata
SPONGE COOKIE:
- 165 g egg
- 100 g sugar
- 100 g cake flour
- 30 g potato starch
- grated zest of one orange
- 1-2 teaspoons vanilla
- pinch of salt
RICOTTA FILLING:
- 800 g ricotta or granulated cottage cheese
- 250 g sugar
- 2 teaspoons vanilla
- 100 g mini dark chocolate chips
- 50 g candied orange, cut into squares
- 1/2 teaspoon cinnamon powder
MARZIPAN:
- 200 g ground almonds
- 193 g powdered sugar
- 10 g honey
- 33 g water
- green food colouring paste, I used Sugarflair "Party Green"
ICING:
- 250 g powdered sugar
- 40-45 g water
ROYAL ICING:
- 15 g egg white
- 100 g powdered sugar
- few drops lemon juice
FOR BRUSHING:
- 1 tablespoon of Amaro liqueur or Strega liqueur
- 1 tablespoon of water
DECORATION:
- candied fruits; pumpkin, green and red cherries, pear, orange, mandarin oranges and candied fruit pieces
- golden sprinkles (optional)
MATERIAL WE WILL NEED AND VISIBLE IN THE VIDEO:
- KitchenAid stand mixer*
- crystal bowl KitchenAid*
- digital kitchen scale
- adjustable rolling pin
- round mold 23 cm diameter x 5 cm
- cake cutter
- silicone spatula
- pastry spatula
- whisk
- grater
- cooling rack
- colander
- bowls
- cheesecloth
- piping bags + decorating nozzle
- tweezers*, optional
*In these products you have a 5% discount on the website Claudia&Julia using this code BAKESTREET. Delivers throughout Europe.
Instructions
FIRST DAY
Prepare sponge cake.
- Line a 23 cm diameter baking tin with baking paper, grease the sides of the tin with butter to help the paper stick. Set aside
- Preheat the oven to 374ºF/190ºC, heat up and down.
- In the bowl of the mixer add the eggs, sugar and salt.
- Beat with the whisk on medium-high speed until you obtain the ribbon point, letter point or "monter au ruban" in French. You should beat the eggs until they are whitish in colour, with a voluminous texture and fall evenly and continuously, like a ribbon or string. The process can take 10-15 minutes.
- While the eggs are being whipped, grate the orange. Remember not to grate the white part so as not to add bitterness to the cake.
- Once the eggs are beaten, add the grated orange along with the whisk. Mix for a few seconds to distribute evenly.
- Mix the flour together with the starch. Start to integrate it into the egg mixture, little by little, while mixing. Mix just until there is no flour left.
- If you notice any remaining flour on the sides of the bowl, fold in the mixture with a silicone spatula using gentle, encircling movements.
- Pour the mixture into the mould and bake at 374ºF/190ºC for 15 minutes. Reduce to 356ºF/180ºC and bake for a further 5 minutes. Before taking it out, check with a toothpick that it comes out clean.
- Remove from the oven and leave to cool completely on a wire rack.
- Wrap tightly in cling film and refrigerate until the next day.
Prepare ricotta filling.
- Place a colander over a bowl and place a cheesecloth on top of it.
- Place the ricotta cheese on the cheesecloth and bring the corners of the cheesecloth together, lift and apply a little force to drain the cheese. Press until the whey is completely removed.
- I recommend letting the cheese rest for a few minutes after pressing before pressing again. I did this step 3 times in total.
- Transfer the cheese to a clean bowl and add the sugar and cinnamon.
- Mix with the help of a whisk or your hands until the ingredients are combined.
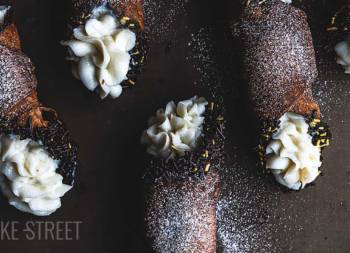
- If you wish, you can process the mixture with the help of a blender to achieve a smooth and silky texture. In my case I omitted this step for this preparation, but I did it for the Sicilian cannoli.
- Cover with cling film and refrigerate until the next day.
Prepare green marzipan.
- Place the ground almonds, powdered sugar sugar, honey and water in a bowl. Mix together.
- Check the consistency of the marzipan and, if necessary, add a little more water. The almond paste should be manageable and not crumbly. The final amount of water will depend on the degree of drying of the almonds; the older they are, the more water they need.
- Once formed, add the green colouring (I recommend wearing gloves to avoid staining your hands). Knead the marzipan until it is a uniform green colour.
- The amount of green colouring to be added can be adjusted to your taste until the desired shade is achieved.
- Form into a cylinder, cover with cling film and leave to rest for at least 2 hours, ideally overnight in the fridge if it is hot, or at room temperature in a cool, dry place at home.
SECOND DAY
Line the mould with the marzipan.
- Line the inside of the mould with cling film. Set aside.
- Sprinkle a work surface with a little icing sugar and roll out the marzipan.
- Use an adjustable rolling pin to give a thickness of 6 mm. You will have some marzipan left over, remember to wrap it in cling film to prevent it from drying out.
- With the help of a cutter, cut one of the edges to achieve a smooth finish. This side will be placed touching the base of the mould.
- To place the marzipan in the mould, ideally, roll the marzipan on itself (forming a spiral or snail) and that way, we can place it while unrolling it. I had planned to do it that way, but I was so focused on putting it inside the mould that I completely missed it.
- Cut off the excess marzipan and seal the joint very well.
Cut the sponge cake and place in the mold.
- With the help of a cake cutter or a serrated knife, cut the sponge cake. For the cassata you need two 1 cm thick discs of sponge cake.
- To fit one of the sponge discs perfectly on the base, I used a 22 cm diameter cake base as a template. I cut off the excess from the edge, so that the sponge fits perfectly on the base.
- Place the cake inside the mould, with the golden side facing upwards, and adjust.
- Brush the cake lightly with the liqueur and water mixture.
Place the filling and finish covering the cassata.
- Put all the ricotta filling into the mould, smooth the surface.
- Place the other disc of sponge cake on top of the filling and adjust. If you wish, you can place a tart disc on top of the last sponge cake.
- Cover tightly with cling film and refrigerate for 12-24 hours.
THIRD DAY
Prepare the icing for the topping.
- Mix the powdered sugar with the water until completely homogenised.
- You should get a consistency similar to the one in the video.


Cover the Sicilian cassata with the icing.
- Spread a generous layer of the icing over the surface. Use a pastry spoon or spatula to spread the icing to the edges of the cake.
- Using a pastry brush, brush the sides (the marzipan). The icing helps to preserve the freshness of the marzipan and prevent it from drying out too much, as well as giving a nice finish.
- Allow to dry completely at room temperature before decorating. This can take 3-4 hours.
Prepare Royal icing
- Mix all the ingredients together until you have a homogeneous icing with an outline texture.
- Pour into a piping bag with a piping nozzle.
Decorate Sicilian cassata.
- Decorate the surface of the cassata, in my case I have left you this presentation suggestion which is inspired by this jewel made by a real artist (I still have a lot of practice to do!), but you can do whatever you like. Even something simpler.
- Let the glaze dry before placing the fruits. At this point, in my case, I let it dry and refrigerated until the next day.
- Decorate the surface with candied fruits as you like.
- Traditionally, candied fruits are usually decorated with icing. In my case I opted for golden sprinkles.
- Serve.

Notes
- It is very important to be well organised so that you have three days to carry it out.
- To make this cake it is not necessary to use baking powder. The sponge cake rises very well thanks to the whipped eggs.
- The sponge cake should rest overnight in the refrigerator so that it can be easily cut the next day.
- The mini chocolate chips should have a high cocoa content, no less than 70-75%. The reason is that the cake, as a whole, is quite sweet. The bitterness of the chocolate goes very well as part of the filling.
- If you don't want to add candied orange to the filling, you can substitute it with more chocolate chips.
- Normally, once the ricotta has been drained, it is beaten with a turmix to achieve a silky texture. This time I decided to keep the texture it had after mixing it with my hands. But keep in mind that it can be done and that it softens the final texture a lot.
- The marzipan can be made and used on the same day, if you wish. Letting it rest helps to enhance the aromas, as well as allowing the almonds to hydrate well.
- When you stretch the marzipan and see cracks forming, this is a sign that it needs more water. No problem, add a little more water, mix well and roll out again. Be careful when adding the water, do it little by little, kneading very well and observing how it behaves. We can always add more, but it is not easy to remove the excess. It can be done by adding more almonds and icing, but this would force us to calculate the quantities in order to maintain a good proportion.
- As we stretch, remove scraps, join them together... The marzipan will dry out. Most probably, you will need to add a little water. You can do it with your hands, a coffee spoon or a bottle.
- This marzipan does not require baking because it does not contain egg white.
- In my case I have used green paste colouring, but you can use any variety of food colouring.
- It is very important to drain the cheese with a cheesecloth, otherwise we will be left with a watery filling that will spoil the texture of the sponge cake and the marzipan.
- You must follow the steps I detail throughout the whole process, but especially in the resting and drying times of the glaze. If you don't wait for the icing to dry, when you pour the decoration, it will sink or mix with the icing.
- Decoration is optional, you can make this step as complicated as you like. Or do something much simpler, of course.
- You can use the candied fruits of your choice.
- Once assembled, you can keep it refrigerated for 4-5 days.


I'm sure you can already imagine what I'm going to tell you.... And, yes, you have to make Sicilian Cassata, of course! Honestly, I think it's a "amazing dessert", really. You are going to look like kings when you walk out of your kitchen doors and into the dining room with such a delicacy in your hands.
They won't be able to thank you enough for the time and effort you put into making it, and they will be overwhelmed by such beauty. If we go to the important thing, its taste, they will have you on a pedestal during the whole of 2024 and part of 2025. Truly, trust me, outstanding.
By the way, I remind you that you can watch all my videos on my YouTube channel. If you subscribe and turn on the little bell, I will be eternally grateful!
I wish you a wonderful Sunday afternoon!
Lots of love,
Eva
Sources:Turismo Sicilia
This post contains affiliated links.