Piononos from Santa Fé
Well, well, the sweet treat I bring you today is outstanding. Classic and traditional, yes, but wonderful as well. I’m sure many of you know them very well and have eaten them countless times. Especially if you live in the South of Spain. We already know that there is always time to enjoy the good things and that is why today I am going to teach you How to do Piononos from Sante Fé, Granada. That way you can do them at home whenever you want and feel like it. What do you think?
I don’t know why, but I’ve been in an old fashioned way lately. The fact is that I’ve been trapped for a while between cakes/tarts and classic and traditional recipes. But now, I’m also starting to move to the classic sweets, the kind that will always remind us of the pastry shop windows of our childhood.

Piononos de Santa Fé origin.
First of all to say that the recipe of thepiononos de Santa Fé, like that of many other recognized and traditional recipes, is secret. So why have you named them that way if it’s not the original recipe? The reason is that you can locate it and know exactly which one I am referring to.
If we are looking for “pionono” recipes, but without specifying it, the normal thing is that we get recipes of rolled sponge cakes with filling. What we commonly know as the “brazo de gitano“(gypsy arm, in Spanish). That’s why I decided to give it this name, to locate the specific recipe. But everyone knows that this recipe (despite being very good) is NOT the original one made in Granada. As I mentioned a few lines ago, it is a recipe that only knows how to make it in their bakery.
Apparently the piononos, one of the most typical sweets of Granada par excellence, were created by Ceferino Isla. Master pastry chef and owner of the Casa Ysla bakery since 1897, in Santa Fé.

It is said that Ceferino was very devoted to the Virgin and wanted to pay tribute to Pope Pius IX (Pio Nono in Italian) who in 1854 had proclaimed the dogma of the Immaculate Conception of Mary. He was the last Pope King, under whose pontificate the Pontifical States became part of the new Italy that arose with the reunification, being these states reduced to the minimum expression: the present Vatican City.
In this context, Ceferino conceived the creation of this cake that not only bears the name of the Pope (Pius IX > Pius Nono> pionono ®), but also recalls the papal figure:
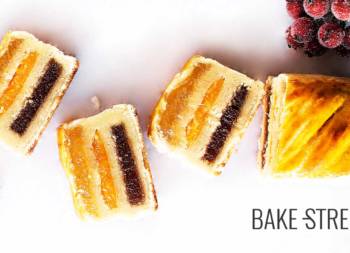
- It has a cylindrical and somewhat chubby appearance: it is a syrupy sponge cake rolled up on itself.
- It is served dressed like the Pope, with a white cassock: the cakes are placed on a wafer/capsule of paper where they are served.
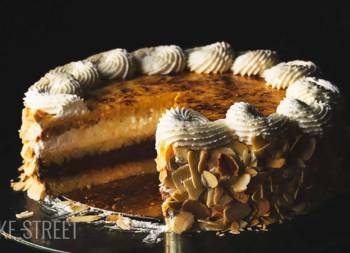
- The upper part is a crown of sugary cream and toasted piped on the cake cylinder: this symbolizes the solide with which the Pope covers his crown.

This is one of the oldest sweets treats in Spain and there are indications of the existence of a similar pastry in the Arab era.
Due to the ingredients used in its production, it was not until 1897 when it emerged in the province of Granada. There is a theory that says that the origin of pionono goes back to the time of Hispanic-Muslim Spain, between the 10th and 11th centuries. Its confectionery was characterized by the use of spices, in this case cinnamon, and honey.
According to this popular theory, the inhabitants of Santa Fé kept the recipe for these cakes, the ancestors of the pionono, as part of their Arab heritage. As time passed and the hands that elaborated it, transforming it to different tastes, in the middle of the XIX century three sisters of the pastry shop “La Blanquita”, decide to rescue the recipe.
They gave it the appearance of a papal tiara and baptized it with the name of Pope Pius IX. Years later, they named it pionono, as a tribute to Ceferino, founder of Casa Ysla.

A delight for the senses.
This is a very fine sponge sheet, moistened with syrup, filled with cream and cinnamon, rolled up on itself. In order to finish it, it is crowned with more cream and this one is toasted. As you already suppose, a marvel for our palate.
Without a doubt, it fell in love with everyone who tried it. In fact, Casa Ysla has received many recognitions throughout more than a century of life. King Alfonso XIII was extremely impressed by these cakes, so much so that he gave Casa Ysla the title of official supplier to the Royal House in 1916. Hence the shield of Casa Ysla has the royal crown of five points.
Ingredients for 15 pieces
FOR SPONGE CAKE:
Recipe from Siempre Dulces
- 4 large eggs
- 80 sugar (divided in 2 parts)
- 50 g pastry/cake flour
- 50 g cornstarch
- 30 g whole milk
FOR EGG YOLK PASTRY CREAM:
Recipe from Carlos Valencia, I saw it on this blog
- 6 large eggs (338 g, shelled)
- same weight of sugar than eggs, in my case 338 g
- 180 g water at room temperature
- 30 g cornstarch
FOR THE SYRUP:
- 160 g water
- 160 g sugar
- rum to taste
- powdered cinnamon to sprinkle when we assemble the cakes
FOR TOAST:
- sugar
Instructions
Make egg yolk pastry cream.
- In a small bowl mix the sugar with the cornstarch. Set aside.
- In a medium bowl, add the eggs together with the water and mix well with a whisk.
- Pour into a medium saucepan through a strainer to remove strands from the eggs.
- Add the mixture of sugar and cornstarch, place at low heat (in a range of 1-6, put heat 2), and cook non-stop stirring with the whisk until the mixture thickens. It will take 7-10 minutes.
- Once the mixture begins to thicken, it will do it very quickly. To guide you, the mixture will be ready in density when it has a temperature between 199º-204ºF/93º-96ºC. In the video you can see the consistency of the cream.
- Remove from the heat and pour it into a large container. The bigger it is, the less time it will take to cool down.
- Cover with film and let it cool completely at room temperature.
Make the sponge cake.
- Preheat oven to 390ºF/200ºC.
- Sift the flour along with the cornstarch. Set aside.
- Separate the yolks from the egg whites.
- In a medium bowl add the yolks and start beating with an electric hand mixer.
- Add, little by little, only half of the sugar (40 g) as we beat increasing the speed progressively. We must whiten the yolks, these will increase their volume.
- Once they are ready, add the milk and mix at low speed until it is completely integrated. Set aside.
- Whip the egg whites together with the other half of sugar (40 g) until firm and bright peaks are obtained. Set aside.
- In a large bowl pour the mixture of yolks and begin to add, little by little, the mixture of dry ingredients. We will integrate both elements with soft and enveloping movements, and we will not add more until both have been completely integrated.
- Once we have added all the flour, begin to add the meringue. We'll do it the same way, in batches and with gentle, enveloping movements.
- Place the mixture in a piping bag.
Bake.
- To prevent the ends of the paper from lifting or moving when you pipe the batter, place a few small "points" of batter in the corners. In this way the paper will remain fixed.
- Cut the tip of the piping bag and pipe the batter. Make a rectangle which will occupy almost the entire surface of the tray. Then fill the inside trying to exert the same pressure all the time.
- Smooth the surface with a spatula.
- Place in the oven for 7-8 minutes. We will observe that it acquires a light golden color for the surface. We are not interested in drying the sponge cake.
- Remove from the oven and let them cool completely on a rack.
- Repeat the process with the rest of the batter. This time we will have enough to make half of a sponge cake like the first we made. The cooking time and process will be the same as with the first one.
Make the syrup.
- Pour the water with the sugar in a saucepan. Place at medium heat and let it boil. The sugar should be completely dissolved.
- Once it comes to the boil, turn off the heat and let it cool completely.
- Add Bourbon to taste and mix.
- Set aside at room temperature.
Assemble Piononos de Santa Fé.
- Place the cake upside down on a clean working surface and carefully remove the baking paper.
- Turn the cake, keeping the golden part up, and place it on the baking paper that we have just removed. This step has helped us to remove the cake from the paper, but we need it to remain in the same position.
- Using a sharp knife, cut the edges. This will give a cleaner finish, as well as removing those drier parts.
- Generously brush with the syrup over the entire surface of the sponge cake.
- Sprinkle with powdered cinnamon to taste.
- Spread a layer, not too thick, of yolk cream pastry. Keep in mind that if we add a lot of it, when the cake is rolled up, it will overflow.
- Cut the cake in half, as I show you in the video. With the help of a spatula, reduce the amount of cream, leaving a very thin layer, in the part that will be the end of the roll. This small amount helps the cake to stay together.
- Roll the way I show you in the video, we will try to exert a little tension so that there are no hollows, but not too much because the filling would come out.
- With the help of a very sharp knife, cut the roll. In my case I have cut portions of 2 inch/5 cm long, but you can adjust them to your taste or according to the size of your cake.
- Place each portion in a cupcake blonde.
- Repeat the same process with the other smaller sponge cake, which corresponded in size to a half cake like the one we just assembled.
- Once the piononos have been assembled, syrup them again. We take, one by one, and soak the sides well with the help of a silicon brush.
- Put it back in its blonde.


Decorate the surface and toast.
- Place the rest of the pastry in a piping bag with a smooth tip 1 cm in diameter.
- Pipe a little mound on each pionono. It is a very soft and grateful cream when decorating.
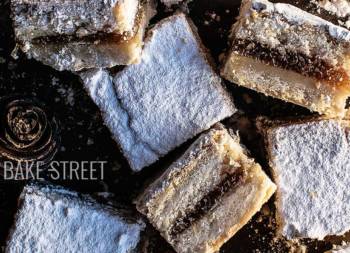
- Sprinkle sugar and burn with a blowtorch.
- Serve.


Notes
- The yolk pastry cream has a very simple process of preparation, but requires care and patience when we are cooking. Do not stop constantly stirring the cream to prevent lumps from forming, they would spoil the final texture. In the end we must be a little more energetic when mixing.
- If we have yolk cream leftovers, we can keep it refrigerated in an airtight container for 2 days.
- The sponge cake to make the piononos has no baking powder just as we should not make it with a rising flour. It will obtain volume and sponginess thanks to the merengue and the whipped yolks.
- We must be careful to integrate the meringue to favor that the final result is spongy.
- We should not exceed the baking time of the sponge cake because we would obtain a dry result and it is not what we are looking for. But we don't want a raw cake either. It will be ready after 7-8 minutes or once it has a soft and beautiful golden colour.
- The outside part of the pionono will be the whitest and most porous part of the sponge cake. That is, the part that is attached to the paper. The golden part will remain in the inside, it will be where we will spread the cream.
- The syrup will help us to maintain the juiciness in the cakes and prevent them from drying out.
- The amount of cinnamon can be adjusted to your tastes.
- The layer of yolk cream should not be too thick, otherwise it will overflow when the cake is rolled up.
- If you don't have a blowtorch, don't sprinkle sugar on top. Don't even put it in the oven to brown them, this would dry out the cake a lot and the result wouldn't be good. In that case, it's almost preferable to sprinkle a little cinnamon on top and that's it.
- They can be kept refrigerated in an airtight container for 2 days.


Really, don't stop trying these Piononos from Santa Fé. It's like an outbreak of happiness that floods our kitchen and then passes to us when we enjoy them. It has many good things, but the one you're going to like the most is that we can do them and enjoy them on the same day.
The sponge cake is super easy to make, in fact it is a very basic sponge cake that only needs 7-8 minutes to cook. The cream is very simple to prepare and in less than 10 minutes it will be ready. Then it must cool, yes, but while we do our thing. Or better yet, you can make it the day before and refrigerate it once it's cold.
And, to finish, we'll just have to assemble them. This will depend on our skill, but in 15-20 minutes we will have them ready to enjoy. Easy, isn't it?
By the way, tradition says you have to eat it in one bite. In my case, I can not, I find it impossible, and almost prefer to enjoy it without so much pressure, hahaha.
Well, I hope you'll cheer up with them soon and tell me how you've done. I wish you a wonderful weekend, see you on Monday!
Big hugs,
Eva