Pineapple and Coconut Cake – Fault Line Cake
Today I come with a cake that has me in love. You have already seen many of this style through social networks, through all of them. The truth is that from the first moment I saw it I said to myself, – Oh my God, I have to do it! And that’s what I’ve done. What better way to celebrate the arrival of summer than with a Pineapple and Coconut cake – Fault Line Cake. Now I’ll explain.
Because when we read pineapple and coconut cake, we don’t see anything out of the ordinary. In fact they are two flavors that combine great, to see who hasn’t ever had Malibu with pineapple juice. Now, what’s that about Fault Line Cake? That’s where the real importance of the recipe I bring you today comes in.

Fault Line Cake.
The meaning would be something like “dividing line” or “crack, fracture”. So what we are going to see today is like making a “cake with a fracture”. It is a type of decoration in which the cake has a central strip and not uniform, in which depth can be appreciated.
In this zone are usually made decorations of the most varied: natural flowers, wafer paper, fondant, SMBC, sprinkles, fruits, even oreo cookies … Everything that comes to mind and can be the theme of the cake you are going to make.
There are several ways to make this cake. You can make 3 sponge cakes in which the central one is narrower than the other ones or you can make a normal cake (with the fillings of our choice) and achieve that volume with the cream we use to decorate. In my case I opted for the latter option. I think it’s simpler, less cumbersome and the results are very good. Now, if we want a lot of depth, then inevitably we will have to make the first choice.
How beautiful it is, oh!

Pineapple and Coconut Cake.
To make the cake I have used the same processes that I have used in some previous cakes. I really like this combination for filling cakes, as well as when it’s time to eat it… It’s a spectacle.
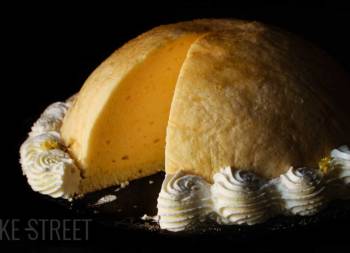
The sponge cake is the same one I used in the Lemon mousse tart, it looks super good and supports all the layers very well. Including syrup. I like to soak the sponge cakes very well so that when it’s time to eat it, it’s very juicy.

For the filling, on this occasion, I opted for a pineapple and ginger curd, which I already made for this cake. The taste is very smooth and delicate, I personally like it very much. Although this one is sweeter than the lemon one. I add ginger because it gives a light fresh and spicy touch that makes the whole sensational. If you don’t like it, all you have to do is omit it.
The central part is a coconut mousse, marvellous in texture and flavor.

Yeah, it tastes a lot like coconut. I tell you because many times you ask me, when I make something with coconut, if it tastes a lot. And yes, you know, but it’s normal, isn’t it? If you don’t like coconut, you can make a mousse of cream cheese or some other ingredient that you like and combines well with pineapple.
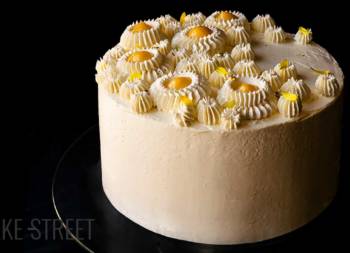
To decorate it I have made a white chocolate SMBC that, I warn you, is very dangerous. Can´t stop eating it! And to give it the final touch I have used golden and pearled sprinkles (I fell in love with them) and dehydrated pineapple flowers. Of course feel free to change the decor to your liking and how you feel more comfortable.
Ingredients for a 8 inch cake
FOR SPONGE CAKE:
Recipe by Julián “Historias del Ciervo”
- 300 g cake/pastry flour
- 180 g sugar
- 225 g unsalted butter at room temperature
- 225 g white eggs (6 large eggs)
- 180 g whole milk
- 14 g baking powder
- 2 tsp vanilla extract
- pinch of salt
FOR SYRUP:
- 150 g water
- 150 g sugar
- Rum to taste, alternatively, another liqueur such as Malibu can be used
FOR PINEAPPLE AND GINGER CURD:
- 700 g fresh pineapple, peeled
- 60 g fresh ginger, peeled
- juice from one large lemon
- one lemon zest
- 6 large egg yolks
- 185 g unsalted butter
- 190 g sugar
- 3 Tbsp cornstarch (25 g)
- pinch of salt
FOR COCONUT MOUSSE:
- 200 g coconut milk, high fat content
- 50 g grated coconut
- 300 g cream, high fat content (very cold)
- 125 g cream cheese
- 75 g sugar
- 5 gelatin sheets (10 g)
FOR WHITE CHOCOLATE SMBC:
- 150 g egg whites
- 300 g sugar
- 430 g unsalted butter at room temperature
- 200 g white chocolate, good quality
FOR DECORATE:
- sprinkles, golden and pearled ones
- dehydrated pineapple flowers
Instructions
FIRST DAY
Make the sponge cake.
- Grease a 8 inch Push-Pan, with butter. Sprinkle flour, remove the excess and set aside.
- Preheat the oven to 320º F/160ºC.
- Sift the flour together with the baking powder and salt. Set aside.
- In a bowl add the egg whites together with the vanilla and milk, whisk until the mixture is homogenized.
- In the bowl of the KA or of a stand mixer, add the butter together with the sugar. Beat with the flat beater at medium speed, until a creamy, aerated and white texture is achieved.
- Begin to integrate the dry ingredients alternating them with the liquids.
- Add 1/3 of the egg white mixture and beat at the lowest speed for a few seconds. Stop, lower the mixture from the sides and add 1/3 more of the dry ingredient mixture. Mix again at low speed for a few seconds.
- Repeat the same process with the rest of the egg whites and dry ingredients mixture. Mix at low speed only until the mixture is homogenized.
- Pour the mixture into the mould and place in the oven at medium height.
- Bake for 70-75 minutes or until you prick it with a toothpick and it comes out clean.
- Remove and let stand 5 minutes in the pan.
- Unmould and leave to cool completely on a rack.
- Once it is completely cold, wrap in plastic film and refrigerate until the next day.
Make pineapple and ginger curd.
- In a blender add the pineapple together with the chopped ginger.
- Blend until a dense juice is obtained. Set aside.
- In a medium pot add the egg yolks together with the sugar, lemon zest, sifted cornstarch and salt.
- Strain the pineapple juice, to remove strands, and pour into the pot along with the yolks. We will obtain around 550 g of juice.
- Add the lemon juice.
- Place at medium heat and stir constantly until it begins to thicken. It will take about 15 minutes.
- Add the butter and continue mixing until it is completely integrated and the mixture finishes thickening. About 10-15 minutes more.
- Pour the curd into a bowl, through a strainer, and let it cool completely at room temperature.
- Refrigerate until the next day.
Make the syrup.
- Pour the water with the sugar in a saucepan. Place at medium heat and let it boil. The sugar should be completely dissolved.
- Once it comes to the boil, turn off the heat and let it cool completely.
- Place the syrup in a bottle with the help of a funnel, add Limoncello to taste, close and shake to mix well.
- Set aside at room temperature.
SECOND DAY
Make white chocolate Swiss Meringue Buttercream.
- In a heat-resistant bowl, add the white chocolate. Place in a water-bath and leave until it completely melts, stirring occasionally.
- Remove from heat and reserve.
- In another heat-resistant bowl, add the egg whites along with the sugar.
- Place on a water-bath at medium low heat. Stirring constantly, leave until the egg whites reach 165ºF/74ºC. For it we will help ourselves of a digital thermometer.
- Remove from the heat, pour the egg whites into the bowl of the KitchenAid or a stand mixer and whip at medium high speed until a firm and shiny meringue is obtained.
- Once we have the firm meringue, begin to add the butter cut into squares little by little and at the same time the mixer continues whipping.
- Once we have all the butter added, increase the speed and finish whipping.
- Stop, scrap the cream with the help of a spatula and add the melted white chocolate. We will do it in a fine continuous thread while the mixer is mixing at the slowest speed.
- Whip again at high speed until the ingredients are completely integrated.
- Cover with film and s aside.
Make whipped cream for the mousse.
- Before we get ready to whip the cream we must make sure of two things:
- Cream must be cold 24 hours before used it.
- The bowl in which we are going to make whipped cream must be cold. I recommend to use one aluminium bowl and freeze 20 minutes before beat it.
- If you want to know how to make whipped cream, you can do it in this video.
- Pour heavy cream into freeze bowl and beat with an electric mixer into low speed.
- Once cream is becoming to form stiff peaks, add sugar little by little stirring the whole time. Increase speed gradually but without reaches high one. Ideally use medium speed.
- Before finish to beat the cream, add vanilla extract along and beat until get a perfect whipping cream. Be sure not to over-beat, otherwise cream will become lumpy and butter-like.
- Cover with plastic wrap and chill until used it.
Make coconut mousse.
- Fill a bowl with very cold water and put the gelatin sheets inside. Let it hydrate for 15-20 minutes.
- In a saucepan add the coconut milk and heat to medium low heat. Leave until it reaches 55º-58ºC. Set aside.
- In a large bowl add the cream cheese, at room temperature, and soften with a silicone spatula.
- Drain the gelatine and put it in the coconut milk.
- Dissolve with the help of a spoon.
- Add the grated coconut and mix again until homogenized.
- Pour over the cheese mixture and mix well until homogenized.
- Add a small quantity of whipped cream and begin to integrate with the help of a silicone spatula. We will do it with soft and enveloping movements, without stirring the mixture.
- Once it is integrated, add another small amount of whipped cream and repeat the same process. We will do this step in several batches and will not add more until the last one is completely integrated.
- Set aside.
Assemble the cake.
- With the help of a cake cutter, cut the sponge cake in 4 equal parts. Remove the upper part, which will be slightly curved, and from here we cut the layers. I recommend you to leave this step done before making the mousse because it will start to curdle in the bowl.
- Place some SMBC into a piping bag with smooth tip.
- Place an anti-slip disk on the base of the Push-Pan mould 8 inch/20 cm to fix the cake disc.
- Put the disc and a small amount of SMBC on it, this will help us fix the cake.
- Place a sheet of acetate inside the mould. This will help us to remove the cake in a cleaner way.
- Place one of the sponge cakes and press lightly.
- Soak with some syrup.
- Pipe SMBC around the edge of the cake. This will help us contain the curd.
- Place 4-5 tablespoons of curd inside the SMBC ring and smooth lightly.
- Place another sponge cake, press lightly and moisten with syrup.
- Pour the mousse and smooth lightly.
- Place another layer of sponge cake and moisten with syrup.
- Pipe SMBC around the edge and fill the centre with 4-5 spoonfuls of curd.
- Place the last layer of sponge cake, press carefully and moisten lightly with syrup.
- Cover the surface with film and refrigerate for a minimum of 4 hours or, if you wish, until the next day.
THIRD DAY
Cover the outside of the cake with SMBC.
- Unmould the cake and remove the acetate carefully. Place it on a cake stand.
- Spread the SMBC with a spatula over the entire surface and remove the excess with the help of an edge smoother. This layer will help us to "pick up" possible crumbs from the cake that could come to the surface when we decorate it.
- Be very careful when you arrange the SMBC by the layers of mousse. We must do so with care not to remove part of it and that it integrates with the cream.
- Refrigerate for 30 minutes for the SMBC to harden.
- Remove from the cold, place another layer of SBMC in the central part, smoothed removing the excess.
- Refrigerate for 10 minutes, otherwise the SMBC will be too soft and we can spoil the smoothing to place the sprinkles.
- Decorate with sprinkles to taste and refrigerate for 20 minutes.
- Place a thicker layer of SMBC at the top and bottom of the cake. There should be a relief that protrudes from the central part that we already have decorated. We must create depth, so that the part of the sprinkles seems to be deeper. As if we had removed part of that layer and had appeared the one we have decorated. Don't worry if it's irregular in height, that's what makes it more beautiful and natural. Real things aren't perfect, that's where the real beauty lies.
- Smooth to collect and smooth the same amount of both parts.
- Refrigerate for 60 minutes.
- Paint the edges with edible golden powder food colorant.
Decorate the cake.
- Place dehydrated pineapple flowers to your taste.
- Refrigerate for 1 hour or until we are going to consume it.
- Remember that the SMBC is better when we leave for a while at room temperature.


Notes
- I used a Push-Pan 8 inch/20 cm, but this quantity is valid for moulds with a diameter of 9 inch/23 cm.
- The baking time of the sponge cake will vary depending on the size of the mould you use.
- If we refrigerate the sponge cake overnight, we help the flavors ripen as well as facilitating the process of cutting the sponge cake. It crumbles less.
- Follow all the steps to get a good SMBC.
- If we have SMBC leftovers, we can refrigerate it for 2 days or freeze it for 30 days. Although in this case we'll have almost nothing left over.
- To make the syrup you can use the liquor you want.
- Pineapple curd takes longer to set than lemon curd. Be patient and, under no circumstances, raise the temperature to speed up the process.
- You can make the top decoration completely to your liking.
- You can see how to make dried pineapple flowers in this post. In my case I make them using a food dehydrator.
- To preserve the cake we must keep it refrigerated for 3-4 days.
- The ideal thing before consuming it is to temper it during a while, it will depend on the external temperature.


Without a doubt, this Pineapple and Coconut Cake - Fault Line Cake is a great option if you are having a celebration in the near future. Both in terms of ingredients and colours, it's very summery for me. Ideal for this season that has just come in. I love summer.
As you can see it's not a complicated decoration to make, but it's true that the cake is composed of several elaborations, so we must have patience to make it. The most important thing is the organization, so we will not be difficult the process at all. However, in case you need it for a specific day, make sure you get everything right so you don't go in a hurry.
I wish you a wonderful weekend, see you on Monday! ;)
Big hugs,
Eva