Mimosa Cake
I must admit that I’ve been a long season in which I only leave you cakes…. But it is something that fascinates me. I really like making them, I enjoy immensely carrying out the whole process and then seeing the final result. Besides enjoying it, of course. Today I bring you a version of the Mimosa Cake. I say version because I have taken the liberty of changing some details, among them the top decoration of the cake.
It’s not that I don’t like the classic decoration, it has its magic. But I wanted to give a twist to the decoration, I hope you like the result as much as I do.
Mimosa Cake origin.
The Mimosa Caket is a dessert created in Rieti, a city in Italy in the Lazio region, in the 1950s. The name is due to the pieces of sponge cake scattered on the surface, which in shape are reminiscent of simple and elegant mimosa flowers. Thanks to the flower’s connection to International Women’s Day, the cake is also often used to celebrate the occasion.

The recipe was created by Adelmo Renzi, a chef originally from San Filippo di Contigliano, owner of a restaurant, “Restaurant del Teatro Flavio“, in the center of the city of Rieti, in Lazio, which closed its doors in 1989. The dessert became famous in May 1962, when the chef participated in a pastry competition in San Remo, specialized in cakes, during which he presented the mimosa with the intention of paying homage to the “city of flowers” and was the winner. However, the original recipe used by Renzi has never been revealed.
One of his daughters, Paola, has continued her father’s tradition and has a pastry shop, La Mimosa di Adelmo, where she continues to bring her father’s recipe to the world along with other sweet wonders.

Making Mimosa cake at home.
This is a fairly simple recipe to carry out, if we omit the top decoration with icing. It is not complicated at all, but it does require more patience.
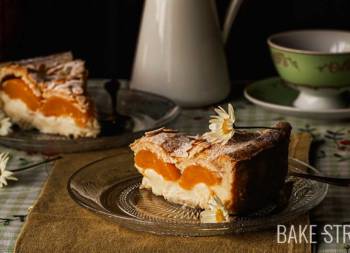
The cake is made of very spongy sponge cake, dyed yellow, syrupy and sometimes sweet liqueur such as Gran Marnier is used, together with a filling of diplomatic cream or Madame cream; pastry cream and whipped cream.

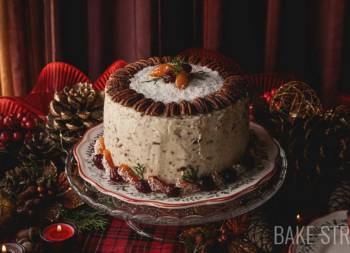
The most representative of this preparation is its outer decoration carried out with squares of sponge cake arranged on the surface that reminds us of the appearance of the mimosa flower. In my case I have taken the liberty of slightly varying the top decoration, I hope you like it.
I decided to create a top layer of icing along with a decoration carried out with royal icing. The same way we decorated the Sicilian Cassata, only this time the royal icing is dyed with the colors of the mimosa flower.
The result is exceptional, a soft, elegant, juicy cake with very delicate and elegant flavors; lemon, vanilla together with sweet touches. Wonderful.
Recipe Mimosa Cake
Ingredients for two molds; one of 20 cm in diameter and the other of 23 cm in diameter
SPONGE CAKE (2 pieces):
- 8 large eggs, whites and yolks separated
- 40 g water, room temperature
- 260 g sugar, separated in two equal parts (130 g + 130 g)
- 240 g cake flour
- 120 g cornstarch
- 8 g baking powder
- zest of one lemon
- pinch of salt
- yellow edible food coloring (in my case I used Sugarflair "egg yolk" coloring paste)
SYRUP:
- 50 g lemon juice
- 120 g water
- 130 g sugar
DIPLOMATIC CREAM/MADAME CREAM:
- 300 g milk
- 100 g whipping cream
- 50 g yolks
- 100 g sugar
- 40 g cornstarch
- 2 tsp vanilla extract
- 270 g whipping cream + 40 g powdered sugar*
*Reserve 70 g of whipped cream to cover the sponge cakes, the rest of the cream is incorporated into the diplomatic cream.
ICING COATING:
- 200 g powdered sugar
- 32 g water
ROYAL ICING:
- 20 g egg whites
- 115 g powdered sugar
- 3 g lemon juice
- green paste colorant "holly green" Sugarflair
- yellow paste colorant "egg yolk" Sugarflair
MATERIAL WE WILL NEED AND SHOWN IN THE VIDEO:
- KitchenAid stand mixer or stand mixer
- digital kitchen scale
- round pan 23 cm diameter x 5 cm height
- 20 cm diameter springform pan
- cake cutter
- silicone spatula
- pastry spatula
- grater
- cooling rack
- rotating cake stand
- colander
- bowls
- piping bags + "2 Jem" or "3 Wilton" nozzle and "1 Wilton" nozzle
- serrated knife
REMEMBER TO ENJOY SWEETS IN MODERATION. SUGAR SHOULD BE CONSUMED OCCASIONALLY AND NOT BE PART OF YOUR DAILY DIET TO MAINTAIN A HEALTHY LIFESTYLE.
Instructions
FIRST DAY
Prepare sponge cakes.
- In the bowl of the KitchenAid, add the egg yolks, water and 130 g of sugar. Whisk on medium-high speed until a whitish color and a creamy texture is achieved, you will notice that it gains volume.
- Add the food coloring and whisk again to distribute evenly.
- Start incorporating the flour, little by little. Integrate while mixing on speed 1.
- Add the baking powder along with the salt, mix.
- Once everything is integrated, set aside.
Whip the meringue.
- In another bowl, add the egg whites and begin to whip. Once it starts to foam, add the sugar (the remaining 130 g).
- Whisk at medium-high speed until a semi-whipped meringue is formed. At this point, add the cornstarch in two batches.
- Add half of the cornstarch and beat until incorporated. Add the remaining starch and whip the egg whites to stiff peaks.
Fold the meringue into the egg yolk mixture.
- Start incorporating the meringue, little by little, into the egg yolk mixture.
- Add a small amount, mix with a spatula until fully integrated and continue adding more. The first part of meringue will help smooth the mixture. As you add more, the mixture will become smoother and lighter.
- When adding the last batch of meringue, add the lemon zest along with the meringue and mix with the whisk using gentle, encircling movements to integrate it.
Pour in the mold and bake.
- Preheat the oven to 356ºF/180ºC, heat up and down.
- Grease and line with baking paper a 20 cm diameter mold and a 23 cm diameter mold and pour the mixture into both molds, pouring the same amount into each mold. Tap gently on a work surface to settle the mixture.
- Bake the 23 cm diameter pan for 25 minutes and the 20 cm diameter pan for 28 minutes.
- Remove from the oven, let stand for 5 minutes in the pan and remove from the mold.
Place on a cooling rack, upside down to make the dome as smooth as possible, and let cool almost completely. - Wrap the sponge cake in plastic wrap when warm and let it cool completely. Refrigerate until the next day.
- NOTE: Wrapping the sponge cake in film, warm to cold, helps the cake to remain very moist and tender. Refrigerating the cake makes the cutting process much easier.
SECOND DAY
Prepare syrup.
- Add the lemon juice, water and sugar to a saucepan. Place over medium heat and bring to the boil. The sugar should be completely dissolved.
- Once it comes to the boil, reduce to medium heat, cook for 5 minutes and turn off the heat.
- Allow to cool completely.
Prepare diplomatic cream.
- In a medium saucepan pour the milk together with heavy cream and vanilla. Place over medium heat and bring to a gentle boil.
- Meanwhile, in a large bowl, whisk the egg yolks with the sugar and the previously sieved cornflour until completely homogenised.
- Once the milk has come to the boil, pour some of it over the egg yolk mixture.
- Whisk quickly to temper the yolks and prevent them from curdling into lumps.
- Stir in the rest of the milk little by little, mixing very well each time.
- Pour the mixture back into the pan and place over medium-low heat, stirring constantly. You will notice that the texture will gradually become thicker, but it will take a while. Patience.
- Once at this point, remove from the heat.
- Pour into a container/bowl (the larger the better because it will cool faster).
- Cover with cling film to prevent it from setting and leave to cool completely.
- Allow to cool completely before using. If desired, it can be made the day before and refrigerated until the next day.
Whip the cream.
- The cream and mascarpone cheese must be at least 24 hours in the cold.
- The bowl in which the cream is whipped must be cold.
- Pour the cream into the chilled bowl with the powdered sugar. Whip with the whisk at medium speed.
- Increase the speed gradually, but never reach maximum speed. The ideal is a medium-high speed. Be careful not to overbeat it or it will be cut and you will get butter...
- Set aside in the refrigerator until ready to use.
Fold the cream into the pastry cream to make the diplomatic cream.
- Whip the pastry cream with a whisk to soften it. Transfer the cream to a large bowl.
- Reserve 70 g of whipped cream without adding it to pastry cream. Store in a bowl covered with plastic wrap in the refrigerator.
- Gradually add the remaining whipped cream. Integrate both elements with the help of a silicone spatula. Make sure to use smooth, enveloping movements to avoid liquefying the cream.
- Transfer the cream into a piping bag with a smooth nozzle 1 cm in diameter.
- Set aside in the refrigerator.
Cut one of the sponge cakes.
- With the help of a cake cutter, cut the 20 cm diameter sponge cake into three equal parts. Remove the most domed part of the third cake.
- Set aside wrapped in plastic wrap to prevent it from drying out.
Assemble the cake.
- Place a tart disk on the surface where you are going to present the cake, if desired.
- Spread the tart disk with a small amount of whipped cream and place the first sponge cake on top.
- Soak well with the lemon syrup.
- Pipe diplomatic cream over the entire surface of the sponge cake.
- Place the second sponge cake on top of the cream and soak with the syrup.
- Pipe again the cream over the entire surface of this second sponge cake.
- Cover with the third and last cake.
- Cover with plastic wrap to prevent it from drying out and refrigerate for 4-5 hours to firm up the cream.
- NOTE: Reserve the rest of the syrup for the last cake and the excess of diplomatic cream in the refrigerator.
Prepare the icing for the topping.
- Mix the powdered sugar with the water until completely homogenised.
- You should get a consistency similar to the one in the video.
Cover the cake with the icing.
- Spread a generous layer of the icing over the surface. Use a pastry spoon or spatula to spread the icing to the edges of the cake.
- Cover the sides of the cake with cling film to prevent it from drying out.
- Refrigerate the cake until the next day.
- NOTE: This step allows the filling to reach the perfect consistency, as well as allowing the icing to dry and allow you to draw on it with the icing.
THIRD DAY
Prepare Royal icing
- Mix all the ingredients together until you have a homogeneous icing with an outline texture.
- Divide the glaze into two bowls. Dye one of them with the green coloring and the other with the yellow coloring.
- Put each of the glazes in a piping bag with a piping nozzle, I recommend using the 2 Jem nozzle or the 3 Wilton nozzle.
- NOTE: For the green icing I used two different nozzles, I advise you to use a nozzle adapter to be able to change it without using more piping bags.
Decorate the surface of the cake with royal icing.
- Decorate the surface of the cake simulating a mimosa plant. In my case I leave you this option, but you can do it any way you prefer. To make it, I was inspired by this cake, which I found to be a beautiful, simple and elegant decoration.
- Refrigerate while you cut the other sponge cake for decoration.


Cut the sponge cake.
- To decorate the sides, you must use the 23 cm diameter cake.
- Cut the squares as I show you in the video or other method you prefer. In my case, I cut the most golden parts so that all the squares have the same color on all sides.
- Place the cake squares in a bowl and cover with cling film to prevent them from drying out.

Decorate the sides.
- Carefully remove the film and cover the sides with the excess diplomatic cream. Smooth with the help of a spatula.
- Cover the sides with the squares of sponge cake.
- Just before serving, sprinkle the sides with powdered sugar, if desired.

Notes
- To make this cake you need a 20 cm diameter springform pan and another 23 cm diameter pan. You can use two 20 cm molds if you wish. One of the cakes is used to assemble the cake (in my case the smaller one) and the other to decorate the outside of the cake (in my case the larger one).
- The amount of ingredients that I leave you to make the sponge cake is to make two units. In case you want to make it in two batches, divide the amount of ingredients for the cake in half.
- The cake is extremely tender. So much so that if you want to cut it the same day you bake it, you must have a good lyre or a very good hand with a serrated knife. The sponge cake is so tender that it shrinks when you push it with the lyre, for that reason the rest favors that this step is carried out more easily.
- This cake should be colored with a little yellow coloring to achieve that tone that reminds us of the mimosa flower. If you do not want to use artificial coloring, you can use a little turmeric instead.
- You can flavor the syrup with a liqueur if you wish, for example Gran Marnier. In my case I preferred to use freshly squeezed lemon juice.
- When whipping the cream, remember that it must be very cold to whip well. Also be careful when whipping it so as not to over whip it and cut it. Whenever you do not use it, keep it refrigerated so that it does not lose its firmness.
- You must be patient when carrying out the pastry cream, it takes a little time to take density. Do not feel the need to increase the heat to speed up this process, you run the risk of the cream sticking to the bottom and burning. Bringing bad taste.
- When integrating the whipping cream into the pastry cream to make diplomatic cream or Madame cream, do it with smooth, enveloping movements. This will prevent the cream from liquefying excessively, which can result in a more fluid cream.
- In this case, when piping the diplomatic cream, I recommend that you do not press the sponge cakes to set. The cream acquires a firmer consistency after several hours in the refrigerator. If you press at this step, the cream will overflow.
- The cake should rest overnight in the refrigerator once it has been assembled with the filling and icing. This will allow the icing to dry and the filling to firm up. It will also ripen and will be much better.
- For the rest of the cake, in the previous step, you must cover the sides with film to prevent the cake from drying out with the cold, especially the sponge cakes.
- To carry out the decoration I used royal icing colored in yellow and green. To create the mimosa flowers, allow a few minutes for it to dry so you can pour more of it and achieve an appearance of volume.
- When you are decorating the cake with the royal icing, to prevent the icing from drying on the tip of the nozzle, insert a toothpick. This will prevent it from drying out and you will not have to clean it before decorating with it again.
- Once the cake is assembled, to keep it refrigerated, I advise you to cover it with plastic wrap to prevent the cake squares from drying out. If the glaze has dried completely, you can cover the whole cake without any problem.
- Once all the decorations have been carried out, it will keep in perfect condition for 3-4 days, refrigerated.


You are going to love this Mimosa Cake, a wonderful Italian pastry as it could not be otherwise. Not only is it simple and elegant, but it is also a cake with a combination of textures and flavors very pleasant to enjoy.
If you do not want to complicate it too much, you can omit the decoration with icing and decorate the entire surface with diplomatic cream and pieces of sponge cake. Normally, at the top, a cream dome is created to achieve a domed appearance. It is then covered with pieces of sponge cake.
If you do it this way, you will have to prepare a little more diplomatic cream.
By the way, I remind you that you can watch all my videos on my YouTube channel. If you subscribe and turn on the little bell, I will be eternally grateful!
I wish you a wonderful Sunday afternoon!
Lots of love,
Eva
Sources: Wiki,La Mimosa di Adelmo