How to make easy bread
I’ve been working all week on an easy bread recipe to help you through these difficult times. We must avoid going out to the streets as much as possible, for that reason I have made this post on How to make easy bread. The fact of buying bread is one of the most motivating things for us to go out to the street, but with today’s recipe, we will be able to reduce it a lot and limit it only to essential moments.
To make these loaves we won’t need special flours, nor ingredients that are difficult to find. In fact we can use those flours that we have at home and adapt the recipe according to our needs. Rather, to the needs of the flour we use where we will have to pay special attention to the final hydration of the dough. Which is what will vary.
I want to make a little note, they are not baguettes, let’s not get confused because it is not the same.

In my case I have used a flour bought in the supermarket, but you can use any flour from the supermarket. A flour with strength W=200 or plain flour with strength W=170-180, for example. If the strength of the flour is not detailed, we should know that plain flour has a protein amount of 10-11% and a bread flour has a protein amount that can vary between 12-14%.
I leave you a small table where you can see the amount of protein in each flour and the “optimal” use for it:
- 8-9% -> pastry/cake flour, ideal for making cookies or pastries such as sponge cakes, for example
- 10-11% -> plain flour, ideal for breads, ciabattas…
- 12-14% -> bread flour, ideal for all those doughs that have butter, milk, eggs… I mean, enriched doughs.
When we are going to elaborate a recipe for bread, or doughs in general, in the ingredients we can find the term “strength” indicated as W in many cases. But what does it mean that a flour has strength?
A strong flour is a flour with a high protein content, this does not mean that all the flours with a high protein index are strength flours. The strength of a flour is given by the union of 3 characteristics:
- Extensibility
- Elasticity
- Tenacity
What is each of these characteristics and what values do they bring to our dough?
- EXTENSIBILITY: It is the capacity of the dough to be stretched. If a dough has good extensibility it will not cost us any work to stretch it. This characteristic will allow us to form pieces easily.
- ELASTICITY: The capacity of the dough to return to its initial state after being stretched.
- TENACITY: The ability of a dough to resist the stretching process. This characteristic influences the capacity to lengthen a dough to be formed.
What happens if I have a flour with a strength greater than W=200 and I want to work with the specified strength?
In this case we can combine two types of flour, one with a strength of W=300, for example, and a plain flour of W=170, for example, to achieve a strength equal to or similar to that detailed in the recipe.

How can we achieve that?
With a formula that helps us to calculate the amount of flour to be mixed in relation to the strength of each one and the final strength we want to achieve. I found this formula on the website of Panarras.com, which unfortunately is no longer operational.
Using 2 types of flour we can create our own medium strength flour. If, for example, we have at home a weak flour of W=80 and a strong flour of W=300, I can get a medium-strength flour of W=200.
To do this we would need to follow the formula below:
- Percentage of strong flour: 100 x (W – Wf) / (WF – Wf)
- Percentage of weak flour: 100 x (WF – W) / (WF – Wf)
Where:
- W= the strength that we want to achieve
- WF= bread flour used
- Wf= weak flour used
We see it with an example applying the previous data:
- Strength flour I’m going to need: 100 x (200-80) / (300-80)= 54,5%
- Weak flour that I’m going to need: 100 x (300-200) / (300-80)= 45,5%
If the recipe we are going to make uses a total of 500 g of flour W=200, we should calculate 54.5% of 250 g to know how much flour strength we need and 45.5% of 250 g to know how much weak flour we need. We would calculate both quantities, put them together and we would have our strong flour of W=200.
And, if I don’t have flours to calculate the strength that is detailed?
In that case we can use the flour we have at home. For example, common wheat flour with a protein percentage between 10-11%.
In this case what we will have to take into account is the final dough’s hydration, because it will vary. As it has less strength, it will admit less water for the consistency we need to achieve to make these loaves. So here’s what we’re going to do.
- The amount of ingredients to make poolish, whatever flour we use, is the same. We will follow the same quantities as detailed in the recipe.
- With respect to the final dough, what will vary is the amount of water.
I remind you that a dough is always rectified with water, never in life with flour. Why? Because the baker’s percentage is based on the total amount of flour in a recipe. That means that the rest of the ingredients are in proportion to the percentage detailed in the recipe based on the final amount of flour. If we add more flour to prevent the dough from being too moist, we are destroying the final formula. Why? Because the salt will no longer be in proportion, nor will the yeast… That’s why it’s important not to rectify with flour. NEVER. It’s one thing to dust the table with flour to handle the dough and quite another to add 50 g more flour because the dough was too sticky.
- When you are about to do the autolysis to make the dough, if the flour you have at home is not strong enough, add less water than specified in the recipe. For example, instead of adding the 265 g of water that we are going to use, add 215-220 g. If the dough is very dense, after doing the autolysis, then we can rectify it with water. There will always be time to add more, but we will never be able to remove it.
- Did you say to observe for consistency after doing the autolysis? Yes, that’s it. The reason is that the flour takes a long time to hydrate and that means that the final consistency will not be the same when you cover the dough to make the rest as when you come back to work with it.
- Once you are ready to add the poolish, yeast and salt, you can see what the consistency is and whether or not you need to add more water. Do not worry if you do not achieve the same hydration as in the video. It can be slightly higher, slightly lower, but the result will be good. You will never make two equal breads and each one you make will allow you to learn a little more about them.
By the way, what is a poolish?
It is one of the first commercial yeast preferments invented at the end of the 19th century. It originated in Poland and therefore its name refers to Polish bakers.
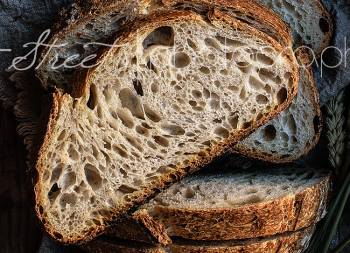
The use of poolish makes the breads lighter in texture and less acidic in taste, much softer than those made from sourdough. It is a preferred hydrated ingredient between 100% and 125%. This already lets us know that it will be very liquid and very sticky in consistency.
To make it we only need flour, water, a small proportion of yeast (it will always depend on the time of fermentation that we are going to use and the temperature) and no salt. We must let it ferment between 4 and 14 hours at room temperature. It tends to weaken the gluten resulting in a soft crumb.
The amounts of yeast will be based on % of the weight of the flour in the poolish:
- For a fermentation of 3 hours, 0.5% of dry yeast is recommended
- 6 hours 0.23% of dry yeast
- 8 hours 0.17%
- 12 hours between 0,03 and 0,05 % (the most recommended since it favours the improvement of the taste and aromas)
If we use fresh yeast we only have to multiply by 3 the previous result
The perfect point for our poolish will be when it looks flat on the surface and very bubbly, at which time it will have matured. While it is fermenting, you can see that the surface is domed or vaulted. At this point it will not be fully matured yet.
This preferement gives extensibility to the dough so it is perfect if we want to get a dough easy to stretch and shape, with alveoli inside.

The amount of yeast in the recipe is very small and my scale only weighs 1 gram…
It’s all right.
If we use dry yeast, we weigh one gram and divide that amount into 5 equal parts (or more or less) and keep one of them. If using fresh yeast, weigh 1 gram, divide into two equal parts and add a pinch of the other to one of them. Solved 🙂
Process of elaboration, easy bread .
In the video I show you how to do the whole process by hand since not everybody has a dough mixer, but that does not mean that you cannot make bread. In fact, in my online bread workshop I teach my students how to work like this. The reason is very simple, it is very important to know the texture, consistency and evolution of a dough in your hands. Only this way you will know well how it behaves and how it changes, in order to understand it.
Once you know how to “listen” to it, you can use the KitchenAid as much as you want. It’s a great assistant, of course. But it’s super important to understand the doughs and that can only be done by touch.
If you use a stand mixer or kneader, follow the same process that I detail only by kneading in it. Always at speed 1, and also at rest so as not to overheat the dough by friction.
I recommend you to be very careful with the dough whenever you handle it. Both in the division of the pieces and in the pre-shaping and shaping. I prefer you to be careful and take a little longer than to go at full speed and spoil it.
Pre-shaping and shaping of the loaves.
Normally, when we preshape a dough, we usually make a round piece. In this case it doesn’t make much sense because our purpose is to achieve an elongated piece. For that reason the pre-shaping is very different from what we usually do or are used to do. In my case I followed the process that Jérémy Ballester does to pre-shape and shape baguettes. You can see it both in his Instagram profile and in my video.
This step is delicate, but not impossible. By this I mean that we don’t have to shape a churro as if we were working with plasticine. By kneading the dough to infinity, we can damage the crumb. Besides, it is never good to manipulate an already fermented dough to excess.
To rise the loaves I have used a linen, which many of you may not have. But that’s okay too. You can use a large cotton cloth or even a tablecloth. It will do the same function. Remember to sprinkle lightly with flour so that the dough doesn’t stick during the final proof.

After all this process, we arrive at the moment of shaping and baking the pieces.
We must have zero terror here. What’s the worst that can happen? That they don’t look perfect? Well, they may not be very pretty, but they will be very good and will allow you to learn for the next ones you make.
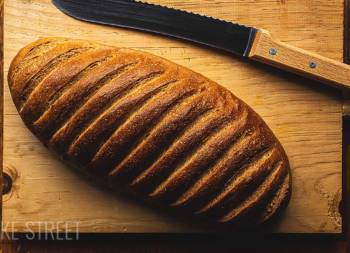
Scoring is one of the most frightening things you can do, but it is nothing more than cutting the surface of the bread. It is much worse for a surgeon 😉
It is important that you make clean, straight cuts that are not bent and slightly deep. By this I mean that they should not be superficial because the oven-spring will not appear. But neither should we make a cut that reaches the middle of the loaf. About 0.5 cm will be enough.
Finish the baking process, this must be done with steam during the first minutes, then without it and finally we will finish with convection to achieve a crispy and well-browned crust 😀
What if I want to have the bread baked in the middle of the day?
In that case you will have to prepare the poolish first thing in the morning, prepare the dough and get to the point where we make bulk fermentation. Once it is inside the container, leave it overnight in the fridge (retard in cold).
The next morning, temper the dough for about 1 and 1/2 hours or 2 hours before working with it. A cold dough is difficult to shape and we will not carry out a properly final proof. And, after all this, continue with the rest of the process as detailed in the recipe.
| INGREDIENTS | % PANADERO | POOLISH | REST | TOTAL |
|---|---|---|---|---|
| Wheat flour | 100% | 180 g | 490 | 670 g |
| Water | 66,4% | 180 g | 265 g | 445 g |
| Yeast | 0,3% | 0,2 g | 1,8 g | 2 g |
| Salt | 1,94% | 13 g | 13 g |
Recipe easy bread
Ingredients for 3 pieces
FOR POOLISH:
- 180 g strong flour W=200, bread flour
- 180 g water
- 0,2 g dry yeast ó 0,6 g fresh yeast
FOR THE DOUGH:
- 490 g de strong flour W=200 or 245 g bread flour + 245 g plain flour
- 265 g water
- all poolish
- 1,8 g dry yeast ó 5,4 g fresh yeast
- 13 g salt
Instructions
FIRST DAY, THE NIGHT BEFORE (21:30 pm)
Make poolish.
- In a bowl add the flour together with the water and yeast. If we use fresh yeast, we will crumble it very well.
- Mix with the help of a spoon until there are no traces of flour left.
- Cover the bowl with film or a disposable shower cap (this is what I use and we can use it several times) and leave it at room temperature until the next morning. In my kitchen there was a temperature of 68º-70ºF/20º-21ºC, this will determine the time it takes for the poolish to ferment. The hotter it is, the faster it will take.
- In very hot weather, we can leave it in the fridge overnight.
SECOND DAY, THE NEXT MORNING (8:00 am)
Make autolysis.
- In a large bowl, mix the flour with the water, then mix with your hands until you get a homogeneous dough. It will be rather dry, but be patient, we must let the protein hydrate.
- Cover with film or shower cap and make an autolysis for 60 minutes.
Make the dough for the bread loaves (9:00 am).
- After this time we add all the poolish to the dough along with the yeast. Mix the dough, at the beginning we will do it with the help of a scraper to facilitate that the poolish (of very liquid consistency) is integrated with the dough (of drier consistency).
- Add the salt and continue mixing to integrate all the ingredients.
- Once we have the dough, more or less amalgamated, transfer to a clean work surface, without any flour, and start kneading. We will do a hard kneading, the one I show you in the video, since its hydration will not allow us to do the French kneading.
- We will combine kneading with resting time, this way the dough will develop the gluten without having to work it too much. Knead for 2-3 minutes and leave to rest for 5-6 minutes.
- Alternate short, gentle kneading with rest until our dough passes the membrane test. The surface should be smooth and soft. In total we will knead for about 15-20 minutes, not counting the resting times.
Make bulk fermentation (10:00 am).
- Prepare a large airtight container or bowl, grease with oil, put the dough inside and cover.
- Make a bulk fermentation of 3 hours and 45 minutes at room temperature (in my house it was 70ºF/21 ºC)
- Let it rest until it doubles its initial volume.
Pre-shape and shape of bread (13:45 pm y 14:15 pm).
- Dump the dough on a slightly floured surface. Divide the dough into 3 pieces of 360-365 g each. Remember that if we get leftovers of dough, it will happen because cutting the piece with the exact weight is a feat, we will place them in the center of the piece. That way, when you pre-shape, they will be inside the dough.
- Pre-shape as I show you in the video to try to obtain an elongated shape. Fold one end towards the centre, turn the piece and fold the other end in the same way. We will try not to degas too much, let it rest for 20 minutes covering the pieces with transparent film.
- Shape the loaves the way I show you in the video. Place the piece on a slightly floured surface. Begin to roll the piece on itself trying to exert tension, but without exceeding it so as not to damage what we have achieved during bulk fermentation.
- Place both hands on the loave and slide one of them to the side at the same time. With this process we manage to obtain the same thickness in all the bread, besides giving length. Be careful not to get too excited and overdo it! They may not fit in the oven.
- Finish the ends of the loaves, if we wish, creating peaks.
- Place the loaf on a lightly floured linen (otherwise we can use cloths or a cotton tablecloth) and create a fold with the linen on the side to contain the bread.
- Repeat the same process with the other two pieces.
- Once the 3 breads are shaped, cover them with the linen itself or a cloth and make the final fermentation. In my case it was 1 hour and 30 minutes at 70ºF/21ºC. The breads will increase in size, but without doubling their volume.
Bake the loaves (15:45 pm).
- Preheat the oven to 428ºF/220ºC. Place the tray, stone or steel plate in the lowest part of the oven and a container/tray with volcanic stones that we will place inside since we turn on the oven, this way they will also take temperature. We can place them in the first position or just on one side of it, leaving space for the bread. The ideal is to preheat for 20-25 minutes before. In case you use stone, I recommend you to preheat for a longer period of time since it takes longer to reach the temperature.
- Five minutes before placing the breads in the oven, heat water (just over half a cup), we can do it in the microwave.
- Transfer the loaves, with the help of a table wood or pizza table to a board lined with baking paper. If you don't have table wood, you can do it with your hands, but you must be careful not to degas the bread. And place the board next to it so that you can handle the bread as little as possible.
- Sprinkle some flour on the surface of the breads and massage gently to prevent sticking. Besides, a massage is always appreciated, right?
- Score the breads. I know that this step is one of the most difficult for you, but do not worry. Everything will be fine.
- With the help of a blade we make 4-5 cuts (depending on the length of the loaf) in the central part of the bread. The cuts should be straight, not inclined, and the blade should be slightly inclined when we do it.
- We must make clean and safe cuts. The depth should be approximately 0.5 cm, by this I do not mean much less that we have to measure it, but I tell you so that they are not superficial and we do not get a small oven-spring.
- Place the breads in the oven helping us with the board (sliding them over the steel plate) and pour the boiling water over the tray with stones, close the door. We must try to do it as soon as possible so as not to lose the inside temperature of the oven.
- In my case I baked first two breads and then the third one. The reason for doing it this way is that I made them longer sod they didn't fit. In fact, I had to place them diagonally so that they could rest on the surface of the plate. I left the third bread in the coldest part of the house and it held up well until it went into the oven.
- Bake for 10 minutes at 428ºF/220ºC with steam. In the NOTES section I will tell you a note about how I bake to avoid the bread getting sealed due to the heat. Sealing makes the crumb not come out correctly and the crumb is dense because the bread does not expand correctly.
- Remove the stones and bake for 10 more minutes at 428ºF/220ºC.
- Finish the baking with convection for 5 minutes at 375ºF/190ºC. In this way, the crust will remain crisp.
- Remove and leave to cool on a rack. If you can ;)
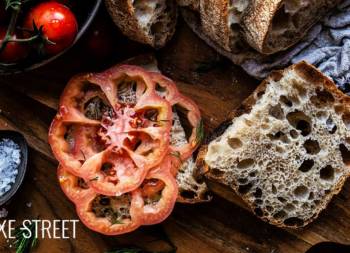
- These loaves are ideal for eating on the same day.


Notes for perfect bread
- To make the loaves I decided to make a poolish. The reason for this is that we will be able to add flavour and aroma to our bread as we will not be using sourdough.
- Can it be done without preferment? Yes, it can, but keep in mind that the result will be a bread with less flavor. In that case, we must add to the final dough the amount of water, flour and yeast that we omit from the preferment. And proceed with the process from the moment we prepare the bread dough.
- These bread loaves are made with a flour I bought at the supermarket. It has a strength of W=200. If you don't find this flour, it's OK, you can use another flour of strength that you have at your disposal. Bread flour or plain flour.
- If you don't have a strong flour, that's okay, we can use a plain flour or a flour with 10-11% protein, for example. In this case, we must reduce a little the final hydration of the dough that not of the poolish. The latter remains the same. Instead of adding 265 g of water, we can add 235-240 g. Make autolysis, add the rest of the ingredients, knead... And observe the consistency. If it is drier than the one shown in the video, add a little more water. Remember that doughs are ALWAYS corrected with water, NEVER with flour.
- You can use fresh yeast or dry yeast, the result will be good in both cases. But keep in mind the proportion to be used in relation to the yeast you use. And remember that for every gram of dry yeast you use 3 grams of fresh yeast.
- Don't omit autolysis. This step helps us to hydrate the flour and makes the kneading process much easier. It also helps us to obtain a bread with more volume.
- It is important that you knead well to get a good result. If you get tired or the process becomes tiresome, remember that we can make a rest. Resting time continues to hydrate the protein and therefore continues to "knead" or facilitate the process of kneading with the consequent development of gluten.
- Respect the raising times and DO NOT force them with crazy temperatures. Otherwise we will get a bad tasting bread.
- When we divide, pre-shape and shape the bread, we must manipulate the dough just enough to avoid damaging everything we have achieved up to this point.
- To shape the loaves we must exert tension, but without pressing hard.
- The cuts must be made just before we put the bread in the oven. Don't make them before time and then think - Oh, I haven't preheated the oven - or - Holly Molly, I haven't heated the water to generate steam... - And do them for sure, you'll do them very well! :D
- If you don't have volcanic stones (something that can be very feasible if you don't make bread at home on a regular basis), we can generate steam by placing a tray on top (without it sticking to the resistance, the second position starting at the top). Preheat the oven with the tray inside so that it takes temperature and when we introduce the bread, pour the boiling water over it. This will help us generate steam. Another option is to place it on the base, but this is not allowed in all ovens. In that case, check your manual just in case.
- I told you during the preparation that I was going to give you a note on how I bake. My oven generates a very powerful heat and that made my breads sealed at the top. But since I need to give a heat stroke at the base, what I do is the following. I preheat the oven as detailed, when I put the bread I place a cold tray on top and pour the boiling water over the volcanic stones next to the bread. This cold tray takes away the direct heat for the first 10 minutes, a step that helps the loaves not to seal and expand. After these 10 minutes, I remove that upper tray, the stones and proceed with the rest of the baking. In the case of the sourdough breads, I do the same, but I also turn off the upper heat because it is a baking longer.
- This bread keeps in perfect condition the same day we bake it. The next day you can eat it, but it will not be crispy and the texture will not be the same. If it is too much bread, it can be frozen in the same way we freeze other breads.

I hope you find this post on How to make easy bread useful and, of course, I'm looking forward to seeing yours! From now on, if you are well organized, you will be able to eat homemade bread every day.
One thing you're also telling me is that now it's not easy to find yeast in the shops... Maybe it's a good time to make your own sourdough and be able to make your first sourdough bread.
Come on and bake some bread at home! :D
By the way, my online workshop on homemade bread for beginners will start soon. If you are interested in learning more about initiation into this world, I invite you to take a look at it and sign up if you want!
I wish you a good weekend!
Big hugs,
Eva