Dorothy Gingerbread House – The Wizard of Oz
Do you believe me if I tell you that one of the days I look forward to the most every year is Halloween? I am fully aware that it is not our holiday, that it is very American and that we have other holidays, traditions or ways of celebrating it. I understand and respect that, but I love to celebrate, dress up and decorate the house (not to mention I love horror movies), so the Halloween pageant really appeals to me. I love it.
I know this year’s costume is along the same lines as last year. I mean, there’s nothing scary about it, is there? There’s a witch and there’s a road that leads to a place with a wizard? I think this time it could work for us, hahaha. For this year I wanted to make the Dorothy Gingerbread House – The Wizard of Oz. To tell you the truth, I have hundreds of ideas in my head (I had doubt between 3 options) and, finally, I decided to choose this one. But it was not easy.
Every year I enjoy more and more thinking and planning what costume I am going to wear and what recipe I am going to accompany it with. Last year I chose Fauna along with the cake she made for Sleeping Beauty, I really enjoyed making the cake, the video and the pictures! But this year I dare say I enjoyed it even more. Of course, this is the cake/ cookie building (to date) that has taken me the longest time to make. The whole process of baking, assembly and decoration has taken me two weeks, plus the time of planning, design and creation of the cutters.
Yes! I don’t know if I told you that my “half lemon” bought two 3D printers, well, I’m always asking him for things to print for me, hahaha. Something that I liked, a lot, is that he can design me cutters and molds, that for me is wonderful because it opens up a huge world. But that doesn’t mean it can’t be done without them, many people make stencils with card stock for gingerbread houses and they work great too.

If you’ve been following me for a long time, you know that I never miss an opportunity to dress up whenever I can, hahaha. Here is my version of Dorothy and Toto.
The Wizard of Oz.
When I was a child I loved the movie The Wizard of Oz, I thought it was magical and interesting for the simple fact that each of the characters need to find something that was already hidden inside them. The message it conveyed was very valuable because it made us see that everything we desire or long to be, we have it inside. We just have to trust ourselves and bring it out. That’s the real magic.
Of all the characters, I adored Lion. He seemed so relatable, funny, loving…. He was my favorite without a doubt!
The Wizard of Oz movie was considered by the American Film Institute in 2008 to be the #1 fantasy film in history, a legend. But no wonder considering the amazing and wonderful actress who starred in it, Judy Garland. Incredible woman.
No one better than her to bring Dorothy to life and wear the coveted “Ruby Slippers“. Not to mention that she made us all fall in love with the incredible song “Somewhere Over the Rainbow“. It seems incredible that more than 80 years have passed since its premiere, in 1939 this work of magic, illusion, dreams and fantasy where everything was possible.

An underrated piece of work for its time.
“Snow White and the Seven Dwarfs” hit theaters in 1937 and became the most successful movie of all time in just a few months. Disney planned to continue adapting L. Frank Baum’s stories due to its great success, but MGM beat them to it and acquired all the rights to what would end up being the movie we all know “The Wizard of Oz” for $75,000, an exorbitant amount for the time.
Metro and Luis B. Mayer made every effort to surpass the success of Disney’s Snow White. The film began shooting on October 13, 1938, with a budget of 2.777 million (approximately 48 million with 2016 inflation), and finished on March 16, 1939, having cost 3 million (51.8 million with 2016 inflation).
Despite the excitement, effort and bad consequences/facts that unfolded during the filming, the movie was not the success it was expected to be at the box office. In fact, it was a resounding flop in the United States. After passing its disinterested domestic release by audiences, the film scored a notorious success in England, Mexico, Brazil, Australia and the Scandinavian countries. They saw something that Americans were unable to appreciate.
Success came little by little and over the years ‘The Wizard of Oz’ became the most legendary live-action fantasy film in cinema. In fact, several studies point to the fact that, with its numerous television runs, re-releases and sales in VHS, DVD, Blu-ray and 4k quality, winning over children from a multitude of generations, ‘The Wizard of Oz’ is the most watched film in history.
Judy Garland was not the preferred choice to star as Dorothy.
It seems that MGM had Shirley Temple in mind for this role, after a negotiation that could not be, it seems that the actress who had her career more consolidated with the studio, our Judy Garland, won the role.
The shooting was very hard for her, something embarrassing, not to mention how hard it was for her to endure all the abuse from the studio, the bad treatment received, the few hours of sleep and the fact that she had to hide her body behind a corset to look like a girl. She also combined filming with her studies.
In spite of everything they might think of her, Judy Garland will go down in posterity as Dorothy for all of us. In addition, it seems that on the day of the actress’ death there was a tornado in Kansas…

Curious facts.
The first color film in history was “Snow White and the Seven Dwarfs”, the use of Technicolor was still considered something strange and even associated with the fantasy genre. In fact, at that time, black and white was usually used for more realistic stories and color for the fantasy world.
So much so that in the feature film of “The Wizard of Oz”, black and white is used to represent Kansas (reality) and Oz (the fantasy world) is carried out in color.
The song “Somewhere over the rainbow” competes with “Singing in the rain” for being the most iconic song in film history. The studio nearly cut this scene from the film because they felt the Kansas part was too long, and also believed that Judy Garland singing on a farm would degrade her status.
The famous “Ruby Slippers” with which Dorothy manages to return home, originally in the books were silver. A very wise decision on the part of MGM, so much so that it is the most mythical footwear in the history of cinema. They even stole them.
If you like this movie, you’ve probably read all about it, like the famous scene when Dorothy, the Scarecrow and the Tin Man head to Oz. Even everything that happened to Margaret Hamilton, the actress who plays the Wicked Witch of the West.
The tale had a hidden message.
One thing that really struck me is the hidden undercurrent of the film in which the politics and society of America of the time is depicted.
Dorothy represents the traditional American, the brainless scarecrow represents the peasants and farmers, the heartless tin man represents industry, the cowardly lion represents politicians and finally the wizard represents technology. All the characters must follow the yellow brick road that represents gold and capital.
A very interesting read that, underneath the unveiling makes it less magical.
Carrying out Dorothy’s Gingerbread house in Kansas… or rather, in the fantasy world.
When I thought of making the house, at first, I thought of making it as a cake. When I started to design it, I realized that I was limited in many aspects. Also, I needed time to make it and it could get damaged.
Thinking about traditional gingerbread houses, I saw that this was a fabulous option. It allowed me to model, design and create, not to mention that I could spend as much time as I needed on the workbench. So, in the end, I chose this option.
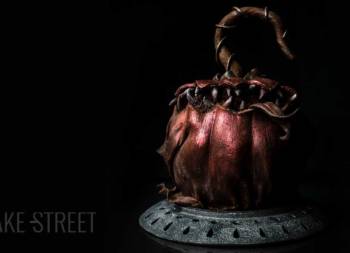
The scene I wanted to depict is the moment when the house has just blown away after the tornado in Kansas and arrives in Oz. Falling next to the famous yellow brick road.
But, as we are celebrating Halloween, I decided to give it a slightly spookier finish, trying to keep the original aesthetics of the house.
To shape the house, my “half lemon”, made me cutters with the 3D printer. The truth is that they helped me a lot!!!, and made the work a lot easier.
I made everything with gingerbread dough cookie and royal icing, except for the legs of the Wicked Witch of the West, which are made with plastic chocolate. Even the details to paint, is very diluted icing with coloring. For the ruby slippers I used edible red glitter.
The only thing that can not be eaten, is the “green moss” that surrounds the tile path.
Recipe Dorothy Gingerbread House - The Wizard of Oz
FOR THE GINGERBREAD COOKIE:
I made this recipe 3 times
- 280 g AP flour
- 220 g pastry/cake flour
- 115 g white sugar
- 115 g dark muscovado sugar
- 85 g honey
- 2 large eggs
- 115 g unsalted butter at room temperature
- 1 tablespoon cinnamon powder
- 1 tablespoon powdered ginger
- 1 powdered clove
- pinch of salt
FOR ROYAL ICING:
I made this recipe 3 times
- 312 g Royal Icing mix
- 41 g water
- water to adjust to desired consistency
- edible coloring in paste; red extra Red, yellow, black
DECORATING:
- Extra White powder food coloring
- red edible glitter
- rice paper to make the curtains (you can see how to make them in this post)
- a piece of gelatin sheet to simulate the door glass
- orange and green metallic powder food coloring for the pumpkins
MATERIAL WE WILL NEED:
- kneader or stand mixer
- perforated trays, preferably two
- silpat and teflon
- silicone spatula
- pastry spatula
- cooling racks
- adjustable rolling pin
- cutters for the house (in my case my partner made them for me with the 3D printer, I leave you the measurements to do it in template)
- square cutters for the windows
- knife
- 2 Wilton or 2 JEM piping nozzles + adapters (for convenience) + piping bags
- pastry brush + brushes
- edible marker
- plastic film
- individual led lights
- model moss for decoration
CUTTER SIZES:
- Large house wall cutter: height 20,5 cm x 10 cm base x 11 cm side wall
- Roof: 15 cm wide x 14 cm high
- Wall: 14 cm base x 11 cm height
- Small house wall cutter: height 14,5 cm x 7 cm base x 8 cm side wall
- Roof: 12 cm high x 6 cm wide
- Wall: 6 cm width x 8 cm height
Instructions
Prepare the gingerbread cookie dough.
- In a saucepan add the honey together with the two types of sugar.
- Place over medium low heat and, stirring from time to time, let the ingredients melt and integrate completely.
- Remove from heat and set aside.
- In the bowl of the KitchenAid add the butter, with the help of the flat beater, start beating on speed 1. Add the molasses that we have prepared in a continuous thread. Mix on speed 1 until a homogeneous mixture is obtained.
- Add the eggs, one at a time and wait to add the second one when the first one has been integrated.
- Add the spices together with the salt and mix again.
- Begin to integrate the flour little by little. Mix until it is completely integrated and add more flour. We will make this step until we add the totality of the flour.
- Dump the dough on a clean work surface and knead a little with your hands.
- Flatten slightly and wrap with plastic wrap or place in a freezer bag.
- Let it rest at room temperature for 2-3 hours.
Roll out the gingerbread cookie dough.
- Stretch the dough between two Teflon sheets. We will give it a thickness of 6 mm with the help of an adjustable rolling pin. It is possible that not all the dough will fit in the tray, so we cut a piece and stretch it separately.
- Refrigerate for 3-4 hours or until the next day.
Cut the cookies.
- With the help of the cutters or a template that we make, cut out Dorothy's house.
- Once we have cut them all, carefully lift them off the Teflon sheet to remove them. If you square the cutters well, it will not be necessary to move the pieces. If you have to do it, I advise you to do it when they are cold to prevent them from losing their shape.
- Repeat the same process with the other gingerbread dough(s).
- Below I detail the amount of dough to cut for each part and thickness. To make window frames and tiles, we will do it by hand.
- For the tiles we will need more than the size of the roof cutter.
- Refrigerate while preheating the oven.


AMOUNT OF DOUGH TO CUT
- For the big house, we need 3 pieces in the shape of a house, 2 for the side walls and two roofs (thickness 6 mm).
- For the small house, we need 1 piece in the shape of a house, 2 for the side walls and two roofs (thickness 6 mm).
- For the side house, 2 shaped pieces, 1 wall and 1 roof (thickness 6 mm)
- For the roof tiles (2 mm thick) and irregularly cut by hand.
- For the porch we will make a floor and 2 bars (thickness 2 mm)
- Window frames, thickness 2 mm (hand-cut and shaped)
- 1 door (thickness 6 mm)
- 1 cartwheel, thickness 2 mm (optional)
- 1 cookie of dimensions x cm to draw the yellow brick road (thickness 6 mm)

Bake.
- Preheat the oven to 330ºF/165ºC with heat up and down.
- Bake directly from the refrigerator. Place at medium height and bake for 15-18 minutes, making sure they do not brown too much.
- Notes: Pieces with a thickness of 2 mm will be ready in 12 minutes of baking.
- Remove and let them cool completely on a wire rack.
- Once all the cookies are baked, let them rest at room temperature for 14-16 hours in a cool, dry place, if possible.
Prepare Royal icing.
- Sift royal icing mix.
- Add with the water and mix lightly with a spatula. In this way we will avoid making a cloud of powder in the kitchen. With this first quantity we will obtain the base/solid consistency of the royal icing.
- Mix the mixture with the water in the KitchenAid (with the help of the flat beater at speed 1) for approximately 7-8 minutes. We will obtain a white and homogeneous icing.
- To decorate the cookies, depending on how we want to decorate them, we must add a little more water.

ASSEMBLING THE HOUSE OF DOROTHY, THE WIZARD OF OZ
Assembly of the roof.
- Spread a layer of royal icing thinnedwith a little water, to make it more spreadable, and begin to glue the tiles.
- When we are ready to place the second row, we will try to place them alternately.
- Let dry for 12 hours.
Assembly of the house.
- Before joining the house, we will paint all the walls of the house with Extra White powder coloring.
- To glue the sides of the walls of the house, use royal icing with very little water added.
- Tip, do not glue only the sides, reinforce the inside with icing to make sure it will not come apart.
- Let dry for 12 hours.
Place the roofs.
- Once the assembled houses have dried, we will place the roofs.
- I have used royal icing to glue them directly. Due to the inclination and the weight (immense) of the roofs together with the tiles, we will have to place a support for them at the base while they dry.
- Have a good amount of royal icing to fix the roofs.
- Let dry for 12 hours.
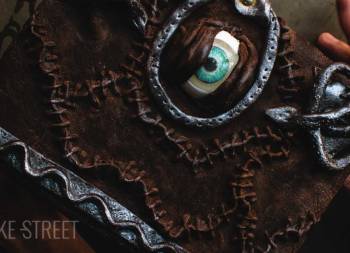
Glue the ornaments.
- With royal icing thinned with a little water, place the window frames, the door, the cartwheel and all the details.
- We will also place on top of the roofs, the union of both, a row of tiles to avoid a gap.
- If you wish, you can make small pumpkins to place around the house and the yellow brick road.
PREPARE THE YELLOW BRICK ROAD
Draw the road.
- With the help of an edible marker, draw the yellow brick road on the cookie.
- Make sure that the dimensions of this are in accordance with the size of the house.
Decorate with icing.
- Prepare gray outlining icing, put in a piping bag with outlining nozzle (2 Wilton).
- Outline the entire yellow brick road.
- The same glaze, put it in a bowl and add water to give it a flood consistency (more fluid).
- Put it back into the piping bag and fill the upper circle.
- Reserve the icing in a small airtight container.
- Prepare yellow and red icing in the same way as with the gray color, first outlining consistency and then flooding consistency.
- With the yellow icing, draw the outlines of the bricks. Then we fill these, we will do it alternately and waiting for the first bricks to dry before filling more. The reason is that if we fill them all at the same time, being very fluid, they will join and the volume of each one of them will not be appreciated.
- With the help of a toothpick, we can spread the icing to reach all the sides of the outline and avoid that it can be seen.
- Repeat the same process with the red icing and, remember, always wait for the previous one to dry before proceeding to fill in the new ones.
- Once both paths, yellow and red, are dry, create the details in gray.
- Stir the leftover gray icing very well and put it in a piping bag with a piping nozzle.
- Outline the paths with the gray outline.
- Wait a few minutes until it begins to dry and, at that time, texturize as I show you in the video.
- Let it dry completely.
Assemble the house.
- Place the large cookie with the yellowbroick road on a flat surface.
- Place the house and insert the LED lights inside.
- Cover the big cookie, except for the path, with decorative moss.
- Place all the rest of the details, the witch's legs, the pumpkins, the porch floor and the broken railings, the side hut with the roof (I didn't attach them to the house), the cartwheel, the door....
- And we enjoyed them and their views :D

Notes
- Honey and icing sugar can be replaced by molasses if you wish.
- This dough is firmer/hard after baking than other gingerbread cookies, the reason is that we need it to be so that the house remains in good condition over the days.
- It is important to let the cookies dry very well on a wire rack before painting or decorating with the icing.
- When making the royal icing, do not overbeat it. The ideal is 7-8 minutes maximum at low speed or 1 always. The reason is that we will incorporate too much air and, when the glaze dries, many air bubbles will appear giving a porous and fragile texture. In fact, when touching the glaze, it will crumble as if it were sand.
- When we give different consistencies to the glaze, either for outlining or flooding, we must add the water little by little. In my case I always do it with a bottle to avoid adding more unintentionally. Mix very well with the help of a spoon to integrate the water and then check the consistency by taking an amount and dropping it.
- All the excess icing we have left, either royal icing or colored icing, we will keep it in an airtight container covered with cling film. When we need it again, since it will have separated and there will be water, we will mix it inside the container itself with a spoon until it is homogeneous again. Place it into a piping bag and proceed to work with it again.
- The royal icing can be kept at room temperature for 15 days or up to 1 month refrigerated. As long as it is made with a royal icing preparation. If it is made with egg whites, its shelf life is much shorter.
- You can decorate it to your liking.

I have to admit that this is one of the posts, to date, that I have taken the longest to complete (more than 2 weeks). But I have enjoyed, very much, making this Dorothy Gingerbread House - The Wizard of Oz. Truth be told, if I could, I would make things like this all the time! But, at least for now, they must be occasional posts.
This post would not have been possible without my wonderful "Toto". The apple of my eye, Björn, who is nicer than all things and is super well-behaved when I ask him to pose for photos. I love him!!!
From here I wish you a wonderful Halloween or All Saints' Day. I hope you enjoy a lot and disconnect a little.
Lots of love!
Eva
Sources: Fotogramas
ACKNOWLEDGMENTS:
- Music, infinite thanks to these three composers who share some of their music royalty-free for content creators like me; Kai Engel, Sergey Cheremisinov and Meydän. On my About Me page I link you to their Spotify channels and their websites.
- Pexels, website where they share videos and free stock photography. Special thanks to Gabby, Magdaehlers, Nick Bondarev, Cottonbro and Free Videos from whom I used videos of the farm, tornado, final witch and Halloween pumpkin and Francesco Ungaro from whom I used the spooky forest photography for my background.
- Birds and tornado sounds, plus fog overlay from PremiumBeat.
- Smoke overlay from RocketStock.