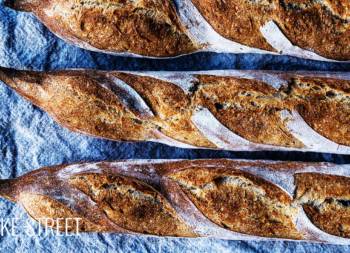
Candeal Bread Crown
We continue to expand the repertoire of breads to make at home and, on this occasion, it is the turn of Pan Candeal. I’m sure many of you are as fond of this variety of bread as I am, with a tighter, denser, but soft and spongy crumb. Coupled with a soft, but incredibly aromatic crust of bread. To make the process a bit more fun or different, I have left you a different shape and we will see how to make this dough by making a Candeal Bread Crown, Corona de Pan Candeal.
This type of bread, inevitably, always takes me back to my childhood. My grandmother always bought “roscas de pan candeal“, it was her favourite bread and she always had it at home. Besides, I remember perfectly, that it was a type of bread that was in perfect condition for several days. The fact is that whenever we visited her, she would give all her grandchildren a few ounces of chocolate (super large ones, by the way) with a piece of candeal bread. The best snack of my life forever and ever. What’s more, as I write this I can even remember the smell of her house perfectly…
That’s why I’ve always been very fond or appreciative of this variety of bread. For me it is a direct link to my maternal grandparents and there is no occasion when I eat this bread and do not remember them.

Besides, I’m going to tell you a little anecdote that has nothing to do with this bread.
But while I was writing I remembered and I feel like sharing it with you.
A few years ago, in fact I think it was when I started making bread, my mother told me that my great-grandfather had flour mills. Apparently, every week he would give away sacks of flour to those who did not have much money so that they could at least make bread at home. Well, bread or those elaborations that could be done with flour. This touched my soul. Not only for his good heart in helping others selflessly, but for knowing that this passion I feel inside, may come with me for my genes. How curious life is, because I believe that there are things that are carried within and emerge alone. They cannot be contained within.
Well, we continue 😀
Pan Candeal origin.
Candeal Bread – Pan Candeal is also known as pan sobao, pan bregao or pan amacerao, it was born in the areas of Castile and Leon, specifically in Valladolid. From 1563 the technique of white bread began to be exported to the south of Spain. Since then and until today, it is a variety of bread that has evolved and taken different forms depending on the baker who carries it out.
What is Pan Candeal?
Pan Candeal is a variety of bread very different from the bread we usually eat. It is usually and must be prepared with candeal wheat flour, which is characterized by its high protein content and by having less gluten than common wheat. This type of wheat gives rise to a flour with less strength than conventional flour and is therefore not suitable for the production of industrial bread.
It has a very particular process to carry it out. The ingredients are mixed and the dough is worked, and then the roller pin is used to carry out the refining process. This consists of stretching the dough several times, accompanied by folds, with the help of a roller pin. The number of rising carried out on this bread is only one instead of the usual two.
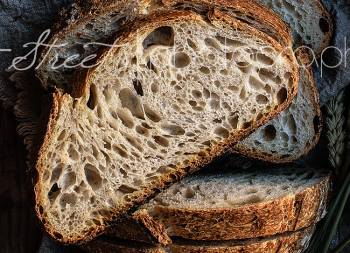
This is how the texture that so characterizes the crumb of this type of bread is achieved. So, candeal bread, is an artisan bread not compatible with the mechanization to which many breads are subjected to, which stands out, above all, for its unique texture and flavor.

What flour should be used to make the bread?
The bread was traditionally made with flour from Candeal wheat, a type of flour that has a high protein content but less gluten than the wheat currently on the market.
In my case, I didn’t have this type of flour, in fact finding flour these days is quite complicated. So what I did was to make this bread with the flour I had at home. I used the “weak” flour I had at that time, a strength W=200 (bread flour) attached to a pastry/cake flour with a strength of W=80. I remind you that in the post about how to make easy bread, I tell you how to calculate the strength of a flour.
To elaborate the Candeal bread crown, we will use a solid preferment.
In fact, we’ll be using what we commonly know as a biga.
This type of preferment was developed in Italy to enhance the development of gluten due to the low protein concentration of its flours. Originally it is a type of dry dough preferment, with a hydration that ranges between 50-60% and free of salt.
We can find recipes with a liquid biga, others more dense, others fermented at room temperature or even cold. So we can say that the term “biga” is used in Italy as a generic term for preferments that refers to a specific process in the preparation.
It is made 6-24 hours in advance and a maximum of 3 days (as the gluten would be very weak). It is the strongest preferment of all and very suitable for the production of breads with high hydration, as it strengthens the gluten mesh. Although it can also be used in low hydration breads, such as the one we are going to prepare today.
The amount of yeast used in it is usually 0.2% of the total weight of yeast in the recipe.
Characteristics of Candeal Bread.
It is a type of bread that has a tight white crumb, this is achieved thanks to the type of flour used. Another factor is the low hydration of the dough. Candeal bread is usually made with 45-50 % of final hydration compared to the 60-65 % of hydration that a traditional loaf may have or even 80 % that a chapata may have.
The low final hydration of this bread is very important to get the dough we are looking for, a tight crumb, dense and without alveoli. Traditionally, a piece of dough from a previous preparation was used for the fermentation of the candeal bread, it was well kneaded until a homogeneous mixture was obtained and it was worked by carrying out its very peculiar process.
Why is it more laborious to work this kind of dough?
Due to its low hydration. There is one thing that we must keep in mind when we make bread of these characteristics and that is that gluten develops in the presence of water. That means that the lower the hydration in a bread, the more complex it will be to develop gluten and therefore the harder our work will be.
This is also the case when the presence of hydration in a bread is very high. Gluten is more difficult to develop. So, it could be said that when we move between 60-65% of hydration in a bread, we will be in the ideal world of breads. Rosy clouds that will make us enjoy the baking process as if we were in a fairy tale. But, when we get out of that range, both up and down, we will enter a more chaotic and darker world, hahaha. In this case, we’ll have to do a lot of kneading by hand or with a roller pin. The good thing is that in the end, there is a great compensation. An amazing bread.
I know that when you’re at work, you’ll remember all the members of my family… But I also tell you that when you finish the refining process and prepare to form the crown of bread, you’ll love me a little more. And after baking them, you’ll love me a lot, hahaha.

It’s a type of bread that’s better digested.
In a study published in the journal Food Chemistry, three types of bread were analyzed; candeal, loaves and ciabatta, according to the percentage of final hydration used in the production of each of them. Candeal bread uses 45% water in relation to the final weight of flour, the loaf has 60% and the ciabatta reaches 80%.
This can also be seen in its internal structure. After baking, the crumb of the candeal bread is more compact and dense, while in the chapata it looks more open and honeycombed. In the crust, in all cases, water evaporates more quickly during baking, which reduces its presence in the final product and the maintenance of the starch structure, which is less accessible to digestive enzymes.
“The speed of starch digestibility is key, as it allows the release of energy to be more widespread”
“According to their behaviour in this degradation, there are three types of starch, fast digesting, slow digesting and resistant”.
Explains Laura Román, researcher in the area of Food Technology.
“Slow digestion is associated with a low glycemic response and with the control and prevention of diseases related to hyperglycemia, such as diabetes or vascular disease,” she adds.
The type of rapidly digestible starch was the most common in any case, both on the outside and inside of the loaves. However, slowly digested starch was significantly more present in the bread, due to the lower water content in its kneading and to its more closed structure.
| INGREDIENTS | % BAKER | BIGA | REST | TOTAL |
|---|---|---|---|---|
| Bread flour | 49,1% | 70 g | 210 g | 280 g |
| Cake flour | 50,9% | 290 g | 290 g | |
| Water | 48% | 35 g | 240 g | 275 g |
| Dry yeast | 0,47% | 0,2 g | 2,5 g | 2,7 g |
| Salt | 1,75% | 10 g | 13 g |
Recipe Candeal Bread Crown
Ingredients for 2 units of 435 g/piece each
FOR SOLID PREFERMENT:
- 70 g bread flour
- 35 g water
- 0,2 g dry yeast
FOR THE DOUGH:
- 210 g bread flour
- 290 g pastry/cake flour
- 230-250 g water
- 2,5 g dry yeast
- all preferment
- 10 g salt
Instructions
FIRST DAY, THE NIGHT BEFORE (9:30 pm)
Make solid preferment, biga.
- In a bowl add the flour together with the water and the yeast. If we use fresh yeast, we will crumble it very well.
- Mix with your hands until there are no traces of flour left. It is not necessary to knead it, but it is not necessary to leave an undefined mixture. The result should be a homogeneous ball of dough.
- Cover the bowl with film or a disposable shower cap (that's what I use and we can use it several times) and leave it at room temperature until the next morning. In my kitchen there was a temperature of 68º-70ºF/20º-21ºC and it was ready in 12 hours (its size will be a bit more than double in volume), this will determine the time it takes to ferment. The hotter it is, the faster it will take.
- In very hot periods, we can leave it for a couple of hours at room temperature and then refrigerate it overnight.
SECOND DAY, NEXT MORNING
Make the dough for Candeal bread crown (9:30 am).
- En un bol mediano vertemos el agua y añadimos el prefermento sólido troceado. Con ayuda de unas varillas, removemos hasta lograr que se disuelva. No es necesario que se disuelva por completo, pero este paso nos ayudará a integrar mucho mejor el prefermento sólido en la masa.
- Vertemos la mezcla sobre la mezcla de harina y añadimos la levadura y la sal. Mezclamos la masa, al principio podemos hacerlo con ayuda de una rasqueta para facilitar que se integren los elementos. En mi caso, hice todo el proceso de mezclado con las manos.
- Una vez que tengamos la masa, más o menos amalgamada, pasamos a una superficie de trabajo limpia, sin nada de harina, y comenzamos a amasar. Realizaremos el amasado duro, el que os muestro en el vídeo, puesto que su hidratación no nos permitirá llevar a cabo otro tipo de amasado.
- Combinaremos amasado con reposos, de este modo la masa irá desarrollando el gluten sin necesidad de trabajarla en exceso. Amasamos 2-3 minutos y dejamos reposar 2-3 minutos. La masa no tiene que estar 100% desarrollada, pero sí nos facilitará el proceso de refinado si hemos logrado obtener una buen desarrollo previamente.
Refinamos la masa (10:00 am).
- Here comes the laborious part of the process because we have to refine the dough to get a good result on our bread. I'm not going to lie to you... It's a process that takes a long time and requires strength with the arms, in my case I think I did even abs, hahaha.
- Stretch the dough with the help of a roller pin, it is not necessary to achieve a specific measure. To guide us a little, we will try to make the dough approximately 1 cm thick.
- Fold as a triptych (remember the process of stiff dough? Here we will work in the same way) and stretch the dough to fold it again. Our goal is to achieve a smooth and soft textured dough.
- In total I did this step 12 times, which will let you know that the refining process took me about 65-80 minutes. I don't remember exactly. During this process you will have to take several breaks to relax the dough. Otherwise it will be very tense and that will make the stretching/refining process very difficult.
- Important, you must cover with film the dough whenever you make a rest, otherwise the surface will dry up and it will crack when you stretch it.
- The result is worth it because the dough is incredibly pleasant to touch.
Divide and preshape the bread dough (11:15 am).
- Once we have our refined and beautiful dough, you must know that the worst is over. What comes next is pure enjoyment.
- Divide the dough into two equal pieces, they will be approximately 435 g. Remember that if you have dough leftovers, we must place them in the piece so that they always remain inside when we preshape it.
- Roll the piece up on itself, making sure there are no spaces between folds. The shape will be slightly elongated, since we need this step to facilitate the process to shape the crown later.
- Cover it with film and let it rest for 10 minutes. It is important that the dough is relaxed so that when shaping the bread, facilitate the process.
Shaping Candeal Bread Crown (11:30 am).
- Take one of the pieces, leave the other one covered with film.
- Shape it the same way we stretch our loaves. Put both hands in the center and start to slide them to the sides. Each one of them towards one side. With this process we manage to obtain the same thickness in all the bread, besides giving length.
- We will have to repeat this step several times since we must achieve a length of 23.6 inches/60 cm.
- Once we have the piece with the desired size, we will flatten the surface. We can do this with the palm of our hands (pressing hard) or with the help of a roller pin.
- Cut the ends with the help of a scraper to obtain a clean finish.
- Fold the dough over itself and press it gently.
- With the help of a metal scraper or a knife, make cuts along the entire length of the piece every 2-3 cm. The cuts should not reach the end of the fold, our intention is to create "fringes".
- Shape the piece into a crown, placing the fringes towards the outside and joining the ends. To do this we will use a little water, so that the piece stays together.
- Place on a tray lined with baking paper. Leave uncovered for 5 minutes and then cover with film.
- Repeat the same process with the other piece.
- Make a final fermentation of 2 and 1/2 hours at 68ºF/20ºC. The dough will increase its volume a little, but without doubling it. It is a type of bread that must enter the oven a little short of final fermentation.


Bake candeal bread crown (14:30 pm).
- Preheat the oven to 410ºF/210ºC . Place the tray, stone or steel sheet in the lower part of the oven. The ideal is to preheat for 20-25 minutes before. In case you use stone, I recommend you to preheat for longer since it takes longer to reach the temperature.
- This type of bread is baked without steam.
- With the help of a toothpick, decorate the top of the fringes. In my case I have done it as I show you in the video, but you can do it the way you like.
- Spray the surface slightly with water and put it in the oven. Slide the bread over the steel sheet, with the baking paper included.
- Bake for 20 minutes, you will see that it acquires a beautiful golden color.
- Remove from the oven and let it cool down completely on a rack.
- Repeat the same process with the other crown.
- This type of bread is ideal to consume in the same day, at most until the next day. This is due to the thickness that it has, it hardens faster because it does not have a large surface.


Notes for a perfect Candeal Bread Crown
- To make candeal bread I decided to make a biga. The reason for this is that we will be able to add flavour and aroma to our bread as we will not be using sourdough.
- Can it be done without preferment? Yes, it can, but keep in mind that the result will be a bread with less flavor. In that case, we must add to the final dough the amount of water, flour and yeast that we omit from the preferment. And proceed with the process from the moment we prepare the bread dough.
- These candeal bread is made with a flour I bought at the supermarket. It has a strength of W=200 and cake flour W=80. If you don't find this flour, it's OK, you can use another flour of strength that you have at your disposal. Bread flour or plain flour.
- I remind you that in this post I tell you how to calculate the strength of a flour. In my case I used it to achieve a strength of W=150. You can even use a lower force, between W=150-180. In that case, you will probably have to modify the final amount of water in the dough, reducing it to 240-250 g. But this does not affect the hydration of the preferment.
- Don't we do autolysis on this bread? No, in this variety of bread the process of autolysis is not carried out. It is a low hydration bread that we must work by hand to achieve the desired texture and refinement.
- The amount of final water will depend on the strength and absorption capacity of your flour. I advise you to add the lowest amount that I detail in the ingredients and, if necessary, add more until the whole is complete. Doughs are always rectified with water, never ever with flour.
- You can use fresh yeast or dry yeast, the result will be good in both cases. But keep in mind the proportion to be used in relation to the yeast you use. And remember that for every gram of dry yeast you use 3 grams of fresh yeast.
- It is important that you knead well to get a good result. If you get tired or the process becomes tiresome, remember that we must take a break. Rest continues to hydrate the protein and therefore continues to "knead" or facilitate the process of kneading with the consequent development of gluten.
- The refining process is hard, I won't deny you that. Do you still think it can be done with a pasta machine? Maybe it could. In my case I make it with stiff sourdough, but this bread has so much dough that you would have to divide the dough into pieces and refine them individually to be able to do it in a pasta machine. Maybe it's a bit much work, but it can be an option for anyone who wants to keep it in mind.
- To get a good result, the ideal is to make 10-12 folds to achieve a good refining of the dough. Cheer up!
- Respect the raising times and DO NOT force them with crazy temperatures. Otherwise we will get a bad tasting bread.
- This bread keeps up perfectly the same day we bake it. The next day you can eat it, but the texture will not be the same. If it is too much bread, it can be frozen in the same way we freeze other breads.

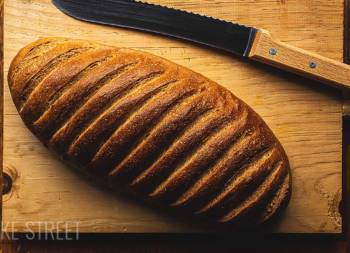
If you feel like exercising and enjoying a different variety of bread, I encourage you to try this Candeal Bread Crown at home. In my case I leave you this format, but you can also make a loaf type bread. On the blog I have this older post of candeal bread that you can use in case you want to make that format.
If you are lucky enough to have in your hands a candeal flour, great, use it. Otherwise, you know that it can be adapted to obtain a similar result. It won't be the same, but I assure you that it is very good in texture, flavor and aroma.
I can't wait for you to tell me how you've done with it and, of course, I look forward to seeing it!
I wish you a good weekend!
Big hugs,
Eva
Sources: Chapela, UvaDivulga Universidad de Valladolid