Boko Castella – Honey Custard Cake
I know it’s not usual to publish a recipe in the middle of the week, but I found this wonderful recipe of Boko Castella or Boko Kasutera, and, as you can imagine, I couldn’t resist preparing it. Not only because of its spectacular appearance, this kind of cakes drive me crazy. If not, also because it is incredibly easy, simple and fast to prepare. In just 30 minutes you will have it ready and, I promise, you will fall in love with it.
In fact, it reminds me a lot of the Japanese cotton cheesecake I left you a while ago. They may look similar at first, but they have nothing to do with it. The Boko Castella has a texture between cake and mousse, as well as being very light and delicate to the palate, with a touch of honey that captivates you just trying it… And for those who do not like the taste of eggs, tell you that it is not appreciated at all.
I followed the recipe thanks to Mandy, from Lady & Pups. I’m sure many of you already know her because she does a fantastic job.

Boko Castella Cake Origin.
The secret and success of this cake lies in its texture and the baking point of the batter.
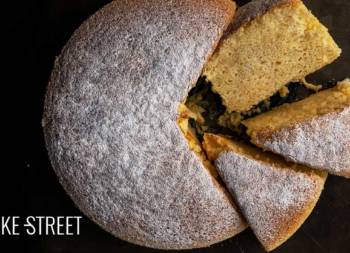
It is a cake made with eggs, honey and a little flour. The difference between the traditional Castella is the lack of final baking that leaves us a cake with a sunken centre (boko), hence its name. It is a preparation that rises a lot in the oven, but once we take it out and let it cool, we will observe how due to the lack of baking the centre collapses.
This concave Castella is inspired by a cake from the traditional Portuguese pastry Pão de Ló, which was introduced in Tanegashima during the Muromachi period. Apparently, the name was given by a popular pastry shop in Tokyo (Azabu-Juban), Hare no Hi.

What is the Castella?
Kasutera or Castella is an old-fashioned Japanese cake that makes people fall in love with it. Without exception. It is a sweet and moist sponge, simple and perfect to eat as it is.
It is said that the original Kasutera cake was brought to Kyushu, the southern island of Japan, in the 16th century by Portuguese missionaries. For hundreds of years, Kasutera has been modified and adjusted to Japanese tastes until it reached the Kasutera or Castella we know today.
To make it, it is sweetened with sugar and honey or sticky syrup such as corn syrup. Thanks to these ingredients we obtain a very moist cake. In addition, the amount of sugar and honey it contains gives the Kasutera its characteristic golden appearance on the surface.
This is my little assistant baker these days, hahaha

It is probably very difficult to overcome the taste and texture of a Castella made by expert hands that have generations behind them preparing them, but even so, we will try to create a cake with the best possible result.
I know it’s hard to contain yourself from eating it freshly made… But it’s better to wait a little. At least until it cools down! 😉
Boko Castella Recipe
Ingredients for a 6 inch/15 cm diameter pan:
- 3 egg large yolks
- 2 large eggs
- 15 g icing sugar
- 90 g honey
- 35 g cake/pastry flour
Instructions
Make the batter for Boko Castella.
- Grease with butter, line with baking paper, grease again with butter and sprinkle with flour, removing the excess, a Push-Pan of 6 inch/15 cm in diameter.
- When we line the pan, we must give more height than it has with paper, to encourage it to grow as much as possible. The result will be much better. Set aside.
- In the bowl of the KitchenAid, add the whole eggs together with the yolks and the icing sugar.
- Mix at medium speed until you get a homogeneous mixture.
- Stop.
- In a saucepan add the honey and place at medium-low heat.
- Once it starts to bubble, simmer for 2 more minutes. The mixture will become very bubbly. It is important not to have strong heat, otherwise we will burn the mixture.
- Remove from the heat.
Preheat the oven and finish preparing Castella batter.
- Preheat oven to 355ºF/180ºC.
- Pour the hot honey, in a thin and continuous thread, into the egg mixture while whisking at the same time. While adding the honey, beat at speed 2.
- Once we have integrated all the honey, we must whip the eggs until they double their size and we obtain a whitish mixture. Whisk, progressively increasing the speed without reaching the maximum, until we reach the ribbon stage* (see in NOTES).
- Add the flour, sifted, little by little as we integrate it with enveloping movements helping us with a spatula. If you prefer, we can add the flour little by little and mixing it with the whisk at speed 1. That way, it is much easier to remove any flour residue that has not been integrated into the mixture.
- Pour the mixture into the pan and place in the oven at medium height.

- Bake for 15-17 minutes. The baking time will depend on how you want to get the inside, if it is less baked will be moist or more cooked and will be firm. In my case I made two; the first with 16 minutes (a juicier inside) and the second with 17 minutes (a firmer inside). At home they liked the second one better than the first one. I liked them both...
- The central texture of the Castella, before taking it out of the oven, should be slightlywobble when we remove the pand.
- Remove from the oven, let it rest for 20 minutes inside the pan and place it on a rack.
- Unmold and enjoy :)


Notes
- I used a 15 cm diameter Push-Pan to make Castella, but you can also use an 18 cm mould to make it. It is not necessary that it is Push-Pan type, in a removable mould it will work well.
- You might think, why do you line the mold with paper and grease and sprinkle it again? The reason is that it is a very sticky cake and we must avoid, as far as possible, spoiling it in the unmoulding process. Its texture is very delicate and tender. This way, you will avoid damaging it.
- As I told you in the post, I did it out twice. I noticed that it's a cake that grows a lot during baking. In the second Castella I prepared, I decided to give more height to the baking pan with baking paper to help it grow as much as possible. The final result was much better than the first one, so I recommend you to do it this way.
- The quality of the ingredients is inevitably reflected in the final result of the cake.
- The ribbon stage is obtained by beating the eggs together with the sugar, in this case some icing sugar and honey, for several minutes. The mixture acquires a whitish colour and the texture becomes very thick to the point of lifting the whisk and being able to form a cord or ribbon over the mixture without it becoming deformed. That's why it takes this name.
- To integrate the flour in Castella we can do it with a spatula, making enveloping movements, or with a hand whisk. Either manually, as I taught you in the Japanese cheesecake, or in the KitchenAid itself at speed 1. We will mix ONLY until the flour is integrated, never ever for longer.
- If you don't like honey, you can substitute it with sugar and I can even think of a touch of vanilla or some kind of liquor that you like. But honey gives it a splendid taste, aroma and texture.
- The final baking time will depend on the inside texture you want to achieve. But keep in mind that just 1 minute can change the final result a lot.
- Before unmoulding, we must let it rest inside the pan. In my case I left it for 20 minutes, the first one I made I left it for 30 minutes and I had the feeling that the sides of the cake were "sweating" a lot.
- It can be kept refrigerated for 3-4 days. But, I don't think it'll live beyond 30 minutes... I made 2 cakes in the same day and didn't make it past mid-afternoon ;)


If you want to enjoy something sweet and take a short time to prepare it, do not hesitate to cheer up with this Boko Castella, I promise you that it will not leave you indifferent! A sweet that we will have ready in a few minutes and, I assure you, you will fall in love. For its taste, its aroma and its texture ...
In addition, we need very few ingredients to make it, something that is undoubtedly a point in its favor. It can be adapted to the pans you have at home, so don't worry if it's not exactly this one. They can even be made in a smaller, individual format.
I hope you'll be happy with it and tell me what you think!
Big hugs,
Eva
Sources: Japanese Cooking 101, Try-e