Vintage Heart Cake
I know you already imagine…. I have made the cake of my dreams! I have been able to let out all my inner kitsch (I’m telling you it’s huge), loud, gaudy, extravagant to leave you with this Vintage Heart Cake. It is nothing new for those of you who read me that I feel absolute admiration for everything retro, vintage. It fascinates me.
Here you have an example.
It is a style that mixes elegance, originality, color, expression and even charisma. Yes, because not everyone can wear, live or feel this style naturally. I love it when I see people dressed in the 20-40’s, with colorful dresses, with flying, beautiful wavy hair, red lips …. I just love it. And from there, we move on to home decorations, especially kitchens, lifestyle and…. Recipes. I just can’t get over the emotion they evoke in me.
That’s why when I prepare a post like today’s, I enjoy it like a child. From the moment I start to think about the recipe, design it, prepare it… To setting up the scenery for the video. Even going to buy all the props for the final scene for me is a party. This week I have been totally and absolutely in my element.

Decade of the Roaring Twenties.
In this time where not only changes were experienced in fashion, home styling, customs, but also in the gastronomy itself and how food began to be presented.
The 1920s were a time of significant cultural and social change, marked by economic prosperity, liberation from traditional social norms and the emergence of a more liberal and hedonistic culture.
Political and social changes, such as World War I and the subsequent Prohibition in the United States, contributed to a change in attitudes and lifestyles in the population.
One of the most outstanding is undoubtedly the fashion of the 1920’s. This was characterized by a break with the styles established to date. Short, loose-fitting dresses, pleated skirts, cloche hats, and men’s suits with shorter jackets and slim-fitting pants became popular. Styles reflected the search for freedom and modernity.
The Art Deco movement, which originated in Paris, influenced the design of the era with its geometric, sleek and modern aesthetic.
Nightclubs, speakeasies and jazz were distinctive elements of the 1920s nightlife. It promoted a fun, extravagant and carefree atmosphere.

Influence on gastronomy.
This lifestyle extended beyond fashions, home decorations, leisure and even behaviors. This lifestyle even reached the cuisine of the time.
The food of the 1920s reflected economic prosperity and the pursuit of pleasure. Extravagant and exotic dishes were appreciated and valued, as well as clandestine alcoholic beverages during Prohibition.
French and continental cuisine were especially popular among the high society.
Food presentation in the 1920s reflected the modern and elegant aesthetics of the period. Attention to detail was emphasized, with plates artistically decorated and served in a refined manner. Elegant dinnerware and glassware became popular, with Art Deco elements and geometric designs.
The presentation of dishes became more theatrical and eye-catching, reflecting the atmosphere of nightclubs and the search for unique sensory experiences. The desire for luxury and pleasure was reflected in all aspects of life during this vibrant and fascinating era.
From this time on, cooking recipes, their presentations and decorations, became ornate, extravagant, colorful and full of all kinds of details that reflected a life of luxury.
The cakes that became fashionable a few years ago, these vintage cakes, have their roots in this era.

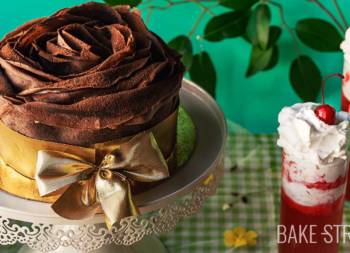
Vintage Heart Cake.
Since Valentine’s Day is just around the corner, I wanted to leave you with this marvel in case you want to fill your love’s table with joy. Certainly this can be done at any time of the year, but for me it has been the perfect excuse to make it and bring it.
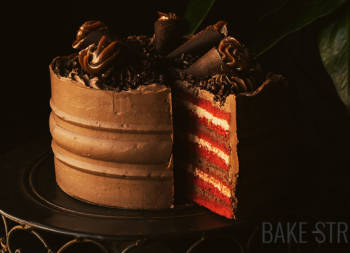
I wanted to carry out a heart-shaped cake, in which you do not need a mold of this shape to do it. I show you how to make this cake with a round mold. The colors I have chosen are shades of pink and red, a very striking combination, bright, gaudy, wow. But you can vary it if you prefer, of course.

This is the first cake I’ve made of this type, except for the “Enchanted Rose” cake from Beauty and the Beast, which has a similar decoration on the sides. But I want to practice more this kind of cakes, I like them very much (especially to carry it out). Because I must admit that the SMBC is a dense cream that is heavy to eat …. On the other hand, both the sponge cake and the curd are incredible delicious.
In short, it has been a wonderful experience that I hope and wish, if you replicate this Vintage Heart Cake, you will enjoy it as much as I did.
By the way, in this post I tell you the origin of Valentine’s Day (it is a very old post, but we all have a past), in this one when the first love letter was sent and in this one the origin of giving flowers. In case you are curious.
Recipe Vintage Heart Cake
VANILLA SPONGE CAKE:
- 300 g cake flour
- 180 g sugar
- 225 g unsalted butter at room temperature
- 225 g egg whites
- 180 g whole milk
- 14 g baking powder
- 2 tsp vanilla extact
- pinch of salt
BLUEBERRY & LICOR 43 CURD:
- 190 g blueberries + 25 g sugar
- 3 egg yolks large + 1 egg large
- 90 g unsalted butter, room temperature
- 60 g sugar
- 25 g freshly squeezed lemon juice
- 20 g Licor 43
SYRUP:
- 130 g water or 100 g water + 30 g lemon juice
- 130 g sugar
SWISS MERINGUE BUTTERCREAM (SMBC):
- 240 g egg white, room temperature
- 455 g sugar
- 600 g unsalted butter, room temperature
- powder coloring "Strawberry Pink" by Rainbow Dust
- red food coloring paste "Extra Red"
- "holly green" coloring paste
DECORATION:
- pearled sprinkles perlados, two sizes
MATERIAL WE WILL NEDD AND SHOWN IN THE VIDEO:
- KitchenAid stand mixer*
- crystal bowl KitchenAid*
- bowls
- push pan 20 cm diameter
- cake cutter
- rotating cake stand
- silicone spatula and pastry spatula
- whisk
- digital kitchen scale
- pastry brush
- cooling rack
- pastry bag
- noozle adapter (recommended)
- 150 Wilton noozle
- 6B Wilton noozle
- 199 Wilton noozle
- 67 Wilton noozle
- 352 Wilton noozle
- PME 13 noozle
- cake drum 25,5 cm diameter (30 cm recommended)
- precision tweezers*, (opcional)
*You have a 5% discount on the website Claudia&Julia using this code BAKESTREET. Delivers throughout Europe.
This post contains affiliated links.
Instructions
FIRST DAY
Make vanilla sponge cake.
- Grease a 8 inch Push-Pan, with butter. Sprinkle flour, remove the excess and set aside.
- Preheat the oven to 320º F/160ºC.
- Sift the flour together with the baking powder and salt. Set aside.
- In a bowl add the egg whites together with the vanilla and milk, whisk until the mixture is homogenized.
- In the bowl of the KA or of a stand mixer, add the butter together with the sugar. Beat with the flat beater at medium speed, until a creamy, aerated and white texture is achieved.
- Begin to integrate the dry ingredients alternating them with the liquids.
- Add 1/3 of the egg white mixture and beat at the lowest speed for a few seconds. Stop, lower the mixture from the sides and add 1/3 more of the dry ingredient mixture. Mix again at low speed for a few seconds.
- Repeat the same process with the rest of the egg whites and dry ingredients mixture. Mix at low speed only until the mixture is homogenized.
- Pour the mixture into the mould and place in the oven at medium height.
- Bake for 70-75 minutes or until you prick it with a toothpick and it comes out clean.
- Remove and let stand 5 minutes in the pan.
- Unmould and leave to cool completely on a rack.
- Once it is completely cold, wrap in plastic film and refrigerate until the next day.
Prepara blueberry & Licor 43 curd.
- Wash the blueberries very well and check if any of them are in bad condition to remove them.
- In a saucepan, add the blueberries and 25 g of sugar. Cook over medium-low heat until the fruit begins to soften and release its juices. Use a spoon to lightly mash the blueberries as they soften.
- Once they have released their juices, cook over low heat for 2 minutes.
- Remove from heat and strain through a sieve to remove the peels from the blueberries. Press well to get all the pulp and be careful not to waste any. Set aside.
- In a medium pot, add the butter and sugar and place over medium heat. Let it melt completely, remember to stir from time to time.
- Add the blueberry puree along with the lemon juice and Licor 43. Mix with a whisk to distribute evenly.
- Finally, add the egg yolks along with the egg and then mix with the whisk while cooking over medium heat. Cook, stirring constantly, until you notice that the curd begins to thicken. It will take about 10-12 minutes.
- Remove from heat and transfer to an airtight or glass container. Cover with cling film and let cool completely at room temperature.
- Once completely cooled, store in the refrigerator until ready to use. You can let it rest for 24 hours in the refrigerator before filling the cake if you wish.
SECOND DAY
Prepare syrup.
- Add all ingredients in a saucepan, cook over medium-high heat until it comes to a boil. The sugar should be completely dissolved.
- Once it comes to a boil, reduce heat to low and cook for 2-3 minutes.
- After that time, turn off the heat and let it cool completely.
- NOTE: If you wish, you can add a little lemon juice as part of the water.
Prepare Swiss Meringue Buttercream.
- In a heat-resistant bowl, add the egg whites along with the sugar.
- Place on a water-bath at medium low heat. Stirring constantly, leave until the egg whites reach 165ºF/74ºC. For it we will help ourselves of a digital thermometer.
- Remove from the heat, pour the egg whites into the bowl of the KitchenAid or a stand mixer and whip at medium high speed until a firm and shiny meringue is obtained.
- Once we have the firm meringue, begin to add the butter cut into squares little by little and at the same time the mixer continues whipping.
- Once we have all the butter added, increase the speed and finish whipping.
- Stop, scrap the cream with the help of a spatula and whip again at high speed until the ingredients are completely integrated.
- Cover with film and s aside.
- NOTE: If you decide to make the SMBC the day before, remember that before using it to decorate the cake, you must whip and whip it again so that it acquires the ideal consistency and texture.
Cut the cake in the shape of a heart.
- To create a heart-shaped cake from a round cake, you will see that it is a very simple process.
- The first thing to do is to remove the top part of the cake, which would correspond to the "domed" part. You must cut a very thin layer (just enough to remove the dome of the cake) with the help of a cake cutter.
- Then, divide the cake into 2 equal parts, do not separate them when cutting.
- Create a round template with baking paper, with the same diameter as the cake. Fold it in half.
- Place this template on the cake, adjust it very well and fold it again.
- With the help of a long knife, mark the top of the cake just along the fold of the template.
- Turn the template 90º (or create another fold perpendicular to the first one) and mark on the cake along the same part of the template. You will get two perpendicular lines on the cake.
- To form the peak of the heart, create an imaginary line from one of the vertices of the line to the next, with which it would form a 90º angle. That is, we are going to cut the cake on the side that would give rise to the hypotenuse of the triangle. Try to make the cut as straight and clean as possible. Do not discard these portions of sponge cake, you will use them later.
- NOTE: If the sponge cake is very cold, it is very likely that the cut parts, when placed with the SMBC, will break. Don't worry, it's okay, there is a solution.
Fill the cake.
- On a rotating cake stand, place a non-slip surface and, on top of it, a cake drum or similar. It is important that you mount the cake where you are going to present it.
- Pipe a small amount of SMBC and place one of the large pieces of sponge cake.
- To create the heart shape, place two of the cut pieces. It is important that they are from the same piece to avoid having different heights. That is, the right cut and the left cut that we removed.
- ttach these pieces to the large piece of sponge cake. To do this, pipe a string of SMBC and attach the piece to the large sponge cake by the rounded part. Adjust each piece trying to create a nice heart shape. In case some of the pieces break, join them with SMBC.
- Brush the surface of the cake with syrup.
- Pipe a double ribbon of SMBC around the edge of the heart-shaped cake.
- Fill the inside with the blueberry curd and Licor 43. Smooth the surface of the curd with a pastry spatula.
- Place the next cake together with the two pieces in the same way you did with the first one. Adjust well and brush the surface with the syrup.
Cover the outside of the cake with SMBC.
- Cover the outside of the cake with a layer of SMBC, it should not be too thick. Use a pastry spatula to spread the cream over the entire surface of the cake and remove the excess with an edge smoother, if desired. This layer will help you to "pick up" possible crumbs from the cake that could come to the surface when you decorate it.
- Refrigerate for 30 minutes for the SMBC to harden.
- Dye 415 g of SMBC with pink food coloring. In my case I used "Strawberry Pink" powder coloring, I did not measure the quantity. I was observing the color as I whipped the cream (in the KitchenAid and with the whisk) with the coloring.
- Cover the outside of the cake with the light pink SMBC. Make sure the surface and sides are as smooth and straight as possible. You will have some SMBC left over, but you will use it for the side decorations.
- Refrigerate for 30 minutes.
Decorate the cake
- Place the leftover light pink SMBC in a piping bag with a 150 Wilton nozzle.
- Create a pattern on the sides of the cake, creating waves, so that it will be easier to decorate it when piping.
- Decorate as I show you in the video, creating two double "sheers".
- Dye a quantity of SMBC with "Extra Red" red food coloring. Put in a piping bag with a nozzle adapter. You will use this color with different nozzles.
- Use Wilton 67 nozzle for the red decoration on the double "sheers".
- Dye 160 g of SMBC with more "Strawberry Pink" powder coloring for a more intense shade.
- Pipe into a piping bag with a 6B Wilton nozzle. Decorate the top of the cake, the edge, the way I show you in the video or another of your choice.
- Replace the piping bag nozzle with the red cream and use the 199 Wilton nozzle. Create rosettes to attach the red decoration on the sides. Decorate each rosette with pearl sprinkles. I used two different sizes, according to the size of the rosettes.
- Dye a small amount of SMBC with green food coloring and, using the 352 Wilton nozzle, create small leaves near the rosettes.
- Finally, change the nozzle of the red cream and use the PME 13 nozzle. Decorate the inside edge of the heart, the top and the bottom edge of the cake base.
- Refrigerate until ready to use.
- NOTE: Remember that SMBC is best when left for a while at room temperature.


Notes
- The baking time of the cake will vary depending on the size of the mold you use.
- Refrigerate the cake overnight, so that when it is time to cut it with the lyre it does not crumble too much or it does it in smaller proportion. In addition to favoring the cutting process.
- The curd can be made with blueberries or, if you do not like them, with blackberries, strawberries or raspberries.
- The shelf life of the curd is 5-6 days. Keep this in mind to control the durability of the cake, not forgetting to take into account if you decide to let it rise a day before.
- I advise you to follow all the steps I detail in the process to obtain a good SMBC.
- It is important that both the egg whites and the butter are at room temperature.
- If there is SMBC left over, you can refrigerate it for 4-5 days or freeze it for 30-40 days.
- The decoration can be totally up to you, in my case I have chosen this option that I hope you like. Yes, I know, it is very kitsch.
- To preserve the cake you must keep it refrigerated for 3-4 days. It is important, at this point, to take into account the filling you are using, which is what will condition its shelf life.
- Ideally, before consuming it, it should be tempered for a while so that the cream is soft like the sponge cake. The time will depend on the outside temperature of your house.


Regardless of Valentine's Day or not, encourage you to prepare this Vintage Heart Cake because it looks beautiful. It really is.
How fun it is to make it and how much you enjoy it. When you make it, when you see it, when you open the fridge and see it there along with the rest of the usual things like vegetables, milk, yogurts... And when tasting it, of course.
I also take this opportunity to wish you a happy day, whatever it is.
By the way, I remind you that you can watch all my videos on my YouTube channel. If you subscribe and turn on the little bell, I will be eternally grateful!
I wish you a wonderful Sunday afternoon!
Lots of love,
Eva
This post contains affiliated links.