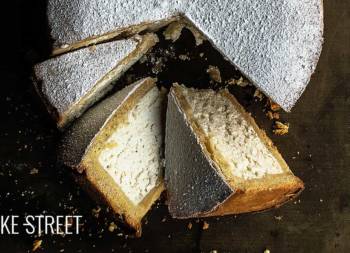
Tiramisu Cake
How it would be a Friday without cake… I think it could be defined as nonsense, insatiable agony, bad living and an overwhelming emptiness. I don’t even want to imagine it. In fact, I prefer not to try, lest we have a hard time at all. So, once again, we will have a weekend in which we can enjoy a wonderful cake. Today I leave you this Tiramisu Cake very easy to make and with a spectacular result.
Who doesn’t like tiramisu? Okay, I’m sure there’s someone in this crazy world. But I think they are not very reliable… A dessert as spectacular as this and that is not to your liking … Something strange is there.

Tiramisu Cake.
The cake that I leave you today, as you already suppose, is inspired by the traditional Italian dessert “Tiramisu“. This dessert is made with ladyfingers biscuits soaked in coffee syrup, covered with a cream made with mascarpone, yolks and sugar, decorated with cocoa powder. This would be a way to elaborate roughly since there are a lot of recipes to carry it out.
The coffee to soak the biscuits can be accompanied with liquor, aromas… The filling cream can be made by adding meringue, whipped cream… There are many variants and each and every one of them is fabulous.
Tiramisu origin.
According to experts, the tiramisu is a modern dessert, not traditional or classic as you might suppose. There are several legends that want to place the tiramisu at a specific time in history.
First legend.
Searching for mentions or data on this production is found that the oldest dates from the late seventeenth century. This dessert is spoken of as an offering in Siena to the Grand Duke of Tuscany, Cosimo III de Médici.
The bakers of the city decided to reflect the virtues of the aristocrat in a sweet. They used coffee to represent his force, cocoa as a symbol of virility and mascarpone cheese as humility. All these elements would accompany the rest taking as name “Duke Soup“.
Without a doubt the story is as interesting as it is credible, but if we look at the details, we will realize that it cannot be true.

At that time, using raw eggs in the making of a cream was too complex, unusual, but above all, dangerous. We have to take into account the methods for preserving food that existed at that time and the incompatibility of carrying out a product like this without those methods. On the other hand, finding mascarpone cheese (a perishable product) in such a short time, in Lombardy and considering how far away they were from where this cheese was produced, makes the story lose all credibility.
Second leyend.
It is situated in the 19th century and its creation is attributed to a Turin pastry shop. The Count of Cavour, Camillo Paolo Filippo Giulio Benso, better known simply as Camillo Benso was who achieved the unification of the various states into which Italy was divided. During that process, the bakery offered the candy to help carry out the business in which it had embarked. The reasons that do not make it feasible are the same as in the previous legend added to the fact of offering something “dangerous for your health” as a gift.
Third legend.
This legend is located in the region of Veneto a little over a century and a half ago and, apparently, this sweet saw the light for the first time in a brothel. According to Arturo Filippini, head of the Toulá restaurant, in the 1950s the brothels of the city of Treviso began to offer their customers this sweet from the hands of the madame. It was said to have restorative and even aphrodisiac effects.
The tiramisu was presented to the parishioners promising them that it would “take them up” which, in Venetian dialect, was expressed with “te tira su“. From there it would derive into “ti tira su” in Italian and, as it became popular, it began to be called tiramisu.

An uncertain origin.
In general, when talking about tiramisu, it is a tendency to defend its most romantic and historical origins. But, the reality is that there is no evidence that can situate its origin joined to a history.
- In the Italian magazine Vin Veneto: rivista trimestrale di vino, grappa, gastronomia e varia umanità del Veneto the gourmet Giuseppe Maffioli pointed to the pastry chef Roberto “Loli” Linguanotto, from the Alle Beccherie restaurant in Treviso, as its author in the late 1960s. This professional with experience in Germany, where he worked especially with cakes made from wine, wanted to try his luck making a sweet with local products.
- Celeste Tonon, chef/owner of Ristorante da Celeste and open in Treviso since the 1970s, her mentor, Speranza Garatti, was “the true mother of tiramisu“. Tonon claims that in the early 1960s, Garatti served the dish in a glass, calling it coppa imperiale. After Garatti made the imperial cup dessert, his friend Ado Campeol, restaurateur of Le Beccherie, made a version and changed the name from coppa imperiale to tiramisu. This gave way to a dispute over who had invented it.
- The text Cocina y tradiciones de Veneto, used in catering schools, attributes the origin of this dessert to the restaurant from Treviso and to a chef with experience in Central Europe. The chef himself explains how he created it on his website Tiramesu.it.
- The Washington Post talks about Carminantonio Iannaccone attributing to him the origin of this dessert. According to his version, everything began after training as a pastry chef in the southern city of Avellino and leaving for Milan, at only 12 years old, looking for work. He settled in northern Italy where he formed a family. In 1969 he opened his own restaurant called Piedigrotta in Treviso. He wanted to make something that joined the daily flavors of the region and with the classic coffee, eggs, a little mascarpone, marsala and savoiardis, ladyfingers, he created the tiramisu. He spent two years perfecting the recipe and soon it was a resounding success. It was imitated and even requested by other restaurants to Iannaccone himself. Now, since his retirement back in the United States, he assures that he never thought that his idea would become a classic of Italian gastronomy, much less a cause for dispute over his invention. He assures that 40 years ago in a small town nobody, and even less he, would think of keeping a proof of something he had created.
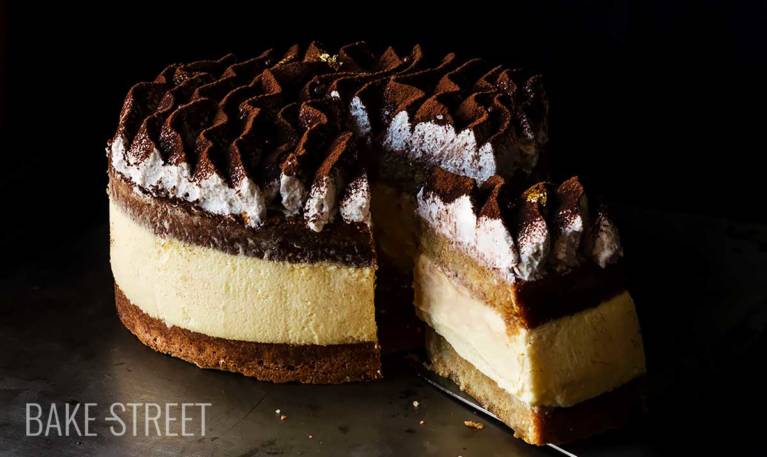
Carrying out the Tiramisu Cake.
This cake is a version of the traditional tiramisu in which the main ingredients are kept, but it adjusts to my personal tastes when it comes to making it as well as its final presentation.
I wanted to make a not-so-fine sponge cake that imitated the traditional ladyfingers biscuits. My intention was to soak them very well in coffee syrup and liquor. The filling is the traditional cream, or at least one of its versions, of the tiramisu.
And, finally, the decoration is carried out with whipped cream with a touch of coffee and decorated with cocoa powder. The upper part of the cake is based on the presentation of this cheesecake from the web Tables de Sucre.
Ingredients for a 8 inch mold
FOR GÉNOISE SPONGE CAKE:
- 4 large eggs
- 145 g sugar
- 165 g pastry/cake flour
- 60 g unsalted butter melted and cooled
- pinch of salt
FOR THE SYRUP:
- 150 g sugar
- 70 g freshly brewed coffee
- 80 g water
- 60 g liquor: Orujo cream/Kahlúa/ Amaretto...
FOR TIRAMISU FILLING:
- 500 g mascarpone cheese at room temperature
- 6 large egg yolks
- 200 g sugar
- 1 tsp vanilla extract
- 240 g fat cream + 2 Tbsp icing sugar
- 4 g gelatin (2 sheets)
FOR WHIPPED CREAM DECORATION:
- 350 g fat cream
- 3 Tbsp icing sugar
- few drops coffee extract
- 1/2 tsp unsweetened cocoa powder
FOR DECORATE:
- unsweetened cocoa powder
- chocolate balls
- edible gold powder
- edible gold foil
Instructions
FIRST DAY
Make the sponge cake.
- Preheat oven to 355ºF/180ºC.
- Grease a 7,85 inch/20 cm diameter removable pan with butter, sprinkle with flour and turn to remove the excess. Set aside.
- Sift the flour, set aside.
- In the bowl of the KitchenAid or a stand mixer, add the eggs along with the sugar and salt. Beat, increasing progressively the speed without reaching the maximum, until reaching the rippon stage* (see in NOTES).
- Add the flour little by little as we integrate with enveloping movements helping us with a spatula.
- Incorporate the butter and integrate again with enveloping and soft movements.
- Pour the mixture into the pan, tap gently to settle the batter and place in the oven.
- Bake for 30 minutes or until a toothpick in the center comes out clean.
- Remove from the oven, let it rest for 15 minutes and unmold.
- Let it cool completely on a rack.
- Once it has cooled completely, wrap with film and refrigerate until the next day.
Make the syrup.
- Add all the ingredients in a saucepan except liquor. Place at medium heat and let it boil. The sugar must be completely dissolved.
- Once it comes to the boil, turn off the heat and let it cool completely.
- Put the syrup in a bottle with the help of a funnel, add the liquor to your choice, close and shake to mix well.
- Set aside at room temperature.
SECOND DAY
Make whipped cream.
- Before we get ready to whip the cream we must make sure of two things:
- Cream must be cold 24 hours before used it.
- The bowl in which we are going to make whipped cream must be cold. I recommend to use one aluminium bowl and freeze 20 minutes before beat it.
- If you want to know how to make whipped cream, you can do it in this video.
- Pour heavy cream into freeze bowl and beat with an electric mixer into low speed.
- Once cream is becoming to form stiff peaks, add sugar little by little stirring the whole time. Increase speed gradually but without reaches high one. Ideally use medium speed.
- Before finish to beat the cream, add vanilla extract along and beat until get a perfect whipping cream. Be sure not to over-beat, otherwise cream will become lumpy and butter-like.
- Cover with plastic wrap and chill until used it.
Cook yolks for the filling.
- Place a half-full saucepan with water and heat until it starts to generate steam, but never reach boiling point.
- Place a heat-resistant bowl over the saucepan and pour the yolks together with the sugar.
- Cook in a water-bath stirring constantly until the mixture reaches 149º-158ºFF/65º-70ºC. You will notice that the yolks turn whitish and thicken slightly.
- Remove from heat and let stand for a few minutes. Ideally, the temperature should be reduced to 131ºF/55ºC.
Make the filling.
- Fill a bowl with very cold water and put the gelatin sheets inside to hydrate them. We must do it 15 minutes before using them.
- Take a small amount of the yolk mixture and pour into a bowl.
- Drain the gelatine sheets and add to the mixture. Mix until completely dissolved.
- In a large bowl add the mascarpone cheese and soften with the help of a silicone spatula.
- Pour the mixture of yolks with gelatine together with the rest of the mixture of yolks. We will do it little by little and mixing at the same time. The mixture will become very liquid, do not worry.
- B begin to incorporate whipped cream little by little making enveloping movements.
- Once we have all the whipped cream incorporated, set aside.
Assemble the cake.
- With the help of a cake cutter, cut the sponge cake in 2 equal parts.
- Slide the lyre several times over the surface to equal it and reduce possible unevenness.
- Place an anti-slip disk on the base of the Push-Pan mould 8 inch/20 cm to fix the cake disc.
- Put the disc and a small amount of cream on it, this will help us fix the cake.
- Place a sheet of acetate inside the mould. This will help us to remove the cake in a cleaner way.
- Place one of the sponge cakes and press lightly.
- Soak with the half of coffee syrup.
- Pour in the filling mixture and smooth lightly.
- Place the other sponge cake, press and moisten with the rest of the syrup.
- Cover the surface with film and refrigerate until the next day.
Make whipped cream for decoration.
- Before we get ready to whip the cream we must make sure of two things:
- Cream must be cold 24 hours before used it.
- The bowl in which we are going to make whipped cream must be cold. I recommend to use one aluminium bowl and freeze 20 minutes before beat it.
- If you want to know how to make whipped cream, you can do it in this video.
- Pour heavy cream into freeze bowl and beat with an electric mixer into low speed.
- Once cream is becoming to form stiff peaks, add sugar little by little stirring the whole time. Increase speed gradually but without reaches high one. Ideally use medium speed.
- Before finish to beat the cream, add coffee extract along with cocoa powder and beat until get a perfect whipping cream. Be sure not to over-beat, otherwise cream will become lumpy and butter-like.
- Cover with plastic wrap and chill until used it.
Decorate.
- Put the whipped cream in a piping bag with an 18mm Saint Honoré tip.
- Decorate the surface by making wavy strips that go from one end of the cake to the other.
- Sprinkle the surface with cocoa powder.
- Decorate with chocolate balls and edible gold foil. Sprinkle with edible gold powder.
- Refrigerate for 2 hours.
- Serve.


Notes
- The ribbon stage is obtained by beating the eggs together with the sugar for several minutes. The mixture takes on a whitish colour and the texture becomes very thick to the point of lifting the whisk and being able to form a cord or ribbon over the mixture without deforming it. Hence the name.
- I have decided the process in 2 days to make it easier and bearable. But if you wish, you can do the whole process in just one day.
- If we refrigerate the sponge cake overnight, we help the flavors ripen as well as facilitating the process of cutting the sponge cake. It crumbles less.
- To make the syrup you can use the liquor you want.
- It is important to moisten cakes, otherwise they may be dry. Don't be afraid to be generous, the result will be a very juicy cake.
- If you do not have acetate you can use baking paper instead. The good thing about acetate is that it helps to unmold cakes very well, as well as being very clean when it comes to working.
- You can make the top decoration completely to your liking.
- It is important that the cake rests for hours in the fridge so that it acquires a more juicy texture and its filling is firm enough to cut.
- We can keep it refrigerated for 2-4 days. Cover it with a bell or inside an airtight container to prevent the cream from drying out.

What I'm going to tell you to convince you... You have to try this Tiramisu Cake as soon as you can. The final result, in terms of taste and texture, is faithful to this dessert. Besides being one of those cakes that we can not stop eating ...
I'm completely in love with it, so I'm not going to be very objective when it comes to talking to you about it. You'd better try it and tell me ;)
I wish you a wonderful weekend, see you on Monday!
Big hugs,
Eva