Roman-style pan pizza
I had promised you an easy and delicious pizza recipe, what I can’t promise is that it will be fast. But that doesn’t mean we have to be with it all the time… We make it, put it in the fridge and forget about it for a day or two. The result? Exceptional. Roman-style pan pizza better known as Pizza in teglia alla romana.
Another concept totally different from the one we have in mind about homemade pizza, but for those of you who love thick, honeycombed dough, with a soft and super delicate crumb and a crispy crust, you will go crazy. Really, it is Italian fantasy in its purest form.
It is curious the term pan because it is not cooked in a frying pan as we know the concept of this kitchen utensil. On the contrary, specific trays are used for this use where the dough, already fermented and well sprinkled with semolina, is placed. I have my eye on some Italian blue steel trays for these pizzas and, I think, it won’t be long before I get my hands on them. I will keep you posted on this subject.

Origin and history of Pizza in teglia alla romana.
Roman-Style Pan Pizza or Pizza in teglia alla romana is a gastronomic product of Roman cuisine. Unlike traditional pizzas, this one is baked in a classic baking tray and then placed on pizza counters for portions or sold as street food. Authentic Roman Pan Pizza is characterized by a crispy bottom layer, accompanied by a well-fermented, highly aerated, and soft crumb due to its long fermentation process.
Pan Pizza or “al Testo” was developed in the early 1900s in Tuscany. At that time, bakers and homemakers used to make this type of pizza and other bakery products for family consumption. The product was prepared in a round or rectangular baking tray and cooked in a wood-fired oven with the fire turned off or at a low temperature.
In the past, this product was very different from the current Pan Pizza: the fermentation process was short, and the dough much denser, with lower hydration. Additionally, it was common to use lard in the dough along with a substantial amount of sugar to give color to the crust, thanks to caramelization, and to prevent the product from drying out during baking.
This old type of production resulted in a less digestible and more caloric product.
Over time, the recipe for Roman pizza evolved, omitting the use of lard and sugar, and increasing the hydration of the dough, accompanied by a much longer fermentation process.
Pizzerias opened their doors to the public.
In the 1970s, the inhabitants of Umbria, especially those from Terni, gradually began opening pizzerias in Rome, achieving resounding success.
The first real evolution occurred in 1981, when Pan Pizza took on the nickname “alla Romana” thanks to the original perspective of Corrado Di Marco. Di Marco came from an ancient family of bakers and founded the company Pizzasnella Di Marco. In fact, it was Di Marco himself who revolutionized Pan Pizza.
He observed that people’s eating habits began to change. Lifestyles started to become more sedentary, and people’s interest in their nutrition was altered. Based on his observations, Di Marco made significant and very valuable changes:
- He omitted the use of the biga (pre-ferment) and instead used a direct method by adding yeast directly to the dough. Additionally, he extended the dough fermentation process to 24 hours, resulting in more aromas and flavors, and making it more digestible.
- The dough hydration was increased to 80%-90%, which should never be less than 60%.
- He used higher quality flours that could withstand long fermentation processes and omitted lard and sugars.
- Instead, he decided to use only olive oil and in a low proportion.
These changes were very significant and resulted in a final product of great quality, perfect for placing on pizzeria counters and reheating without losing its characteristic crispy texture.

Making pizza in teglia alla romana.
Despite the fact that its preparation process is VERY simple, it is true that we must follow certain steps and, most importantly, adhere to the specified resting and fermentation times. This is the only way to achieve a good result with this dough to make a Roman-Style pan pizza at home.
After looking at several recipes, even though they are quite similar, I was guided by the wonderful work of Daniela Bongiovanni. Thank you so much!
To begin, we will mix the flour with almost all the water to achieve an amalgamated dough. Then we will do autolysis (in this post I explain in more detail what it is and what it is for), this step will take us 3 hours. The autolysis time in a dough is always related to the type of flour we use. The higher the strength or protein content, the longer we can subject the dough to this method.
This step not only helps to speed up the kneading process and reduce dough oxidation but also allows us to obtain a product with greater volume.
After this time, we will knead the dough with the remaining ingredients: yeast, salt, and the rest of the water. Once the dough is ready, we will give it a couple of folds with a resting time between them to give the dough strength (it has high hydration) and structure. The fermentation process will take place in the refrigerator. We will leave our dough for 24 hours, completely relaxed, letting it work its magic.
One day later, we will find a doubled, airy, and beautiful dough.
We proceed to divide it without tempering, directly from the fridge. Pre-shape each piece to the desired size and let it rest again.
At this point, we can do two things: leave it at room temperature for 4-5 hours to shape and bake or leave it at room temperature for 2 hours and then refrigerate for another 24 hours. In my case, I did both options (in fact, you can see it in the video). The dough holds up very well and the result is FABULOUS.
If you leave any of the doughs in the refrigerator for 48 hours, on the second day the dough will already be divided and pre-shaped because we did this step after the first 24 hours. You will only need to temper the dough for 1 hour before baking. Turn it out onto semolina, stretch it, transfer it to the tray, and into the oven. A marvel in your kitchen for two days in a row…
You can use the toppings you prefer for your Roman-style pan pizza, entirely to your taste. In my case, I’ll leave you two options, but feel free to add whatever you like best.
Recipe Roman-style pan pizza
DOUGH:
- 1 kg Manitoba flour W=380 (I have used thios from Molino Grassi)
- 800-815 g water
- 3 g fresh yeast or 1 g dry yeast
- 22 g salt
SHAPING:
- semolina
- olive oil
TOPPINGS (OPTIONAL):
- pesto (recipe sage and hazelnut pesto, basil, arugula and almond pesto, watercress, dill and peanut pesto)
- crème fraîche
- arugula
- prosciutto
- tomato passata (recipe in this link)
- mozzarella
- blue cheese
- anchovies
- fresh basil leaves
MATERIAL WE NEED AND VISIBLE IN THE VIDEO:
- kneader or stand mixer
- bowls
- scraper
- 38 x 25 x 2.5 cm pan or other similar one
- oilcan
- large bowl to ferment the dough, mine has a 5 liter capacity
Instructions
FIRST DAY
Prepare the dough for autolysis.
- In a large bowl, add the flour along with 700 g of water. Mix until no dry bits remain, that is, until you achieve an amalgamated dough without any flour lumps.
- Cover with plastic wrap and let it autolyze for 3 hours.
- NOTE: If you prefer, you can do this step in a stand mixer.
Prepare the dough with the remaining ingredients.
- Place the dough in the mixer bowl if you mixed by hand as I did, and add the crumbled fresh yeast.
- Knead for 5 minutes at medium speed.
- After these minutes, add the salt and knead at medium speed for another 4-5 minutes. After this kneading time, you will have good gluten development.
- Start adding the remaining water little by little. Wait for the dough to absorb all the water before adding more. Doing it this way helps it integrate easily and without problems. Depending on the absorption capacity of your flour, you can add 100 or 115 g of water. In total, it will be 800-815 g of water.
- Once you have incorporated all the water and have good gluten development, turn the dough out onto a work surface previously greased with olive oil.
- Fold the dough to give it uniformity.
- Place it in a container, previously greased with olive oil. Mine has a capacity of 5 liters.
- Let it rest at room temperature, in my case 24ºC (75ºF), for 15 minutes.
Fold the dough.
- After 15 minutes, fold the dough as shown in the video.
- Let it rest for another 15 minutes and perform a second fold.
- After completing these two folds, place the dough in the refrigerator and let it ferment for 24 hours.
SECOND DAY
Divide and preshape the dough.
- After 24 hours in the refrigerator, the dough will have doubled in size. You should work with the dough cold, without tempering.
- Turn the dough out onto a surface greased with olive oil. Divide the dough into pieces according to the size you want for your pizzas. In my case, I formed two pieces of approximately 650 g each and one piece of 400 g.
- Preshape each piece, remember that if you have scraps of dough, you should place them in the center of the piece, and gently shape into balls.
- Place each dough piece in a bowl or container previously greased with olive oil. Cover with plastic wrap to prevent the top of the dough from drying out.
- Let it rest for 4-5 hours at 24ºC (75ºF). The dough should double in size or a little more.


Shape pizzas.
- Preheat the oven to 265ºC (509ºF),heat up andd down, using a steel plate or stone to get it hot. Place it one position above the middle of the oven.
- Grease the tray where you will bake the pizza with olive oil, and set it aside.
- Prepare a tray with a generous amount of semolina; we will use it to shape the pizza and avoid spreading semolina all over the work surface.
- Turn the dough out onto the semolina, letting it fall out of the bowl on its own to avoid excessive degassing or damaging it.
- Lightly sprinkle the surface with semolina and press your fingers all over the dough. Do this gently and without overdoing it.
- Carefully transfer the dough to the greased tray. Stretch it gently.
- Drizzle olive oil over the surface to your liking.

Bake.
- Bake by placing the tray with the dough on the steel plate or stone for 10 minutes.
- Remove from the oven, place it on a rack, and cover the surface with toppings that require baking: pesto, passata, cheese...
- Return to the oven at the same temperature and bake for an additional 3-4 minutes.
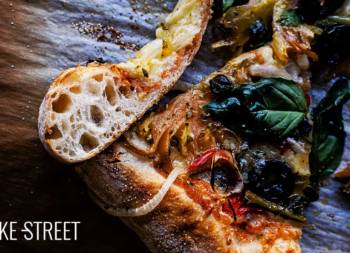
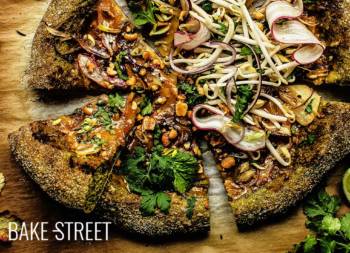
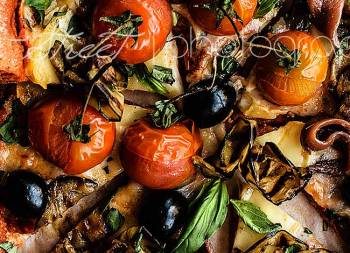
- Remove from the oven and finish decorating with your chosen ingredients. In my case, I made one with pesto, crème fraîche, arugula, and prosciutto, and another with tomato passata, mozzarella, blue cheese, anchovies, and fresh basil.
- Enjoy them as soon as they come out of the oven, although they hold up very well over time.

Notes
- I use a strong flour with W=380, Manitoba flour, but if you use one with higher strength, that would also be suitable. Likewise, if you decide to use one with lower strength, for example W=340-360, you need to observe the final hydration as it might require a few less water. It's important to use a high-strength flour to prepare this pizza dough because, in addition to working with high hydration, we will subject the dough to a long fermentation process.
- Not all flours have the same absorption capacity. If you use a lower strength flour, reduce the amount of water when mixing the ingredients for autolysis. You can always add more water later when you begin kneading. Remember one thing: "doughs are always adjusted with water, never with flour."
- Do not skip the autolysis time, as it helps the flour hydrate and reduces kneading time, among other beneficial factors for the dough such as increased volume and prevention of oxidation during kneading.
- Remember, for every gram of dry yeast, you use three grams of fresh yeast.
- Refrigerating the dough is useful to prolong the fermentation process and favor the development of flavors and aromas.
- For baking the dough, I used an aluminum tray, but you can use any other tray you have at home. If possible, it's important to bake the pizza in a pan/tray on a steel plate or stone. This greatly enhances the cooking and initial expansion of the dough.
- The baking time depends on the thickness of the dough, not its size or dimensions.
- I recommend adding sauces or cheeses after the first 10 minutes of baking. Otherwise, the weight of the toppings may prevent the dough from rising properly. After adding them, bake for an additional 3-5 minutes to ensure they are cooked to perfection.
- I advise against using ingredients that add a lot of moisture, as they can make the pizza lose its characteristic crispy crust, which is a defining feature of this pizza.
- Once cooked, these pizzas can be frozen and reheated with toppings in the oven for a quick meal.

If you enjoy making homemade pizza, you must try this wonderful version, Roman-Style Pan Pizza or Pizza in Teglia alla Romana. We have been deeply amazed with it.
It may remind us of focaccia, but it's not the same... Although they share certain similarities in appearance. Focaccia has its origins in Italy, especially in the region of Liguria, while Pizza in Teglia alla Romana originates from Rome.
Focaccia is thicker and fluffier, with a shorter fermentation process, unlike skillet pizza which is thinner, crispy, and has a very airy and delicate interior. Not to mention its long fermentation process. Toppings used on focaccias are simpler, whereas skillet pizza can feature a wide variety including cured meats and vegetables.
Focaccia is often served as bread or a snack to accompany other dishes, while skillet pizza is a main course. Both are wonderful, but if I had to choose, I'd go with Roman pan pizza!
I remind you that you can watch all my videos on my YouTube channel. If you subscribe and turn on the little bell, I will be eternally grateful!
I wish you a wonderful Sunday afternoon and happy Easter!
Lots of love,
Eva
Sources: Teglia Romana