Hveiti Bread
I’m back with another weaved bread… I to admit it, I’m obsessed! Despite preparing many recipes for the blog, whether sweet or savory, in my head these breads are always hanging around. I keep thinking about new braids, different ways of shaping them, combining colors, flavors… In fact, when I visit Pinterest, one of the things I always look for and look at, are photos related to craftsmanship. These works inspire me a lot to carry out the shaping of this type of bread. Today I decided to name it Hveiti Bread.
You’ll think it’s a strange name. Yes, it is, but everything has its reason. To tell you the truth, it has not been easy to “baptize” this bread. I’ve given running around in circles more than a Ferris wheel, because I didn’t want to give it any name (which I could have given it). But I looked at the bread (while I ate it , it has to be said) and I thought – I can’t give it just any name. So I started looking for it.
The first thing was to try to express in a single word what it transmitted to me. That, if I’m honest with you, I would have loved to ask you because it’s always good to hear opinions different from those you have. In fact, I tried it at my house… unsuccessfully. When I asked them – what comes to your mind when you see this bread? Well, it’s very nice. Name it, pretty bread. -Ok, the help from my family is automatically ruled out.

Looking for a name.
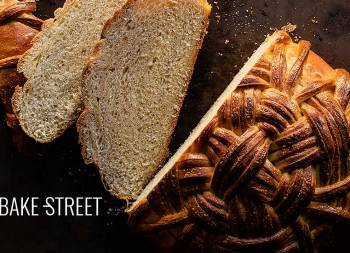
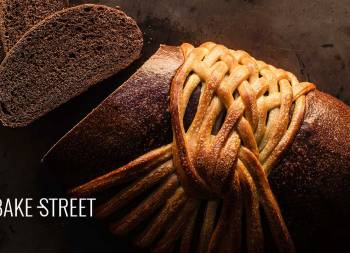
This bread moves me to the Scandinavian countries. More specifically to the Viking era. The strips of cocoa that cover the bread shaping simple braids and filigree, resemble leather strips. Perfectly arranged to create a armor, but without losing elegance and majesty.
That’s why I thought I should find a word to capture these feelings. Since I obviously do not know Norwegian, Danish or Icelandic, I turned to our beloved Google for help.
Searching for the languages spoken at that time, I found that the Old Norse was the Germanic language spoken by the inhabitants of Scandinavia and its overseas colonies from the early Viking period until about 1300. It is now an extinct language. I already got it! Now I just had to find a translator of this language into Spanish or English. And I found it.

To be honest, I would have loved to use the word “leather” translated to describe this bread. But as the translation told me that it was not very reliable and most of the words referred to the scalp… I decided to omit that idea.
Found!
Then I thought of more options such as braid, strips, basketry, craftsmanship… I didn’t like the words. Until I thought, if the bread is made of wheat, then let’s try our luck. Oh, I loved it! The result was Hveiti and I thought it was beautiful, besides transmitting that Viking/Scandian spirit I was looking for.
If any of you know Icelandic, you will know this word.
The majority of the surviving texts from that period apparently originated in medieval Icelandic, hence the standard variant of this language is the Western dialect. I mean, the Norwegian and Icelandic Ancient. Yes, I also looked at the name in Norwegian (hvete), but I liked it better in Icelandic.
There was also another eastern variant of this language, which was spoken in the Viking settlements of Sweden and Denmark. There was no clear geographical separation between the two dialects. There was a third dialect called Old Gutnish, which is included within the Ancient Eastern Nordic as it was less well known. The speakers of these three dialects considered that they spoke the same language that they called dansk tunga until the 13th century.
Very boring all this information, maybe… hahaha.

I have always felt a strong attraction for the Scandinavian countries.
I don’t know what this place has, but I love it. I was fortunate enough to visit Norway a few years ago and came back amazed… I couldn’t visit as much as I wanted to, in fact I only visited from the middle of Norway (Trondheim) to the south, but this way I have an excuse to come back two, three and a thousand times!
I came back in love with the beautiful cities, the mountains, the fjords, the glaciers, the food (yes, the food, people told me I was going to eat badly, but it wasn’t true!), the super polite and attentive people, the beautiful houses, the magical surroundings…. In fact I remember one of the tour guides we had who told us that he went to Norway on holiday and returned to Spain to get his things and come back to live there. I would love to be able to do the same, no doubt.
And all this text comes because I feel a special affection for that part of the world, to which I hope to return very soon, and for that reason the whole process that has involved this bread has been very special for me. I hope you guys enjoy it as much as I do.
| INGREDIENTS | BAKER´S % | SOURDOUGH | REST | TOTAL |
|---|---|---|---|---|
| Bread flour | 10,8% | 65 g | 65 g | |
| Rye flour | 4,2% | 25 g | 25 g | |
| T45 flour | 85% | 510 g | 510 g | |
| Water | 15% | 90 g | 90 g | |
| Milk | 39,1% | 235 g | 235 g | |
| Egg | 9,1% | 55 g | 55 g | |
| Butter | 12,5% | 75 g | 75 g | |
| Honey | 6,67% | 40 g | 40 g | |
| Cocoa powder | 2,5% | 15 g | 15 g | |
| Salt | 1,6% | 10 g | 10 g |
Ingredients
- 21,1 oz (600 g) T45 flour
- 10,5 oz (300 g) whole milk at room temperature
- 0,53 oz (15 g) cocoa powder + 0,85 oz (24 g) whole milk
- 0,12 oz (3,5 g) dry yeast
- 1 large egg (55 g)
- 2,65 oz (75 g) unsalted butter at room temperature
- 1,4 oz (40 g) honey
- 0,35 oz (10 g) salt
Instructions
Make the dough.
- In a bowl add the flour together with milk, egg and dry yeast.
- Mix the ingredients in the bowl until a homogeneous dough is obtained.
- Add the honey and knead until it is fully integrated. Add salt and mix again.
- Transfer to a work surface and start kneading. We will have to obtain a smooth, silky and developed dough.
- Once we have a medium-developed gluten, add the butter. The ideal is to do it little by little, waiting for the dough to absorb it and facilitate the kneading process.
- Knead for about 15-20 minutes to develop the gluten well and obtain an elastic, soft and very well developed dough. The dough, always after a rest, must pass the membrane test. Here's how to do it.
- If we do rest we must always cover the dough to prevent it from drying.
Divide the dough into 2 pieces to integrate the cocoa.
- Divide the dough into two pieces, one of 27,1 oz (770 g) and the other of 10,5 oz (300 g). Remember that if there are any pieces of dough left, these will always be in the centre of the dough before pre-shaping.
- Make a ball with the largest piece and place in a bowl previously greased with olive oil. Cover with film and set aside to make bulk fermentation.
- Work the small piece of dough. Add the cocoa powder together with milk.
- Knead until both ingredients are completely integrated. We must obtain a dough with a uniform chocolate colour.
- Make a ball with the piece and place in a bowl previously greased with olive oil. Cover with film and set aside to make bulk fermentation.
Make bulk fermentation.
- Let rise at room temperature for 3 hours an 40 minutes, in my case at 70ºF or until it doubles in size.
- If we want to retard the dough in cold, let it rise 1-2 hours at room temperature, until it grows 1/3 of its volume and place in the fridge until the next day.
If we have retarded the dough in cold, temper before working.
- Remove the dough from the cold and let it warm for 2 or 2 1/2 hours. It's likely to even triple its size.
Shape the bread.
- Dump the cocoa dough on a clean surface and degass gently.
- Shape the same way we shape a batard.
- Set aside and cover with film.
- Take the other piece of dough and stretch it with a roller. We will form a rectangle of approximately x 9,8 inches (35 x 25 cm).
- Using a sharp cutter or knife, cut parallel strips with a thickness of 0,4 inch (1 cm), the length of which is the longest side of the rectangle. We'll need about 20 strips, but we'll get a few more. Better, in case something happens.
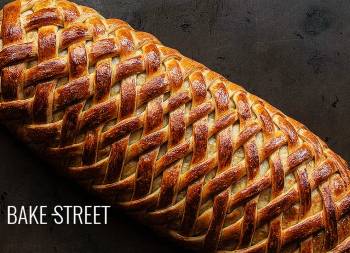
- Braid the bread, this process is better seen in detail in the video.
- Once we have the bread shaped, with great care, transfer to the baking tray lined with baking paper.
- Lightly grease the surface of the bread with olive oil, cover it with film and let it rise until it doubles in size. In my case it was 3 hours at 71,6ºF.


Bake.
- Preheat oven to 355ºF.
- Under each chocolate spiral, carefully insert a toothpick. It is not necessary to put the whole stick inside the bread, with 1/4 of this, it will be enough. This way they will be held without falling off during baking.
- Brush the bread with whipped yolk with milk and salt, place it in the oven for 40 minutes. Watch the final minutes of baking, if the bread gets very colorful, cover it with a sheet of aluminum foil.
- Remove and allow to cool completely in a rack.
Notes
- For those of you who make the bread with sourdough, the bulk fermentation must be until the dough grows 1/3 of its volume and there, place in the fridge until the next day. Follow the process in the same way that I detail you in the recipe. The final proof will last much longer, it can be around 5-6 hours.
- T45 flour is equivalent to a special wheat flour for puff pastry, with a W=280 and good elasticity.

- Can honey be replaced by sugar? Yeah, no big deal. Just bear in mind that invert sugars speed up the proofing process compared to normal sugar.
- The cocoa powder I use is sugar-free, so the flavor will be bitter. But on this occasion I consider that there is no need for a superior addition of honey or sugar, as I suggested in Shibari bread, since the amount of dough used is only for decoration.
- The weaving is simple, but it requires a little attention to avoid getting involved. Do not hesitate to watch the video as many times as necessary before preparing to form it. Even practice with shoelaces, all help will be welcome.
- When you cut the cocoa strips, always cover them with plastic film while you shape the bread. If the dough is dried and found, we can't use it to decorate the bread.
- To know if our bread has finished the cooking time, remember that with a digital thermometer and checking its temperature we will know. It must be around185-195ºF.
- Preservation: This bread can be kept in an airtight bag for 4 days. If you prefer, you can freeze it in film wrapped portions.

What am I going to tell you about this Hveiti bread... Well, you have to try it, of course! It is true that we will not find new variants in the dough in terms of process, ingredients and flavor. In fact the recipe is almost more like a tutorial on how to carry out the shaping process.
Unless you have not tasted the two previous breads in which we use a dough very similar and in which I show different shapes.
Have a wonderful weekend, see you on Monday!
Big hugs,
Eva