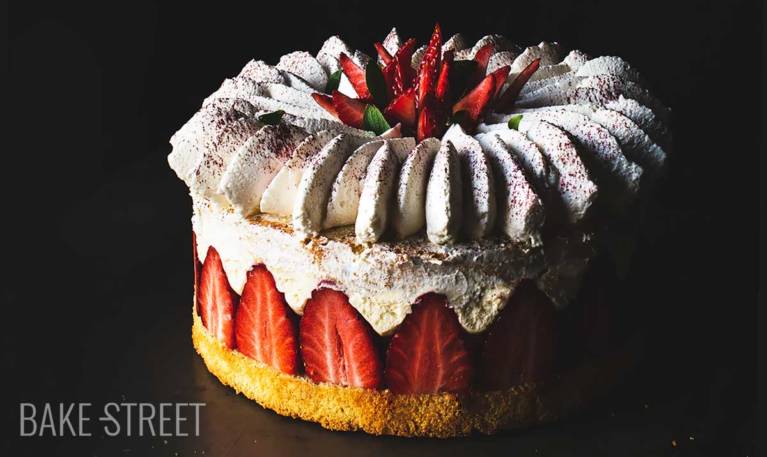
Fraisier Cake
You can’t imagine how eager I was for the strawberries season… Not only because I love them, adore them, and find them fantastic to make hundreds of recipes. But also because I was looking forward to making Fraisier Cake.
I know it’s nothing new, it’s a world-famous recipe and perhaps little will surprise you. Yes, it’s true. But I had never made it before and I really wanted to leave it here. Besides, what would be a Friday without cake? I can hardly conceive of it.

Fraisier Cake Origin.
This cake has its origins in French gastronomy being one of the great classics in many bakeries. Its origin is somewhat uncertain.
Some situate this cake in the year 1860, time in which another of the great elaborations of the French confectionery was also created, the Opera Torte. Unlike this one, its author is unknown, but we do know that it arrived to be placed as one of the great cakes of its confectionery.
Its name derives from the word “fraise“, “strawberry” in French.

This cake consists of two layers of Genoese sponge cake soaked in Kirsch syrup, filled with strawberries and a mousseline cream. Traditionally it is decorated with a layer of marzipan on the surface or Italian merengue, but I wanted to do something different. So I decided to decorate it with Chantilly, strawberries and ruby powder.
This cake was originally filled with butter cream. But, with the passing of time and the evolution of the pastry, a cream made with butter and pastry cream, mousseline began to be used. Other versions can be found in which they also add to this Italian meringue cream.
In my case I am going to leave you this version. It reminded me a little of the SMBC and I thought that the result would be good. Oh, it was very good!

Making the Fraisier Cake.
The elaboration process itself is quite simple, only we have to take several steps. This, in many occasions, makes you a little backwards. But if you organize well, you can enjoy a wonderful cake.
On the first day we can bake the sponge cake and the prepared syrup. You can even make the pastry cream for mousseline. However, in this case, don’t forget to refrigerate it.
The next day we will only have to make the mousseline cream, which if we have made the pastry cream, we will only have to make an Italian meringue and beat the butter along with the rest of the ingredients. On the other hand, whip the cream, cut the strawberries and assemble the cake … That´s all! 😉
You will enjoy a wonderful cake, fresh and perfect to start the weekend.
Ingredients for a 8 inch cake
FOR GÉNOISE SPONGE CAKE:
- 4 large eggs
- 145 g sugar
- 165 g pastry/cake flour
- 60 g unsalted butter melted and cooled
- pinch of salt
FOR THE SYRUP:
- 125 g sugar
- 125 g water
- 2 shoots Kirsch
FOR MOUSSELINE (cream, meringue and butter):
- 250 g unsalted butter at room temperature
Pastry cream:
- 250 g whole milk
- 1 tsp vanilla extract or a pod opened lengthwise
- 2 large eggyolks
- 60 g sugar
- 1 y 1/2 Tbsp flour
- 1 y 1/2 Tbsp cornstarch
Italian meringue:
- 75 g egg whites
- 120 g sugar
- 30 g water
FOR CHANTILLY:
- 350 g heavy cream
- 3 Tbsp icing sugar
- 1 tsp vanilla extract
PARA DECORAR:
- 650 g strawberries
- ruby powder Squires Kitchen
Instructions
FIRST DAY
Make the sponge cake.
- Preheat oven to 355ºF/180ºC.
- Grease a 7,85 inch/20 cm diameter removable pan with butter, sprinkle with flour and turn to remove the excess. Set aside.
- Sift the flour, set aside.
- In the bowl of the KitchenAid or a stand mixer, add the eggs along with the sugar and salt. Beat, increasing progressively the speed without reaching the maximum, until reaching the rippon stage* (see in NOTES).
- Add the flour little by little as we integrate with enveloping movements helping us with a spatula.
- Incorporate the butter and integrate again with enveloping and soft movements.
- Pour the mixture into the pan, tap gently to settle the batter and place in the oven.
- Bake for 30 minutes or until a toothpick in the center comes out clean.
- Remove from the oven, let it rest for 15 minutes and unmold.
- Let it cool completely on a rack.
- Once it has cooled completely, wrap with film and refrigerate until the next day.
Make the syrup.
- Add all the ingredients in a saucepan except Kirsch. Place at medium heat and let it boil. The sugar must be completely dissolved.
- Once it comes to the boil, turn off the heat and let it cool completely.
- Put the syrup in a bottle with the help of a funnel, add the Kirsch, close and shake to mix well.
- Set aside at room temperature.
SECOND DAY
Make whipped cream.
- Before we get ready to whip the cream we must make sure of two things:
- Cream must be cold 24 hours before used it.
- The bowl in which we are going to make whipped cream must be cold. I recommend to use one aluminium bowl and freeze 20 minutes before beat it.
- If you want to know how to make whipped cream, you can do it in this video.
- Pour heavy cream into freeze bowl and beat with an electric mixer into low speed.
- Once cream is becoming to form stiff peaks, add sugar little by little stirring the whole time. Increase speed gradually but without reaches high one. Ideally use medium speed.
- Before finish to beat the cream, add vanilla extract along and beat until get a perfect whipping cream. Be sure not to over-beat, otherwise cream will become lumpy and butter-like.
- Cover with plastic wrap and chill until used it.
Make pastry cream.
- Here you can see how to prepare the pastry cream.
- Once you have it ready, reserve it at room temperature until the moment of its use if you make the galettes the same day.
- In case you make it one day in advance, once it has cooled completely, place in the fridge until the next day.
Make Italian merengue.
- In a medium saucepan pour the water together with the sugar and, without stirring, place at medium heat.
- Leave until it reaches a temperature of 250ºF (121ºC), the ideal would be to help us with a digital thermometer.
- While the syrup is cooking, whisk the egg whites together with the 45 g of sugar until obtaining a meringue that forms soft peaks.
- Once it reaches 250ºF (121ºC) remove from the heat and begin to integrate on the egg whites in a fine and continuous thread. We will do it at the same time that we beat the meringue to a medium speed. The final appearance will be a firm and very shiny meringue.
- Set aside.
Make mousseline.
- Add the butter in the KitchenAid bowl and beat with the flat beater at medium-high speed. We must obtain a spongy butter, white and very aired. It will take about 10-12 minutes.
- Stop the KA and with the help of a silicone spatula scrap the butter from the walls of the bowl.
- Add half of the meringue and mix at medium speed for 2 minutes.
- Stop, add the rest of the meringue and mix again at medium speed until fully integrated.
- Remove the film from the cream and soften with the help of a whisk.
- Add the pastry cream to the mixture of butter and meringue.
- Beat at medium high speed until a smooth and creamy consistency is obtained. It will take about 4-5 minutes.
- Transfer the mousseline to a piping bag.
- Set aside.
Assemble the cake.
- With the help of a cake cutter, cut the sponge cake in 2 equal parts.
- With a serrated knife, subtly cut the edges of the sponge cake to remove the most golden tonality.
- Wash the strawberries and dry with kitchen paper.
- Cut some of the strawberries in half, removing the part of the stem making a straight cut.
- Place some mousseline cream on the base of the Push-Pan mould to adhere to the cake disc.
- Place a little more on the disc and have one of the sponge cakes. Press lightly.
- Place a sheet of acetate inside the mould surrounding the sponge cake. This will help us to remove the cake in a cleaner way.
- Moisten the cake with half the syrup.
- Place a row of strawberries around the cake. The ideal is to cut as we place, so we will not cut too many strawberries.
- Cover around the strawberries with the mousseline and form a spiral at the base.
- Place whole strawberries, previously washed and with the part of the stem cut, inside the cake and on the mousseline spiral.
- Cover all the holes with the rest of the mousseline.
- With the help of a spatula, smooth out the holes, making sure that all the holes are filled.
- Place the other sponge cake, press lightly and moisten with the rest of the syrup.
- Arrange a very thin layer of whipped cream on top of the sponge cake. Smooth with the help of a cake straightener.
- Refrigerate for a minimum of 2 hours. At this point we can leave it refrigerated even until the next day.
Finish decorating.
- Put Chantilly in a piping bag with an 18mm Saint Honore tip.
- Decorate the surface the way I show you in the video.
- Place some very finely laminated strawberries in the center.
- Sprinkle the sides with ruby powder and decorate with some strawberry leaves.
- Serve.


Notes
- The ribbon stage is obtained by beating the eggs together with the sugar for several minutes. The mixture takes on a whitish colour and the texture becomes very thick to the point of lifting the whisk and being able to form a cord or ribbon over the mixture without deforming it. Hence the name.
- I have decided the process in 2 days to make it easier and bearable. But if you wish, you can do the whole process in just one day.
- If we refrigerate the sponge cake overnight, we help the flavors ripen as well as facilitating the process of cutting the sponge cake. It crumbles less.
- To make the syrup you can use the liquor you want.
- It is important to moisten cakes, otherwise they may be dry. Don't be afraid to be generous, the result will be a very juicy cake.
- If you do not have acetate you can use baking paper instead. The good thing about acetate is that it helps to unmold cakes very well, as well as being very clean when it comes to working.
- VERY IMPORTANT: We cannot freeze the cake because the strawberry freezes very badly... It loses a lot of water in the thawing process and this could ruin the final result.
- You can make the top decoration completely to your liking.
- We can keep it refrigerated for 2-4 days. Cover it with a bell or inside an airtight container to prevent the cream from drying out.


This Fraisier Cake is a classic and, as such, promises to be a sure success. Many times we want to innovate too much and forget the origins. I know I'm very boring with this, but what I'm going to tell you (which I've said a million times) for me is a big truth.
I think that pastry has a base that is comparable to classical ballet. If you don't master this one, you won't be able to dance the rest of the styles well since they are all born from it. Pastry is the same.
You have to master the base, the traditional, the classic and then create your own choreographies. Or in this case, let the creativity take shape.
I wish you a wonderful weekend, see you on Monday!
Big hugs,
Eva
Source: Wholekitchen