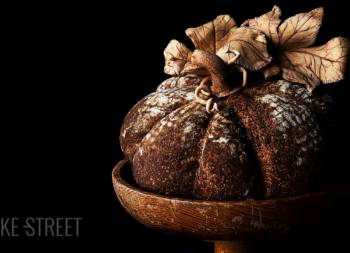
Easter basket made with dough
Today I bring you an elaboration that I had long wanted to prepare, an Easter basket made with dough. To tell the truth, it should not necessarily be a basket for Easter, it can be a basket to accompany us at any time of the year. But I wanted to decorate it with Easter eggs (we are in the season) and fresh flowers, simulating that we have gone to look for them in the forest and come back home with our personal booty. It never hurts to have a little magic in our daily lives.
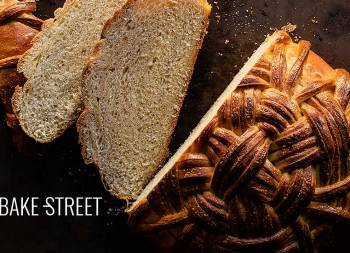
I’m sure many of you already know that I love making braided doughs. I had a season in which I made several breads like this Basket Bread – Flechtkorbbrot or this Shibari Bread. But this time I wanted to create an object with volume, that could look like a craft, even use it, but at the same time be edible. Or to eat it if we felt like it!
So I decided to start preparing this basket without knowing very well how it was going to turn out. It is true that during the process I found some small mistakes that, fortunately, I was able to solve them without any problem. At some points I relied too much on the behavior of the dough and, for that reason, you will see in the video steps that come a little later than they should. But this will not happen to you because I have already experienced it so I can give you a solution to every possible situation.

I am in love with the result.
Of course there are things that can be improved, for example the interior finish of the basket, the cuts of the skewers, some parts of the braiding…. But I am happy with this crazy idea that I came up with and, I assure you that after this experience, there will be more to come.
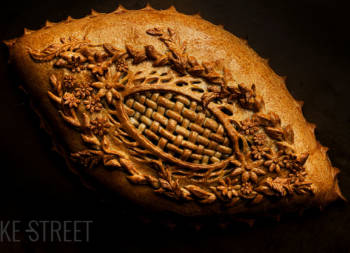
Originally, the dough was going to be a leavened dough, but after thinking about it a lot, seeing how it behaved and how the dough I used for the savoury curried potato and spinach pie turned out, I decided to use a non-leavened dough. These have many advantages since they allow us to model much better and create decorations with much more detail. In addition, we know for sure that its appearance and final finish will be quite faithful to what we see without baking. Of course, following some guidelines.
The process of the dough is very simple to carry out, we only have to knead and let it rest for a few hours to help the dough to stretch without resistance. In addition to achieving a perfectly smooth and soft finish.
The laborious part, although entertaining, will come in the assembly of the basket. In my case I have left this format, but you can make it round, square, rectangular, oval…. As you like.
Since this basket will be filled with Easter eggs, I thought it would be nice to accompany it with the origin of this tradition.
Easter, tradition and symbolism.
Traditions and symbols of Easter have evolved throughout history, although some of them exist and have been maintained for centuries. For Christians, Easter is the celebration of the resurrection of Christ, but there are many Easter traditions that are still carried out today, even though they are not detailed in the Bible.
The most prominent secular symbol of the Christian holiday, the famous Easter bunny, was introduced to America by German immigrants who brought their stories of an egg-laying hare. Egg decorating is believed to date back to the 13th century, while the rite of the Easter parade has even older origins. Other traditions, such as the consumption of Easter candy, are some of the modern additions to the celebration of this spring holiday.
Many scholars believe Easter had its origins as an early Anglo-Saxon holiday celebrating the goddess Eastre and the coming of spring, in a sense a resurrection of nature after winter, according to Carole Levin, professor of history and director of the Medieval and Renaissance Studies Program at the University of Nebraska.
“Some Christian missionaries hoped that celebrating Christian holy days on the same dates as pagan holidays would encourage conversion, especially if some of the symbols were carried over. Eggs were part of the Eastre celebration. These were apparently eaten at the feast and also, possibly, buried in the ground to encourage fertility.”
An alternative history of Easter eggs sticks to Christianity, but in that version Easter eggs may have resulted from a practical matter. At that time, fasting rules during Lent were very strict. Christians could not eat meat or any animal products – including cheese, milk, cream or eggs – so they boiled the eggs their hens produced during that time and stored them for later consumption, according to Henry Kelly, professor of medieval studies at the University of California, Los Angeles. Since Lent ends in the run-up to Easter, that time when eggs would be distributed (often to the poor, who could not afford meat for their celebrations) would naturally occur right around the holiday.
Easter Bunny.
The Bible does not mention a cute mythical creature with long ears and a short tail that hands out decorated eggs to well-behaved children on Easter Sunday. However, the Easter bunny has become a symbol of Christianity’s most important holiday. The exact origins of this figure are unclear, but rabbits are known to be great procreators, hence an ancient symbol of fertility and new life.
According to some sources, the Easter bunny first came to America in the 18th century with German immigrants who settled in Pennsylvania and transported their tradition of an egg-laying hare called “Osterhase” or “Oschter Haws” Their offspring made nests in which this creature could lay its colorful eggs.
The meaning of Easter bunny is closely related to its historical use as a symbol of fertility: Easter coincides with spring, a time of rebirth and new life. A time when flowers begin to bloom and many animals are born.
Over time, the custom spread throughout the United States and deliveries of the legendary bunny on Easter morning expanded. In addition to Easter eggs, children enjoyed chocolate, candy and gifts. Children would often leave carrots for the bunny in case he got hungry from hopping around.
In Denmark, until the 1920s, the tradition was only celebrated in Jutland and on the island of Langeland. Today it has spread throughout Scandinavia. The Easter Bunny brings chocolate eggs and hides them in gardens for children to find on Easter Sunday.

The origin of Easter eggs.
Easter is a religious celebration, but some of its customs and traditions, such as Easter eggs, are probably related to pagan traditions. The egg, an ancient symbol of new life, has been associated with pagan holidays celebrating spring. From a Christian perspective, Easter eggs are said to represent Jesus’ emergence from the tomb and resurrection.
The decoration of Easter eggs is a tradition that dates back to the 13th century, according to some sources. One of the explanations for this custom argues that in ancient times, eggs were a forbidden food during Lent. So people painted and decorated them to mark the end of the period of penance and fasting. And, of course, they subsequently ate them at Easter.
PAGAN SYMBOLISM: Pagan holidays celebrating spring have long used eggs as an ancient symbol of new life. The vernal equinox marks the day when light equals darkness and continues to grow. It is a period to celebrate renewal, with eggs and hares as symbols of the season.
Another shared that eggs were especially prized at Easter because, before industrial agriculture, hens laid few or no eggs during the winter. Egg production depends on light and, given the scarcity of sunlight during the winter, egg production stagnated. When spring came, the hens would start laying again. Eggs were so prized that they were even used as partial payment for the salaries of shepherds, parish clerks and servants.
In the United States, the Easter egg race is held at the White House. This tradition, an annual event held on the Monday after Easter, involves children pushing decorated hard-boiled eggs across the lawn.
The first official egg race at the White House took place in 1878, when Rutherford B. Hayeswas president. The event has no religious significance, although some people consider the egg toss to symbolize the fact that the stone blocking Jesus’ tomb was removed, an event that led to his resurrection.
CHRISTIANITY: For the church, eggs symbolize the resurrection of Jesus. The hard shell is the tomb and the chick inside is Jesus. This explanation is especially convincing if we consider the traditional game of rolling eggs down a grassy hill. This is supposed to represent the tombstone rolling to reveal the empty tomb of Jesus.
Easter egg hunts are another popular activity celebrated on Easter Sunday. Eggs wrapped in beautifully colored paper are hidden in gardens and parks for children to find.
The chocolate Easter egg was first manufactured by Cadbury’s in 1875.
Two years after J.S. Fry & Sons of England devised the first chocolate egg.
Its production was due, in part, to the breakthrough in separating the cocoa butter from the cocoa beans, as this made it possible to work with a chocolate that could be molded, like eggs. However, it is not clear why an egg. Most likely, John Cadbury took the opportunity to capitalize on the popularity of decorative Easter eggs by making them edible.
The practice of decorating eggshells is quite ancient. They were already carried out on ostrich eggs, decorated and engraved. Some of them were found in Africa 60,000 years old. Depictions of ostrich eggs in gold and silver were often placed in the tombs of the ancient Sumerians and Egyptians.
One of the earliest accounts of dyed eggs in British history dates back to 1290, when the household of Edward I purchased 450 eggs to be colored or covered in gold leaf and distributed to “the royal entourage” for Easter, according to Stations of the Sun: A History of the Ritual Year in Britain, by Ronald Hutton, professor of history at the University of Bristol. The book also mentions that, two centuries later, the Vatican sent Henry VIII an egg enclosed in a silver case as a “seasonal gift.”
Such objects were also known as “eggsilver”. Today, the most famous decorated Easter eggs are Fabergé eggs, which were first presented to the Russian royal court in the late 19th century.
Recipe Easter basket made with dough
DOUGH:
- 525 g traditional French flour, a flour with 11-12% protein can be used
- 150 g cold water
- 65 g egg
- 125 g unsalted butter, room temperature
- 10 g sugar
- 10 g salt
FOR BRUSHING:
- beaten egg + pinch of salt
FOR DECORATING:
- Easter eggs
- flowers
MATERIAL WE WILL NEED:
- kneader
- roller pin
- scraper
- sharp knife or pizza cutter
- flower cutters with ejector (these are which I used)
- perforated tray
- baking paper
- pastry brush
- aluminum foil + metal molds to reinforce during baking
- 15 cm wooden skewers (I used 55 units)
- cork, packing foam or surface on which the skewers can be skewered
Instructions
- Beat the egg in a bowl.
- Dissolve, more or less, the salt and sugar in the water, pour into the egg and beat again. Set aside.
- In the bowl of the stand mixer, add the butter and smooth with the flat beater.
- Add the egg mixture together with a third of the flour and mix.
- Once it has been integrated, continue adding the rest of the flour while mixing.
- Switch to the hook and knead until a homogeneous dough is obtained.
- We can continue kneading in the mixer until we have a smooth and soft dough or we can transfer it to a work surface and finish kneading by hand.
- Once we have the dough at this point, flatten it slightly, cover it with film and leave it to rest for 2-3 hours. In my case I had to go out and it was resting for 6 hours at room temperature, 70ºF/21ºC.
Stretch the dough to create the base of the basket.
- Divide the dough into two equal parts. Leave the half that we are not going to work with covered with film.
- Stretch one of the pieces on a clean work surface, we will try to give a rectangular or elongated format. The thickness of the dough should be about 4-5 mm.
- Shape the base of the basket, in my case I used a lid of a tupperware container with approximate dimensions of 17.5 x 20 cm and with curved corners. You can give it the format that you like or prefer.
- Place the lid, in this case, on the dough and press. Cut with a sharp knife and remove the excess dough. Wrap in plastic wrap and set aside.
- Transfer the base to a sheet of baking paper, carefully to prevent it from losing its shape. Place on a board and store in the freezer while preparing the other portion of dough.
Create the strips to decorate the basket.
- Stretch one of the pieces on a clean work surface, try to give it a rectangular or elongated shape. The thickness of the dough should be about 2-3 mm.
- With the help of a sharp knife or a pizza cutter, even out the piece a little by cutting the outer edges. We cut strips of about 3 mm wide. In my case I made 22 strips.
- Cover with film to prevent the surface of the dough from drying out.
Remove the base from the freezer and prepare to create the basket.
- Place the base of the basket on a skewerable surface; cork, packing foam.... It must be firm and solid, but allow us to pierce it with the skewers to create the "skeleton" of the basket.
- Prick the wooden skewers around the edge of the base, and through the solid surface that allows us to hold them securely, leaving a small margin with respect to the outer edge of the base piece.
Braid the basket.
- Take a strip of dough and start braiding it. We must zig zag it through the skewers (you will see this step better in the video).
- Once we have placed the first strip, leave the final end placed towards the inside of the basket to be able to join it with another strip and continue the route.
- We will do this same step every time we finish placing one of the strips. In total I put 15 strips with a height of 10 strips, 5 on each of the skewers.
- When placing the last strip of dough, make sure that the height of the basket is equal over the entire surface. Place the final end towards the inside and seal with the dough to help it stick together.
Make a braid to decorate the edge.
- Create a braid of 3 strands and place it at the top edge of the basket. This way we will achieve a more attractive final finish.
- Once the braid is braided, we lightly moisten the back part with water and place it on the rim. Adjust carefully.
- Place the final ends towards the inside and seal. If there is any excess dough, remove it.
- With the help of cutting pliers, cut off all the top excess of the wooden skewers. Do this carefully to avoid damaging the basket.
Make the handles for the basket.
- With the 4 strips we have left over, we will make the handles.
- Take two strips and link them together. Once they are joined, fold them in half and link them again to form a single piece.
- Seal the ends.
- Place on a surface, which we will make with aluminum foil, with the shape we want our handles to have.
- We hold the handles with two toothpicks, each one of them, perforating up to the aluminum foil.
- Set aside.
Create the flowers and leaves to decorate the top border.
- To make the flowers I used cutters with ejectors of different sizes. The leaves are handmade.
- Decorate the edge of the basket with the flowers and leaves we have created. These will help us to give a more attractive finish to the basket, as well as cover any skewers that may be visible.
- To attach the flowers, moisten the back with a little water. We can also use a skewer to press on the central part. This step will help us to join it, besides giving it volume.
- Once we have the basket assembled, refrigerate it without covering or covering, until the next day, together with the handles placed on one side (we will place them after baking). In my case it was around 19 hours at 39ºF/4ºC.


Bake.
- Preheat the oven to 374ºF/190ºC with fan.
- Remove the basket from the skewerable surface, very carefully (and with the dough very cold, after resting overnight) to avoid damaging it.
- With the help of cutting pliers, cut off the excess from the base of the skewers.
- Place the basket on a perforated tray.
- Brush the basket with egg beaten with salt. Try to cover the entire surface of the pastry, but avoid getting too much egg in the holes. The final result would be unattractive.
- Fill the inside, very well, with aluminum foil balls. We need the basket to have an interior support so that during baking it keeps its shape.
- Place rectangular molds in the part near the door and the two sides, leaving the front part without a mold in front (these will act as a small containment to help it keep its shape). We must not glue them to the basket, otherwise and with the egg, we run the risk of them sticking. But they should be close to provide that "security" that we may need. When baking with air, the surface will dry very quickly.
- Bake at medium height, preferably on a perforated tray, for 5 minutes. Reduce to 355ºF/180ºC with fan and bake for a further 35 minutes.
- Remove and leave to cool completely on a wire rack.
Assemble the handles and decorate.
- At the base of each handle, make small holes with a knife and then with a skewer to give it depth.
- To place the handles, ideally, leave two skewers in the air on each side of the basket to adjust them there. Otherwise, you can always skewer some long skewers inside the base of the basket and very close to the edge. So that it looks like it is attached to the rim of the basket.
- To decorate the inside, I have arranged some crumpled ream paper (to occupy a large part of the inside) and, in addition, this helps me to hold the flowers and Easter eggs.
- We can place it as a centerpiece on the table when serving desserts (whether at Easter or any other time of the year!).
Notes
- The flour I used is a traditional French flour, so I can't tell you how strong it is because it doesn't specify it. It is a flour with 11-12% protein, so you can use a flour with similar characteristics.
- The amount of water in the dough will have to be adjusted according to the flour you use, it is possible that in some cases it may require a little more water. The dough should be pleasant to the touch, not dry or hard.
- Beat the egg with the water, salt and sugar, which helps these elements to integrate into the dough and not form lumps (the latter due to the egg's texture).
- We must let the dough rest so that the gluten relaxes and, in this way, we can stretch it and work with it without any problems.
- The dough strips will stretch a little when you handle them and place them on the skeleton that we have created with skewers. This is completely normal, but it is important not to lift them too much so that they stretch too much and the thickness becomes too thin.
- The decorations can be to your liking, I have left this suggestion, but you can change them if you wish.
- To cut the flowers with the cutter with ejector, you must press them very well and press the ejector several times so that the dough comes out on its own. If you pull them out by hand, you can unintentionally make them lose their shape.
- It is VERY IMPORTANT to leave the filled and decorated pastry in the refrigerator overnight. That way the dough will be very hard the next day and will not lose its shape during baking.
- Adding a little salt to the egg for brushing will help it to liquefy a little, which will allow us to brush the pie and decorations much better.
- Be careful not to brush too much egg into the hollows or flowers, or the end result will not be as attractive.
- Do not forget to fill the inside with aluminum foil to help maintain the shape of the basket. The molds that we will place in the oven will serve as a support to prevent the basket from deforming slightly.
- Baking with fan helps the surface to dry faster, which is another plus point for our pie to keep its shape after baking, as well as achieving a beautiful uniform colour.
- The basket should be allowed to cool before assembling, filling and decorating.
- It can be kept at room temperature for a long time. If it is going to be consumed, it is best not to leave it too long to prevent it from drying out too much.


I know that this Easter basket made with dough is one of those things that, in order to make them, we have to have a very high motivation. But I tell you one thing, just the fact of sitting down and start making something with your hands, fills you completely. Nothing can bring more satisfaction than doing something for you.
It is true that when we dedicate time to something, we want it to turn out well. And, if possible, on the first try. But unfortunately, these two variants do not always coincide at the same time. If it goes wrong, we will always learn something. Everything that prevents us from moving forward makes it easier for us to learn. I always tell students in my courses, we never spend time in vain even if the result is not what we expected.
With this I want to encourage you to elaborate it without fear of how the final result will be. The important thing is to try, try to do what we want and, if it turns out well, enjoy it. And if not, take the positive side that surely has it.
For those of you who are going on a trip this Easter, enjoy it very much! And for those of you who are not, like me, enjoy it to the fullest!
I wish you a wonderful weekend! See you back from Easter :)
Eva
Sources: History, Scandinavia Standard, Time