Coconut sourdough bread
I return to make use of the coconut in a recipe and this time I bring in a format that I know you like very much, bread. Well, as you see, when I like an ingredient I use it to the satiety! Lately I really fond of coconut, should be the age … before I did not like too much and now I use it in everything. Like in this coconut sourdough bread.
Am I getting too old? The other day someone told me; – When you like marzipan, you’re already old! -… And I say, I love marzipan, for years. I was born older.
You can imagine that I have made tons of bread, in fact I make bread weekly and I always make between 2-3 loaves. Not counting tin loaf and various whims, in bread format, that they have at home. Well this coconut bread is one of the ones I liked most of all I’ve tried. There have been many who have fascinated me and stayed home forever; like this orange and honey bread, seeds, two wheats, carrot bread or the basic I left you last week.
These are the most normal and without “rare” ingredients, which I normally make at home to consume daily. I often alternate them and so do not get bored of them. Those of more “peculiar” flavors and strange ingredients, I usually take them (because I love to mix rare things in bread´s recipes) and I am not delicate for that type of mixes.
This coconut bread is not uncommon at all, in fact it is really easy to make. We use two types of flour very grateful and simple to bake; bread flour and semolina rimacinata. Both will not give you complications when it comes to making bread and the result, always, will be awesome.
What is rimacinata flour?
It is a durum wheat variety that after grinding with rollers you get a flour of grainy texture, semolina flour. To achieve a finer flour, as rimacinata, goes through a conditioning of a fraction of this semolina and re-mechanization (hence the rimacinata), which achieves a much finer caliber.
Source, Panarras, to know more about it, click in this link.
It will leave a slightly sweet, very pleasant taste that will blend perfectly with the coconut.
The final bread hydration is easy to work, a 64,9% practically 65% hydration. So if you made the basic bread and everything went well, you can try this new recipe. The dough hydration will be get with water and coconut water.

Where do I get coconut water? …
Ideally would be to have real coconut water, which it is inside the coconuts, but this time has not been so. Instead I used the water I kept from the making of this coconut and lychees cake. Since I was only interested in the solid part to elaborate it and I did not want to discard the water, I decided to refrigerate it to hydrate a bread. We must take advantage of everything that comes into our kitchen.
I did not add the whole hydration of the bread with coconut water because it came from a commercialized coconut milk. When I read the ingredients I found sugars, which I do not know if they are added later… Since I did not want that could damage the final result, I used something less than half for the final hydration and rest with water.
When should I add the grated coconut in the dough?
We must integrate it at the end of the kneading as if it was seeds. By having a somewhat rigid texture, it can interfere with the development of gluten if we add it from the beginning. Ideally you integrate it in the dough in batches, that way it will be much easier. And do not mistreat the dough, always do it with delicacy, without hitting it hard. If you give it affection it will return a glorious bread.
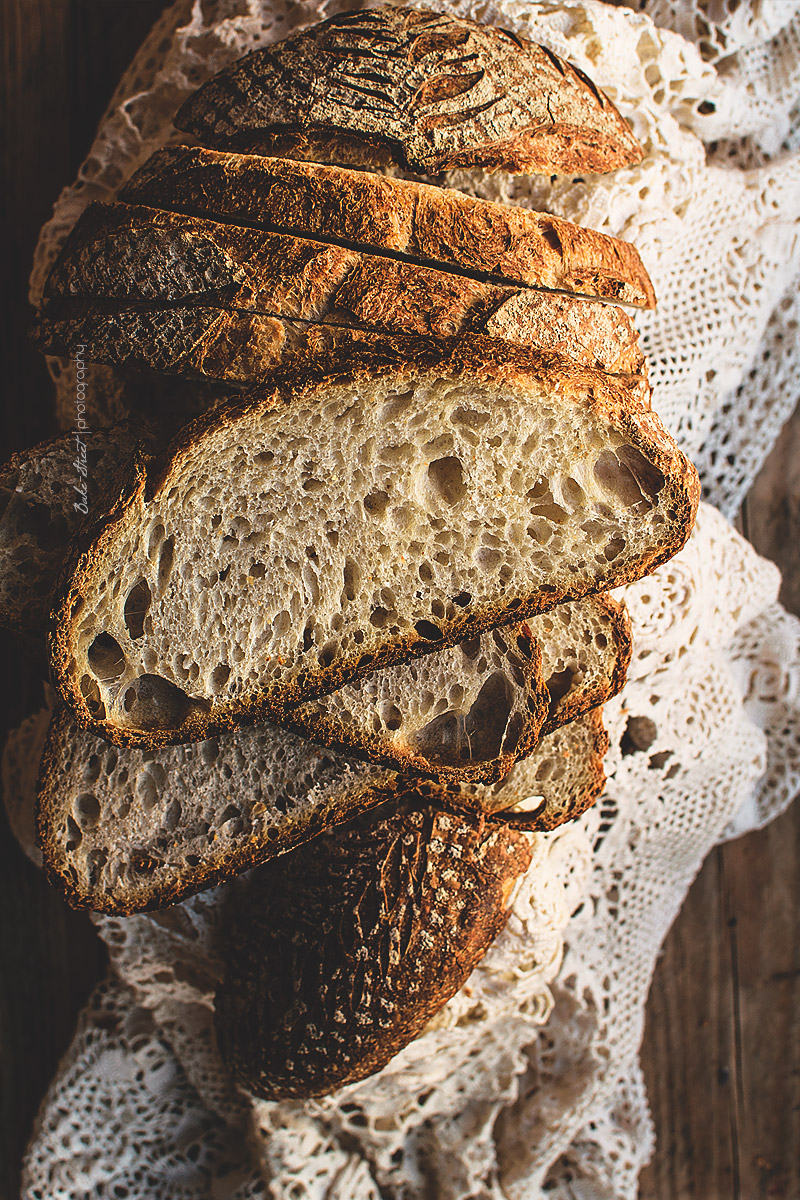
This time I have brought you a boule, a round bread. I do not know why this shape is valued less, it is true that until very recently, I did not usually do it. It seemed less attractive, simpler … I do not know. But now I have found its charm and I love it. It is true that when we shape this bread does not allow us to be as creative as with a batard, but where we can be creatives is scoring … What a world so immense opens us with these loaves!
I follow many bakers who make amazing scorings in loaves and, indeed, they have aroused an interest in me for them. In this case I followed a video of Nikolai Meling to score this bread. I found it absolutely beautiful, some leaves with a few spikes all over the surface … What I was not very clear was the final result. It is difficult to know how a bread will behave during baking because it depends entirely on how we have shaped it, tension throughout the surface and how we score it. It is important that cuts are balanced so that when the bread is expanded, does not have some kind of bean.
Did I tell you that I love bossa nova? Song by “Bebel Gilberto” – Aganju 🙂 (Youtube link).
Come on with this coconut bread recipe 😉

COCONUT SOURDOUGH BREAD:
SOURDOUGH 100% HYDRATION:
- 6.34 oz (180 g) 100% hydration starter refreshed with 80% Shipton Mill wheat flour and 20% Shipton Mill rye flour
Here you can read how to make water yeast fruits or here how to make common sourdough (By the moment, both are only available in Spanish)
FOR THE DOUGH:
- 14.1 oz (400 g) bread flour (I used Pani Ylla flour)
- 3.9 oz (110 g) rimacinata
- 6.5 oz (185 g) coconut water
- 4 oz (115 g) water
- 1 oz (30 g) grated coconut
- 0.38 oz (10,8 g) sea salt
| INGREDIENTS | BAKER´S % | SOURDOUGH | REST | TOTAL |
| Shipton Mill Wheat | 11,25% | 67,5 g | 67,5 g | |
| Bread flour, Pani de Ylla | 66,7% | 400 g | 400 g | |
| Shipton Mill Rye | 3,75% | 22,5 g | 22,5 g | |
| Rimacinata | 18,3% | 110 g | 110 g | |
| Coconut water | 30,8% | 185 g | 185 g | |
| Water | 34,1% | 90 g | 115 g | 115 g |
| Grated coconut | 5% | 30 g | 30 g | |
| Salt | 1,8% | 10,8 g | 10,8 g |
INSTRUCTIONS:
FIRST DAY
Make coconut bread dough.
- In a large bowl add flour with leaven and water, mix with your hands until it is well hydrated and looks smooth. Cover with plastic wrap or cotton cloth and allow to make autolysis for 30 minutes.
- Transfer to a work surface, without flour, and knead. Combine kneading with resting to get almost a complete developed dough.
- Knead 2-3 minutes and let sit 5-6 minutes. Total time kneading will be roughly 10 minutes without time resting.
- Before the first rest, add salt and mix with your hands making sure it is completely incorporated.
- Alternate short kneading with rest until the dough is developed. In total knead about 10 minutes, not counting the rest.
- Once we have the almost developed gluten, add the grated coconut and knead until fully integrated.
Make bulk fermentation.
- Grease with olive oil a bowl or recipient and put the dough inside. Cover and make a bulk proof for 4 1/4 hoursat room temperature. My home temperature was 71ºF. Turn and fold after 40 minutes and a second fold after 50 minutes.
- Let rise until almost double in sized.
- Dust with rye flour a banneton, let aside.
Shape the dough.
- Preshape into a boule (ball), be careful not to degas too much, and allow to bench rest for 15 minutes cover with a cotton cloth.
- Shape a boule, following the same process as when preshape a bread.
- Place seam-side up in banneton, cover with a cotton cloth or film and put in the fridge for 18 1/2 hours + 1 hour at room temperature.
SECOND DAY
Bake…
- Preheat oven 450ºF at least 30-40 minutes prior to baking with your stone or steel sheet on it positioned on final rack. Put inside a pan with volcanic stones, this helps to get steam in the baking.
- Transfer the bread from the banneton over a wooden board cover with parchment, seam side down. Score the bread. This time I followed the same pattern that I saw Nikolai Meling on his Instagram.
- Place the bread into the oven and pour boiling water over the pan with volcanic stones. Close the oven door immediately to trap the moisture.
- Bake for 20 minutes at 430ºF.
- After first 20 minutes, open the oven door to allow steam goes out, remove the track with volcanic stones with kitchen gloves and reduce oven temperature to 410ºF. Bake for 10 minutes.
- Reduce temperature to 375ºC and bake 10 minutes more. Finally bake with convection at 375ºC for 10 minutes. Bread will get a better crust this way.
- Total bake time is 50 minutes.
Ending the bake…
- Once bake has ended, turn off the oven and let sit the bread inside the oven with the door ajar for 15 minutes. Remove from the oven and let cool over a rack.


PRESERVATION: Bread can be stored for up 3-4 days cover with cotton cloth. If the beginning is dry, cut the first slice and inside will be still tender. You can cut the bread into slices, cover with plastic film and freeze. This way is the better to make perfect toast each morning. You can use the bread slice from the freezer and put into the toaster, they will be perfect 😉

The result is a bread with an extraordinary flavor … During baking it smells like coconut, but when we taste it, too. It is really wonderful.

Taste is not very intense enough to become uncomfortable, we will notice it subtly after every bite. And when you toast it … superb! Since I tried it for the first time, I’ve done it twice and it is been my breakfast for these last days. Try it and tell me!
Big hugs,
Eva