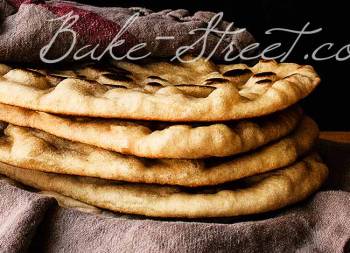
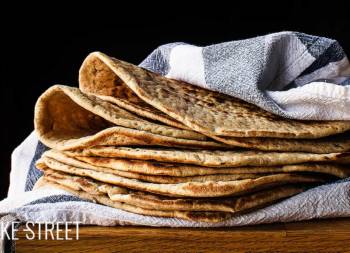
Pita Bread
For a long time I wanted to share with you how to make homemade Pita Bread. I’m sure the same thing happens to you as it does to me. It is a type of bread that you consume a lot at home, but due to lack of time, many times you end up buying it… If I’m honest, it’s not a very time-consuming or complicated process, on the contrary. It is a variety of bread that is very easy to prepare, but it needs a good kneading process.
The times of raising are quite short if we compare it with a bread of sourdough, but much more in this moment of the year that we have a quite good temperature to raise doughs. Come on, I leave you no choice but to tell me that you are not going to prepare them this weekend, hahaha.
Pita Bread origin.
Pita bread, also known as Arabic bread, Syrian bread and Lebanese bread, has existed since approximately 2500 BC.
Excavations of ancient Egyptian cities show that they grew wheat and barley, and these grains were used to bake flatbreads. It is believed that the Egyptians discovered the leavened bread accidentally, leaving a forgotten dough in a warm place. This gave rise to a natural preferment.
Before a process of making yeast was developed, bakers used to set aside a piece of unbaked dough from each batch. This reserved portion of dough had fermented. When the next batch of bread was made, it was added and mixed with fresh dough to make it rise.
In 1665, an enterprising baker thought of adding brewer’s yeast to his reserved dough from another batch.
At first, the grain was ground manually by grinding it between two stones. Later, a mechanical process was invented in which a cattle-drawn traction stone rotated on a lower, perpendicular stationary stone. Over time, livestock was replaced by water mills or windmills.
In the late 18th century, a Swiss miller invented a steel roller mechanism that greatly simplified the flour milling process.

It is believed that the Bedouins may have been the first to make pita bread.
It is difficult to know with certainty its origin, but archaeologists have determined that it was first done by groups of people from the western Mediterranean, most likely by the Bedouins or Amorites. They placed the loaves at the bottom of the mixing pot and baked them over an open fire. This bread was used as a utensil as well as for food.
As the Bedouins traveled through the Arab and Saharan deserts, the pita bread spread and became known to the rest of the people.
In the Middle East, pita bread is still baked on a traditional patio stove, unlike the cooking methods we use today. Some Arab and Israeli communities have community ovens or bakeries where hours are set aside for families to bake their homemade breads.
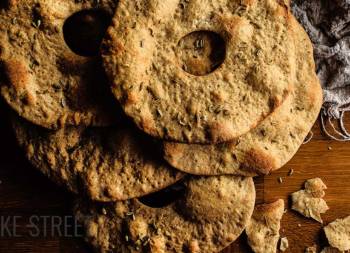
This variety of bread must be baked at a high temperature (450-475 °F), to allow the water in the dough to turn into steam, so that the bread swells creating a pocket inside. When taken out of the oven, the layers of bread dough remain separated, allowing the bread to be opened for filling.
This variety of bread has been maintained over time and is still enjoyed as a basic food in many countries of the world.
When immigrants from the Middle East began moving to the United States, they introduced Americans to their cuisine. Pita bread became a very popular choice of bread, especially because of the absence of butter and the small amounts of sugar added. By the 1990s, the wholesale pita bread market was approaching $80 million in annual sales. Commercial pitas are usually made with all-purpose flour or whole wheat flour. Their size ranges from 10, 16 and 25.4 cm in diameter.
Making and enjoying pita bread at home
As you can see in the video, this type of bread has no major complications. It is super easy to carry out. I show you how to do the whole process by hand, but in case you want to use a stand mixer, you can do it. You will probably have to help the dough from time to time with a little bit of hand work, since it has quite moderate hydration.
This variety of bread can be enjoyed in many ways, either with hummus (on the blog I have several recipes that you will love), tirokafteri… Although soon I will leave you a recipe to use them that you will love.
Pita Bread recipe
Recipe adapted from Advanced Bread and Pastry
Ingredients for 9-10 pieces
- 265 g bread flour
- 235 g all purpose flour
- 315 g water
- 4 g dry yeast
- 2 g sugar
- 17 g olive oil
- 11 g salt
Instructions
Prepare pita bread dough.
- In a bowl add the two types of flour together with the water, the dry yeast and the sugar.
- Mix with the help of a spatula to amalgamate the ingredients.
- Add the salt and mix again.
- Turn the dough over on a clean work surface and start kneading. We will combine kneading with bench rest until achieving a good gluten development.
- Incorporate olive oil, we will do it by batches to facilitate that it is integrated well in the dough. We will not add more until it has been incorporated completely.
- Remember to take a break to facilitate the kneading process.
- Once we have a smooth and fully developed dough, preshape gently.
- Grease an airtight container or a glass bowl and introduce the dough inside. Cover and let it rise until it doubles in volume. In my case it was 2 1/2 hours at 77-80ºF/25-27ºC, the temperature increased as time went by.
Preshape pita bread.
- Turn the dough over on a clean work surface, divide the dough into portions of approximately 80-85 g each. In my case, 10 units of 82 g came out.
- Preshape, cover with film and left to rest for 20 minutes.
Shape pita bread.
- Preheat oven to 500ºF/260ºC, in my case I baked breads on the steel plate. So I preheated the oven with it in the lower part of the oven.
- Sprinkle the work surface with flour, flatten it slightly with the palm of the hand and proceed to stretch it with a roller pin. In my case I gave them a diameter of 15-17 cm, but you can make it smaller if you want.
- Place it on a tray lined with baking paper and stretch another piece.
- In my case I placed two pita breads per tray, so that it was more comfortable to transfer them to the oven. Once we put them on the tray, we covered them with film and let them rest for 10 minutes.
Bake pita bread.
- Put breads in the oven, with the help of the tray, and bake it for 3-4 minutes.
- The bread will be puffed during the first minute of baking, the remaining time we will leave the bread inside to carry out its baking in a properly way.
- The bread should not be golden, but white, because we do not want it to have a crunchy texture, but tender and soft. But baked.
- Take them out of the oven, place it on a wooden board and cover it with a cotton cloth so that it keeps its humidity and heat. We can even pile up the breads if we wish.
- Repeat the same process with the rest of the breads.
- Serve immediately.


Notes
- In my case I have used two types of strength flour because I wanted to bring the taste and aroma of multigrain flour. It can be done without problems only with a variety flour, bread flour for example. It is important to take into account its absorption capacity in order to reduce the final hydration. Don't add all at once so that you can observe its consistency.
- It is important to obtain a good development of gluten to achieve good results. Combine kneading with resting, so that the whole process becomes much more bearable. The complete process of kneading, with rests, can be around 45 minutes.
- Whenever you take a break, cover the dough with your own bowl or film to prevent the surface from drying out or crusting.
- The diameter of the pita bread will condition the amount of crumb and thickness of the bread. In my case they prefer fine pita bread, for that reason I give them a bigger diameter. If you want them to have more crumb and be a little thicker, stretch each piece less.
- The baking time will also be conditioned by the diameter of the breads. The larger the diameter, the shorter the baking time. And vice versa. My breads were ready in 3-4 minutes, but if we give them more thickness, they will need about 6-7 minutes of baking time.
- If we have surplus pita bread, once it has cooled down, we can store it inside a zip-top bag. It will be ok for 1-2 days, although ideally it is better to consume it the same day it is made.
- Once they have cooled down, before consuming it, we can give it a heat stroke in the toaster so that it acquires a very tender texture. But, if we don't consume it right away, it will harden quickly.

If you feel like making an easy bread this weekend, don't hesitate to try this Pita Bread recipe. You will love it. The whole process of elaboration is fantastic, but without a doubt my favorite part is the moment when we bake the breads... That magic that is created inside the oven during 3-4 minutes does not stop surprising me.
It may seem silly to you, but in each and every one of the baking sessions I did, I sat in front of the oven with the camera, hahaha. It's really relaxing and rewarding to be able to see how each bread develops and grows during the baking. You can tell me if the same thing happens to you when you bake them at home.
I wish you a wonderful weekend!
Big hugs,
Eva
Soures: Encyclopedia.com