Laufabrauð – Icelandic leaf bread
I couldn’t wait to share this recipe with you, but I had to wait for Christmas to arrive before I could do it. If there’s one thing I like about winter it’s, without a doubt, Christmas. I love everything that surrounds this time of year, from gastronomy, tradition, custom or the most insignificant gesture to the simple fact of being able to share it with my family. The recipe I bring you today is an elaboration of family tradition that brings together the loved ones to carry it out, Laufabrauð or Icelandic Leaf Bread.
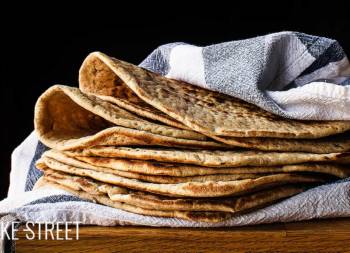
This is a bread made with a very simple dough, but has the particularity of being very thin. It is said that the dough must be thin enough to be able to read a newspaper through it. That is why it is called “leaf bread”. Then it is decorated with different patterns and fried, obtaining a very crunchy result.

Laufabrauð origin.
The preparation of this bread is a tradition that originated in northern Iceland and subsequently expanded throughout the territory. The first written mention dates from the first half of the 18th century (1736). It was probably older, but there are no references to it. Today, it is an essential Christmas tradition in Iceland.
Iceland, at that time, was a country in which it was very difficult to find products such as flour, sugar, salt… especially in winter. They were considered luxury products and only accessible to the richest. In addition that most of the times they arrived with mold by the lack of interest of the merchants. Until the 18th century there was no milling equipment in the country.
The Icelanders learned how to make water mills. The problem was the grain, although it was cheaper, they had to save to be able to buy it. That is why everything made from flour was intended for special occasions. Housewives tried to stretch the dough as thin as possible to create more pieces. They said that the ideal was to be able to read the Bible through the dough. Each bread was designed with great care and affection to emphasize the importance of consuming that piece of bread.

Making Icelandic leaf bread.
When it is elaborated, it is necessary to achieve a very thin dough so that the subsequent result is very crunchy. In the past it was fried in lamb fat, which gave it a very particular flavor, but today it is fried in vegetable oil. As soon as the bread is taken out of the oil, and still hot and tender, it is placed on kitchen paper and pressed with a wooden board called laufabraudshlemmur, which helps to make it look smooth. These wooden boards are usually made by children at school to give to their parents and/or grandparents. In my case what I did was to press each bread with kitchen paper and helping me with my hands.
It was also common to use a mixture of ammonium bicarbonate and ammonium carbamate or hjorthornssalt, deer antler salt. I told you about this ingredient in Tunnbröd or Polar Bread. Nowadays is common to use baking powder instead.
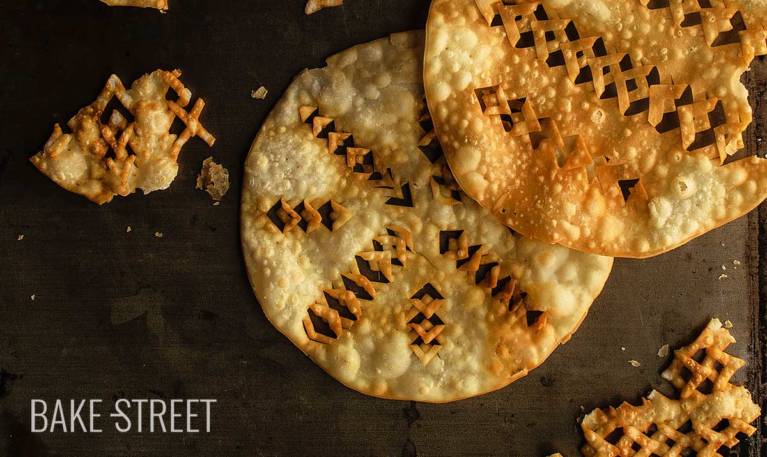
It is probable that you will also find it under the definition of “snowflake bread” due to the aspect that is achieved thanks to the patterns with which it is decorated. To decorate this bread is used a specific bronze tool called laufabrauðsjárn, greatly facilitates the process. I must admit that when I saw it I fell in love with this utensil… But it is completely impossible to find it, at least at a reasonable price.
If you want to see some patterns to make in your breads, you can do it in this link. It’s much simpler with the tool… With a blade there are some complicated designs!
This bread is cooked in advance, families usually meet on the first Sunday in December to make it, and it is preserved in tins until Christmas Day. It is usually served with hangikjöt (smoked sheep) or other traditional recipes from the dates.
Ingredients for 15 pieces
FOR THE DOUGH:
- 100 g whole milk
- 35 g water
- 12 g unsalted butter
- 170 g cake/pastry flour
- 50 g cornstarch
- 2 g baking powder
- 7 g sugar
- 2 g salt
FOR FRYING:
- sunflower or olive oil
Instructions
Make the dough.
- Sift the flour into a medium bowl, set aside.
- Add the sugar together with the salt and the baking powder. Mix with the help of a spatula.
- In a saucepan pour the milk together with the water and the butter. Place at medium heat and leave until the butter melts, but without boiling.
- Remove from the heat and pour over the dry ingredients. Integrate the ingredients with the help of a spatula.
- Begin to knead, amalgamate the dough with your hands.
- Transfer to a clean work surface and start kneading. If, as you knead, you notice that the dough is very dry, you can add a few drops of water, but without exceeding ourselves. The dough should be slightly dry to the touch, but that allows us to manipulate it without cracking.
- We will work the dough until it is homogeneous, practically smooth and the flour has been completely integrated. It will take about 5-7 minutes.
- Cover with the bowl and leave to stand for 10 minutes.
Divide the dough and stretch.
- Remove the film from the dough. Using a metal scraper or a sharp knife, divide the piece into 15, more or less equal, portions. While we work on each piece to stretch it, cover the rest with film to prevent it from drying out. This is very important.
- Take one of the portions and stretch slightly with your fingertips.
- Stretch the dough with a roller to a very thin, almost transparent thickness. We will stretch the dough very delicately to help achieve the desired diameter, this will be around 5,9-6,3 inches (15-16 cm).
- Place a ring or plate on the dough and remove the excess with the help of a very sharp knife.
- Take the piece and place it on a sheet of kitchen paper or waxed paper (if you have). Cover with another sheet of kitchen paper and then with a cloth.
- Repeat the process with the rest of the pieces.
Decorate.
- To decorate the leaf bread or laufabrauð, you use a utensil called laufabrauðsjárn. In my case I don't have it, so I used a blade. You could also use a very sharp knife.
- Decorate the bread making cuts on the surface. You will appreciate this step much better in the video. We must always make pair cuts.
- Once we have decorated one of the breads, place it again on a sheet of paper, cover it with another sheet and the cloth. Just like we did the first time.
- Repeat the process with the rest of the breads.
Fry.
- Fill a medium saucepan with enough oil to be able to fry the breads and float.
- Place at medium heat and let it reach a temperature of around 345ºF (175ºC).
- This step will be quite fluid, we will go fast so I advise you to leave everything prepared.
- Place several pieces of kitchen paper where we can drain the bread that we are taking out and a space to be able to go stacking the breads.
- Prick the surface of the bread and put a bread in the pot and fry during few seconds by each side. As it is very fine, it will be cooked immediately, the ideal is that we are left with a light golden color.
- Remove from the pot, drain and place on the kitchen paper.
- Quickly and with the help of kitchen paper, press the surface to flatten and remove the excess oil.
- Set aside and repeat the same process with the rest of the pieces.
- Store in a tin container or enjoy.


Notes
- This bread is made with cake/pastry flour, that is to say, the same flour that we use to make biscuits, but without the addition of baking powder.
- We must knead very well to obtain a soft and elastic dough. In spite of the low amount of protein in the flour, we will obtain very good results. Remember that rest will help the protein hydrate and therefore facilitate kneading.
- If you wish, you can add ground caraway or anise to the dough, it will give it a very aromatic touch.
- The normal size of this bread is around 5,9-7 inches (15-18 cm) in diameter. In case you want to make it smaller, there is no problem. Just keep in mind that you will get more pieces.
- Be careful when stretching the dough so that it doesn't break. It is not as resistant as strudel, for example, because of the flour we used to make it.
- The cooking time is very low, with a few seconds per side will be ready. It is important that the oil is not too hot so that it does not burn the breads as soon as they are placed into the pot.
- We must not exceed in the cooking of the bread to prevent it from becoming very golden. In addition, if so, we run the risk of breaking it by pressing it with the board or hands with paper after frying them.
- They are kept in perfect condition for several weeks in a tin container.

What to tell you about this Laufabrauð or Icelandic Leaf Bread, because you have to encourage yourself to prepare it at home this Christmas. It can be a perfect excuse to get together with the people you love the most and even spend a good afternoon with the children.
They won't be able to stretch the dough, but they will be able to decorate it making their own designs. You can give them a children's knife so they don't run the risk of cutting or hurting themselves.
Have a wonderful weekend! See you on Monday.
Big hugs,
Eva
Sources: Edimdoma, La Majuluta